4
Cautions
1. New lock is defined as always open mode until it was unlocked once by mifare card.
2. Please swipe authorised card,time sync card,room card at first for the new lock.
3. The lock is equipped with mechanical keys for manual unlocking. Remove the
mechanical keys from the package and keep them in a safe place.
4. To power on the lock, four alkaline AA batteries (not included) are required.
Non-alkaline and rechargeable batteries ARE NOT RECOMMENDED.
5. Do not remove batteries when the lock is in working state.
6. When battery power is low, the lock will beep to remind user to renew the batteries.
Please do not mix up positive and negative while replacing battery.
7. Avoid contacting with corrosive substances, and do not hang objects on the handle.
8. The software within the lock manages the RFID cards, for more details refer to the
software user manual.
9. If there are any questions, please do not hesitate to contact the seller.
Summary of Contents for LH6000
Page 1: ...Installation Instruction Version 1 1 Date Apr 2018 LH6000 ...
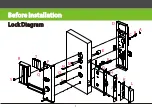
Page 2: ...B A C D E H F G L S M P R Lock Diagram Before Installation 1 I J Q N O K T F ...
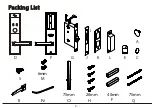
Page 3: ...B G P D Packing List N 2 A M 6mm F H Q 40mm 20mm 75mm O 75mm K L S J I C E ...
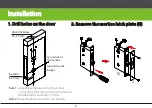
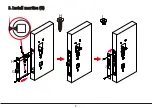
Page 7: ...6 3 Install mortise G H H G I J I ...
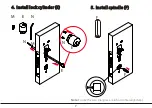
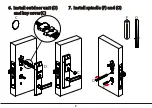
Page 9: ...8 7 Install spindle F and O F O F O 6 Install outdoor unit D and key cover C D C C ...
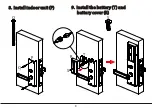
Page 10: ...9 9 Install the battery T and battery cover R Q T S P Q 8 Install indoor unit P S R ...
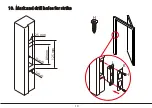
Page 11: ...10 10 Mark and drill holes for strike 3 mm 22 mm 125 mm 89 mm 25 mm H L K H ...


