background image

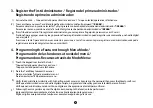
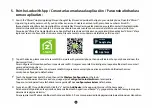
3. Register the First Administrator / Registro del primer administrador /

Registrando o primeiro administrador:

1)  Activate the Lock.  /  Toque el teclado para activar la cerradura.  /  Toque no teclado para ativar a fechadura.

2) To access the menu, press* and# and type the administrator's default password, "123456". / 

Para acceder al menu, presione las teclas * y # y ingrese la contrasena predeterminada del administrador "123456". /
Para acessar o menu, pressione a tecla * e tecla # e digite a sen ha padrao do administrador "123456". 

3) Press 1 to add a user and 1 to register an administrator;you can register a fingerprint, password, or an IC card. /

Presione 1 para agregar usuario y luego presione1 para registrar administrador; puede registrar una contrasena, una huella digital 

o una tarjeta IC. /

Pressione a tecla 1 para adicionar um usuario e pressione a tecla 1 novamente para registrar um administrador;voce pode

registrar uma impressao digital, sen ha ou um cartao IC. 

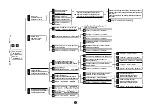
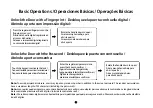
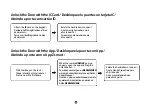
4. Programming the Features through Menu Mode/

Programaci6n de las funciones a traves del menu/

Programando os Recursos atraves do Modo Menu:

1)  Touch the 

keypad 

to activate the lock. /

Toque el teclado 

para activar la cerradura. /

Toque 

no teclado para ativar a fechadura.

2) Press the* and# 

key to access the 

menu. /

Presione 

las teclas *y 

para acceder al 

menu. / 

Pressione as teclas * e # para acessaro menu. 

3)

Verify the 

administrator's 

identity with his/her fingerprint 

or card, or 

by entering 

the 

password 

then 

press the# key to 

confirm./

Verifique 

el administrador con su 

huella digital o tarjeta, 

ingrese 

la contrasena y 

presione 

la 

tecla 

# para confirmar./

Verifique 

o administrador usando cartao, ou 

digite 

a sen ha 

epressione 

a tecla # para confirmar. 

4) 

Following 

the voice 

guidance, 

enter the 

digit corresponding 

to the function 

to 

be 

performed./

lngrese el dfgito correspondiente 

a la 

funci6n 

a realizarla 

siguiendo 

la 

gufa de voz./

Digite o dfgito correspondente 

furn;ao 

a ser executada 

seguindo 

guia 

de voz.

Summary of Contents for ML100

Page 1: ...e lnstala ao m Model Modelo Modelo ML100 LockBody Esdandarde laCerradura Tipode mecanica European5050 mortise Mortaja5050de Esdandar Europeo Mecanicapadraoeuropeu5050 Version Version Versao 1 0 Englis...

Page 2: ...ualquierconsultasobre la instalaci6n 2 Se recomienda que la instalaci6n sea realizada por un tecnico profesional para evitar posibles costes por servicio debido a una instalaci6n incorrecta 3 jNoinser...

Page 3: ...laci6n de la Mortaja lnstalai ao do mecanismo 5 4 Installation ofthe StudsandtheOutdoorunit lnstalaci6ndelosTaquetesyla UnidadExterior lnstalandoospinos ea Unidade Externa 6 5 Installation ofthe Indoo...

Page 4: ...arafusoA Screw CI Tornillo C ParafusoC t PM4 45mm ti PM4 50mm Note The standard kit includes screws and spindles fordoors with thicknesses ranging from35 to60 mm Tomakesurethat the operation of the lo...

Page 5: ...tteryCover Cobertura Para lasBaterfas Tampa daspilhas Spindle Plug Tap6n Tampa Indoor Unit Unidad Interior Unidade lntema Perno Chaveta wA illoA Parafuso A Strikeplate and Box Placa Metalica y Contrac...

Page 6: ...tationofdooropening directionin relationtoyourlocationoutsidethe room isshownbelow Laposid6ndemanija esdeterminadaporla direcci6nde apertura delapuerta Debajoseencuentralarepresentaci6ngrafica dela ap...

Page 7: ...3 Rotatethelatchboltat 180 insidethemortise andthenloosenit Roteelpestilloa 180 dentrodelamortaja luego sueltelo Gireotrincodafechadura a 180 dentrodoencaixe esolte o 180 o o 0 Adjustthedirectionofthe...

Page 8: ...onformegabarito I I I cb J Backset Entrada Distfinciadabroca so tfl DoorThickness GrosordePuerta Espessuradaporta 35 60mm Centerlineofthehandle Lfneacentraldemanija linhacentraldama aneta j l C E tEE...

Page 9: ...ificiosperforadospara fijarlaunidadexterioralapuerta lnsiraospinosatravesdosfuros perfurados parafixaraunidade externaaporta Studs I Taquetes Pinos Thetrianglemarkmustbeup 0 LaMarcaTriilingulodebeesta...

Page 10: ...stallationoftheStrike Plateandthe Box Instalaci6ndelaplacametaIicaylacontrachapa lnstala aodobatenteecaixa A Make surethattheStrike Plateand theBox arealignedwith thelatch bolt Then usetheInstallation...

Page 11: ...LockbyusingtheMechanical Key Pruebelacerradurausandolallavemecanica Testeafechadurausandoachavemecanica Insertthe Keyintothekeyholeandrotate go0 anticlockwise then pressthehandletoretractthelatches ln...

Page 12: ...r Im anual de Usuario m anual do Usuario m Model Modelo Modelo ML100 Version Version Versao 1 0 English Espanol Portugues 1 2 3 4 5 6 7 8 9 0...

Page 13: ...uracuandoeste funcionando 4 Lasbaterfasdebenreemplazarseinmediatamentecuandolacerraduraeimtala advertencia de Baterfabaja 5 Lacerraduraestaequipadacon IIavesmecanicasparadesbloqueomanual Guardelas IIa...

Page 14: ...thispoint Nota Utiliceelmetodocorrectoalpresionarcon lasdedosellectordehuellasdigitalespararegistrarseeidentificarse Nuestraempresa no asumira ninguna responsabilidad par problemas de reconocimiento...

Page 15: ...rogramaci6n de las funciones atraves del menu Programando os Recursos atraves do Modo Menu 4 5 Pairthe Lockwith App Conectarla cerradura a la aplicaci6n Pareandoa fechadura comoo aplicativo 6 BasicOpe...

Page 16: ...al Sensor de impressao digital Handle Manija Ma aneta Mechanical Key Hole Orffido para la Ilave mecanica Furo chave mecAnica I Micro USS Interface lnterfaz de Micro USS Portamicro USS 0 Battery Cover...

Page 17: ...sensitivity ofthekeypadwill beaffectedif the same lowpower batteries are used Nota CadausuariopuederegistrarunahueIladigita unatarjetaounacontrasef a lnicializaci6n Todoslosdatosdeusuarioregistradosse...

Page 18: ...maportasempredestrancada oqueeadequadoparaasaladereuni6eseoutroslocaisondenao harestric 6esdeentradaesafda Avisodebateriafraca Quandoaenergiadabateriaestiverbaixa quandoobloqueioforativado elesolicita...

Page 19: ...ar um administrador voce pode registrar umaimpressao digital senha ouum cartao IC 4 Programmingthe FeaturesthroughMenu Mode Programaci6ndelasfuncionesatravesdelmenu Programandoos Recursosatravesdo Mod...

Page 20: ...Excluir porTipo Return Volver atras Retamar Voice and LanguageSetting Canfiguraci6ndeVoz e ldiama Canfigurai 6es de linguagem e audio Set Unlock Mode ConfigurarelMododeDesblcqueo Configura aodomodode...

Page 21: ...onnect asecureWi Fi networkwith your smartphone thenopen Bluetooth on your phone andnear the device smart lock Paraconfigurar eldispositivo por favor conecteuna redWi Fiseguraconsutelefonointeligente...

Page 22: ...ivarafechadura Enter the registered password and press the key to confirm lngrese lacontrasenaregistraday luego presione latecla para confirmar Digite asenharegistradae pressione atecla para confirmar...

Page 23: ...ckthe DoorwiththeApp DesbloqueelapuertaconApp Abrindo aportacomoAppZsmart Click the key on the lock Toque la tecla en la cerradura Pressione a na fechadura When the remote UNLOCK pop up appears open t...

Page 24: ...no guarantee that interference will not occur in a particular installation If this equipment doescause harmful interference to radio or television reception which can be determined by turning theequi...

Reviews: