background image

1

Nota:

 Esta cerradura es apta para un grosor de puerta de 36 mm a 55 mm. Si la puerta es 

ms  gruesa  de  55mm,  esta  cerradura  no  es  apta  para  su  proyecto.  Por  favor  contacte  a 
suagende de ventas.

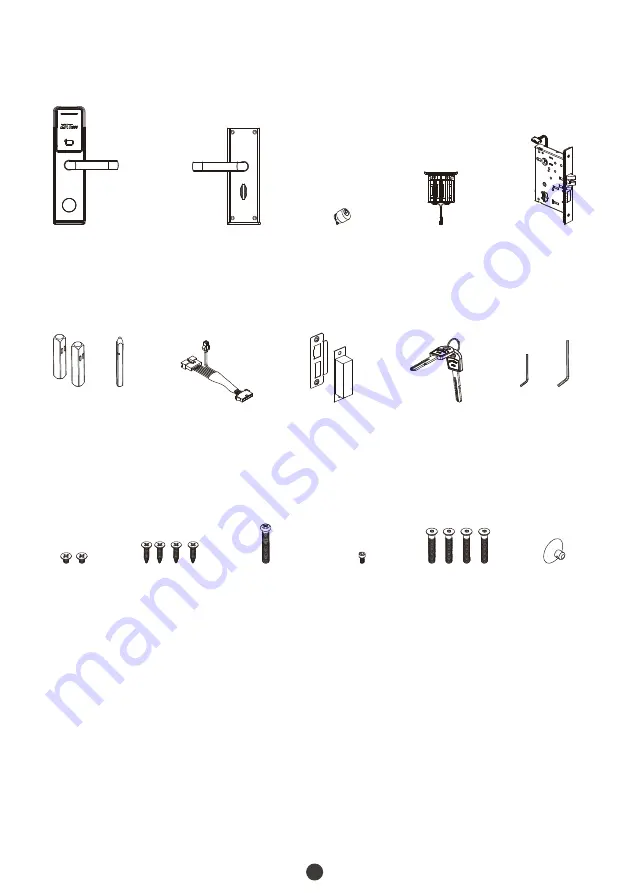
Contenido

A

B

A

B

 Unidad Exterior

 Unidad Interior

Cilindro

Caja de Baterías

 Mortaja

 Perno

Cable de transferencia

Placa de  Caja 

Contrachapa 

Llave Mecánica

 Llave 

Hexágonal

 Tornillo A

 Tornillo B

 Tornillo C

 Tornillo D

 Tornillo E

Ventosa 

de Succin

Summary of Contents for ZL700

Page 1: ...Installation Guide Model ZL700 Lock Body America Standard Mortise with 5 Latches Version 1 0 English...

Page 2: ...are required Non alkaline and rechargeable batteries ARE NOT RECOMMENDED Do not remove the batteries when the lock is in working state When the battery power is low the lock will beep to remind the u...

Page 3: ...nstallation Procedure 2 1 Check Opening Direction 2 2 Drill Holes on the Door 3 3 Remove the Guide Plate 3 4 Installing Mortise 4 5 Installing Outdoor Unit 5 6 Installing Indoor Unit 6 7 Installing St...

Page 4: ...oor Unit Outdoor Unit Strike Plate and Box Spindle Hex Wrench Keys Vacuum Sucker Screw A Transfer Cable Note This type of lock is suitable for a door thickness of 36 mm to 55 mm If the door is thicker...

Page 5: ...Spindle A Cylinder Mortise Screw C Screw B Screw A Screw B Screw A Screw B Keys Transfer Cable Vacuum Sucker Outdoor Unit Door Strike Plate and Box Person Location Left Inward Right Inward Left Outwa...

Page 6: ...ste the Installation Template at the desired handle height Mark for the holes to be drilled and drill the marked places 1 2 3 Remove the Guide Plate Unscrew the Screw A and remove the Guide Plate 36 t...

Page 7: ...the drilled hole secure it with Screw B Make sure the Cylinder toward Outdoor Unit secure Cylinder with Screw C and Screw D by Hex Wrench A Secure the guide plate with Screw A make sure the cable tow...

Page 8: ...onnect 6 PIN end of Transfer Cable with Mortise cable Insert a Spindle A into the clutch toward Outdoor Unit Attach the Outdoor Unit to the door by connecting 8 PIN end of Transfer Cable with mainboar...

Page 9: ...talling Indoor Unit Insert another Spindle A into clutch toward Indoor Unit and insert the Spindle B into turn knob Secure the below of Indoor Unit with 2 Screw E 1 2 Spindle A Spindle B Screw E Hex W...

Page 10: ...e Battery Box and Indoor Unit with 2 Screw E 3 4 Screw E Hex Wrench B 7 Installing Strike Plate and Box Make sure that the Strike Box is aligned with the latch bolt Then use the Installation Template...

Page 11: ...ock by Mechanical Key Remove the cover on the key hole with the Vacuum Sucker Insert the key into the Cylinder and rotate it by 90 then rotate down the handle to open the door it means normal 1 2 Keys...

Page 12: ...Cerradura Hotelera de Est ndar Americano de 5 Pestillos Versi n 1 0 Modelo ZL700 Gu a de Instalaci n Espa ol...

Page 13: ...lcalinas AA no incluidas NO SE RECOMIENDAN pilas recargables y no alcalinas No quite las bater as cuando la cerradura est en funcionamiento Cuando la carga de la bater a es baja la cerradura emitir un...

Page 14: ...1 Direcci n de Apertura 2 2 Realice los Agujeros en la Puerta 3 3 Remueva la Placa Gu a 3 4 Instalaci n del Mortaja 4 5 Instalaci n de la Unidad Interior 5 6 Instalaci n de la Unidad Interior 6 7 Inst...

Page 15: ...dura no es apta para su proyecto Por favor contacte a suagende de ventas Contenido A B A B Unidad Exterior Unidad Interior Cilindro Caja de Bater as Mortaja Perno Cable de transferencia Placa de Caja...

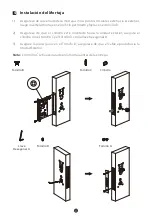
Page 16: ...transferencia Llave Mec nica Llave Hex gonal A Tornillo D Perno B Perno A Llave Hex gonal B Tornillo E Unidad Interior Ventosa de Succin Perno A Tornillo E La puerta Bater as no incluidas Proceso de I...
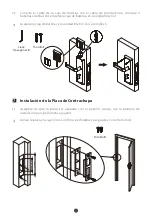
Page 17: ...altura deseada de la manija Marque los agujeros a perforar y perfore los lugares marcados 1 2 3 Remueva la Placa Gu a Desatornille el tornillo D y retire la placa gu a 36 to 55 mm Realice los Agujero...

Page 18: ...Aseg rese de que el cilindro est orientado hacia la unidad exterior asegure el cilindro con el tornillo C y el tornillo D con la llave hex gonal A Asegure la placa gu a con el Tornillo A aseg rese de...

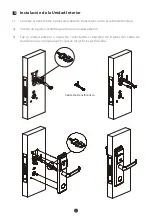
Page 19: ...e de transferencia con el cable de Mortaja Inserte un eje A en el embrague hacia la unidad exterior Fije la unidad exterior a la puerta conectando el extremo de 8 pines del cable de transferencia con...

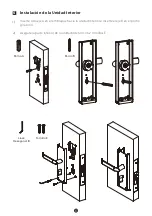
Page 20: ...el embrague hacia la unidad interior e inserte el eje B en el pomo giratorio Asegure la parte inferior de la unidad interior con 2 tornillos E 1 2 Instalaci n de la Unidad Interior Perno A Tornillo E...

Page 21: ...de bater as y la unidad interior con 2 tornillos E 3 4 7 Instalaci n de la Placa de Contrachapa Asegrese de que la placa est alineada con el pestillo Luego use la plantilla de instalaci n para perfora...

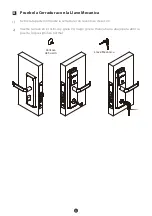
Page 22: ...Mecanica Retire la tapa del ori cio de la cerradura con la ventosa de succin Inserte la llave en el orificio y grela 90 luego gire la manija hacia abajo para abrir la puerta lo que significa normal 1...

Page 23: ...not occur in a particular installation If this equipment does cause harmful interference to radio or television reception which can be determined by turning the equipment o and on the user is encoura...

Page 24: ...ZKTeco Industrial Park No 32 Industrial Road Tangxia Town Dongguan China Phone 86 769 82109991 Fax 86 755 89602394 www zkteco com Copyright 2022 ZKTECO CO LTD All Rights Reserved...

Reviews: