32
How to Change Parts
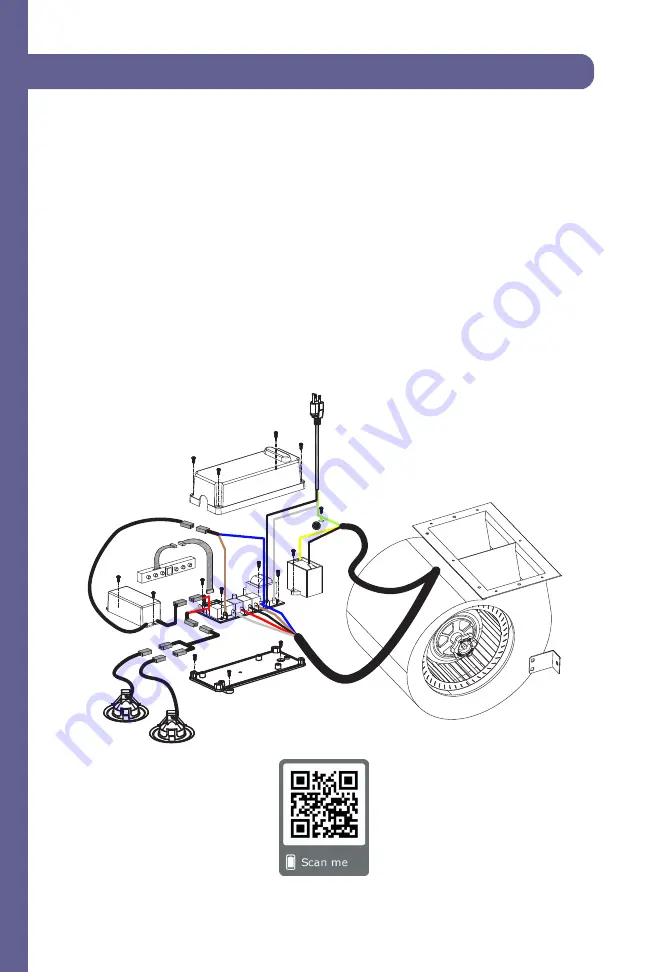
How to Replace the Circuit Board:
1. Turn the power off at the breaker and unplug the Range Hood.
2. Remove all screws from the top of the circuit board cover.
3. Take a picture of the wiring layout (this will help you put the circuit board back
together properly).
4. Remove the wiring connected to the circuit board.
5. Remove the screws from the circuit board.
6. Replace the wiring and screws to reassemble the new circuit board per the
diagram below.
Note: Never work on or clean the range hood while power is ON. Always unplug
the unit or switch the electrical breaker to the off position.
Installation Tutorial Video
Summary of Contents for 432-30
Page 1: ...Range Hood Installation Guide and Users Manual...
Page 2: ......
Page 10: ...4 Wall Range Hood Installation Installation Tutorial Video...
Page 16: ...10 Designer Wall Range Hood Installation Installation Tutorial Video...
Page 21: ...15 Island Range Hood Installation Installation Tutorial Video...
Page 25: ...19 Installation Tutorial Video Designer Island Hood Installation...
Page 29: ...23 Under cabinet Installation Installation Tutorial Video...
Page 33: ...27 Range Hood Insert Installation Installation Tutorial Video...
Page 46: ...40 How to Change Parts Single Motor Electrical Diagram...
Page 47: ...41 How to Change Parts Dual Motor Electrical Diagram...
Page 54: ...48 MOUNTING SPECIFICATIONS...
Page 55: ...49 MOUNTING SPECIFICATIONS...
Page 56: ...50 MOUNTING SPECIFICATIONS...
Page 57: ...51 MOUNTING SPECIFICATIONS...
Page 58: ...52 MOUNTING SPECIFICATIONS...
Page 59: ...53 MOUNTING SPECIFICATIONS...
Page 60: ...54 MOUNTING SPECIFICATIONS...
Page 61: ...55 MOUNTING SPECIFICATIONS...
Page 62: ...56 MOUNTING SPECIFICATIONS...
Page 63: ...57 MOUNTING SPECIFICATIONS...
Page 64: ...58 MOUNTING SPECIFICATIONS...
Page 65: ...59 MOUNTING SPECIFICATIONS...
Page 66: ...60 MOUNTING SPECIFICATIONS...
Page 67: ...61 MOUNTING SPECIFICATIONS...
Page 68: ...62 MOUNTING SPECIFICATIONS...
Page 69: ...63 MOUNTING SPECIFICATIONS...
Page 70: ...64 MOUNTING SPECIFICATIONS...
Page 71: ...65 MOUNTING SPECIFICATIONS...
Page 72: ...66 MOUNTING SPECIFICATIONS...
Page 73: ...67 MOUNTING SPECIFICATIONS...
Page 74: ...68 MOUNTING SPECIFICATIONS...
Page 75: ...69 MOUNTING SPECIFICATIONS...
Page 76: ...70 MOUNTING SPECIFICATIONS...
Page 77: ...71 MOUNTING SPECIFICATIONS...
Page 78: ...72 MOUNTING SPECIFICATIONS...
Page 79: ...73 MOUNTING SPECIFICATIONS...
Page 80: ...74 MOUNTING SPECIFICATIONS...
Page 81: ...75 MOUNTING SPECIFICATIONS...
Page 82: ...76 MOUNTING SPECIFICATIONS...
Page 83: ...77 MOUNTING SPECIFICATIONS...
Page 84: ...78 MOUNTING SPECIFICATIONS...
Page 85: ...79 MOUNTING SPECIFICATIONS...
Page 86: ...80 MOUNTING SPECIFICATIONS...
Page 87: ...81 MOUNTING SPECIFICATIONS...
Page 88: ...82 MOUNTING SPECIFICATIONS...
Page 89: ...83 MOUNTING SPECIFICATIONS...
Page 90: ...84 MOUNTING SPECIFICATIONS...
Page 91: ...85 MOUNTING SPECIFICATIONS...
Page 92: ...86 MOUNTING SPECIFICATIONS...
Page 93: ...87 MOUNTING SPECIFICATIONS...


