background image

19

18

Cooktop Cooking

Cooktop Cooking

OPERATION

SURFACE BURNER OPERATION - ELECTRIC IGNITION

To activate the electric ignition, simply turn the control knob counter-clockwise to 
maximum power, then press the knob in to start the flow of gas and the ignition spark. 
The spark will be released at the metal tip of the white ceramic pin located on the side 
of the burner. Once the flame is on, release the control knob gently. If the flame turns 
off, simply repeat the above procedure.

MANUAL IGNITION

Manual ignition is always possible even when the power is cut off or in the event of 
a power failure. Turn the control knob counter-clockwise to the MAXIMUM position; 
light the flame with a kitchen lighter or with a match.

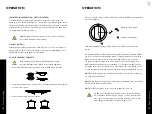
USING THE BURNERS CORRECTLY

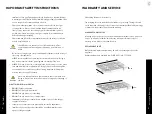
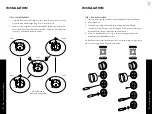
1.  Always check that the burner caps are properly installed before operation: 

2.  Verify that the flame of the worktop burners is completely blue and with a regular 

aspect as shown below: 

3.  Never let flames wrap around cookware.

DO NOT ignite the burners if the black burner cap is not installed or 
not centered, the flame will be irregular.

Keep children at a safe distance from the appliance during 
operation. DO NOT allow children to operate the appliance!

A

B

A

B

Correct

Incorrect

Correct

Incorrect

A

B

A

B

A

B

Correct

Incorrect

Correct

Incorrect

A

B

A

B

A

B

Correcte

Incorrecte

Correcte

Incorrecte

A

B

WARNING

WARNING

Cooktop Cooking

OPERATION

Be sure to set all worktop/oven/broiler burner controls to the OFF position after each 
use of the appliance.

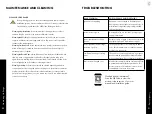
Maximum temperature setting/recommended control knob position for burner 
ignition.

The regulating knobs should be turned in anti-clockwise direction until the small flame 
symbol, vice-versa for the larger flame symbol. To light up the burner, keep pushing 
the knob and turn it anti-clockwise to maximum, and hold it for 3 to 5 seconds. 
The ignition will spark and ignite the burner. At this position, the gas supply is at 
the maximum and the flame also at its maximum. You can reduce the flame size by 
turning the knob in anti-clockwise direction. Should the burner fail to light up, turn the 
knob to its original position and try again. Your burner flame should be blue in color.

NOTE

: When igniting a burner, all burners will spark, but only the burner’s knob you 

are using will ignite the flame.

NOTE

: When first used, the gas burner will not ignite immediately. Time is required for 

the LPG to fully fill the operating system.

NOTE

: System cooling fan will run on all oven setting when it is in use.

OFF

OFF

OFF

The flame color should always be blue. Flickers of orange and yellow 
are acceptable. If flames appear orange or yellow and stay that 
way, check the surrounding area. Candles, cleaning products, and 
other changes in atmosphere can affect the flame color.

Maximum Flame Height

Minimum Flame Height

WARNING

Cooktop Cooking

Summary of Contents for RCBR30

Page 1: ...Dropins Installation Guide and Users Manual...

Page 2: ...nd professional features into everyone s homes Because we continually strive to improve our products we may change specifications and designs without prior notice REGISTERING YOUR PRODUCT Please regis...

Page 3: ...Bath and or our service contract partner Unapproved out of pocket payments for service will not be reimbursed All warranty procedures must be followed to maintain warranty coverage Warranty shall not...

Page 4: ...ely and carefully Please observe all local state and national codes and ordinances Please ensure the range is properly grounded The installer should leave these instructions with the consumer who shou...

Page 5: ...nce DO NOT touch any electrical switch DO NOT use any phone in your building DO NOT use any aerosol cans or combustibles Immediately call your gas supplier from a neighbor s phone follow the gas suppl...

Page 6: ...ssible location in the gas line external to the appliance for the purpose of turning on and shutting off the gas to the appliance Do not use aerosol sprays in the vicinity of this appliance while it i...

Page 7: ...35 3 8 19 1 2 19 1 8 20 3 8 2 1 2 INSTALLATION INSTALLATION ATTACHING THE DROPIN To prevent liquids from accidentally leaking into the underlying storage space the appliance is equipped with a specia...

Page 8: ...shipped from the factory for use with natural gas For LP Propane household installation the appliance must be converted by the dealer factory trained professional or qualified licensed plumber or gas...

Page 9: ...as pipe Gasket Gas connection adaptor 1 2 NPT with pressure test point 1 8 NPT to be fixed toward external side of the appliance Pressure test point stopper PRESSURE REGULATOR Since service pressure m...

Page 10: ...e is a convertible type pressure regulator for use with Natural Gas at a nominal outlet pressure of 4 w c or LP gas at a nominal outlet pressure of 1 1 w c and it is pre assembled from the factory to...

Page 11: ...a small size flathead screwdriver locate the choke screw see diagram below and turn to the right or left until the burner flame is adjusted to desired minimum 4 Make sure that the flame does not go ou...

Page 12: ...of a gas cooking appliance generates heat and humidity in the room where it is installed Proper ventilation in the room is needed Make sure the kitchen is equipped with a range hood of appropriate pow...

Page 13: ...cte Incorrecte Correcte Incorrecte A B WARNING WARNING Cooktop Cooking OPERATION Be sure to set all worktop oven broiler burner controls to the OFF position after each use of the appliance Maximum tem...

Page 14: ...ation never move the appliance from its original installation position Never use abrasive cleaners Scratches on the stainless steel surfaces are permanent Do NOT clean the range when hot WARNING RANGE...

Page 15: ...Installation Guide and User Manual 1 614 777 5004 2 0 0 www zlinekitchen com contact zlinekitchen com...

Reviews: