


28
27
Car
e & Cleaning
Cookwar
e Noise
MAINTENANCE AND CLEANING
OPERATION
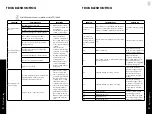
COOKWARE NOISE
• Heavier pans such as enameled cast iron, will produce less noise than a lighter
stainless steel pan. Light weight cookware may also vibrate. Heavy weight quality
cookware is recommended.
• Cookware with irregular or warped bottoms can vibrate audibly on the ceramic
glass surface, though again, typically only at high power settings.
• Loose-fitting handles on cookware, typically when rivets are used, can vibrate.
• “Cracking” noise- occurs if the cookware base is made of a different material.
• “Low Humming” noise- occurs when cooking, which is normal particularly at high
power settings.
• A “whistling” noise- occurs if both elements are being used at the same time at high
settings, and the cookware base is made of a different material.
COMPATIBLE COOKWARE
• DO NOT USE
heat-resist glass, ceramic, copper, aluminum pan/pots, round-
bottomed cookware, or cookware with a base less than 5 inches.
• Compatible cookware packaging often will have the induction logo
Before using the product for the first time, clean the top to protect and make cleanups
easier. Daily use of a ceramic glass cleaner will keep the cooktop looking new with
every use.
• Use a ceramic glass cleaner when the cooktop is cool
• Apply a few drops directly to the cooktop and use a paper tower or a soft cleaning
pad.
• Use a dry cloth or paper towel to remove all cleaning residue.
NEVER RUN THE COOKTOP UNDER WATER
CLEANING BURNED RESIDUE
• Use a ceramic glass cleaner when the cooktop is cool
• Spread a few drops on the burned residue area.
• Use a ceramic glass cleaning pad, rub the residue with pressure as needed.
• Repeat the steps above if any residue remains
CLEANING HEAVILY BURNED RESIDUE
• Use a ceramic glass cleaner when the cooktop is cool
• Use a single-edge razor blade scraper approximately at a 45˚ angle against the
glass surface, and scrape off the residue.
• After scraping the residue, spread a few drops on the burned residue area and
finish off with a ceramic glass cleaner and paper towel.
METAL MARKS AND SCRATCHES
• For preventative measures, be careful not to slide pots or pans across the cooktop
surface. This will leave metal marks. These metal marks are removable using a
ceramic glass cleaner with a cleaning pad.
• If pots with a thin overlay of aluminum or copper boil dry, the overlay may leave a
black discoloration on the cooktop. This must be removed immediately before using
the cooktop or the discoloration will become permanent.
• If cracks or indentations in the glass surface occurs, the cooktop will have to be
replaced. Contact us at 1-614-777-5004 for assistance.
Induction
WARNING