


10
Compatible Cookwar
e
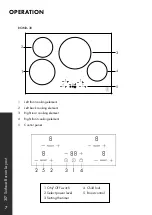
OPERATION
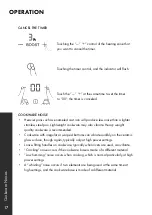
CHOOSING THE RIGHT COOKWARE
• Only use cookware with a base suitable for induction cooking. Look for the induction
symbol on the packaging or on the bottom of the pan.
• You can check if cookware is suitable by carrying out a magnet test. Move a magnet
toward the base of the pan. If it is attracted, the pan is suitable for induction.
• If you do not have a magnet:
1. Put some water in the pan you want to check.
2. Follow the steps under "To start cooking".
3. If does not flash in the display and the water is heating, the pan is suitable.
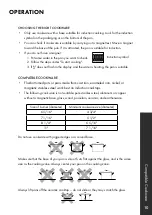
COMPATIBLE COOKWARE
• Flat-bottomed pots or pans made from cast iron, enameled iron, nickel, or
magnetic stainless steel work best on induction cooktops.
• The following cookware is not suitable: pure stainless steel, aluminum or copper
without a magnetic base, glass, wood, porcelain, ceramic, and earthenware.
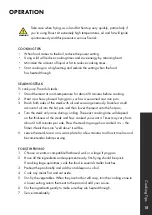
Do not use cookware with jagged edges or a curved base.
××
Make sure that the base of your pan is smooth, sits flat against the glass, and is the same
size as the cooking zone. Always center your pan on the cooking zone.
×××
Always lift pans off the ceramic cooktop – do not slide or they may scratch the glass.
×
Compatible Cookware
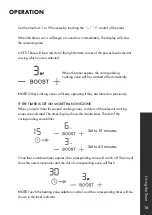
NOTE:
Some cookwares can produce noises when used on induction
cooking zones. This is not a fault in the cooktop, and its function will not
be impaired in any way as a result.
Because induction cooking requires a magnetic vessel for heating, only
certain materials can be used on your cooktop
.
Induction
Optimally the cookware will have this
induction image on the retail box:
Induction requires pots and pans that are
made of ferrous(meaning
magnetic)
materials.
Check your cookware’s retail box for the
induction symbol. To tell if your current
cookware is compatible with the induction
technology, grab a magnet and see if it
holds to the bottom of the cookware. If
your magnet stays on then your cookware
is ready to be used on the Induction
cooktop!
The quality of your cooking is dependent on the cookware you use.
The
following are
not
compatible: heat-resist
glass, ceramic, copper, aluminum pan/pots,
round-bottomed cookware, or cookware with a
base less than 5 inches.
INSTALL GUIDE
MASTER CONTRACT: 272713
REPORT: 80028905
PROJECT: 80028905
Att3 Instructions
Page 31
Induction symbol
Size of burner (diameter)
Minimum cookware size (diameter)
6 5/16"
4 3/4"
7 1/16"
5 1/2"
8 1/4"
6 5/16"
11"
7 1/16"


