6
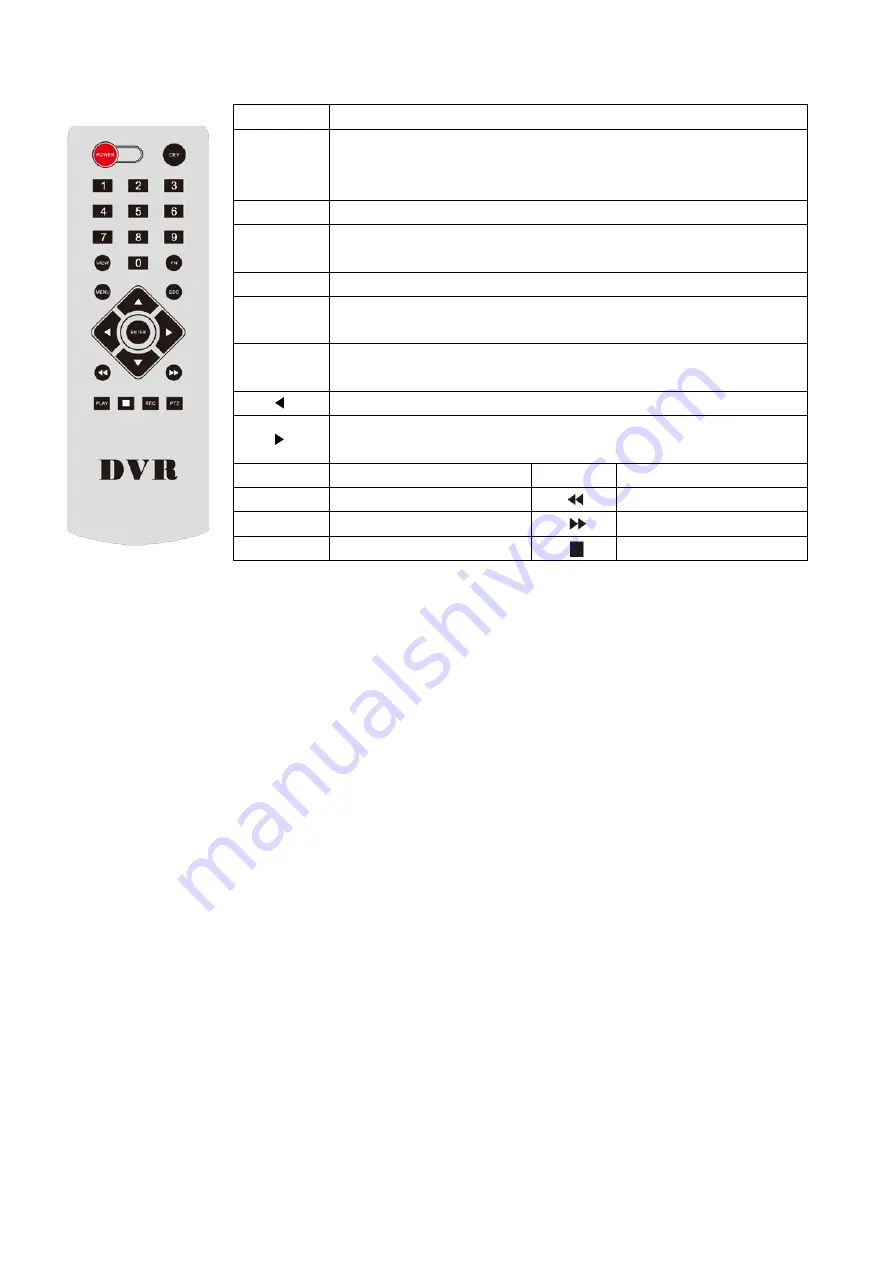
2.3 Remote Control Description
POWER
Power switch
DEV
Device button: after press "DEV", input the same number as device
number and press “ENTER” to save the setting. Then DVR can
operated by remoter
0-9
Number button
MENU
Menu button; eliminate all the areas when set up motion detection
area
ESC
Exit
▲
In menu mode: upwards; in PTZ mode: control the PTZ camera
revolve upwards
▼
In menu mode: downwards; in PTZ mode: control the PTZ camera
revolve downwards
In menu mode: left; in PTZ mode, control the PTZ camera revolve left
In menu mode: right; in PTZ mode, control the PTZ camera revolve
right
ENTER
Select key
VIEW
Multi-screen key
PLAY
Video playback
Fast rewind key
FN
Subsidiary key
Fast Forward key
REC
Recording key
Pause key
Note: If many devices are in the same place, remote control should select a device according to device
number. So each device needs a unique device number, unless remote control may effect to multi
devices with the same number.
Chapter Three: Description of Operation System
3.1 Turn on / off
Confirm that AC voltage accessible matches with DVR .Ensure that the DVR power outlet connects with
good middle ground grounding. After switching power, the device started,
【
POWER
】
light is on. Turn
into system, if the panel status light flashing, it's normal conditions.
3.2 Preview
After device start, preview interface can be seen immediately. In the preview interface you can see the
system date, time, channel name. Press corresponding number key of panel or click the left mouse
button, user can preview the single channel; Press "QUAD" key in the panel or click the left mouse
button, you can return to a multi-interface monitoring state.
3.3 Menu operation instructions
3.3.1 Enter menu mode
【
MENU
】
,enter the device's main menu interface.
【
PLAY
】
shortcut keys for playback interface.
【
REC
】
shortcut keys for manual recording.
【
PTZ
】
shortcut keys for PTZ control.
Note: Default password is 111111, click "OK" can into menu directly.


