Page 10
ENGLISH
Zodiac
®
Sheer Descent
®
and Fiberfall
®
Water Features
|
Installation and Operation Manual
for thicker finishes like rock or brick) to
ensure
lip will be 1/4 inch (0.64 cm) past finished pool
wall
.
3. Tap in and level.
4. Apply 5/8 inches (1.6 cm) of cement finishing
to top, sides and back of waterfall to encase unit.
Slope top surface slightly towards back, 1/4
bubble on level. Refer to Figure 8.
5. Remove excess cement from front of waterfalls.
2.3.2 Finishing the Waterfall
1. Use thin-set to install coping material onto cement
on top of waterfall. Tap in and level. Refer to
Figure 9.
2. Remove bender board.
Section 3. Pump Sizing and
Installation Options
NOTE
Make sure the cuts in the beam are properly
completed before proceeding.
2.3.1 Positioning the Waterfall
CAUTION
The waterfall lip must be positioned correctly in
order to achieve the designed sheer descent effect.
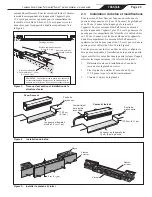
Refer to Figure 6.
1
2
3
4
5
Figure 7. Positioning the Waterfall in Notch
Position the Waterfall
Make Sure the Lip Extends 1 inch
(or more) beyond the Gunite.
Figure 8. Slope Surface Towards Back of Waterfall
Inlet
Lip
Correct
Incorrect
Inlet
Lip
Figure 6. Position the Waterfall Correctly in the
Notch
1. Create a bed of cement mortar in the notch to
provide a solid base for the waterfall. Refer to
Figure 7.
2. Set the unit into the mortar bed. The lip should
extend 1 inch (2.5 cm) beyond gunite (or more


