background image

Page 13

ENGLISH


 Zodiac

®

 Sheer Descent

®

 and Fiberfall

®

 Water Features   

|

   Installation and Operation Manual

NOTE

  A flow control valve must be plumbed in a 

convenient location on the supply line for 

regulation of the water supply to the unit. See 

Figure 14.

4.3  Plumbing Multiple Units

Plumbing two or more Sheer Descent waterfalls 

together is done in exactly the same way as the 

installation procedure for a single unit, explained 

previously, with the exception that additional two-way 

valves are required for each Sheer Descent waterfall. 

See Figure 15. The loop plumbing option can also be 

used for two or more units. See Figure 16.

Figure 13. Three-Way Valve Plumbing Setup

Suction

from pool

Water to

sheer descent

Pump

Jandy

®


three-way

valve

Filter

Line bypass to pool

Figure 14. Single Sheer Descent Plumbing Setup

Notch in beam

Beam

Back Feed plumbing for 

units 1 feet through 8 feet.

Ensure plumbing lines to unit are clear of debris.

Ensure plumbing is properly sized.

Figure 15. Multiple Sheer Descent Plumbing Setup

Option #1 - Sheer Descent 

waterfall back feed plumbing 

for multiple units.

Make sure no debris is in any of 

the plumbing lines in the unit

Jandy

®

Valve

Figure 16. Multiple Sheer Descent Loop Plumbing 

Setup

Jandy

®


Valve

Option #2 - Sheer Descent waterfall 

back feed loop plumbing for  

multiple units.

Make sure plumbing lines are clear of debris.

the Sheer Descent waterfall.  A Jandy three-way valve 

is suggested to be used as the “T” from the return line 

of the pool to the Sheer Descent waterfall. A properly 

plumbed valve in that position will allow full control of 

the water to the Sheer Descent, as well as to the rest of 

the pool.  In most cases, this valve can be located after 

the filter near the equipment pad. See Figure 13. 

NOTE   All water to the Sheer Descent must be filtered. 

Those systems using a separate pump must 

use our separate energy filter (p/n 3456) or 

equivalent to prevent debris from entering the 

Sheer Descent unit.

4.2  Plumbing a Single Unit

All back feed Sheer Descent waterfalls have the 

equivalent of standard 1½ inch inside and 2 inches 

outside pipe protruding from the back of the unit. For 

waterfalls 1 through 8 feet in length, this fitting is 

located in the center of the back of the waterfall. 

Standard 1½ inch and 2 inch PVC fittings will glue 

in and over the 1½ inch slip by 2 inch insert fitting 

provided on all Sheer Descent waterfalls.  

4.4  Cutting the Lip for Radius or Custom 

Installations

The extended lip Sheer Descent waterfall can be custom 

cut in the field to meet specific needs, such as radius, 

irregular shapes, etc. In order to custom fit the waterfall, 

carefully measure the amount of extended lip to be 

Summary of Contents for Sheer Descent

Page 1: ...aller or maintainer must be a professional with sufficient experience in pool equipment installation and maintenance so that all of the instructions in this manual can be followed exactly Before insta...

Page 2: ......

Page 3: ...10 Section 3 Pump Sizing and Installation Options 10 3 1 Existing Pool Filter Pump Installation 11 3 2 Separate Pump for the Sheer Descent Waterfall 11 Section 4 Plumbing the Sheer Descent Waterfall 1...

Page 4: ...ackwash multiport slide or full flow valve position with the pump running WARNING Due to the potential risk of fire electric shock or injuries to persons Zodiac Equipment must be installed in accordan...

Page 5: ...to the pool equipment such as filters or pumps Zodiac pool equipment is pressure tested at the factory If however the WARNING cannot be followed and pressure testing of the piping system must include...

Page 6: ...line the sin gle suction line may be equipped with a valve that will shut off both main drains from the pump The system shall be constructed such that it shall not allow for separate or independent sh...

Page 7: ...NSI APSP 16 Anti entrapment Cover Grate or Suction Fitting securely fastened to Main Drain Sump Listed certified to the latest published version of ANSI ASME A112 19 8 or its successor standard ANSI A...

Page 8: ...ation or damage to the unit which would effect its ability to perform may occur To properly install this product please review the following installation and maintenance instructions 2 2 Excavation an...

Page 9: ...4 cm deep and 1 inch 2 5 cm longer than the width of the unit For FiberFalls notch for unit length plus 6 inches 15 2 cm on the left to accommodate the lens chamber and fiber cable or 6 inches 15 2 c...

Page 10: ...2 Remove bender board Section 3 Pump Sizing and Installation Options NOTE Make sure the cuts in the beam are properly completed before proceeding 2 3 1 Positioning the Waterfall CAUTION The waterfall...

Page 11: ...d e g When plumbing two 6 foot units you now have 12 feet of waterfall which requires 144 gallons per minute 3 1 Existing Pool Filter Pump Installation The installation of the Sheer Descent waterfall...

Page 12: ...ance in Swimming Pools Wading Pools Spas Hot Tubs and Catch Basins Suction Line Separate Return to Pool Jandy Three Way Valve Sheer Descent Filter Strainer Filter Pump Water Line Sheer Descent Unit Co...

Page 13: ...Valve Option 2 Sheer Descent waterfall back feed loop plumbing for multiple units Make sure plumbing lines are clear of debris the Sheer Descent waterfall A Jandy three way valve is suggested to be us...

Page 14: ...the waterfall follow with a fine grade of sandpaper to get the edge as smooth as possible A sanding block is recommended to avoid rounding the edges of the waterfall Insert the lip protector back into...

Page 15: ...Lip 6 Lip 6 Lip 6 Lip 12 Lip 12 Lip Custom Custom 6 5 6 Lip 6 Lip 6 Lip 6 Lip 6 Lip 12 Lip 12 Lip Custom Custom 7 6 Lip 6 Lip 6 Lip 6 Lip 6 Lip 12 Lip 12 Lip Custom Custom 7 5 6 Lip 6 Lip 6 Lip 6 Lip...

Page 16: ...s are installed one of the waterfalls is stronger than the other s The water supplied to the units is not properly balanced Adjust the valves for each waterfall until the proper effect and balance is...

Page 17: ...le l agent d entretien doit tre un professionnel avec suffisamment d exp rience dans l installation et la maintenance d quipement de piscine pour appliquer correctement les consignes du pr sent manuel...

Page 18: ......

Page 19: ...de la pompe et options d installation 26 3 1 Installation avec une pompe existante 27 3 2 Installation avec une pompe d di e pour la cascade Sheer Descent 27 Section 4 Raccordement de la cascade Shee...

Page 20: ...ricit NEC tous les codes locaux d lectricit et de s curit et la Loi sur la s curit professionnelle et la sant OSHA Des copies du Code national de l lectricit pourront tre command es en ligne de l Asso...

Page 21: ...ue les filtres ou les pompes L quipement de piscine Zodiac a fait l objet d essais de mise sous pression en usine Toutefois si cet AVERTISSEMENT ne peut pas tre suivi et que les essais de mise sous pr...

Page 22: ...e d aspiration de pompe de circulation Les centres des bouches d aspiration sur toute conduite d aspiration doivent tre au moins un 1 m tre 3 pi l une de l autre de centre en centre Voir Figure 1 Le s...

Page 23: ...16 Couvercle grille anti pi geage ou raccord d aspiration viss e la pompe de vidange principale num r Certifi la derni re dition publi e de la norme ANSI ASME A112 19 8 ou de sa norme subs quente ANS...

Page 24: ...raient survenir Pour installer correctement ce produit veuillez revoir les consignes d installation et d entretien 2 2 Travaux d excavation et modifications l acier d armature Il est recommand que l e...

Page 25: ...appareil Pour les cascades FiberFall faire une encoche pour la longueur de l appareil plus 15 2 cm 6 pouces sur la gauche pour le compartiment de la lentille et le c ble de fibre ou 15 2 cm 6 pouces s...

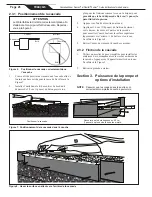
Page 26: ...veau Se r f rer la Figure 9 2 Retirer la planche cintrer Section 3 Puissance de la pompe et options d installation NOTE S assurer que les coupes dans la poutre sont correctement compl t es avant de po...

Page 27: ...6 pieds vous avez maintenant 4 m 12 pieds de cascade qui n cessitent 545 litres 144 gallons par minute 3 1 Installation avec une pompe existante L installation de la cascade Sheer Descent en utilisan...

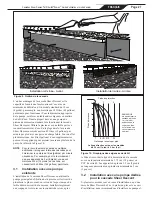
Page 28: ...hydraulique Tableau 1 pour les sp cifications La conduite d alimentation doit se terminer l arri re de la poutre de ma onnerie pr s du centre de l emplacement de la cascade Tableau 1 Graphique sur le...

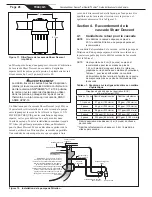
Page 29: ...ans l une des conduites de l unit Soupape Jandy La soupape devrait tre situ e dans un emplacement id al sur la conduite d alimentation pour r guler le d bit de l eau vers la cascade Sheer Descent Une...

Page 30: ...bord Le dessus de la poutre o l unit Sheer Descent doit tre install devrait tre d un minimum de 22 9 cm 9 pouces Figure 18 Installations personnalis es Rayon concave Rayon concave 5 cm 2 po minimum D...

Page 31: ...2 po Personna lis Personna lis 7 5 pi Bordure de 6 po Bordure de 6 po Bordure de 6 po Bordure de 6 po Bordure de 6 po Bordure de 12 po Bordure de 12 po Personna lis Personna lis 8 pi Bordure de 6 po B...

Page 32: ...des multiples sont install es l une des cascades est plus forte que l autre ou les autres L eau aliment e vers les appareils n est pas quilibr e de fa on appropri e Ajuster les soupapes pour chaque ca...

Reviews: