ART26247-002 Rev. A 12/16 ©2016 Abbott
Lancing device product of UK.
This product is protected by the following patent: EP1171036B1. Other Patents pending .
ENGLISH
This reference guide demonstrates how to use the AlphaTRAK Lancing Device II only.
The AlphaTRAK Lancing Device II is for use with AlphaTRAK lancets.
Refer to the User’s Manual for complete information about your blood glucose monitoring system and
instructions on how to obtain a blood glucose reading.
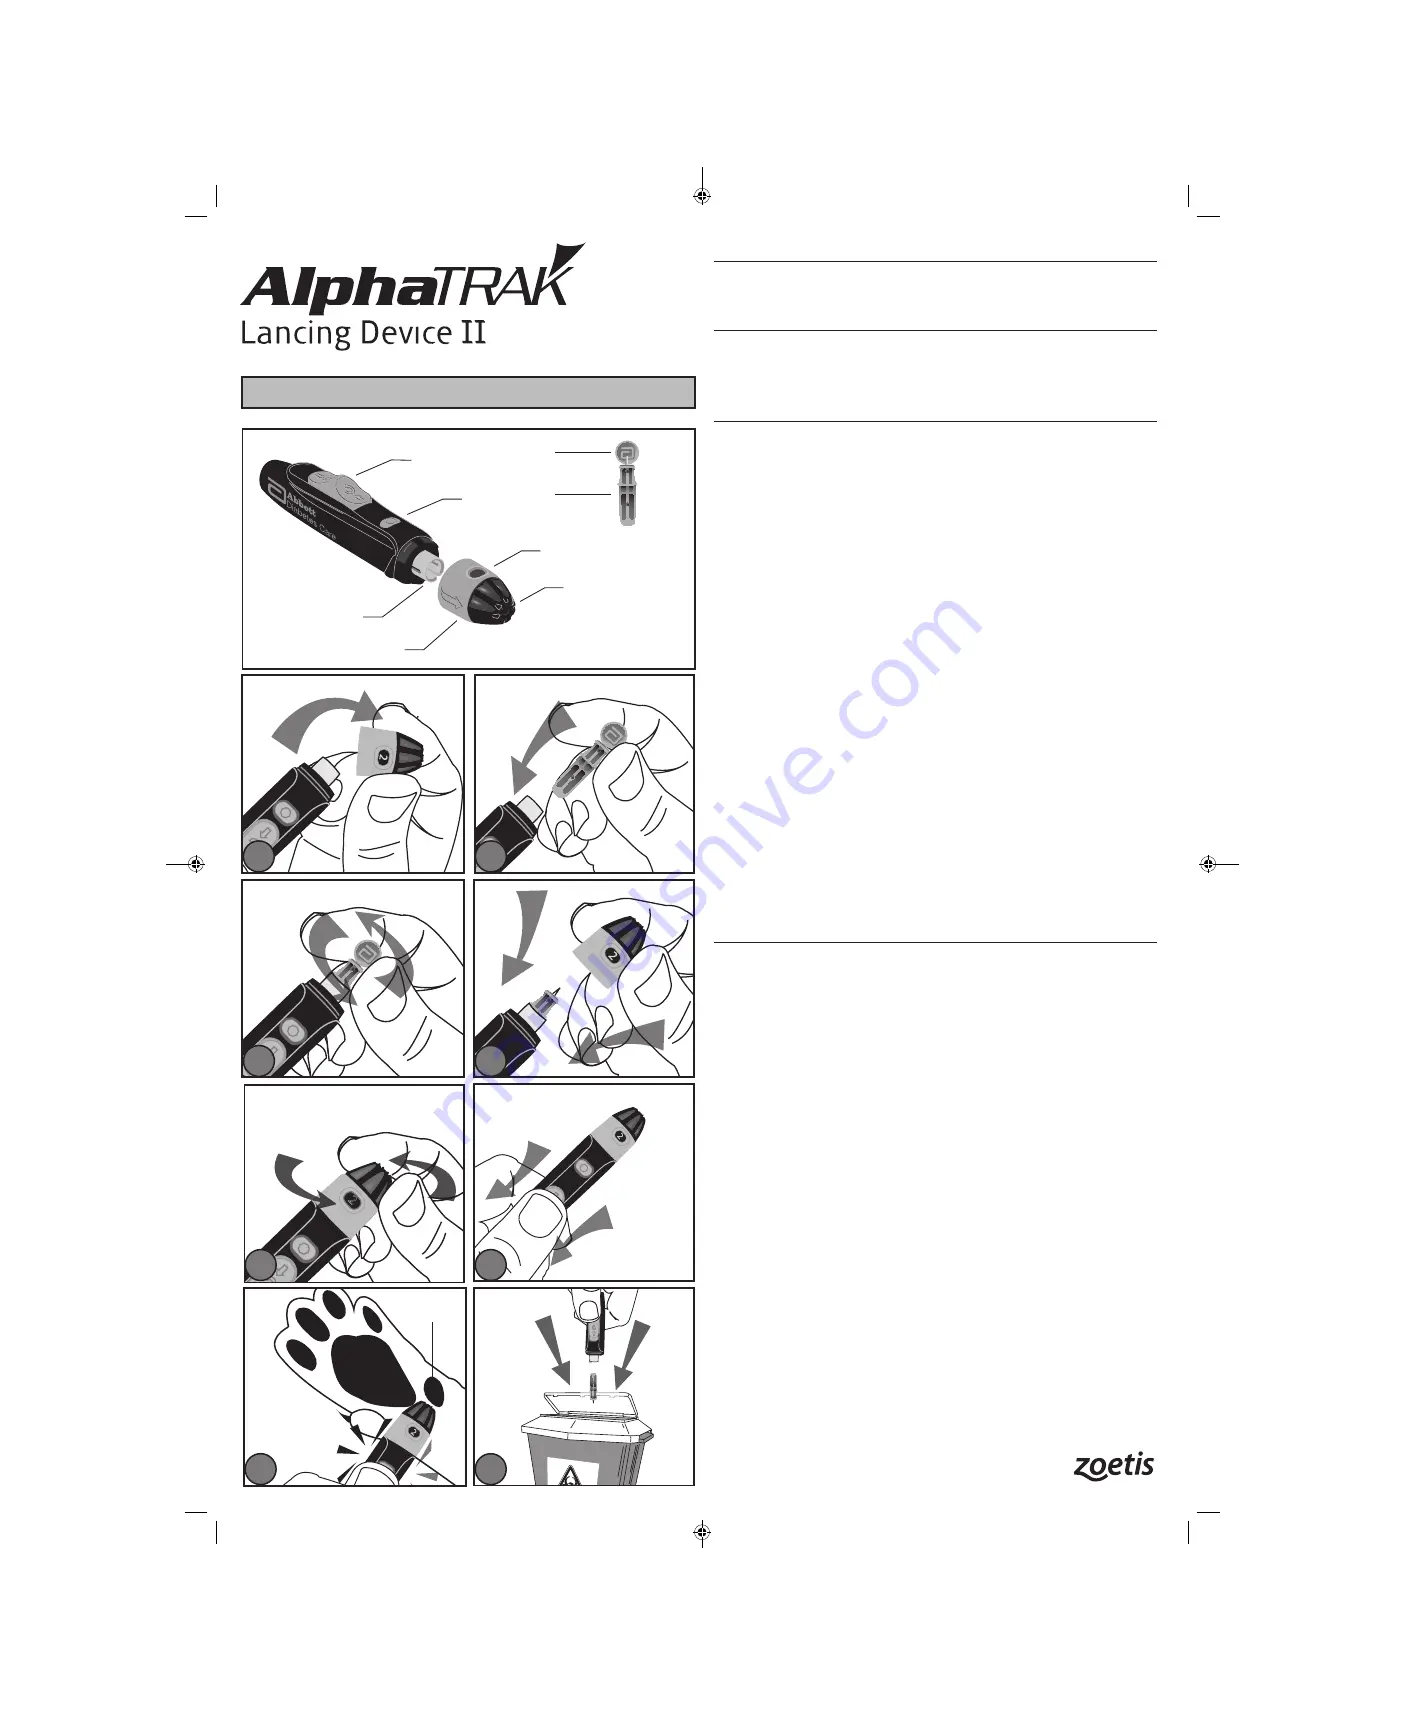
Lancing Device At-A-Glance (refer to illustrations)
(A) Depth Setting Dial
(E) Lancet Holder
(B) Depth Setting Indicator Window
(F) Lancing Device Cap
(C) Lancing Button
(G) Lancet Cover
(D) Cocking/Release Slider
(H) Lancet
Using the Lancing Device
1. Remove Lancing Device Cap (F)
Snap off the cap on the lancing device at an angle.
2. Insert Lancet (H) into Lancet Holder (E)
Insert a new lancet firmly into the blue lancet holder cup. (This may cock the device.)
3. Twist Off the Lancet Cover (G)
Hold the lancing device firmly in place with one hand; use your other hand to twist off the lancet cover.
4. Replace Lancing Device Cap (F)
Replace the cap until it snaps or clicks into place. Be careful not to touch the exposed needle on the lancet.
5. Set the Depth Setting (A)
The lancing device offers 9 different settings (including half settings). Level 1 is the shallowest depth; Level 5 is
the deepest.
6. Cock the Slider (D)
Pull back the grey slider until it clicks. (You may have already cocked the device in step 2.) You are now ready to
perform a blood glucose test.
7. Select Your Preferred Test Site
Select Your Preferred Test Site and Obtain Capillary Blood Sample
• Acceptable sites: Marginal ear vein (cat and dog); non-weight-bearing paw pad (cat and dog); elbow callus
(dog); inner or outer lip (dog).
• Warm the test site as needed to increase blood flow by gentle rubbing or applying a warm (not hot) cloth to the
site.
• Optional--a thin layer of petroleum jelly may be applied prior to lancing the site.
This can help the blood form into a droplet and avoid spilling into the hair.
• Hold the lancing device firmly against the selected site.
• Press the Lancing Button (C).
• Apply blood droplet to the side of the test strip as directed.
• Gently apply pressure to the test site with sterile gauze or cotton wool to help stop the blood flow.
If you accidentally prick yourself with a lancet, please follow normal first aid procedures. If bleeding persists, please contact
your local healthcare professional.
Note:
Avoid veins, bones and tendons. Bruising may occur at the test site, if bruising occurs, consider selecting another
site.
8. Removing the Lancet
• Remove the Lancing Device Cap (F).
• Push the Release Slider (D) downward to detach the lancet from the device.
• The lancet should be removed and disposed in accordance with local waste regulations.
Maintenance
Use isopropyl alcohol or soap and water to wipe the outside of the lancing device. If you wish, remove the cap, wash it in
warm water and rinse well. Store lancing device in carry case or in a clean and dry environment.
Important:
Do not immerse the body of the lancing device in water or any other liquid.
(F)
(E)
(C)
(B)
(A)
(D)
(G)
(H)
Non-weight-
bearing pad
8
1
2
3
4
6
2
5
7
Lancing Device
At-A-Glance
ART26247-002_rev-A.indd 1
12/28/16 3:48 PM


