62
ZOLL AED 3 Administrator’s Guide
9650-000752-01 Rev. D
3. Press
Save
at the bottom right of the screen to save the changes. The AED
displays the message
SAVING CONFIGURATION, PLEASE WAIT.
When the
AED has saved the configuration, it displays the Advanced Configuration
window.
IT Setup for Device History
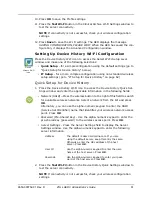
1. Press the Device History Wi-Fi icon.
2. Press the IT Setup button to access the Device History Wi-Fi Settings win-
dow.
3. Press the Network Settings icon. The Network Settings window displays.
4. In the DHCP (Dynamic Host Configuration Protocol) field, select ON or OFF:
•
If you select ON, all necessary information is obtained from the network.
Press
OK
and go to step 6.
•
If you select OFF, all of the network setup fields display in the Network
Settings window. Go to step 5 to enter the static information.
5. You can either keep all of the displayed default settings and press
OK
, or
you can enter information in the following fields:
•
Local IP Address
- Use the numeric keypad to enter your Local IP address
(format is xxx.xxx.xxx.xxx where xxx = 000-255). Press
OK
.
•
Gateway IP Address
- Use the numeric keypad to enter your Gateway IP
address (format is xxx.xxx.xxx.xxx where xxx = 000-255). Press
OK
.
•
Subnet Mask
- Use the numeric keypad to enter your Subnet Mask (format
is xxx.xxx.xxx.xxx where xxx = 000-255). Press
OK
.
•
Primary DNS (Domain Name Server) IP Address
- Use the numeric keypad
to enter your Primary DNS IP address (format is xxx.xxx.xxx.xxx where
xxx = 000-255). Press
OK
.
•
Secondary DNS IP Address
- Use the numeric keypad to enter your
Secondary DNS IP Address (format is xxx.xxx.xxx.xxx where
xxx = 000-255). Press
OK
.
6. Press
OK
to save the Network settings.
7. Press the Server Settings icon and enter information in the following fields:
•
Mode
: Select URL or IP.
•
Address
- The default is dxsvc.zollonline.com. Use the alpha-numeric
keypad to change this default only if your URL/IP is different than the
default.
NOTE
If you are not using the default value, you need to make an entry in
the DNS table for the default value, and you will have to import a new SSL
root certificate. For detailed information on how to import a root certificate,
see “Importing Files from a USB Flash Drive” on page 16.
Device History
Wi-Fi icon
Network
Settings icon
Server
Settings
icon
Summary of Contents for AED 3
Page 1: ...Administrator s Guide 9650 000752 01 Rev D...
Page 20: ...12 ZOLL AED 3 Administrator s Guide 9650 000752 01 Rev D...
Page 36: ...28 ZOLL AED 3 Administrator s Guide 9650 000752 01 Rev D...
Page 40: ...32 ZOLL AED 3 Administrator s Guide 9650 000752 01 Rev D...
Page 72: ...64 ZOLL AED 3 Administrator s Guide 9650 000752 01 Rev D...


