


906-0731-01-05 Rev. C
ZOLL Ventilator Operator’s Guide
7-5
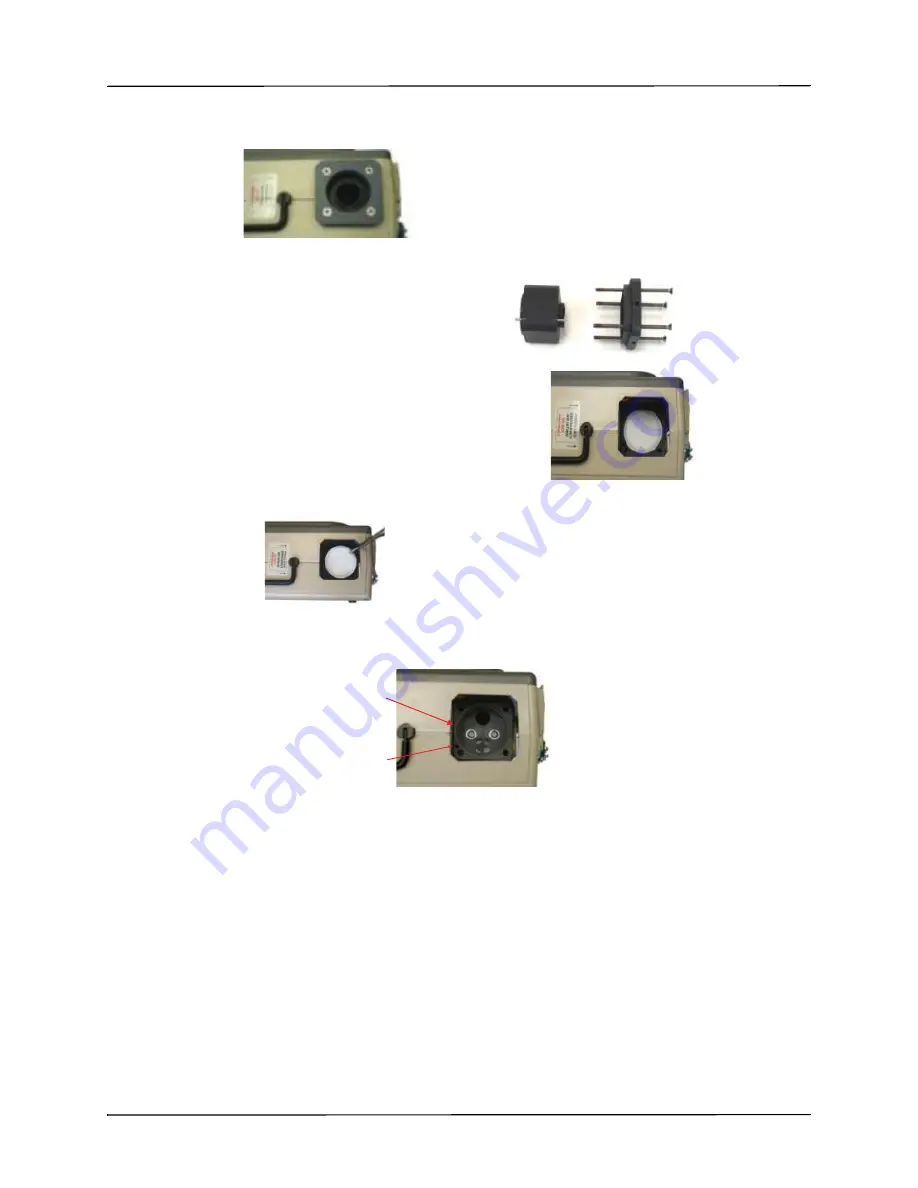
Replacing the Disk Filter
1.Remove the four (4) 8-32 x 3 Phillips Flat Head screws
that secure the Compressor Inlet Fitting Assembly to the
cover.
2.
Lift the two (2) segments of the
Compressor Inlet Fitting Assembly
away from the unit.
If the two segments
come apart,
do not
lose the gasket that
seats between the parts.
The Disk Filter is now exposed.
Do not
remove the filter at this time.
3.
Examine the surface of the Disk Filter.
Do not
replace the Disk Filter if it isn’t
discolored. If the Disk Filter is discolored,
replace the filter.
Remove the Disk Filter using the hemostat or
tweezers and replace it with a new, clean filter.
Make sure that the filter sits flat on the shoulder in
its recessed area.
4.
Set the lower segment of the Compressor Inlet Fitting Assembly into the unit, making
sure that its alignment pin mates.
5.
Set the upper segment of the Compressor Inlet Fitting Assembly into the lower segment,
making sure that its alignment pin mates.
6.
Secure the Compressor Inlet Fitting Assembly to the device by equally tightening each
of the four (4) 8-32 x 3 Phillips Flat Head screws.
Momentarily turn the unit’s
POWER
switch to its “ON” position to confirm operating
power.
A
DISCONNECT
alarm sounds.
Turn the unit’s
POWER
switch to its “OFF” position.
Battery Maintenance
The ZOLL Ventilator uses a rechargeable lithium-ion battery, which offers a wide temperature
operating range, does not exhibit “memory” characteristics (reduced capacity), or vent
hydrogen gas. Avoid exposing the battery to direct sunlight or heat sources. Never store the
Alignment Pins
Shoulder
Alignment
Hole


