3
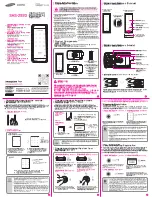
Install exterior assembly
A
IMPORTANT: Before installation, make sure the latch is fully retracted (in the unlocked position) .
Route the cable below the latch and insert the cylinder tailpiece through
the horizontal slot in the latch.
B
2 / 6
4
Install interior assembly
Insert the cable connector to
the socket. Push the connector
in firmly until it is completed
seated.
B
Rotate the thumbturn and keep it in a vertical position.
Make sure the latch is still fully retracted (unlocked).
C
5
While the door is OPENED and UNLOCKED
(latched retrated), load 3 AA batteries into the
battery compartment.
NOTE:
For best results, use new, non-rechargeable Alkaline
batteries only. Do not mix old and new batteries.
Reset the lock to teach the lock the orientation of the door.
A
Press and hold the Reset button. Do not
release the reset button until you complete
the next step.
B
Place the 4th battery and keep holding the reset button,
until the latch bolt extend.
C
Test operation using backup key and thumbturn
for smooth rotation. If thumbturn doesn’t rotate,
repeat step 4C, making sure the thumbturn in vertical
position, and tailpiece in horizontal position.
D
IMPORTANT: Always run this step after installation. The motor will not operate before completing the step.
NOTE:
If the latch doesn’t extend within 10 seconds, repeat step
4C and 5A, making sure the thumbturn is always vertical
and latch always retracted.
IMPORTANT: Do not load batteries until lock is completely installed.
IMPORTANT: Do not insert the physical key before and during installation.
Remove the battery cover.
Locate the slot at the bottom and use your fingernail or a
flat head screwdriver to pry the cover up and pull it off.
A
Secure the interior assembly
with the supplied screws.
E
K
Secure the mounting plate with the supplied screws.
D
J
Keep Parallel to door edge.
Horizontal
unlocked
Send the cable through the bottom horizontal slot in the mounting plate.
C
E
unlocked
G
F
tailpiece horizontal
Vertical


