21
Air+ 50
Operation
CONNECTING AND STARTING
The unit you have purchased is a “Plug&Play” device, which means that it does not
require prior configuration. All you need to do is fix it to the chosen wall.
SWITCHING OFF AND DISCONNECTING THE AIR+ 50
To switch the unit off, slide the ON/OFF button lever towards “0”.
If you are going to stop using the purifier for an extended period of time,
it is recommended to disconnect the cable from the power.
1.
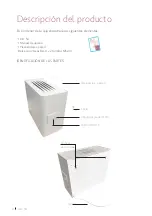
Before starting the assembly, check that you have all the necessary components:
wall mounting bracket, bolts and wall plugs, and the Air+ 50 purifier.
2.
Find a power socket close to the purifier that it can be connected to.
IMPORTANT: do not pinch the cable.
3.
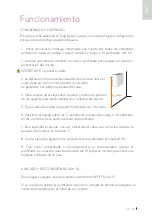
The minimum recommended distance from the mounting
bracket to the floor is 80 cm, in order to guarantee optimum
air intake.
4.
Put the mounting bracket on the wall and mark the position
of the holes in order to drill the 2 holes required.
5.
Fix the mounting bracket securely to the wall with 2 bolts.
6.
Position the unit on the 2 extruding parts of the mounting bracket
and insert them into the 2 holes on the back of the purifier.
7.
To start the unit, once the cable is connected to the power, put the start-up lever
into the “I” position.
8.
Turn the speed regulation wheel until it is increased to the maximum (10).
9.
After having checked it is working, it is recommended to set the purifier to its
maximum speed for the first 10 minutes in order to clean the room thoroughly.
H
min
=80cm
ENG
Summary of Contents for AIR+ 50
Page 1: ...ZONAIR3D A 50 AIR 50 MANUAL DE USUARIO USER MANUAL MANUALE D USO MANUAL DE UTILIZADOR ...
Page 4: ...4 Air 50 MANUAL DE USUARIO ESPAÑOL ...
Page 16: ...16 Air 50 USER MANUAL ENGLISH ...
Page 28: ...28 Air 50 MANUALE D USO ITALIANO ...
Page 40: ...40 Air 50 MANUAL DE UTILIZADOR PORTUGUÊS ...
Page 51: ...51 Air 50 POR ...
Page 52: ...AIR 50 ZONAIR3D A 50 ...


