background image

13

SADIGI THERMOSTAT OPERATING INSTRUCTIONS

Lower heat
setpoint

Pwr

Off/On

Fan

On/Auto

A

C

H

Raise heat
setpoint

Lower cool
setpoint

Raise cool
setpoint

H

72

70

C

74

76

View heat 
setpoint

View cool 
setpoint

73

SLIDE SWITCHES

There are two switches located on the bottom of the thermostat. The switch on the left controls
the fan and the switch on the right powers the thermostat. Sliding the fan switch to the left
turns the indoor blower fan on continuously. Sliding it to the right runs the fan only when the air
conditioner is on. Slide the power switch to the right to turn on the thermostat and to the left to
turn it off.  

MODE

The SADIGI thermostat can operate in three different modes: Heat, Cool or Auto. In Heat mode,
the SADIGI can only make heat calls and only the heat setpoint can be viewed or changed. In Cool
mode, the SADIGI can only make cool calls and only the cool setpoint can be viewed or changed.
In Auto mode, the SADIGI can make either heat or cool calls and both the heat and cool setpoints
can be viewed.  

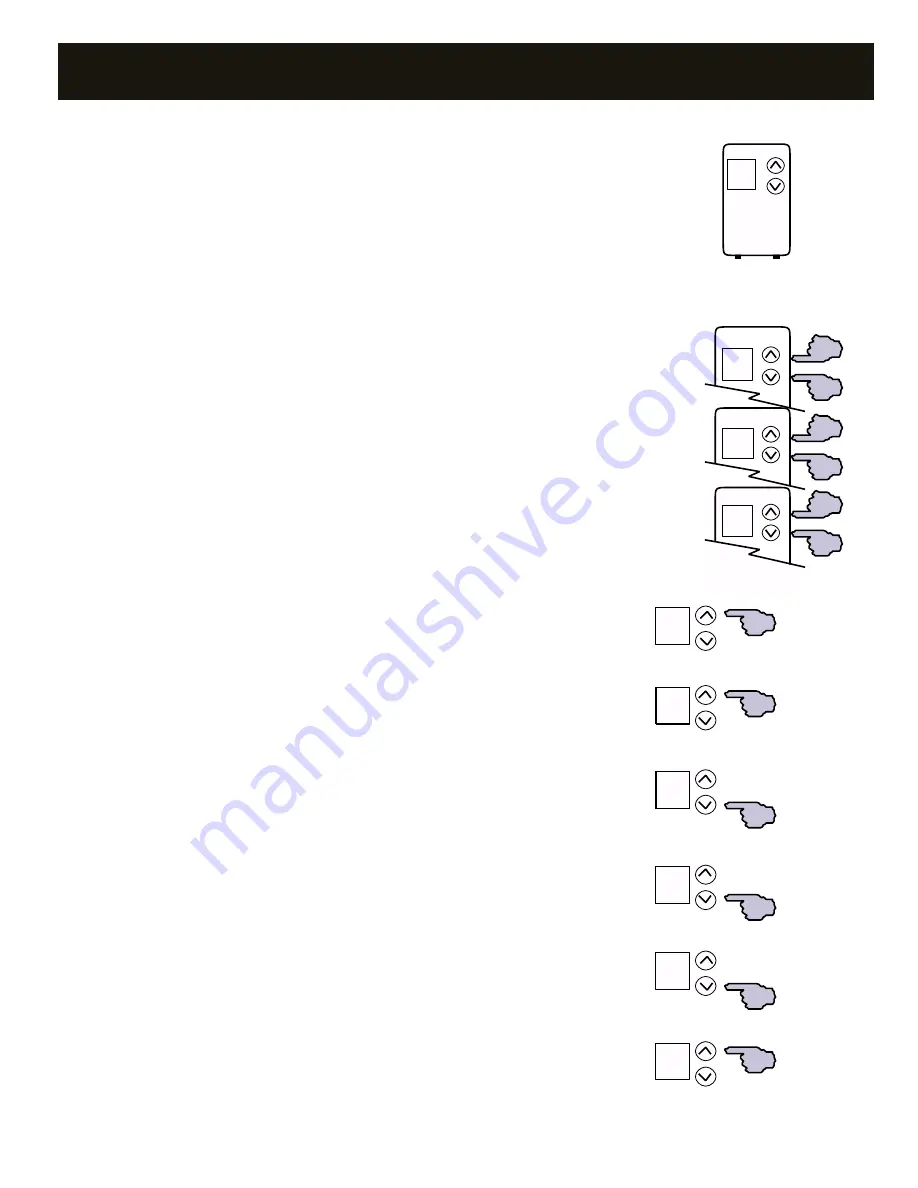
View mode:

To view the current mode, press the top and bottom buttons simultaneously.

The present mode will be displayed by the letter H, C or A. 

Change mode: 

To change the mode, continue simultaneously pressing both the top and bottom

buttons until at the mode desired, then release both buttons.  

SETPOINTS

When the SADIGI thermostat is in Auto or Heat mode, the thermostat will make a heat call when
the room temperature drops two degrees below the heat setpoint and, after running a minimum
of 2 minutes, turn off when the temperature has risen to the heat setpoint. When in Auto or Cool
mode, the thermostat will make a cool call when the room temperature rises two degrees above
the cool setpoint and, after running a minimum of 2 minutes, turn off when the temperature has
dropped to the cool setpoint.

View/change heat setpoint:

The heat setpoint can be viewed when in either Auto or Heat mode.

To view the current heat setpoint in Auto mode, press the top button until “H” appears and then
release.  To view in Heat mode, press either the top or bottom button until “H” appears and then
release. The heat setpoint is displayed after “H”. To change the setpoint, immediately after
the setpoint is displayed press and hold either the top or bottom button until the setpoint is at
the desired value and then release. Approximately two seconds after the button is released the
current room temperature will be redisplayed.

View/change cool setpoint:

The cool setpoint can be viewed when in either Auto or Cool mode.

To view the current cool setpoint in Auto mode, press the bottom button until “C” appears and
then release. To view in Cool mode, press either the top or bottom button until “C” appears and
then release. The cool setpoint is displayed after “C”. To change the setpoint, immediately
after the setpoint is displayed press and hold either the top or bottom button until the setpoint is at
the desired value and then release. Approximately two seconds after the button is released the
current room temperature will be redisplayed.

Summary of Contents for DigiTract 4-2

Page 1: ...DigiTract 4 2 Two Stage Heat Cool Comfort Control System Installation Guide Part DT4MAN Rev April 2003 Zoning Systems That s all we do...

Page 2: ...Heat Pump DTHP4 2 11 Calibration 11 LAS Installation 11 ZONE THERMOSTATS Types 12 Zonex Systems Gas Electric Models 12 Digital SADIGI 12 Digital SADIGI Operation 13 Programmable 101PROG 12 Communicati...

Page 3: ...he auxiliary heat to maintain a minimum supply air temperature of 88 degrees See Capacity Controller section page 11 for further information The Zone Dampers are air valves placed in the forced air du...

Page 4: ...BBD diam Rectangular RBB W x H PROGRAMMABLE DIGITAL 101PROG SADIGI OVER 5 TONS ELECTRONIC BYPASS Round STMPD diam Rectangular STCD W x H STATIC PRESSURE CONTROLLER 101ASPC BYPASS TRANSFORMER FIELD SUP...

Page 5: ...e LAS downstream of the bypass takeoff Ensure wire polarity is correct Refer to CAPACITY CONTROLLER LAS INSTALLATION on P 11 for further information NOTE Shielded conductor provided for installations...

Page 6: ...er sized and fused for the total number of zone dampers See DAMPER TRANSFORMER on page 23 Emergency heat terminal E Use only if emergency heat source is different from auxiliary heat W2 If used do not...

Page 7: ...1AMPD 101MRTD 101CD DAMPER RELAY BOARD R C MC RC W W Y RO TB2 TB1 N C N C N C N C N C N C N C N C 101 SERIES DAMPER TO ADDITIONAL 101 SERIES DAMPERS IF APPLICABLE FUSED 24VAC XFMR Transformer and fuse...

Page 8: ...nating Dampers for the zones not calling for cool are powered closed and the dampers for the zones calling for cool are left open This is indicated by the DPR LEDs If the DPR LED is illuminated on the...

Page 9: ...o know this number if conferring with technical support F Heat Mode Fan Control Selection Jumper In the A position the blower is energized by the furnace when heat is energized gas furnaces In the B p...

Page 10: ...e if the System Controller receives a call for the opposite mode the System Controller will continue to run in the current mode for 15 minutes or until all current calls are satisfied Then the System...

Page 11: ...per is closed STATUS LEDs O B Y1 Y2 G W2 PWR DPR MODE FUNCTION OFF OFF OFF OFF OFF OFF OFF Off Power off OFF OFF OFF OFF OFF ON OFF On Power on blower off all zones satisfied OFF OFF OFF ON OFF ON 0 V...

Page 12: ...gized G made to R requests that the DTHP4 2 energize the indoor blower fan C Heat pump unit 24V power return C Damper Terminals Connects dampers for up to four zones and damper power supply TR1 TR2 24...

Page 13: ...rgize Y1 and operate with a minimum run time of 4 minutes regardless of the leaving air temperature At the completion of the minimum run time if the leaving air temperature drops below 45 F Y is deene...

Page 14: ...n SADIGIRS 101PROG Programmable dual setpoint single stage heat cool electronic non power robbing auto changeover weekday weekend 5 1 1 programmable manual override capable Thermostat includes a larg...

Page 15: ...n the room temperature drops two degrees below the heat setpoint and after running a minimum of 2 minutes turn off when the temperature has risen to the heat setpoint When in Auto or Cool mode the the...

Page 16: ...d easy spring open operation A cross pin on the motor shaft provides positive direct drive to the damper blade shaft without a coupling or set screws allowing for a quick and easy motor change if requ...

Page 17: ...19 21 PART 101AMPD06 101AMPD08 101AMPD10 101AMPD12 101AMPD14 101AMPD16 101AMPD18 6 8 10 12 14 16 18 Nominal CFM Duct Diameter Duct Velocity FPM Damper P WC 10 12 14 16 6 8 7 9 410 660 1450 1000 110 25...

Page 18: ...ully closed and cycle off when the damper is opening or in the full opened position Since this is a spring open damper in the event of power failure the damper fails to the full open position RECTANGU...

Page 19: ...MOTOR 48 MAXIMUM WIDTH A Rectangular heavy duty dampers should operate at 1500 FPM E G A 24 x 12 damper 2 square feet 2 square feet X 1500FPM 3000 CFM 4 200 280 390 490 700 1090 1500 2000 2500 3000 36...

Page 20: ...tic pressure and noise at the diffusers Zonex Systems offers two types of bypass dampers Barometric and Electronic Each is available in round or rectangular configuration Barometric bypass dampers are...

Page 21: ...or 5 minutes to equalize pressure Then make sure all dampers are open by checking for air flow out of each damper c By moving counter weight up or down the lever arm adjust it so that the damper just...

Page 22: ...olume is 400 CFM and we have a four ton system Thus the air volume we need to bypass is 400 4 400 which equals 1200 CFM Using the ROUND BYPASS SELECTION TABLE we would select a 12 inch bypass since it...

Page 23: ...16500 18333 20167 22000 48 12000 14000 16000 18000 20000 22000 24000 8 10 12 14 16 18 20 22 8 667 833 1000 1167 1333 1500 1667 1833 10 833 1042 1250 1458 1667 1875 2083 2292 12 1000 1250 1500 1750 200...

Page 24: ...ass damper is Closed Bypass dampers using a square motor have a grey release lever on the bottom side of the damper near motor to manually open or close the damper c At 101ASPC Static Pressure Control...

Page 25: ...ng system go to step 12 2 At System Controller a Disconnect LAS sensor at terminals and place jumper wire between terminals b Turn power switch ON 3 Turn off all thermostats except zone 1 4 At zone 1...

Page 26: ...ext zone a Verify air is not coming out of register diffuser b At thermostat b 1 Set power switch on b 2 Set to Heat mode b 3 Set Fan switch to Auto mode b 4 Set heat setpoint several degrees above ro...

Page 27: ...Thermostat has cooling anticipator compensator Remove anticipator Air flow too low over evaporator Isolate and correct air flow problem Bypass damper opening prematurely Adjust bypass damper closed w...

Page 28: ...Fax 714 898 6802 Visit our Web Site http www hvaccomfort com E mail us at calecon hvaccomfort com PATENTED PRODUCT Zonex Systems reserves the right to discontinue or change at any time specifications...

Reviews: