30
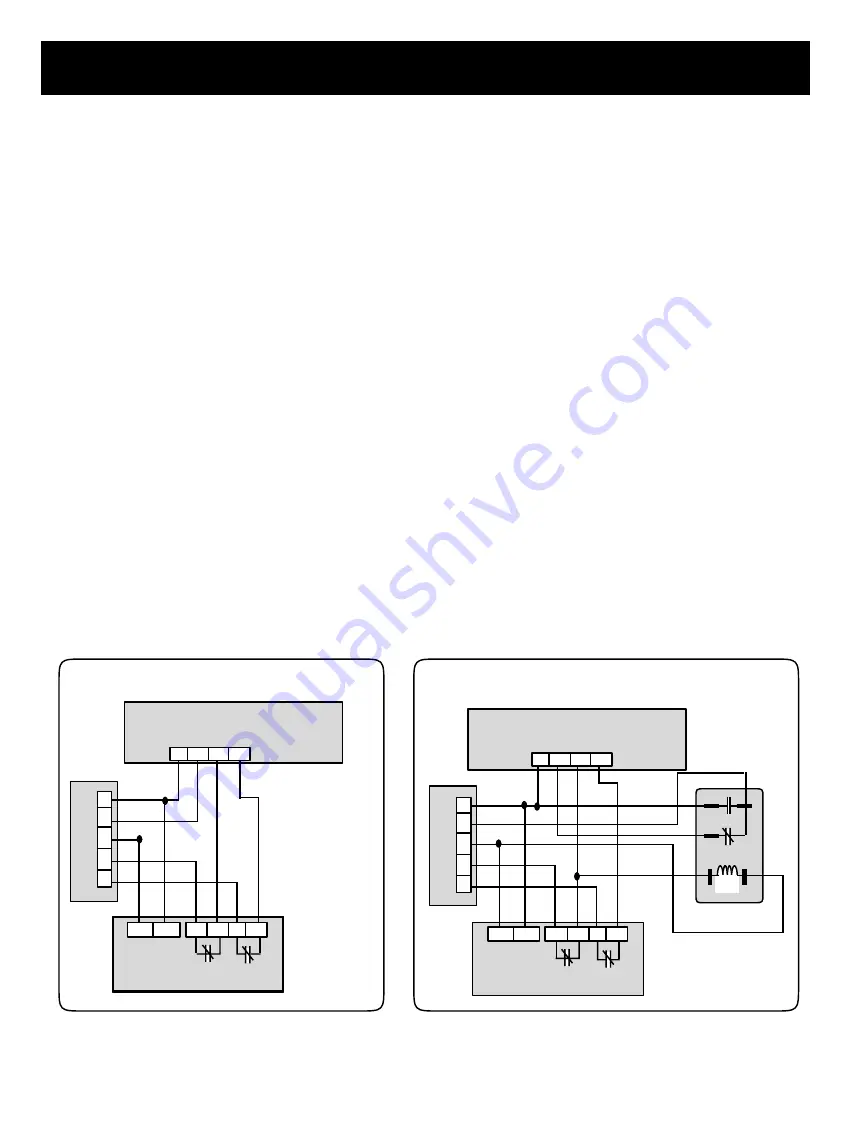
The 101CAPGE is installed as detailed in the Capacity Controllers
installation section, Page 40. The following wiring diagrams show how
to wire the 101CAPGE to the System Controller and the HVAC unit.
Terminals TR1 and TR2 of the 101CAPGE can be wired either to R and C
of the HVAC Unit or to TR1 and TR2 of the System Controller.
There are two ways of wiring the 101CAPGE: without a fan relay and with
a fan relay.
Use the “Without Fan Relay” drawing if the indoor blower fan will be
running continuously or the furnace keeps the indoor blower fan on for
at least three minutes after the heat call is removed (W de-energized).
Use the “With Fan Relay” drawing if the indoor blower fan will not be
running continuously and the furnace does not keep the indoor blower fan
on for at least three minutes after the heat call is removed (W de-energized).
The relay is a SPDT, 24V AC.
System Controller (101ASSB)
Switching Center (SYGE)
101CAPGE
K1a
K1b
H
V
A
C
U
N
I
T
Y
W
C
G
R
R
G
W
Y
Y1
Y1
W1
W1
TR1
TR2
Without Fan Relay
With Fan Relay
K1a
K1b
H
V
A
C
U
N
I
T
Y1
Y1
W1
W1
TR1
TR2
SPDT, 24V
AC Relay
Y
W
C
G
R
101CAPGE
System Controller (101ASSB)
Switching Center (SYGE)
R
G
W
Y
4
2
5
1
3
CAPACITY CONTROLLERS – 101CAPGE
G.
HVAC/System Controller Interface Terminals
– Y1 controls
the A/C compressor and W1 controls the furnace. W1 controls the
first stage furnace and W2 controls second stage. One Y and W connect
to the System Controller, the other Y and W connect to the HVAC unit.
It does not matter which W/Y connects to the System Controller and
which connects to the HVAC unit. See WIRING section for detailed
wiring instructions.
H.
Power Source Terminals
– Connect to 24V AC power source.
Recommend using either the HVAC unit transformer or the System
Controller transformer. 101CAPGE uses less than 2 VA of power. See
WIRING section for detailed wiring instructions.
I.
Power Switch
– When off, the display is off, the 101CAPGE is
disabled and the relay contacts are closed. The HVAC unit can run at
this time but will not have capacity control protection. When the
switch is on, the display is on and the 101CAPGE is operational.
J.
Setpoint Adjustment
– Use the UP/DN buttons to view and change
the cut-out setpoints. Refer to the Setpoints, Calibration section (Page
41) for reading and adjusting the setpoints.
K.
Board Number
– This number indicates the circuit board number
and revision. You may need to know this number if conferring with
technical support.
101CAPGE WIRING


