27
ZOOM UIB-01
UIB-01
Applications
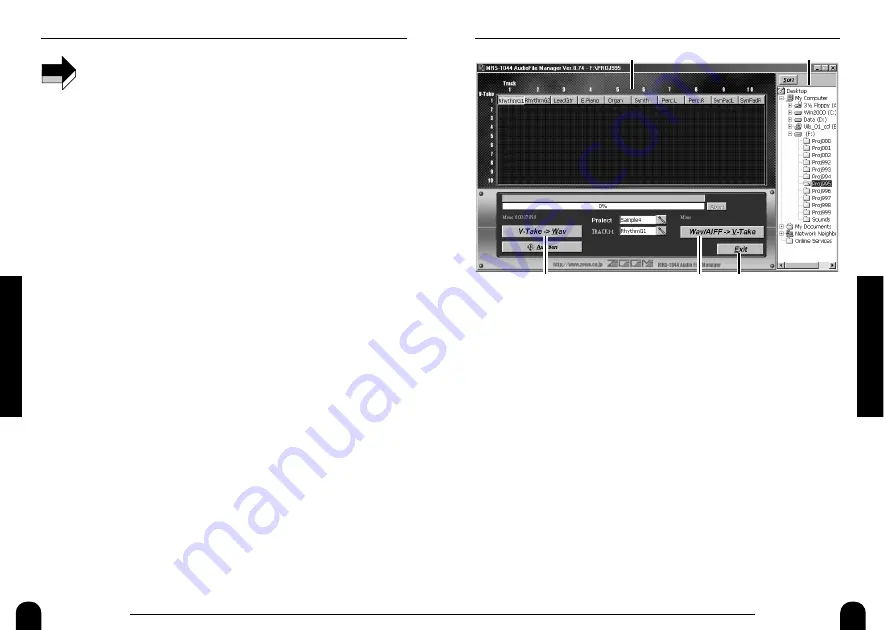
(1) Tree view :
Shows all drives connected to the computer as well as
any network drives in a tree configuration. From this view, you can
select a project in the MRS-1044.
(2) Track/V-take window :
The track/V-take configuration of the
currently selected project can be checked here. At V-take positions
where audio data are recorded, a button with the name of the V-take is
shown.
(3) V-Take
→
Wav button :
Clicking on this button will cause the audio
data of the V-take selected in the track/V-take window (2) to be
exported to a WAV file (file extension: WAV).
(4) Wav/AIFF
→
V-Take button :
Clicking on this button will cause the
audio data of a WAV file (file extension: WAV) or AIFF file (file
extension: AIF) to be imported to the V-take selected in the track/V-
take window (2).
(5) Exit button :
Shuts down the Audio File Manager program.
2.
To terminate the Audio File Manager, click on the [Exit]
button.
26
ZOOM UIB-01
UIB-01
Applications
•
To return the MRS-1044 to the factory condition, be sure to use
the Factory Recovery Tool. Simply copying the FACDAT folder to
the MRS-1044 will not perform a restore, and the MRS-1044 will
not operate normally.
Using the Audio File Manager
The CD-ROM supplied with the UIB-01 also contains the "Audio File
Manager" application program that serves for exchanging audio data
between the computer and the MRS-1044. Using this program, you can
convert any V-take of the MRS-1044 into a WAV file, or convert existing
WAV/AIFF files into V-takes of the MRS-1044.
This section contains a simple description of the Audio File Manager. For
details on using the program, please refer to the Operation Manual that is
supplied as a PDF file in the same "UTY" folder as the Audio File
Manager. This software may be periodically updated without notice.
To obtain the latest information, please visit the web site of Zoom
Corporation (http://www.zoom.co.jp).
Installing the software
1.
Insert the supplied CD-ROM into the CD-ROM drive of the
computer, and double-click on the "UIB_01_CD" icon in
"My Computer".
2.
Click on the "UTY" folder, and select [Copy] from the [Edit]
menu on the menu bar.
3.
Open the destination drive/folder and select [Paste] from
the [Edit] menu on the menu bar.
The "UTY" folder with the Audio File Manager is copied to the hard
disk.
Starting the Audio File Manager
1.
Open the copied "UTY" folder and double-click on the
"TakeWave" icon.
The Audio File Manager program starts up. The program has the
following main functions.
(2)
(3)
(4)
(5)
(1)
NOTE


