background image


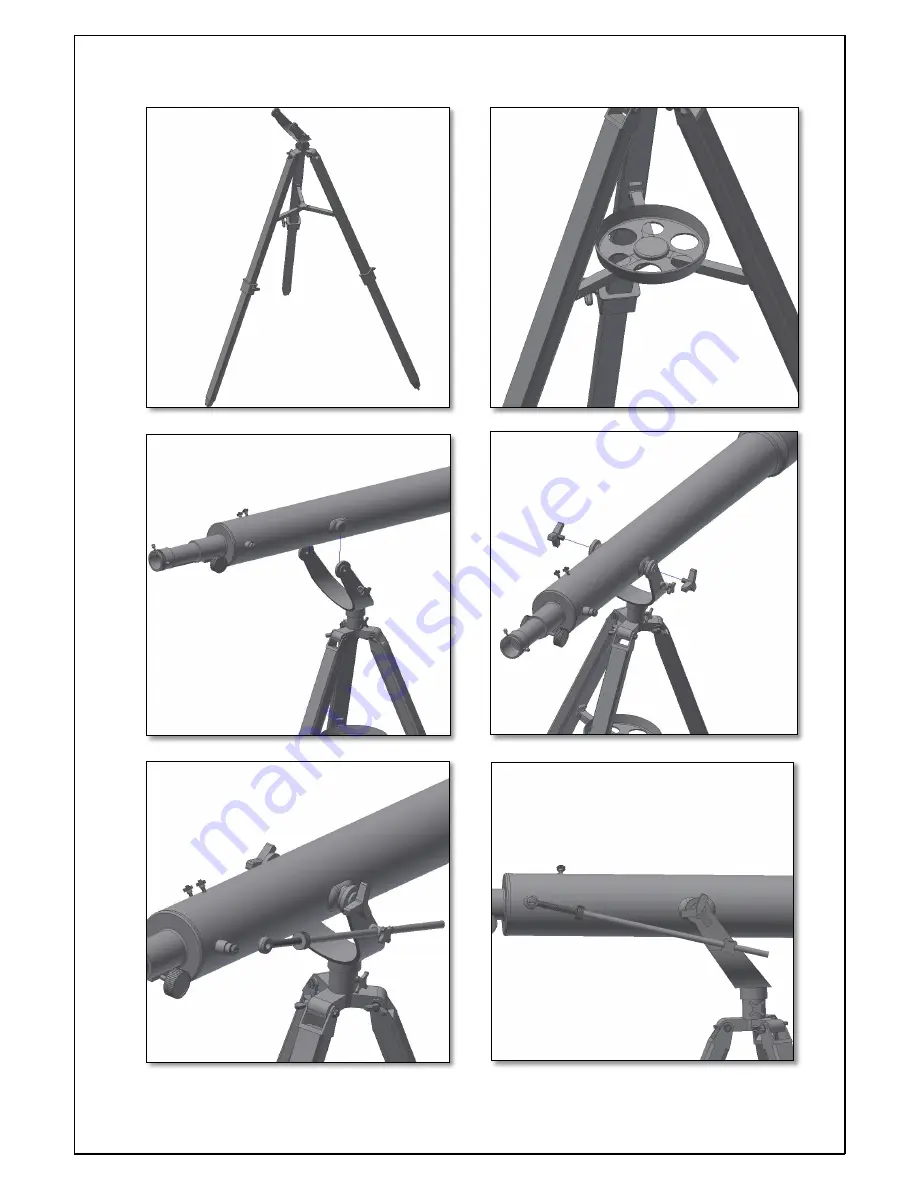
Figure 2. Tripod assembly. 

Figure 3. Tray placement. 

Figure 4. Place tube on the fork mount. 

Figure 5. Secure the tube with the supplied hand knobs. 

Figure 6. Insert fine focusing shaft. 

Figure 7.Fine focusing shaft in place. 

Summary of Contents for Viking 60 AZ

Page 1: ...1 Instruction Manual Viking 60 AZ English version 8 2014 Rev A...

Page 2: ...ies Different accessories combinations give different results such as different image magnifications or correct image But all this will be explained in detail in the next pages 3 Assembly Start by set...

Page 3: ...2 Tripod assembly Figure 3 Tray placement Figure 4 Place tube on the fork mount Figure 5 Secure the tube with the supplied hand knobs Figure 6 Insert fine focusing shaft Figure 7 Fine focusing shaft...

Page 4: ...broader field of view than that of the telescope Aligning means matching the telescope image to the image of the center of the finderscope This way when looking through the finderscope one know the t...

Page 5: ...e see the same building but in this case the chimney is not centered We adjust the finderscope using the three thumbscrews so that the finderscope moves slightly This is enough to correct the objects...

Page 6: ...900mm H20 eyepiece focal length is 20 mm 900 20 45 This means that the H20 eyepiece provides a 45x power magnification This seems low but try it you will see a a bright image with some very good deta...

Page 7: ...ator between illumated and dark surfaces 6 2 Jupiter is the biggest planet of our solar system It is also on of the favorite targets for beginners Galileo was able to discover that the four tiny dots...

Page 8: ...s designed for visual use It doesn t mean it can t be used for photography however it will be hard to get high quality pictures with this telescope If you have a smartphone you can shoot the Moon or s...

Reviews: