background image

3D Printer User Guide

Inkspire 2

Summary of Contents for Inkspire 2

Page 1: ...3D Printer User Guide Inkspire 2 ...

Page 2: ...ology Glossary 12 First Use Preparation 15 Connecting the printer to a network 22 Firmware Update 26 Navigating through the Menu 27 Changing the Resin 29 Platform Calibration 31 Z SUITE Installation 33 How to Start Remove and Post Process a Print 34 Available Materials 40 Basic Maintenance and Service Work 41 Support and Troubleshooting 45 Error Messages 47 Specification 50 Recycling 52 Certificat...

Page 3: ...n installation usage storage and disposal Furthermore the users should take into consideration the risk of possible damage of the device resulting from defects in material and workmanship The users are responsible for qualifying and determining the intended use of 3D printed models The Manufacturer takes no responsibility for any use of printed objects especially when those objects constitute a pa...

Page 4: ...cations displayed on the screen Turn off the printer and empty the resin vat once the printing process is finished Monitor your device for wear and tear regularly Contact our Support Center via the support form at https support zortrax com support form for assistance while replacing worn or broken parts Keep the printer away from heat sources flammable materials equipment emitting radiation source...

Page 5: ... the printer and do not use electronic replacement parts other than those recommended by the Manufacturer Replace electronic units according to the instructions and be particularly careful while using the tools supplied with the printer Before plugging the power cable into the outlet make sure that the power supply voltage in the outlet matches the required value provided on the nameplate at the b...

Page 6: ... careful while removing prints from the platform Always wear gloves and glasses The FEP film that is installed in the resin vat is very thin and fragile therefore special care should be taken when cleaning installing and disassembling the vat Risk of Burns There is no risk of burns as all components working in high temperatures are enclosed and protected from being touched Constructional modificat...

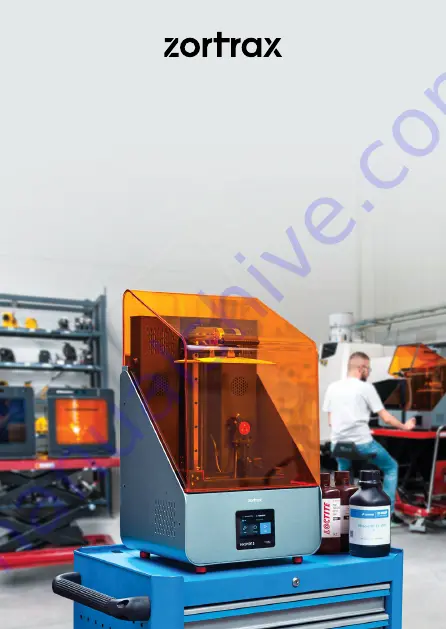
Page 7: ...ng Station constitutes the whole 3D printing ecosystem The printer makes it possible to turn digital three dimensional projects into reality using the UV LCD technology which relies on curing liquid photopolymer layer after layer The UV LCD technology involves projecting an image of a layer on the transparent underside of the vat with liquid resin and curing the layer using backlight from an integ...

Page 8: ...re off time or how many support structures should be generated The file is then ready to be printed To start the printing process turn the printer on prepare the resin type which corresponds with the one you have chosen in Z SUITE and carefully place the resin bottle in the holder at the back of the printer Next open the cap of the bottle and insert the resin tube into the bottle and start the loa...

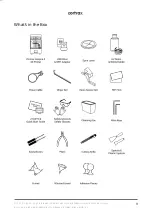
Page 9: ...2022 Zortrax S A All rights reserved All trade names logos and trademarks mentioned in the following document are registered trademarks of Zortrax and are subject to legal protection 9 What s in the Box ...

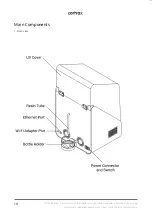
Page 10: ...Zortrax S A All rights reserved All trade names logos and trademarks mentioned in the following document are registered trademarks of Zortrax and are subject to legal protection 10 Main Components 1 Back view ...

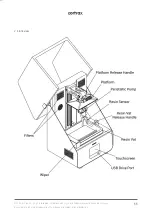
Page 11: ... 2022 Zortrax S A All rights reserved All trade names logos and trademarks mentioned in the following document are registered trademarks of Zortrax and are subject to legal protection 11 2 Front view ...

Page 12: ...nitors all the data in the device It also gives the possibility to enable disable the printer s functions FEP FILM the transparent foil which is installed in the rack attached to the resin vat It creates a clean way for the UV light to quickly and precisely cure liquid resin during the whole printing process The FEP film requires replacement once it becomes stretched or deformed LCD SCREEN the fla...

Page 13: ...n STARTER KIT several pieces of equipment that are put together in one set and delivered with the printer The set contains tools and protective equipment including for example FEP films funnels and spatulas The tools from the starter kit are required for operating the printer as well as for performing maintenance work SUPPORT STRUCTURES special 3D printed structures in the form of pillars which en...

Page 14: ...o resin sedimentation ZCODEX a file format which contains a model prepared for 3D printing with previously selected print settings such as layer exposure time exposure off time additional support exposure time etc All print settings can be managed in Z SUITE before generating the zcodex but it is still possible to change some of the settings during the printing process using options from the menu ...

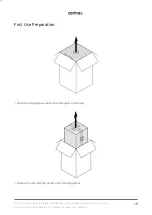
Page 15: ... and trademarks mentioned in the following document are registered trademarks of Zortrax and are subject to legal protection 15 First Use Preparation 2 Remove the box with the printer from the shipping box 1 Open the shipping box and remove the upper cushioning ...

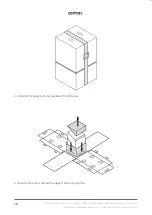
Page 16: ...ames logos and trademarks mentioned in the following document are registered trademarks of Zortrax and are subject to legal protection 16 3 Unfasten the safety belt and separate it from the box 4 Open the box Next remove the upper cushioning and foil ...

Page 17: ...in the following document are registered trademarks of Zortrax and are subject to legal protection 17 5 Open the UV cover by pushing it backwards 6 Plug the power cable in A turn the printer on and wait until the platform automatically moves up Next remove the box with the Starter Kit B ...

Page 18: ...g document are registered trademarks of Zortrax and are subject to legal protection 18 7 Turn the printer off and remove the cushioning from the resin vat 8 Place the printer on a flat and stable surface Align the unit by tightening or loosening the printer s legs manually as needed Use a spirit level ...

Page 19: ... and trademarks mentioned in the following document are registered trademarks of Zortrax and are subject to legal protection 19 9 Loosen the release handle A and slide the lock to the right B Next remove the resin vat C 10 Remove the sticker from the LCD screen ...

Page 20: ...ademarks of Zortrax and are subject to legal protection 20 12 Fasten the wiper holder to the wiper blade A using the two screws Next install the wiper in the vat insert the wiper in the holder and secure it with the screw B 11 Install the resin vat back in its place A press the lock to the left B and tighten the release handle C ...

Page 21: ...tection 21 13 Plug the resin sensor cable into the resin sensor shaft cover and secure the sensor to the printer s housing with the two screws A Next install the sensor onto the shaft cover metal pin B Place the metal pin in the vertical position to block the resin sensor C 14 Plug the bottle holder cable in and secure the holder to the back of the printer with the two screws ...

Page 22: ...be connected to a local network in two ways via Wi Fi or an Ethernet cable Both methods allow you to manage the printer directly from Z SUITE and make it possible to remotely transfer zcodex files from your computer to the printer To connect the printer to a Wi Fi network open the Settings menu and select Wi Fi From the list of available networks choose your network and if it s required enter the ...

Page 23: ...d trademarks of Zortrax and are subject to legal protection 23 To connect the printer with an Ethernet cable create a local network and connect the router modem switch to the printer The connection will be established automatically You can control the Ethernet connection settings in the main menu select Settings and Ethernet ...

Page 24: ...ject to legal protection 24 Once your printer is connected to the network open the My Devices panel in Z SUITE You can search for devices available in the local network and add them to the program s panel Select the icon with your printer s IP address and click on it to add the printer to the panel You can also add a printer manually by typing its IP address ...

Page 25: ...protection 25 Each added printer can easily be managed in Z SUITE You can start stop and pause the printing process see the printer s current state Ready to Print Printing Paused Offline change the name of your printer or preview basic information about the printer In the 3D Printer Files tab you can preview all zcodex files that are stored on the printer s USB flash drive ...

Page 26: ...rmware updates and starts the installation process You can also check if there is a newer firmware version available at any point of working with the Zortrax Inkspire 2 and update the firmware Select Settings About Printer Check for updates If you have decided not to connect the printer to the Internet check https support zortrax com downloads regularly for updates To update the firmware transfer ...

Page 27: ...can either move the platform up or down or set it in the home position Calibration this option activates the procedure of platform calibration Resin level control system the submenu with all options useful to manage the resin level system Level sensor calibration this option allows you to perform resin sensor calibration Material weight sensor calibration this option allows you to perform calibrat...

Page 28: ...s option allows you to change the language of the menu Working options Resin level control type here you can set the type of resin level control automatic or manual Resin level control this option enables disables the resin level control in the device Wiper this option enables disables the wiper in the device Buzzer this option enables disables the buzzer in the device Software autoupdater this op...

Page 29: ...e subject to legal protection 29 Changing the Resin 1 Open the UV cover by pushing it backwards 2 Select Tools and then Material Choose the resin type you re going to use Next the printer will start the procedure of cleaning the resin vat If you haven t filled the resin vat with resin yet or you have properly cleaned the vat before you can skip this step ...

Page 30: ...os and trademarks mentioned in the following document are registered trademarks of Zortrax and are subject to legal protection 30 3 Next carry out resin level sensor calibration Follow the instructions provided on the screen 4 Your device is ready to be used ...

Page 31: ...ollowing document are registered trademarks of Zortrax and are subject to legal protection 31 Platform Calibration 1 Open the UV cover by pushing it backwards 2 Start the calibration with the options from the menu Select Tools and then Calibration Follow the instruc tions provided on the screen ...

Page 32: ...rax S A All rights reserved All trade names logos and trademarks mentioned in the following document are registered trademarks of Zortrax and are subject to legal protection 32 3 Your printer is ready to be used ...

Page 33: ...e latest Z SUITE update can be found in the Downloads section at https support zortrax com To download and install Z SUITE you can enter the serial number of your printer or your email address This number can be found in the printer s menu Settings About Printer and on the nameplate at the back of the printer Remember to update Z SUITE regularly All updates are available at https support zortrax c...

Page 34: ...r wiping up liquids Note Printing and post processing waste including empty bottles failed prints supports rafts as well as paper towels with resin residues should be put in the UV Station or in any source of UV light before disposal Uncured resin has to be disposed of in accordance with national and local regulations concerning hazardous waste Detailed information regarding usage and waste dispos...

Page 35: ...tection 35 2 Open the main menu and select Material Choose the resin type you re going to use Follow the instruc tions provided on the screen Place the resin bottle in the bottle holder at the back of the printer remove the cap and insert the resin tube into the bottle 3 Transfer the file to the printer via Wi Fi Ethernet or using the USB drive and start the printing process ...

Page 36: ... to legal protection 36 4 Once the printing process is finished wait until the resin fully drains off of the model Open the top cover 5 Wipe the top edges of the platform with a paper towel Next open the platform release handle and detach the platform from the holder Be careful not to spill the liquid resin on the printer and its surroundings Close the top cover ...

Page 37: ...t to legal protection 37 6 Immediately attach the platform onto the holder in the Cleaning Station and close the handle The model cannot be exposed to the UV light 7 Turn the device on Cleaning time depends on the size of models and the resin type used Suggested cleaning time is provided in Z SUITE while exporting the zcodex file or at https support zortrax com ...

Page 38: ...o legal protection 38 8 Leave the platform with the model to air dry and ensure that the model isn t exposed to the UV light until it s completely dry You can use compressed air for better and faster drying Open the release handle and detach the platform from the holder 9 Next remove the model from the platform Remove the raft and support structures from the model ...

Page 39: ...s mentioned in the following document are registered trademarks of Zortrax and are subject to legal protection 39 10 Install the platform back in the printer 11 Place the model on the glass table in the Curing Station and start the curing process using options from the menu ...

Page 40: ...e already used resin after each print Mix it with the fresh resin to make sure that there are no cured remains in the liquid as they could have a negative influence on the quality of the next print Mixing used and fresh resin also helps to extend the resin lifespan Available Materials The complete offer of materials is available at https zortrax com resins Material Technical Data Sheets and Safety...

Page 41: ... maintenance before each print and some every few hundred working hours All maintenance activities do not take much time and are not complicated Before commencing any repair it is important to turn off the printer and let it cool down Remember to always wear gloves and glasses The printer is delivered with a full set of tools needed to carry out maintenance service work The following tables presen...

Page 42: ... paper towels If it s necessary use IPA paper towels IPA safety gloves Checking the degree of wear of the filters and if it s necessary cleaning them Every 500 working hours Replacing the filters Every 3 4 months The filters are installed at the back of the printer s housing New filters Cleaning the LCD screen Every time the resin vat is removed Soak a paper towel in IPA and clean the LCD screen p...

Page 43: ...sin to check if there are any residues in the liquid a plastic spatula safety gloves Checking if there are residues of cured resin on the FEP film Before each printing process Empty the resin vat If there are any residues of cured resin on the FEP film remove them using a plastic spatula a plastic spatula safety gloves Emptying and cleaning the resin vat Every time the resin type or color is chang...

Page 44: ...cessary accessories Cleaning the platform Before each printing process Cured resin should be removed using a spatula Liquid resin should be removed using a pa per towel spatula paper towels Calibration After each failed print Adjust the platform s position and tighten the platform screws The platform has to properly adhere to the LCD screen Run calibration from the menu and follow the instructions...

Page 45: ...re that both the platform and the FEP film are clean that is there are no residues of cured resin on them Filter the already used resin and mix it with the fresh resin to make sure that there are no cured remains in the liquid 3 Carry out platform calibration again 4 Prepare a sheet of sandpaper grit 160 and put it on a flat surface Place the platform on the paper and smooth its surface in a circu...

Page 46: ... sure that while preparing the file in Z SUITE you chose an appropriate printing profile that is the print settings match the type of used resin If the profile is correct enable Additional support exposure time option 5 Check if the FEP film is not bent deformed or perforated Replace the FEP film if you notice such defects 6 Contact the Support Center at http support zortrax com support form ...

Page 47: ...pport Center through the support form https support zor trax com support form 4 Communication issue with LCD screen HDMI signal LCD screen control system error Check if the the HDMI and LCD cables are connected If the problem reoccurs contact Zortrax Support Center through the support form https support zor trax com support form 5 Wrong lamp temper ature Temperature of the UV lamp is too high The ...

Page 48: ...connected If the problem reoccurs contact Zortrax Support Center through the support form https support zor trax com support form 15 Cannot update the firmware An error has occurred while updating the firmware Contact Zortrax Support Center through the support form https support zor trax com support form 17 Communication issue with LCD screen TE signal LCD screen control system error Check if the ...

Page 49: ...rt form 102 Right UV fan not detected Right UV fan wire is discon nected or has been dam aged Contact Zortrax Support Center through the support form https support zor trax com support form 103 Left UV fan not de tected Left UV fan wire is discon nected or has been dam aged Contact Zortrax Support Center through the support form https support zor trax com support form 104 UV fans error UV fans do ...

Page 50: ... LCD screen 8 9 monochrome Light source integrated LED panel wavelength 405 nm ensuring even light distri bution across the entire platform Supports mechanically removed printed with the same material as the model Device Build Volume 192 x 120 x 280 mm 7 56 x 4 72 x 11 02 in Platform pre calibrated during quality control immediately ready for 3D printing Connectivity Wi Fi LAN USB Operating system...

Page 51: ...0 40 C 68 104 F Storage Temperature 0 35 C 32 95 F Electrical AC Input 100 240 V AC 6 2 A 50 60 Hz Maximum Power Consumption 340 W Software Software Bundle Z SUITE 2 Supported File Types stl obj 3mf dxf only 2D models ply Supported Operating Systems Mac OS Mojave and newer versions Win dows 7 and newer versions Additional information All information contained in this User Guide and specication is ...

Page 52: ... information regarding usage and waste disposal of the liquid detergent utilized to clean 3D prints should be found in the SDS delivered by the producer of the liquid Waste electrical and electronic equipment This symbol indicates that it is electrical and electronic equipment which must not be disposed of with household waste Substances contained in the equipment may be harmful to natural environ...

Page 53: ...office office zortrax com technical support support zortrax com more information zortrax com update 24 10 2022 2022 Zortrax S A All rights reserved ...

Reviews: