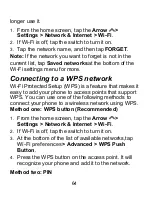
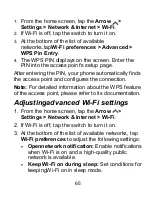
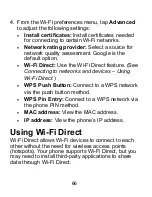
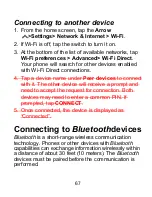
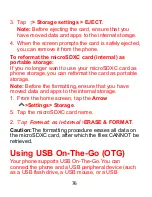
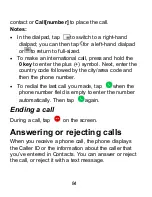
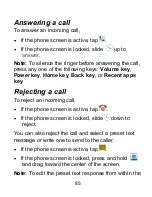
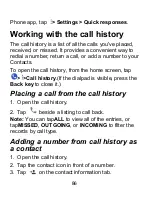
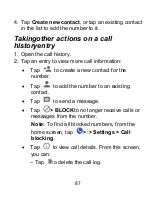
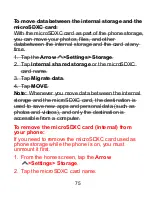
background image


74 

FORMAT

.


Caution:

The formatting procedure erases all data on 

the microSDXC card, after which the files CANNOT be 
retrieved. 

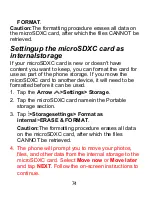
Settingup the microSDXC card as 
internalstorage 

If your microSDXC card is new or doesn't have 
content you want to keep, you can format the card for 
use as part of the phone storage. If you move the 
microSDXC card to another device, it will need to be 
formatted before it can be used. 
1.  Tap the 

Arrow

>Settings> Storage

.


2.  Tap the microSDXC card namein the Portable 

storage section.


3.  Tap

>Storagesettings> Format as 

internal

>

ERASE & FORMAT

.


Caution:

The formatting procedure erases all data 

on the microSDXC card, after which the files 
CANNOT be retrieved. 

4.  The phone will prompt you to move your photos, 

files, and other data from the internal storage to the 
microSDXC card. Select 

Move now

 or

 Move later


and tap 

NEXT

. Follow the on-screen instructions to 

continue. 

Summary of Contents for Blade X2 Max

Page 1: ...1 ZTE Blade X2 Max User Guide ...

Page 2: ...available outside of Cricket Please review the terms and conditions and the associated privacy policy for each location based service to learn how location information will be used and protected In addition your Cricket phone may be used to access the Internet and to download and or purchase goods applications and services from Cricket or elsewhere from third parties Cricket provides tools for you...

Page 3: ...Laboratories Dolby Dolby Audio and the double D symbol are trademarks of Dolby Laboratories Qualcomm and Snapdragon are trademarks of Qualcomm Incorporated registered in the United States and other countries Used with permission Other marks are the property of their respective owners ...

Page 4: ... touch screen 19 Getting to know your phone 21 Key functions 23 Getting to know the home screen 24 Extending thehome screen 25 Personalizing 27 Changing the system language 27 Setting the date and time 27 Changing the ringtone and notification sound 28 Turning system sounds on off 29 Adjusting volumes 29 Switching to silent or vibration mode 30 Using Do Not Disturb mode 30 Applying new wallpapers ...

Page 5: ...8 Rearranging the primary shortcuts 48 Entering text 49 Gboard Google keyboard 50 Google voice typing 53 Editing text 53 Opening and switching apps 55 Using two apps in split screen mode 56 Uninstalling or disabling an app 57 Connecting to networks and devices 59 Connecting to mobile networks 59 Connecting to Wi Fi 62 Using Wi Fi Direct 66 Connecting to Bluetoothdevices 67 Connecting to your compu...

Page 6: ...ing options during a call 89 Managing multi party calls 90 Adjusting your call settings 92 Contacts 100 Checking contact details 100 Adding a new contact 100 Setting up your own profile 101 Importing exporting and sharing contacts 101 Working with favorite contacts 103 Searching for a contact 104 Editing contacts 105 Accounts 107 Adding or removing accounts 107 Configuring account sync 108 Email 1...

Page 7: ... 116 Adding an attachment 118 Replying to a message 120 Forwarding a message 120 Deleting messages or threads 121 Changing message settings 121 Calendar 122 Viewing your calendars and events 122 Creating an event 123 Editing deleting or sharing an event 124 Changing calendar settings 125 Searching an event 125 Browser 126 Opening the browser 126 Setting the home page 126 Using multiple browser win...

Page 8: ...s 135 Gallery 138 Opening the Gallery app 138 Working with albums 138 Working with pictures 139 Retouching your pictures 141 Making a GIF or a collage 143 Playing videos 144 Music 145 Viewing your music library 145 Setting a song as the default ringtone 146 Playing music 146 Managing playlists 149 Video 150 Opening the video library 150 Playing and controlling videos 150 Managing video files 153 ...

Page 9: ...r radio region 156 Voice Recorder 157 Recording a voice memo 157 Playing a voice memo 157 Playing and managing memos 157 More apps 159 Calculator 159 Clock 159 Dolby Audio 160 Downloads 161 File Manager 161 Google Apps 163 Sharecare 164 Z Assistant 165 Z Backup 166 Settings 167 Network Internet 167 Connected devices 170 Apps notifications 171 ...

Page 10: ...he phone software 187 Troubleshooting 188 Health and safety information 195 General safety 195 Radio frequency RF energy 197 FCC regulations 199 Hearing aid compatibility HAC regulations for mobile phones 200 CTIA requirements 203 Distractions 205 Product handling 205 Electrical safety 210 Radio frequency interference 211 Explosive environments 213 ...

Page 11: ...11 Warranty 215 Consumer limited warranty 216 How to get warranty service 221 Other warranty programs 221 Specifications 222 ...

Page 12: ...cting to networks and devices Using the microSDXC card as portable or internalstorage Note Your phone will come with the nano SIM card already installed Warning To avoid damage to the phone do not use any other kind of SIM card or any nonstandard nano SIM card cut from a SIM card You can get a standard nano SIM card from your service provider 1 Insert the tray eject tool into the hole on the nano ...

Page 13: ...13 2 Place the nano SIM card and microSDXC card on the tray with the gold colored contacts facing down 3 Carefully slide the tray back into place ...

Page 14: ...nly ZTE approved chargers and USB Type C cables The use of unapproved accessories could damage your phone or cause the battery to explode Do not remove the back cover The battery is not removable Removal may cause fire or explosion Do not change the built in rechargeable battery in your phone by yourself The battery can only be changed by ZTE or a ZTE authorized service provider Note Use the USB T...

Page 15: ...tus Bar 3 Disconnect the charger when the battery is fully charged Note If the battery is extremely low you may be unable to power on the phone even when it is being charged In this case try again after charging the phone for at least 20 minutes Contact customer service if you still cannot power on the phone after prolonged charging ...

Page 16: ...i usage and GPS functionality can drain your battery You can follow these helpful tips to conserve your battery power Use the Battery saver feature See Settings Battery Reduce the screen backlight time Lower the screen brightness Turn auto sync Wi Fi and Bluetooth off when not in use Disable the GPS function when not in use Most applications using this function will periodically query the GPS sate...

Page 17: ...ting up your phone for the first time When you first power on your phone after you purchase it or reset it to factory settings see Settings System Reset you may need to set it up before using it 1 Tap the language field to select the language you want and tap LET S GO 2 Follow the prompts to set up your Wi Fi connection Google services name device protection and other options Note Users with low v...

Page 18: ...ly turns off the screen after a certain period of time when you leave it idle You will still be able to receive messages and calls while the phone screen is off To unlock the screen and keys 1 Press the Power key to turn the screen on 2 Swipe up from the bottom of the screen to unlock the phone or Press and hold and slide toward the center of the screen to make a call Press and hold and slide towa...

Page 19: ...on and settings icons or press on screen buttons simply tap them with your finger Press and hold To open the available options for an item for example a message or a link in a web page press and hold the item To quickly access shortcut menus for certain apps press and hold the app icon and select from the options Swipe or slide To swipe or slide means to quickly drag your finger vertically or hori...

Page 20: ...hange the screen orientation from portrait to landscape by turning the phone sideways Notes The auto rotate feature needs to be enabled for the screen orientation to automatically change From the home screen tap the Arrow Settings Display Advanced Device rotation Rotate the contents of the screen You can also access the screen rotation control by sliding down the Status Bar twice and tapping Auto ...

Page 21: ...21 Getting to know your phone FPO ...

Page 22: ...2 You can switch the positions of the Back key and Recent apps key From the home screen tap the Arrow Settings Featured Navigation keys and select an option Dual lens camera Flash Fingerprint sensor FPO ...

Page 23: ...play on or off Homekey Press to return to the home screen from any application or screen Press and hold to access Google Assistant Recent apps key Press to see recently used applications Double tap to switch to the most recent application Back key Press to go to the previous screen Volume keys Press or hold to turn the volume up or down ...

Page 24: ... home screen is the starting point for your phone s applications functions and menus You can customize your home screen by adding shortcuts folders widgets and more Status and notification bar Shortcut Folder Primary shortcuts Widgets Arrow ...

Page 25: ...me screen 2 Slide the home screen thumbnails left or right and tap Deleting a home screen panel 1 Press and hold an empty area of the home screen 2 Swipe left or right to view the home screen thumbnails Tap on the top right corner of a thumbnail 3 If the panel is not empty tap OK to confirm The items on the panel will also be removed Note There must be at least one home screen panel Moving a home ...

Page 26: ...26 thumbnails Press and hold a thumbnail and drag it left or right to the place you need Note Tap at the top of a home screen thumbnail to set it as the main home screen ...

Page 27: ...t the one you want 3 Press and hold next to the language you want to use and drag it to the top of the list Note To remove languages from the list tap Remove select the languages you want to delete and then tap OK Setting the date and time 1 From the home screen tap the Arrow Settings System Date time 2 Set the date time time zone and time format To adjust the date and time automatically tap to en...

Page 28: ...at Changing the ringtone and notification sound You can customize the default ringtone for incoming calls and the default notification sound 1 From the home screen tap the Arrow Settings Sound Advanced Ringtones 2 TapRingtones or Default notificationsound 3 Scroll through the list and select the ringtone you d like to use 4 TapOK Notes Many applications have their own notification sound settings S...

Page 29: ...unds and vibrations section tap the switch beside each option to turn it on or off Adjusting volumes 1 From the home screen tap the Arrow Settings Sound 2 Drag the sliders below Ring volume Notification volume Media volume and Alarm volume to adjust the volume for each type of audio Note You can adjust the media volume when a media application is in use by pressing either of the Volume keys If no ...

Page 30: ...keyto switch the phone to vibration mode Press the Volume down key again in vibration mode to switch the phone to silent mode From the home screen tap the Arrow Settings Sound Advanced Notification mode and select Vibrate or Mute to switch to vibration or silent mode Note Refer to Using Do Not Disturb mode below for another method Using Do Not Disturb mode You can limit interruptions with Do Not D...

Page 31: ...pping up on the screen and or from turning on the screen when it is off 3 Under Automatic rules manage rules for automatically turning on Do Not Disturb mode You can tapan existing rule to enable disable modify or delete it or tap Add more to create a new rule There are two types of rules Time rules Do Not Disturb mode will be activated automatically according to the days start time and end time y...

Page 32: ... exception for a specific app from the home screen tap the Arrow Settings Apps notifications Notifications and then tap Notifications again Select the app you want and then tap Override Do Not Disturb to allow its notifications in Priority only mode You can also activate Do Not Disturb mode from the Quick Settings menu Use two fingers to slidethe Status Bardown to open Quick Settings and then tap ...

Page 33: ...iew on the home screen or lock screen 5 Tap to select the current wallpaper and then tap to select where to apply it Home screen Lock screen or Home screen and lock screen Notes Alternatively from the home screen tap the Arrow Settings Display Advanced Wallpaper If you select a photo from My photos you can position and resize the image by swiping zooming Changing the screen brightness 1 From the h...

Page 34: ...he home screen 2 Tap HOME SETTINGS Themes 3 Tap a theme to select it Setting the home screen transition effect 1 Press and hold an empty area on the home screen 2 Tap HOME SETTINGS Desktop Sliding Effects 3 Tap an effect and the phone will demonstrate how it works 4 When you have found an effect you like you can press the Home key to return Protecting your phone with screen locks You can protect y...

Page 35: ...hat you must draw to unlock the screen TapPIN or Password to set a numeric PIN or a password that you must enter to unlock the screen 3 For Pattern PIN or Password lock select whether to protect your phone by requiring your pattern PIN or password before it starts up Note Until your phone starts up it cannot receive calls messages or notifications When this feature is enabled you must unlock your ...

Page 36: ...e photos or answer calls Note The fingerprint feature is available only when a screen lock Pattern PIN or Password is enabled When the screen lock is reset to None or Swipe all registered fingerprints are erased Registering a fingerprint 1 From the home screen tap the Arrow Settings Security Location Fingerprint Fingerprint management 2 Enter the screen lock pattern PIN or password you set If you ...

Page 37: ...ake photo Press the Fingerprint sensor to take a photo when the Camera app is open Answer call Press the Fingerprint sensor to answer incoming calls 3 Tap Fingerprint management and enter your pattern PIN or password 4 Tap to enable the Fingerprint sensor functions you would like Fingerprint verification is required for these actions Wake up and unlock your phone Press the Fingerprint sensor to wa...

Page 38: ...s cannot switch to other apps or access your personal information Turningon screen pinning 1 From the home screen tap the Arrow Settings Security Location Screen pinning 2 Tap the On Off switch 3 If you have set a screen lock you can tap Ask for unlock pattern PIN password before unpinning You will need to draw the pattern or enter the PIN password to unpin the screen Pinning a screen 1 Ensure tha...

Page 39: ...n the front tab 5 Tap GOT IT Unpinning the screen To unpin the screen and return to normal use press and hold the Back key If you enabled the Ask for unlock pattern PIN password before unpinning option unlock the screen with your fingerprint pattern PIN or password depending on your screen lock and fingerprint settings ...

Page 40: ...low are some of the icons you may see Indicators and icons Indicat or What it means Indicat or What it means EDGE 2G connected No signal 3G connected Signal strength 4G connected Airplane mode 4G LTE connected Bluetooth on Silent mode Connected to a Wi Fi network Vibration mode Wi Fi in use Do not disturb mode Alarms only or Priority only Speakerphone on ...

Page 41: ...ired headset connected Battery charging TTY mode on Alarm set Managing notifications The Status Bar at the top of the home screen provides notification icons on the left side Below are some of the icons you may see Indicators and icons Indicato r What it means Indicat or What it means New SMS MMS message s Upcoming event New Email message s ...

Page 42: ...sing the Notification Panel Notifications report the arrival of new messages calendar events and alarms as well as ongoing events such as music playing You can open the Notification Panel to view notification details To open the Notification Panel swipe your finger down on the home screen or from the top of the screen To close the Notification Panel swipe your finger up on the screen or press the ...

Page 43: ...so tap or spread pinch with two fingers to expand or collapse certain notifications and bundled notifications To remove a notification swipe it left or right To remove all nonpersistent notifications tap CLEAR ALLat the end of the list of notifications Some notifications are persistent and cannot be removed until you tap them To manage notifications you have received you can press and hold a notif...

Page 44: ...ettings panel drag down again or tap down arrow You can open the full Quick Settings directly by using two fingers to swipe down from the top of the screen Notes Swipe left on the Quick Settings panel to view more tiles At the bottom of the Quick Settings panel tap to open the full Settings menu To turn settings on or off quickly 1 Open the Quick Settings panel 2 Tap a Quick Settings tile to turn ...

Page 45: ...ile press and hold it and drag it down to Drag here to remove To add a tile press and hold a tile under Drag to add tiles and drag it up to the main Quick Settings panel Managing shortcuts and widgets Addingshortcuts and widgets 1 To view apps from the home screen tap the Arrow or swipe up from the bottom of the screen Or to view widgets press and hold an empty area of the home screen and tapWIDGE...

Page 46: ...ase the item to place it on the new panel Movingshortcuts or widgets 1 Press and hold a shortcut or widget on the home screen 2 Drag it to the place you need Removingshortcuts or widgets 1 Press and hold a shortcut or widget on the home screen 2 Drag it to Removeto remove it Adjustingwidget size 1 Press and hold a widget on the home screen and then release it 2 An outline appears around the widget...

Page 47: ...available options appears beside the shortcut Tap to select an option Notes Not all apps support shortcut menus You can create a home screen shortcut directly to a function from the menu Press and hold the desired function in the list and then drag it to the home screen ...

Page 48: ...ll be created with the shortcut inside 3 To add more shortcuts to the folder press and hold each shortcut and drag it over the folder before releasing it Note To rename a folder tap the folder and then tap the name field Rearranging the primary shortcuts The customizable primary shortcuts area at the bottom of the home screen remains the same on every home screen panel You can keep up to five item...

Page 49: ...g with the Google voice typing feature Enabling or disablinginput methods 1 From the home screen tap the Arrow Settings System Languages input Virtual keyboard Manage keyboards 2 Tap the switches beside the input methods to enable or disable them as options for entering text Note Some default input methods may not be disabled Adjusting input method settings 1 From the home screen tap the Arrow Set...

Page 50: ...en screen auto rotation is enabled turn the phone sideways and the keyboard will change from portrait to landscape The landscape keyboard is not supported in all applications Tap the alphabetic keys to enter letters Press and hold some specific keys to enter associated accented letters or numbers For example to enterÉ press and hold and the available ...

Page 51: ...t case you are using for lowercase for uppercase and when locked in uppercase Tap to delete the text before the cursor Tap to select numbers You can then tap to find more Tap to select emoji and emoticons Tap to use Google voice typing Press and hold to change the input language or set up the Google Keyboard Press and hold and slide to to change to a smaller keyboard for easier one handed typing T...

Page 52: ...ord by sliding from letter to letter on the keyboard To enable and use gesture typing 1 Press and hold while usingGboard and then tap Gboard keyboard settings 2 Tap Glide typing Enable glide typingif this feature is turned off 3 While using Gboard slide your finger from letter to letter to trace a word without lifting the finger until you reach the end of the word Start of the word End of the word...

Page 53: ...ch to text You must have a data connection on a mobile or Wi Fi network to use it 1 While using Gboard tap to access the voice typing feature 2 When you see Speak now besidethe microphone image speak what you want to type 3 You can continue entering text or tap an underlined word to change or delete it Note Say comma period question mark exclamation mark or exclamation point to enter punctuation E...

Page 54: ...CT ALL or more icon SELECT ALL to highlight all of the text for selection Cut or copy Select the text you want to manipulate Then tap CUT or COPY to cut or copy the text to the clipboard Replace text with the clipboard text Select the text you want to replace Then tap PASTE Insert clipboard text to the text field Tap the tab below the cursor Then tap PASTE Share text Select the text you want to sh...

Page 55: ...n the right side of the screen to the initial letter of the app you need or tap the search field at the top of the list To change the order in which apps appear in the list tap dots in the search field Select sort by a z sort by time or sort by frequency Switchingbetween recent apps 1 Press theRecent apps key The apps you ve used recently are displayed in a series of tabs Swipe up and down to see ...

Page 56: ...en mode You can work with two apps at the same time in split screen mode Note Not all apps support split screen mode 1 PresstheRecent apps key to view your recently used apps 2 Press and hold the tab of the first app you want to use and then drag it to Drag here to use split screen 3 If the second app you want to use is in the recent apps list tap its tab If not press the Home key and tap the Arro...

Page 57: ...old an app icon 3 Available options appear around the icon Tap to view the App info menu or Drag the app icon onto the home screen 4 TapDISABLE DISABLE APP or UNINSTALL OK or Drag it to Disable or Uninstall at the top of the screen Tap OK to confirm From the home screen 1 Press and hold an app shortcut on the home screen 2 Drag the icon to to uninstall it 3 Tap OK ...

Page 58: ...ot all apps can be uninstalled or disabled To find disabled applications from the home screen tap the Arrow Settings Apps notifications App info Disabled apps Tap a disabled app and then tap ENABLE to restore it ...

Page 59: ...work Internet Mobile network Mobile Data 2 Slide the Mobile Data switch to enable or disable mobile data use To get data services when roaming internationally 1 From the home screen tap the Arrow Settings Network Internet Mobile network International Data Roaming 2 Slide the Mobile Data switch to enable or disable roaming Note Data roaming may incur significant roaming charges ...

Page 60: ...her this feature is available Disabling 2G service 1 From the home screen tap the Arrow Settings Network Internet Mobile network 2 Slide the Disable 2G switch to enable this feature which disables 2G service on the device Note If 2G service is disabled some apps and functions may not work in areas with limited coverage Setting Access Point Names You can use the default Access Point Name APN to con...

Page 61: ...network operator 1 From the home screen tap the Arrow Settings Network Internet Mobile network Network operators 2 Tap Search networks to search for all available networks 3 Tap a network in the network list to register manually or tap Choose automatically to select the preferred network automatically Note The Network operators option is displayed only when this feature is available Please check w...

Page 62: ... 2 If Wi Fi is off tap the switch to turn it on 3 Tap a network name to connect to it 4 If the network is secured enter the password and tap CONNECT Note Your phone automatically connects to previously used Wi Fi networks when they are in range Gettingnotified of open networks When Wi Fi is on you can receive notifications in the Status Bar when your phone detects a high quality Wi Fi network 1 Fr...

Page 63: ...you first need to get the security details from the network s administrator 1 From the home screen tap the Arrow Settings Network Internet Wi Fi 2 If Wi Fi is off tap the switch to turn it on 3 At the bottom of the list of available networks tapAdd network 4 Enter the network name SSID If necessary enter security or other network configuration details 5 Tap SAVE Forgetting a Wi Fi network You can ...

Page 64: ...ted Setup WPS is a feature that makes it easy to add your phone to access points that support WPS You can use one of the following methods to connect your phone to a wireless network using WPS Method one WPS button Recommended 1 From the home screen tap the Arrow Settings Network Internet Wi Fi 2 If Wi Fi is off tap the switch to turn it on 3 At the bottom of the list of available networks tap Wi ...

Page 65: ...d configures the connection Note For detailed information about the WPS feature of the access point please refer to its documentation Adjustingadvanced Wi Fi settings 1 From the home screen tap the Arrow Settings Network Internet Wi Fi 2 If Wi Fi is off tap the switch to turn it on 3 At the bottom of the list of available networks tap Wi Fi preferences to adjust the following settings Opennetwork ...

Page 66: ...e See Connecting to networks and devices Using Wi Fi Direct WPS Push Button Connect to a WPS network via the push button method WPS Pin Entry Connect to a WPS network via the phone PIN method MAC address View the MAC address IP address View the phone s IP address Using Wi Fi Direct Wi Fi Direct allows Wi Fi devices to connect to each other without the need for wireless access points hotspots Your ...

Page 67: ...nder Peer devices to connect with it The other device will receive a prompt and need to accept the request for connection Both devices may need to enter a common PIN If prompted tap CONNECT 5 Once connected the device is displayed as Connected Connecting to Bluetoothdevices Bluetooth is a short range wireless communication technology Phones or other devices with Bluetooth capabilities can exchange...

Page 68: ... the home screen tap the Arrow Settings Connected devices Bluetooth 2 If Bluetooth is off tap the switch to turn it on 3 Tap Rename this device 4 Edit the name and tap RENAME Pairingwith another Bluetooth device 1 From the home screen tap the Arrow Settings Connected devices Bluetooth 2 If Bluetooth is off tap the switch to turn it on Your phone automatically scans for and displays the IDs of all ...

Page 69: ...ands free car kits You can try entering 0000 or 1234 the most common passkeys or refer to the documentsfor that device Forgetting unpairing with a Bluetooth device You can make your phone forget its pairing connection with another Bluetooth device To connect to the device again you must search for it and may need toenter or confirm a passkey again 1 From the home screen tap the Arrow Settings Conn...

Page 70: ...h 1 Turn Bluetooth on before trying to receive data via Bluetooth Note If the phone has not been paired with the sending device you may need to open the Bluetooth menu in Settings to keep the phone detectable through Bluetooth 2 When prompted tap ACCEPT to start receiving the data Swipe down on the Status Bar to locate the prompt if needed Received files are stored automatically in a dedicated fol...

Page 71: ... USB 1 Connect your phone to the PC with a USB cable 2 The Use USB to options menu will open automatically or you can open the Notification Panel and tap 3 Choose one of the following options Charge this device Charge your phone via USB Transfer files MTP Transfer files on Windows orMac Note For Windows XP install the Media Player 11 or later version when you use MTP Transfer photos PTP Transfer p...

Page 72: ... your microSDXC card is new or doesn t have content you want to keep you can also set it up as an extension of the phone storage This requires formatting that prevents the microSDXC card from working with other devices If you use the microSDXC card as part of phone storage the phone will allowdownloaded apps to be stored to the card Caution As part of the phone storage the microSDXC card may have ...

Page 73: ...XC card used as portable storage while the phone is on you must unmount it first 1 From the home screen tap the Arrow Settings Storage 2 In the Portable storage section tap next to the card name 3 When the screen prompts the card is safely ejected you can remove it from the phone To erase and format the microSDXC card portable 1 From the home screen tap the Arrow Settings Storage 2 In the Portable...

Page 74: ...to another device it will need to be formatted before it can be used 1 Tap the Arrow Settings Storage 2 Tap the microSDXC card namein the Portable storage section 3 Tap Storagesettings Format as internal ERASE FORMAT Caution The formatting procedure erases all data on the microSDXC card after which the files CANNOT be retrieved 4 The phone will prompt you to move your photos files and other data f...

Page 75: ...d name 3 Tap Migrate data 4 Tap MOVE Note Whenever you move data between the internal storage and the microSDXC card the destination is used to save new apps and personal data such as photos and videos and only the destination is accessible from a computer To remove the microSDXC card internal from your phone If you need to remove the microSDXC card used as phone storage while the phone is on you ...

Page 76: ...rage you can reformat the card as portable storage Note Before the formatting ensure that you have moved data and apps to the internal storage 1 From the home screen tap the Arrow Settings Storage 5 Tap the microSDXC card name 2 Tap Format as internal ERASE FORMAT Caution The formatting procedure erases all data on the microSDXC card after which the files CANNOT be retrieved Using USB On The Go OT...

Page 77: ... by activating the mobile hotspot feature to create a Wi Fi hotspot Sharingyour mobile data connection via USB You can access the Internet on your computer via the USB tethering feature of your phone This feature requires a data connection on a mobile network and may result in data charges Note You cannot transfer files between your phone and your computer when the phone is USB tethered 1 Connect ...

Page 78: ...ires a data connection on a mobile network and may result in data charges Note When the Mobile Hotspot feature is enabled you cannot use your phone s Wi Fi capability to access the Internet You still remain connected to the Internet via your mobile data network 1 From the home screen tap the Arrow Settings Network Internet MobileHotspot 2 Slide theswitch to the On position If Wi Fi was on tap OK t...

Page 79: ...ork Internet MobileHotspot 2 Tap an option to configure settings Configure Networkname Enter or edit a network name SSID that other devices see when scanning for Wi Fi networks Security Choose a security option Open not recommended or WPA2 PSK other users can access your hotspot only if they enter the correct password When you select WPA2 PSK tap the Password field to edit the security password Sh...

Page 80: ...nnect to the hotspot simultaneously and view a list of connected users More Settings Set hotspot auto off sleep policy and notification Connecting to virtual private networks Virtual private networks VPNs allow you to connect to the resources inside a secured local network VPNs are commonly deployed by corporations schools and other institutions to let people access local network resources when no...

Page 81: ...Arrow Settings Network Internet VPN 2 Tap to add a new VPN 3 Enter the VPN name server address and other information provided by your network administrator Check Show advanced options to fill out additional details 4 Tap SAVE The VPN is added to the list on the VPN screen Connecting to a VPN 1 From the home screen tap the Arrow Settings Network Internet VPN 2 Tap the VPN that you want to connect t...

Page 82: ...82 Modifying a VPN 1 From the home screen tap the Arrow Settings Network Internet VPN 2 Tap beside the VPN that you want to modify 3 Edit the VPN settings and tap SAVE ...

Page 83: ... to open the dialpad 3 Enter the phone number or the contact name with the dialpad Tap to delete incorrect digits Note As you enter the phone number or the contact name your phone searches for contacts that match If you see the number or contact you want to dial tap it to place the call immediately 4 Tap below the keypad to dial You can also tap Search contacts at the top of the main Phone screen ...

Page 84: ... country code followed by the city area code and then the phone number To redial the last call you made tap when the phone number field is empty to enter the number automatically Then tap again Ending a call During a call tap on the screen Answering or rejecting calls When you receive a phone call the phone displays the Caller ID or the information about the caller that you ve entered in Contacts ...

Page 85: ...ey Home key Back key or Recent apps key Rejecting a call To reject an incoming call If the phone screen is active tap If the phone screen is locked slide down to reject You can also reject the call and select a preset text message or write one to send to the caller If the phone screen is active tap If the phone screen is locked press and hold and drag toward the center of the screen Note To edit t...

Page 86: ...story from the home screen tap Call history If the dialpad is visible press the Back key to close it Placing a call from the call history 1 Open the call history 2 Tap beside a listing to call back Note You can tapALL to view all of the entries or tapMISSED OUTGOING or INCOMING to filter the records by call type Adding a number from call history as a contact 1 Open the call history 2 Tap the conta...

Page 87: ... entry to view more call information Tap to create a new contact for the number Tap to add the number to an existing contact Tap to send a message Tap BLOCKto no longer receive calls or messages from the number Note To find all blocked numbers from the home screen tap Settings Call blocking Tap to view call details From this screen you can Tap to delete the call log ...

Page 88: ... send a message call back edit the contact add the contact to favorites or add the number to contacts Note In the main Call History menu you can tap Clear call history OK to delete all call history records Calling your contacts 1 From the home screen tap 2 Tap Your favorite and frequently called contacts are displayed in the tab Tap one to place a call or Tap Your full contact list is displayed Ta...

Page 89: ...f prompted enter your voicemail password 4 Follow the voice prompts to listen to and manage your voicemail messages Note See Phone calls Adjusting your call settings Setting voicemail for how to set your voicemail service For detailed information please contact your service provider Using options during a call During a call you will see a number of on screen options Tap an option to select it Tap ...

Page 90: ... Tap to put the call on hold when this option is available Tap to merge the separate calls into a single conference call Tap to put the caller you are speaking to on hold and switch to the other call Tap to end the current call Warning Because of higher volume levels do not place the phone near your ear during speakerphone use Managing multi party calls When the call waiting and three way call fea...

Page 91: ...rms you and displays the caller ID To respond to an incoming call while on a call Swipe upto answer the incoming call and place the first call on hold Press and hold and drag toward the center of the screen to answer the incoming call and end the first call Swipe downto reject the second call Press and hold and drag toward the center of the screen to reject the second call and select a preset text...

Page 92: ...merge the two calls 4 Tap manage conference to manage the conference call From this screen you can tap an option beside one of the numbers tap split to separate the calls or tap gray end call to end that call If one of the callers hangs up you and the remaining caller stay connected If you initiated the call and are the first to hang up all callers are disconnected To end the conference call tap A...

Page 93: ... CONTACTStab of the Phone app 1 From the home screen tap Settings Display options 2 Tap Sort by or Name format to set the order of the contacts or the format of the contact names Setting sound and vibration options Set the incoming call ringtone vibration and dialpad sounds 1 From the home screen tap Settings Sounds and vibration 2 Tap an option Tap Phone ringtone to select the ringtone for incomi...

Page 94: ...le ending calls by pressing the Power key Tap the Vibrate when call is answered slider to enable or disable vibration when a call is answered Settingspeed dials You can press and hold the 1 9 keys on the dialpad to call the corresponding speed dial number The 1 key is reserved to speed dial your voicemail To assign a speed dial key 1 From the home screen tap Settings Speed dial 2 Tap a speed dial ...

Page 95: ...p Settings Call settings 2 Tap an option Tap Fixed Dialing Numbers for the following options Enable FDN Input the PIN2 code to enable the FDN feature Change PIN2 Change the PIN2 code for FDN access FDN list Manage the FDN list Note The PIN2 code is provided by your carrier Entering an incorrect PIN2 code more times than allowed can get your nano SIM card locked Contact the service provider for ass...

Page 96: ...tified of incoming calls during a call Additional settings Tap Caller ID to choose whether your number is displayed or hidden when someone receives your outgoing call Blocking calls Call blocking allows you to block calls and messages from certain numbers 1 From the home screen tap Settings Call blocking 2 Tap ADD A NUMBER 3 Enter the phone number or tap Contacts to select one from the contact lis...

Page 97: ...icemail service provider Your carrier is the default Tap Setup to view the voicemail number If needed tap Voicemail number to edit it SettingTTY mode Your phone is a TTY compatible device A TTY device can allow people who have hearing or speech disabilities to communicate by telephone Simply connect the TTY device to the phone s headset jack Select a TTY mode for your phone to work with a TTY devi...

Page 98: ...en to the other party and respond via text messages TTY VCO Users who can talk but cannot hear can use this mode to talk through the phone and receive responses via text messages Enabling hearing aid compatibility Your phone supports the Hearing Aid Compatibility HAC function If you use a hearing aid with a telecoil and turn on hearing aid compatibility it can help you hear more clearly during pho...

Page 99: ...Caution Do not turn on the Hearing aids option unless you use a hearing aid with a telecoil Using this setting without a hearing aid or with a hearing aid without a telecoil may be harmful to your hearing ...

Page 100: ...r contacts 3 Tap a contact to view its details Adding a new contact 1 From the home screen tap 2 Tap to add a new contact 3 Enter the contact name phone numbers and email addresses Tap More fields to enter other information 4 Tap SAVE Note If you have added accounts to the phone tap Saving to if you want to select an account in which to save the contact If a sync account is selected the contact wi...

Page 101: ... Importing exporting and sharing contacts You can import export contacts from to the nano SIM card phone storage or microSDXC card This is especially useful when you need to transfer contacts between different devices You can also quickly share contacts using Messaging Email Bluetooth Google Drive Gmail etc Importingcontacts from thephone storage or microSDXCcard 1 From the home screen tap 2 Tap S...

Page 102: ...2 Tap Settings Import SIM card 3 If prompted choose the account you want to import your contacts to 4 Check the contacts you need and then tap Exportingcontacts to the phone storage or microSDXCcard 1 From the home screen tap 2 Tap Settings Export Export to vcf file 3 The phone will prompt you with the name of the vCard file and the directory in which the file will be saved Tap SAVE to create the ...

Page 103: ...cts 3 When prompted open the Notification Panel and tap Finished exporting contacts 4 Choose how to share the contacts Options depend on the applications and services installed 5 Tap ALWAYS to set this as the default method for sharing contacts or tap JUST ONCE to continue without setting a preferred sharing method Working with favorite contacts You can mark the contacts you use frequently so that...

Page 104: ...list Removing a contact from favorites 1 From the home screen tap 2 Tap a marked contact and then tap at the top of the screen 3 Press the Back key to return to the Contacts list The contact is no longer at the top of the list Searching for a contact 1 From the home screen tap and then tap to search 2 Inputthe contact name or other information such as phone number you want to search for The contac...

Page 105: ...ho is calling when you hear the ringtone 1 From the home screen tap 2 Tap a contact and then tap More fields Default ringtone 3 Select a ringtone you like and tap OK 4 Tap SAVE Linkingcontacts As your phone synchronizes with multiple online accounts you may see duplicate entries for the same contact You can merge all the separate information of acontact into one entry in the Contacts list 1 From t...

Page 106: ...Unlinkingcontact information If contact information from different sources was linked in error you can separate the information back into individual contacts on your phone 1 From the home screen tap 2 Tap a linked contact you want to unlink 3 Tap View linked contacts UNLINK 4 Tap UNLINK to confirm ...

Page 107: ...ap the type of account you want to add 3 Follow the on screen steps to enter the information about the account Most accounts require a username and password but the details may vary You may also need to obtain some information from IT support or your system administrator When the account is successfully added it is displayed in the Accounts menu in Settings Removing an account Removing an account ...

Page 108: ... the home screen tap the Arrow Settings Accounts 2 Tap the Automatically sync data slider to enable or disable automatic sync When automatic sync is turned on changes you make to information on your phone or on the web are automatically synced with each other When automatic sync is turned off you need to sync manually to collect emails updates or other recent information Syncingmanually 1 From the...

Page 109: ...Tap the account you want to manage and then tap Account sync to view a list of information types the account can sync 3 When automatic sync is enabled tap items to switch syncing on or off as you need Items with syncing switched on will be kept in sync automatically When auto sync is disabled tap an item in the list to sync that type of information between the phone and the web ...

Page 110: ... and more Setting up the first email account 1 Open Email and tap an email server account type 2 Enter your email address and password 3 Tap NEXT to let the phone retrieve the network parameters automatically Note You can also enter these details manually by tapping MANUAL SETUP or if automatic setup fails 4 Follow the on screen instructions to finish the ...

Page 111: ...d earlier emails swipe up to reach the bottom of the list and then tap LOAD MORE You can adjust how often your account downloads new emails From your inbox tap Settings name of the account Sync settings Sync frequency Tap an option to select it Writing and sending an email 1 Open Email and tap Note If you have added more than one email account tap the From line to select the account you want to us...

Page 112: ... and compose the email text 4 Tap to add images videos audio files or other types of files as attachments 5 Tap to send the message Responding to an email You can reply to or forward an email that you receive You can also delete emails and manage them in other ways Replying to or forwarding an email 1 Open the email you want to reply to or forward from the inbox 2 Choose one of the following To re...

Page 113: ...a batch of emails as unread While reading a message tap Mark unread While in the inbox tap the circle beside each message you want to mark unread and then tap Deleting an email You can delete an email or a batch of emails While reading a message tap While in the inbox slide a message left or right to delete it or tapthe circle beside eachmessage you want to delete and then tap Note If you delete a...

Page 114: ...t up the account as you did with the first one Note You can also add accounts from the Settings app see Accounts Adding or removing accounts Adding an account Editing an email account You can change a number of settings for an account The options you can configure depend on the type of account 1 From your inbox tap Settings 2 Tap the account whose settings you want to change 3 Make the changes you...

Page 115: ...nging general email settings General settings apply to all email accounts you add 1 From your inbox tap Settings General settings 2 Make the changes you want and tap or press the Back key when you re finished ...

Page 116: ... an ongoing message thread Tap to write a new text or multimedia message Tap to search for a message using keywords Tap an existing message thread to open the conversation Tap white menu dots for more options Sending a text message 1 On the Messaging screen tap 2 Add recipients in one of the following ways In the To field enter the recipient s number or the contact name You can tap to enter number...

Page 117: ... Enter numbers or contact names or select from your contacts Tap 3 Tap the Sendmessage field and enter your message To add an attachment tap see Adding an attachmentbelow 4 Tap Notes Do not add an attachment if you want to send a text message Otherwise you may be charged for a multimedia message You can also include email addresses as recipients for multimedia messages ...

Page 118: ...118 Adding an attachment Numb er Function 1 Tap to snap a photo It will be attached instantly 2 Tap to start recording a video Tap to stop recording The video will be attached ...

Page 119: ...s press and hold a photo thumbnail tap any others you want to select and then tap white checkmark on blue to attach all of the selected photos 5 Tap to select another attachment option Video Voice Recorder Files Contacts or Quick reply 6 Tap to enlarge the camera viewscreen to full size Tap to switch to the front facing camera Tap to switch to the back camera 7 Tap to select a focus area Notes Swi...

Page 120: ...ew thread is created 1 On the Messaging screen tap the thread that has the message you want to reply to 2 Type your reply in the Send message field You can tap to add an attachment including a quick reply or contact information 3 Tap Forwarding a message 1 On the Messaging screen tap the thread that has the message you want to forward 2 Press and hold the message and then tap 3 Tap an existing thr...

Page 121: ...reen press and hold a thread you want to delete or tap a thread and press and hold a message you want to delete 2 If there are more messages threads you want to delete tap them one by one 3 Tap DELETE Changing message settings Tap Settings in the Messaging screen to change message settings ...

Page 122: ...e To open Calendar Tap the Arrow Viewing your calendars and events Selectingvisible calendars 1 Open the Calendar app 2 Tap Calendars to display 3 Tap to check the calendars you want to see or uncheck the calendars you d like to hide Events from hidden calendars are not shown in the Calendar app Changingcalendar views You can view your calendars in different forms The app offers four views Month W...

Page 123: ...h to today To quickly switch to a specific date tap Go to date swipe horizontally to find the month you want and tap a day OK Viewingevent details In Agenda Day or Week view tap an event to view its details In Month view tap a day to view events on that day and then tap an event to view its details Creating an event 1 In any Calendar view tap to open an event details screen for a new event You can...

Page 124: ...a new event by copying the details of an existing event Just open the event details screen and tap Copy Then edit the new event information and tap SAVE Editing deleting or sharing an event 1 Find the event you want to edit delete or share 2 Open its details screen see Calendar Viewing your calendars and events Viewing event details 3 Choose one of the following options To edit the event tap Tap S...

Page 125: ...corporate or Google account For General settings choose options for Calendar view setting and Notifications reminders You can choose to show the week number set the day of the week the calendar starts on and use home time zone when you travel You can also change the event reminder settings such as notification sound vibration default reminder time and more Searching an event Tap Searchevent and th...

Page 126: ...ge 2 Tap the address box at the topof the web page 3 Enter the address URL of a webpage or terms you want to search for 4 Tap a URL or search suggestion or tap the enter key on the keyboard to open the web page or search results Setting the home page Your home page opens when you open a new browser tab and when you open Chrome after restarting your phone 1 From the home screen tap 2 Tap Settings H...

Page 127: ...e time one page in each window and switch between them freely Opening a new browser window Tap New tab A new browser window opens Switching between browser windows 1 Tap at the top of the screen to see thumbnails of currently opened web pages 2 Tap the thumbnail of the page you want to open Note Tap or swipe left or right to close a browser window Tap Close all tabs to close all windows ...

Page 128: ...loaded files are saved to your phone or microSDXC card You can view or open them in the Downloads app Changing browser settings You can configure a number of settings to customize the way you browse the web including several that you can use to control your privacy In the main Chrome screen tap Settings Make changes as needed and press the Back key when done ...

Page 129: ...allery app Capturing a photo 1 From the home screen tap 2 Aim the camera at the subject and make any necessary adjustments PHOTO automatic camera mode is used by default 3 Tap the area on the screen where you want the camera to focus or let the camera autofocus on the center of the image 4 Tap to take a photo Warning Keep a safe distance when using the flash Do not point the flash toward the eyes ...

Page 130: ...130 Numb er Function 1 Enable or disable the High Dynamic Range HDR feature back camera only 2 Change the camera settings 3 Change the flash setting back camera ...

Page 131: ...hoto 7 Switch between the front camera and the back camera 8 Use MANUAL PANORAMA MONO or TIMELAPSE mode back camera only 9 Adjust the focus point and exposure 10 Select image effects 11 Enable or disable the LIVE photo function Notes You can pinch or spread your fingers on the screen to zoom in or out before taking a picture In PHOTO mode when you tap the screen to focus the exposure bar appears b...

Page 132: ... mode In PORTRAIT mode you can take pictures in portrait orientation with blurred backgrounds and foregrounds 1 Tap PORTRAIT 2 Hold the camera within 8 feet of the subject 3 Tap to take the picture Using BOKEHmode In BOKEH mode you can take a photo with the subject in focus and the background blurred 1 Tap BOKEH 2 Hold the camera within 1 to 6 5 feet of the subject and adjust the slider to change ...

Page 133: ...and hold it to lock the focus Drag the yellow circleto any area on the screen where you want the camera to meter exposure so as to adjust the photo brightness Press and hold it to lock exposure Tap the icons at the bottom of the screen and adjust the slider to manage exposure ISO white balance and interval for time lapse pictures PANORAMA Capture panorama photos either horizontally or vertically M...

Page 134: ...at you want the camcorder to focus on before and during recording 3 Tap to start recording You can tap to pause resume recording or tap to save the frame as a photo 4 Tap to stop recording Notes You can pinch or spread your fingers on the screen to zoom in or out before and during recording When you tap the screen to focus during recording the exposure bar appears beside the focus point You can dr...

Page 135: ...ettings Note Some camera and video options will change in different camera modes Resolution Set the image size for your photos Point and shoot front camera Enable tapping the screen to take a photo Smile front camera Enable smile detection Timer Set a delay time before taking a photo after the shutter icon is tapped Composition back camera Show or hide the grid or golden spiral used for balanced p...

Page 136: ... a customized watermark to your photos Geo tagging Enable or disable storing the GPS location in captured photos and videos Volume key Assign the function of the Volume keys for the Camera app Take photo Zoom or Volume Anti banding Set the anti banding value to avoid stripes on the screen when you take pictures or record videos of TV or computer screens Save location Change the storage location fo...

Page 137: ...137 video settings ...

Page 138: ...and Albums displays contents organized by album Working with albums Viewing album contents In Albums view tap an album to view the pictures and videos it contains Sharing albums pictures or videos 1 Press and hold an album picture or video to select it 2 Tap more items that you want to share 3 Tap and select a sharing method Deleting albums pictures or videos 1 Press and hold an album picture or v...

Page 139: ...nt to delete 3 Tap DELETE Working with pictures Tap a picture to view it in full screen Double tap the picture or pinch two fingers together or spread them apart to zoom out or in Slide left or right to view other pictures in the album or list ...

Page 140: ...Numb er Function 1 Return to the previousscreen 2 Swipe left or right to see more pictures 3 Share the picture 4 Delete the picture 5 Access more options rename rotate edit print set as wallpaper or contact ...

Page 141: ... picture or video by swiping it up in the filmstrip view If you accidentally delete one tap Undo to retrieve it When viewing a picture captured in the dual camera BOKEH mode you can tap to adjust the focus Tap anywhere on the picture to refocus and then select the blur level Tap to save Not all options may be available for certain albums or pictures Retouching your pictures You can edit any photos...

Page 142: ...y filters old photo effects or blur effects Crop rotate or flip mirror the picture Adjust exposure contrast sharpness and other light options Adjust the color of the picturewith saturation hue and other color effects Draw add text or apply a mosaic effect on the picture 3 Tap to keep the change or to cancel it 4 Tap to save the new picture Note Tap in the PhotoEditor screen to see the edits you ha...

Page 143: ... GIF tap 2 to 50 pictures in the order or reverse of the order that you want them to appear in the GIF To make a collage tap 2 to 9 pictures The pictures you tapped are displayed along the bottom of the screen Tap to remove the pictures you do not want 4 Tap NEXT The GIF or collage is displayed 5 Tap the options along the bottom to adjust the final picture For GIF you can adjust the speed play ord...

Page 144: ...or tap to save the collage Note Depending on your storage settings the picture is saved to the picture_editor Collage or GIF folder in your phone storage or the microSDXC card Playing videos 1 Tap an album in Gallery and then tap the thumbnail of a video 2 Tap at the center and select a player to start playing 3 Tap the video to view the playback controls ...

Page 145: ... all your audio files are cataloged according to the information stored in the files Tap All songsto seeyour music library organized by ALL SONGS ARTISTS ALBUMS and GENRE You can also tapFavorites to view songs you ve marked as favorites Recently played to play a song again or Folders to locate an audio file by storage location Note If an audio file is being played its name and player controlsare ...

Page 146: ...ote If you are in the playback screen tap at the top left of the screen to return to the music library 2 Tap next toa song in any list 3 Tap Set as the ringtone and select Set asringtone or Notification ringtone Note If the song is being played and you re on the playback screen tap Set as the ringtone and select Set asringtone or Notification ringtone Playing music Tap a song in the music library ...

Page 147: ...147 Numb er Function 1 Song album and artist information 2 Return to music library 3 Album artwork if available ...

Page 148: ... 9 Access additional options 10 View the current playlist You can still control the music when you are not in the playback screen In other apps swipe down to open the Notification Panel Tap the song title to restore the playback screen or you can pause resume playback or skip songs When the screen is locked the song information album cover and playback controls are displayed on the screen Double t...

Page 149: ...like in the order you prefer Tap Add to beside a song to add it to a new or existing playlist From the main Music screen tap a playlist to view its contents While viewing a playlist Tap Delete to delete the playlist Tap Rename to rename the playlist To remove a song from the playlist tap beside the song and then tap Remove ...

Page 150: ...e up or down to find the video you want You can tap boxes icon to change the view mode tap Search to search for video files or tap View or Sort to change the display mode or sort the list Playing and controlling videos Tap a video in the video library to play it Tap the screen to show the playback controls You can control the video and audio or carry out other operations ...

Page 151: ...151 Numb er Function 1 Video name 2 Return to the video library 3 Hide video playback controls and lock the touch screen ...

Page 152: ... video 6 Reduce the video playback screen to a small floating screen that you can watch while using another app 7 Share delete rename the video view details or configure player settings 8 Turn Dolby Audio off or on Notes Slide horizontally on the video to rewind or fast forward Slide vertically on the right or left part of the screen to adjust volume or brightness respectively ...

Page 153: ...s and hold a video 2 Tap to select other videos you want to share 3 Tap and select a sharing option Trimming a video 1 Tap a video to start playing it 2 Tap Trim 3 Drag the two tabs on the progress bar to select the portion you want to keep You can tap to preview the selected portion 4 Tap The trimmed video is saved as a new video file Note You cannot trim the video during the preview ...

Page 154: ...ceive an incoming call while listening to the radio the radio will be turned off Scanning and saving channels 1 Plug in a wired headset Tap the Arrow 2 Tap Scan Your phone automatically scans for all available channels and saves them to the All channels list Note When you open the FM Radio app for the first time it will automatically scan for channels and show the All channels list You can also ta...

Page 155: ...In the All channels list tap next to a channel to add it to favorites Favorite channels are accessible from the FM Radio main screen Slide up to view all favorite channels You can save up to 16 channels to favorites Tap to listen to FM Radio through the phone speaker Editing a saved channel 1 Open the FM Radio app and tap All channels to display the list of saved channels 2 Press and hold a channe...

Page 156: ...be turned off when the clock reaches 0 00 Turning off immediately From the FM Radio main screen tap the switch at the top of the screen Setting your radio region FM radio frequency ranges differ in different regions Tap FM frequency range to select the range you need Note If you change the frequency range previously saved channels are not shown until you switch back to the original frequency range...

Page 157: ...ap to start recording During recording you can tap to pauseand to continue recording 4 Tap DONEto stop recording Enter a title if needed and tap SAVE to save the memo Playing a voice memo Playing and managing memos Playing and editing memos 1 From the home screen tap the Arrow Voice Recorder to openthe Recordings list 2 Tap a memoon the list to play it 3 While playback is in progress tap beside th...

Page 158: ...emos 1 From the home screen tap the Arrow Voice Recorder to open theRecordings list 2 Tap next to thememo to share delete rename or edit it check its file information or set it as your phone or notification ringtone ...

Page 159: ...te To see more calculator options tap or turn the phone to landscape view Clock From the home screen tap the Arrow Clock The Clock app allows you to check local time in places around the world set alarms and use timers Setting a new alarm 1 Open the Clock app and tap 2 Tap at the bottom of the screen to create a new alarm 3 Tap the clock to set the alarm time and then tap OK Notes ...

Page 160: ...s Sound Advanced Ringtones Default alarm sound Checkingworld time 1 Open the Clock app and tap 2 World time lets you check local times for cities around the world Tap to add a new city Using stopwatch and timer 1 Open the Clock app and tap or 2 Stopwatch allows you to record lap times while timer allows you to set a time and count down to zero Dolby Audio Your phone supports Dolby Audio which enha...

Page 161: ...en it with the appropriate application Press and hold a file to delete or share it File Manager Quickly access all of your images videos audio clips and other types of files on your phone storage and the microSDXC card Tap the Arrow File Manager Tap CATEGORY to find the file by category or tap LOCAL to browse folders and files on the phone storage or on the microSDXC card Tap folders and files to ...

Page 162: ... or move an item press and hold the item tap Move or Copy navigate to a new location and tap PASTE Tap to search for a file or folder by name Tap Show local hidden files to display hidden system files and folders ...

Page 163: ...ks browsing history and more synced with your Google account Drive Store files on Google servers for free after you sign in to your Google account You can access them on your computers phones and other devices share them or collaborate on themwith others Duo Video chat one on one using Wi Fi or mobile data Gmail Send and receive emails via your Gmail account or other personal email accounts Google...

Page 164: ...d TV shows Play Music Play music on the phone and streamed from your Google account Play Store Purchase and download apps games and more from the Google Play Store YouTube Watch video clips from YouTube com or upload your own and share with the world Sharecare Sharecare is a comprehensive health and wellness platform that enables you to track your steps sleep activities and more Setting up Shareca...

Page 165: ... Enter the information to set up your profile and then tap CREATE UsingSharecare 1 From the home screen tap the Arrow Sharecare 2 Tap menu stack icon and choose a category for example Tracker or Challenges 3 Follow the on screen instructions Z Assistant Tap the Arrow Z Assistant You can regularly back up your user data such as messages and installed applications to the microSDXC card or phone stor...

Page 166: ...can regularly back up your user data such as messages and installed applications to the microSDXC card or phone storage regularly If the data gets lost restore it from the card or storage From the application tap Help to view a detailed guide ...

Page 167: ...ended settings Network Internet Wi Fi Turn Wi Fi on or off and configure your Wi Fi connections see Connecting to networks and devices Connecting to Wi Fiand Using Wi Fi Direct Wi Fi calling Turn Wi Fi calling on or off see Phone calls Adjusting your call settings Enabling Wi Fi calling Mobile network Control mobile data use data roaming 2G service and Access Point Names see Connecting to networks...

Page 168: ...ed Mobile data Enable or disable mobile data Mobile data usage Check how much data has been used during the time cycle you set see which apps have been using mobile data restrict background data for individual apps or allow individual apps to have unrestricted data usage when Data Saver is on Billing cycle Set the reset date of the data usage cycle and set the mobile data warning and limit Wi Fi d...

Page 169: ...haring your mobile data connection Sharingyour mobile data connection via USB TapBluetooth tethering to share your phone s mobile data connection with other devices via Bluetooth see Connecting to networks and devices Sharing your mobile data connection Sharingyour mobile data connection via Bluetooth VPN Tap VPN to set up and connect to virtual private networks see Connecting to networks and devi...

Page 170: ... Hotspot Airplane mode Tap Airplane mode to turn airplane mode on or off All the phone s radios that transmit voice or data are turned off when airplane mode is on Call settings Configurecall options see Phone calls Adjusting yourcall settings Connected devices Bluetooth Turn Bluetooth on or off and configure your Bluetooth connections see Connecting to networks and devices Connecting to Bluetooth...

Page 171: ...gure Google Cloud Print service or other printer plug ins installed from the Google Play Store or your printer manufacturer Apps notifications App info View and manage apps installed on your phone Tap an app to see details The following options may be available FORCE STOP Stop the app UNINSTALL Uninstall the app DISABLE ENABLE Disable or enable the app App notifications Manage the app s notificati...

Page 172: ...e links in the app and clear the app s defaults Battery View the app s battery usage since last full charge and manage battery optimization Memory View the app s memory usage Picture in picture Allow the app to create a picture in picture window that displays on top of other apps Modify system settings Allow the app to modify system settings Install unknown apps Allow apps to be installed from thi...

Page 173: ...ation dots When enabled a dot will appear on the app icon when you have notifications Press and hold the app icon to view a shortcut menu of options for these notifications Tap Onthe lock screen to manage the display of notification content on the lock screen Note The notifications of some apps cannot be turned off Content hiding is available only if you have set a pattern PIN or password screen l...

Page 174: ...r to turn Battery saver on or off or to configure it to turn on automatically to conserve battery power Tap Battery percentage You can turn Battery percentage on or off to show battery percentage in status bar Featured Navigation keys Select an option to swap the positions of the Back keyand the Recent apps key Scheduled power On Off Enable and schedule time days for your device to be automaticall...

Page 175: ...key Back key and Recent apps key Gesture motion Tap to enable or disable the use of gestures motions to control specific functions on your device Tap a specific function to learn more or tap the slider to enable disable the function Note When enabled this feature may affect battery performance Use of a device cover case may prevent some functions from working Smart cover Tap to enable or disablesm...

Page 176: ... fall asleep more easily Adaptive brightness Enable or disable automatic adjustment of screen brightness for available light Display apps in full screen Advanced ZTE locker When enabled vivid lock screen images change regularly providing a fresh look for your phone Wallpaper Select a background image or animation for the home screen or lock screen Sleep Set the length of time of inactivity before ...

Page 177: ...bient display When enabled causes the screen to wake when you receive notifications Navigation key light duration Set the duration of the backlight for the Home key Back key and Recent apps key Indicator light Tap to select which types of notifications cause the Indicator light to flash or to enable disable this feature Sound Adjust different types of volume see Personalizing Adjusting volumes ena...

Page 178: ...ersonalizing Turning system sounds on off Storage View details and manage settings for the internal phone storage and the microSDXC card if one is installed see Connecting to networks and devices Using a microSDXC card as storage When you connect a USB storage device such as a USB flash drive to your phone with an OTG adapter cable you can view its storage status unmount it or erase all data on it...

Page 179: ...ock for more settings Make pattern visible When enabled the screen lock pattern is visible while you enter it Available when a pattern is set Automatically lock Set the length of time before lock protection is activated after the screen turns off Available when a pattern PIN or password is set Power button instantly locks When enabled pressing the Power key immediately activates lock protection Av...

Page 180: ...eep the phone unlocked when connected to trusted devices while in trusted places when recognizing a trusted face or voice or while being held or carried Note You must set a screen lock pattern PIN or password to use the Smart Lock feature Location Enable or disable location access set app level permissions enable or disable Wi Fi or Bluetooth scanning manage location services and see which apps ha...

Page 181: ...dministrators SIM card lock Lock the nano SIM card and change the nano SIM PIN Lock SIM card Activate or deactivate the PIN lock to require PIN before accessing the nano SIM card Change SIM PIN Change the PIN used to access the nano SIM card Note Put all your confidential passwords in a safe place for future use If you enter the wrong SIM PIN more times than allowed your nano SIM card will be lock...

Page 182: ...card Install certificates from storage Clear credentials Delete all certificates Trust agents View or deactivate trust agents Screen pinning Keep a screen of your choice in view so that others cannot switch apps and access personal information see Personalizing Protecting your phone with screen pinning Apps with usage access Turn on or off some apps access to your phone usage information Accounts ...

Page 183: ...ency dialer without unlocking the phone Automatically sync data When enabled allows apps to refresh data automatically Tap an account type to see accounts of that type you have added and adjust their settings Accessibility Configure the accessibility plug ins and services on your phone such as using Color inversion or Font size for users with low vision Google Manage settings for Google services ...

Page 184: ...hile a physical keyboard accessory is active Keyboard shortcuts helper Display available shortcuts Advanced Spell checker Enable Google spell checker to check for spelling errors when entering text and change its settings Autofill service Manage services that can automatically fill in forms using stored information Personal dictionary Manage a list of words for personalized spell check and word su...

Page 185: ...peed and pitch of spoken text Date time Set date time time zone and time format or use network provided data see Personalizing Setting the date and time Cricket Software Update Check for phone software updates and download them when theyare available Storage card updates Copy an update package to amemory card for system updates Backup Enable automatic backup of data and settings including apps and...

Page 186: ...and notifications app links background data restrictions and permissions Factory data reset Reset your phone to factory default settings All your personal data from the phone s internal storage will be erased You can also erase the data on the memory card during the process You can tap BACKUP AND RESTORE to use Z Backup to back up data and restore it after the reset About phone View phone status l...

Page 187: ...ackage offered by your mobile service provider 3 Use your PC to download an upgrade package to your microSDXC card and install it to your phone from the card Note Visit the ZTE official handset service support website http www ztedevice com support and click your country or region to learn more about the above upgrade methods as well as which phones and methods are supported ...

Page 188: ...ses Possible solution Poor reception The network signal is too weak at your current location for example in a basement or near a tall building because wireless transmissions cannot effectively reach it Move to a location where the network signal can be properly received The network is busy at the current time for example during peak times there may be too much network traffic to handle additional ...

Page 189: ...f your service provider End the call and dial again You may be switched to a better quality network link or phone line Poor local telephone line quality End the call and dial again You may be switched to a better quality network link or phone line Unable to select certain features Your service provider does not support these features or you have not applied for services thatprovide these features ...

Page 190: ...harger is damaged Contact the dealer The phone s temperature is below 32 F 0 C or higher than 113 F 45 C Adjust the battery charging environment to avoid extremes of temperature Poor contact between the battery and charger Check all connectors to ensure that all connections have been properly made ...

Page 191: ...uration The same phone used with different service providers systems will not provide exactly the same length of standby time If you are located in an area where signaling is weak temporarily power off the phone The battery is depleted In high temperature environments battery life will be shortened Contact the dealer for a new battery ...

Page 192: ...on to one where the network is accessible or temporarily turn off your phone Cannot turn your phone on Battery power has been depleted Recharge the phone s battery nano SIM card error The nano SIM card has malfunctioned or is damaged Take the nano SIM card to your service provider for testing The nano SIM card is inserted improperly Insert the nano SIM card properly There is debris on the nano SIM...

Page 193: ... provider Poor signal Move to an open space or if you are inside a building move closer to a window Cannot answer incoming calls You have activated the Call blocking feature Disable this feature See Phone calls Adjusting your call settings Blocking calls Cannot make outgoing calls You have activated the Fixed DialingNumbers feature Disable this feature See Phone calls Adjusting your call settings ...

Page 194: ...e provider If the service provider provides the nano SIM card s PUK code use the PUK code to unlock the nano SIM card Phone crashes reboots freezes or cannot be powered on Some third party software is not compatible with your phone Uninstall the software that may be causing the problem Upgrade the phone software Reset the phone to factory status ...

Page 195: ...handheld calls while driving Never text while driving Don t use at gas stations Keep your phone at least 10 mm 0 4 in away from your body while making calls Your phone may produce a bright or flashing light Small parts may cause choking Don t dispose of your phone in fire ...

Page 196: ...r ear while the loudspeaker is in use Avoid contact with anything magnetic Avoid extreme temperatures Keep away from pacemakers and other electronic medical devices Avoid contact with liquids Keep your phone dry Power off when asked to in hospitals and medical facilities Don t take your phone apart Power off when told to in aircrafts and airports Only use approved accessories ...

Page 197: ...tions that simulate RF exposure in usage against the head with no separation and near the body with the separation of 0 4 inches 10 mm Although the SAR is determined at the highest certified power level the actual SAR level of the device while operating can be well below the maximum value This is because the phone is designed to operate at multiple power levels so as to use only the power required...

Page 198: ...nd under the Display Grant section of www fcc gov oet ea fccid after searching on FCC ID SRQ Z6400C The FCC ID also can be found on the device when you press the Home key Settings About phone Regulatory information For this device the highest reported SAR value for usage against the head is 0 422 W kg and for usage near the body is 1 436 W kg While there may be differences between the SAR levels o...

Page 199: ... FCC Rules Operation is subject to the following two conditions 1 This device may not cause harmful interference and 2 this device must accept any interference received including interference that may cause undesired operation This equipment has been tested and found to comply with the limits for a Class B digital device pursuant to part 15 of the FCC Rules These limits are designed to provide rea...

Page 200: ...e separation between the equipment and receiver Connect the equipment into an outlet on a circuit different from that to which the receiver is connected Consult the dealer or an experienced radio TV technician for help Caution Changes or modifications not expressly approved by the manufacturer could void the user s authority to operate the equipment The antenna s used for this transmitter must not...

Page 201: ...ne than others to this interference noise and phones also vary in the amount of interference they generate The wireless telephone industry has developed a rating system for wireless phones to assist hearing device users in finding phones that may be compatible with their hearing devices Not all phones have been rated Phones that are rated have the rating on their box or a label located on the box ...

Page 202: ...ut return or exchange policies consult your service provider or phone retailer M Ratings Phones rated M3 or M4 meet FCC requirements and are likely to generate less interference to hearing devices than phones that are not labeled M4 is the better higher of the two ratings T Ratings Phones rated T3 or T4 meet FCC requirements and are likely to be more usable with a hearing device s telecoil T Switc...

Page 203: ...the battery Do not modify or remanufacture attempt to insert foreign objects into the battery immerse or expose to water or other liquids expose to fire explosion or other hazard Only use the battery for the device for which it is specified Only use the battery with a charging system that has been qualified with the system per CTIA Certification Requirements for Battery System Compliance to IEEE 1...

Page 204: ...ble Promptly dispose of used batteries in accordance with local regulations Battery usage by children should be supervised Avoid dropping the phone or battery If the phone or battery is dropped especially on a hard surface and the user suspects damage take it to a service center for inspection Improper battery use may result in a fire explosion or other hazard The phone shall only be connected to ...

Page 205: ...evices while driving Operating machinery Full attention must be given to operating the machinery in order to reduce the risk of an accident Product handling General statement on handling and use You alone are responsible for how you use your phone and any consequences of its use You must always switch off your phone wherever the use of a phone is prohibited Use of your phone is subject to safety m...

Page 206: ...ose your phone or its accessories to open flames or lit tobacco products Do not expose your phone or its accessories to liquid moisture or high humidity Do not drop throw or try to bend your phone or its accessories Do not use harsh chemicals cleaning solvents or aerosols to clean the device or its accessories Do not paint your phone or its accessories Do not attempt to disassemble your phone or i...

Page 207: ... not leave your phone and its accessories within the reach of small children or allow them to play with it They could hurt themselves or others or could accidentally damage the phone Your phone contains small parts with sharp edges that may cause an injury or may become detached and create a choking hazard Demagnetization To avoid the risk of demagnetization do not allow electronic devices or magn...

Page 208: ...e in a safe and secure area before driving your vehicle Seizures Blackouts The phone can produce a bright or flashing light A small percentage of people may be susceptible to blackouts or seizures even if they have never had one before when exposed to flashing lights or light patterns such as when playing games or watching video If you have experienced seizures or blackouts or have a family histor...

Page 209: ...tive Text Take frequent breaks to stretch and relax Emergency calls This phone like any other wireless phone operates using radio signals which cannot guarantee connection in all conditions Therefore you must never rely solely on any wireless phone for emergency communications Loud noise This phone is capable of producing loud noises which may damage your hearing Turn down the volume before using ...

Page 210: ...he phone with sharp objects Connection to vehicles Seek professional advice when connecting a phone interface to the vehicle electrical system Faulty and damaged products Do not attempt to disassemble the phone or its accessories Only qualified personnel can service or repair the phone or its accessories If your phone or its accessories has been submerged in water punctured or subjected to a sever...

Page 211: ...inimum separation of 6 inches 15 cm be maintained between a mobile phone and a pacemaker to avoid potential interference with the pacemaker To achieve this use the phone on the opposite ear to your pacemaker and do not carry it in a breast pocket Hearing aids People with hearing aids or other cochlear implants may experience interfering noises when using wireless devices or when one is nearby The ...

Page 212: ... your wireless device whenever you are instructed to do so by airport or airline staff Consult the airline staff about the use of wireless devices onboard the aircraft and enable airplane mode of your phone when boarding an aircraft Interference in vehicles Please note that because of possible interference with electronic equipment some vehicle manufacturers forbid the use of mobile phones in thei...

Page 213: ...lly explosive atmospheres include fueling areas below decks on boats fuel or chemical transfer or storage facilities and areas where the air contains chemicals or particles such as grain dust or metal powders Blasting caps and areas Power off your mobile phone or wireless device when in a blasting area or in areas where signs are posted to power off two way radios or electronic devices to avoid in...

Page 214: ...214 ...

Page 215: ...nate warranty coverage with respect to that Product This limited warranty is not transferable to any third party including but not limited to any subsequent purchaser or owner of the Product This limited warranty is applicable only to end users in the United States 1 This product is warranted for 12 twelve months from date of purchase 2 For warranty service information please call ZTE service numb...

Page 216: ...cation food or liquid spillage acts of God c Normal wear and tear d If the product has been opened modified or repaired by anyone other than a warranty service center or if it is repaired using unauthorized spare parts e If the serial number or mobile accessory date code has been removed erased defaced altered or is illegible in any way subject to sole judgment of ZTE The following Consumer Limite...

Page 217: ...ico Seller will at its sole and absolute discretion either repair or replace a Product which unit may use refurbished parts of similar quality and functionality if found by Seller to be defective in material or workmanship or if Seller determines that it is unable to repair or replace such Product Seller will refund the purchase price for such Product provided that the subject Product i is returne...

Page 218: ...iii any Product operated outside published maximum ratings iv cosmetic damage v any Product on which warranty stickers or Product serial numbers have been removed altered or rendered illegible vi cost of installation removal or reinstallation vii signal reception problems unless caused by defects in material and workmanship viii damage the result of fire flood acts of God or other acts that are no...

Page 219: ...D TO LOSS OF PROFITS UNANTICIPATED BENEFITS OR REVENUE ANTICIPATED PROFITS ARISING OUT OF USE OR INABILITY TO USE ANY PRODUCT FOR EXAMPLE WASTED AIRTIME CHARGES DUE TO THE MALFUNCTION OF A PRODUCT OR CONTRIBUTION OR INDEMNITY IN RESPECT OF ANY CLAIM RELATED TO A PRODUCT REPAIR OR REPLACEMENT OF A DEFECTIVE PRODUCT OR REFUND OF THE PURCHASE PRICE RELATING TO A DEFECTIVE PRODUCT AS PROVIDED UNDER TH...

Page 220: ...ions do not allow the exclusion or limitation of incidental or consequential damages or allow limitations on how long an implied warranty lasts so the above limitations or exclusions may not apply to you This limited warranty gives you specific legal rights and you may also have other rights which vary from jurisdiction to jurisdiction For warranty service information please call the following tel...

Page 221: ... information available when you send the phone in for repair A valid Proof of Purchase Return address Daytime phone number or fax number Model number IMEI number Complete description of the problem Transportation prepaid Other warranty programs You may have other warranty programs with your purchase such as warranty exchange If so please refer to the equipment package or the original point of sale...

Page 222: ...ards LTE GSM UMTS Dimensions 6 5 H x 3 2 W x 0 3 D Weight 6 3 oz with battery Display 6 1920 1080 Camera Front 8 MP Back 16 MP 2 MP Internal memory ROM 32 GB RAM 2 GB Removable memory card Supports microSDXC card up to 256 GB Battery 4 080 mAh non removable Continuous idle time Up to 14 days Continuous talk Up to 30 hours ...

Page 223: ...2 0 Wi Fi 802 11 b g n Bluetooth 4 2 HAC M4 T3 Note The phone s talk time and idle time are based on ideal working environments The use of extended backlighting browser and network conditions can reduce battery life and talk idle time ...

Reviews: