background image

Chapter 3 Fault Locating Methods

Parameter

Description

MD Name

Select an MD name from the configured MD list.

MA Name

Select an MA name from the configured MA list.

MPID Primary Key

Sets the local MEP ID configured for the port.

Loopback

Sets whether the function is enabled.

Repeat Count

Sets the number of times that an LBM packet is sent by the local end.

Data Length

Sets the length of a packet sent by the LB function.

TimeOut Time

Sets the timeout value for the remote end to send the LBR packet.

Transmit Type

Sets the packet transmit type to be

Unicast

or

Multicast

.

Destination MAC

Sets the MAC address of the remote end.

5.

In the left navigation tree, select

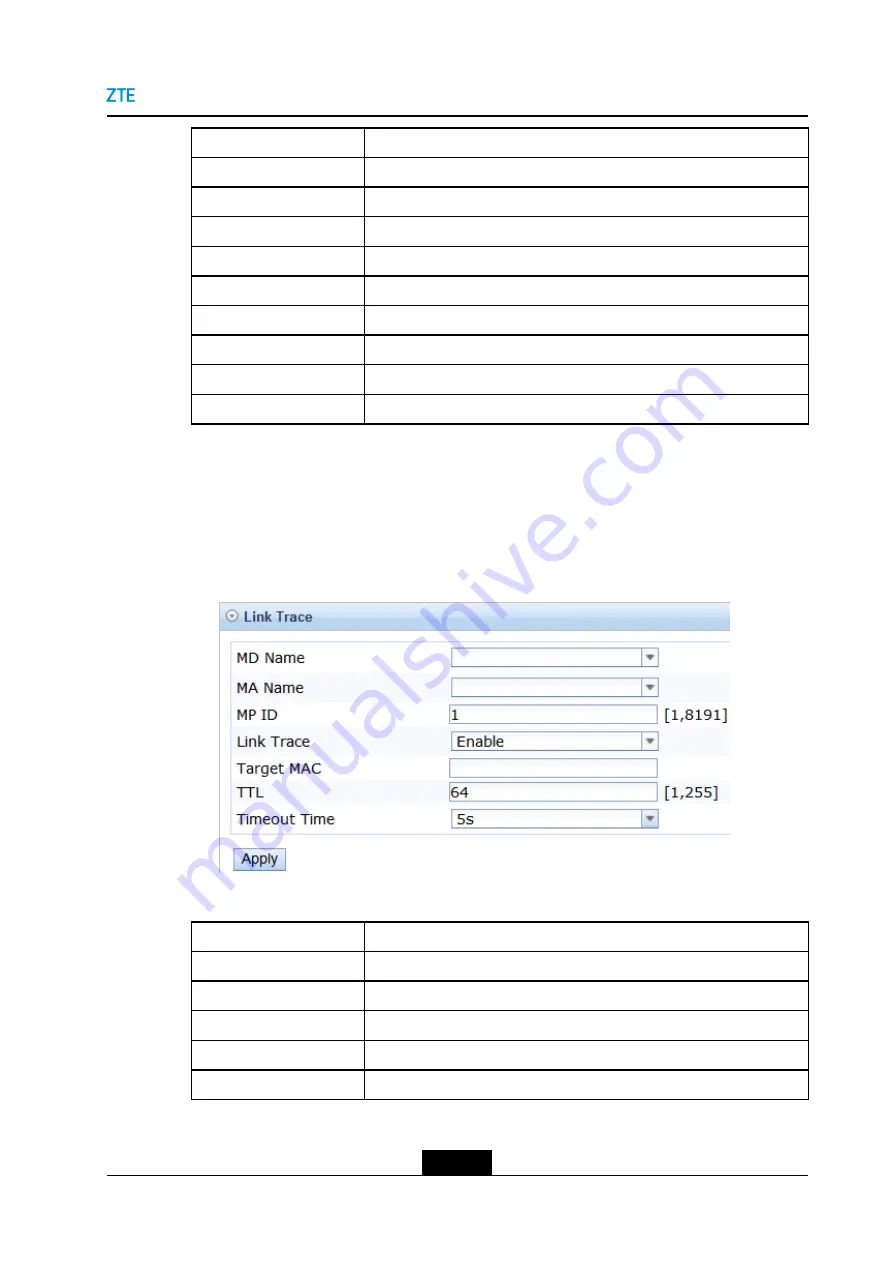
ETH > OAM_CFM > Link Trace

. The

Link Trace

pane is displayed on the right.

6.

Set the parameters, and click the

Apply

button.

The CFM link trace function is

enabled, see

Figure 3-6

.

Figure 3-6 CFM Link Trace Pane

For a description of the parameters, refer to the following table.

Parameter

Description

MD Name

Select an MD name from the configured MD list.

MA Name

Select an MA name from the configured MA list.

MPID Primary Key

Sets the local MEP ID configured for the port.

Link Trace

Sets whether the function is enabled.

Destination MAC

Sets the MAC address of the remote end.

3-7

SJ-20150804150350-006|2015-09-17 (R1.0)

ZTE Proprietary and Confidential

Summary of Contents for ZXMW NR8120A

Page 1: ...icrowave Transmission System Maintenance Guide Version V2 04 02 ZTE CORPORATION No 55 Hi tech Road South ShenZhen P R China Postcode 518057 Tel 86 755 26771900 Fax 86 755 26770801 URL http support zte com cn E mail 800 zte com cn ...

Page 2: ... infringement ZTE CORPORATION and its licensors shall not be liable for damages resulting from the use of or reliance on the information contained herein ZTE CORPORATION or its licensors may have current or pending intellectual property rights or applications covering the subject matter of this document Except as expressly provided in any written license between ZTE CORPORATION and its licensee th...

Page 3: ...nstallation 1 8 1 3 3 Checking the Combiner Installation 1 9 1 3 4 Checking the Antenna Installation 1 9 1 3 5 Checking the IF Cable 1 10 Chapter 2 Troubleshooting 2 1 2 1 Application Faults 2 2 2 1 1 A PC Connected to the LMT Interface Cannot Ping Equipment 2 2 2 1 2 A PC Connected to the NMS Interface Cannot Ping the Equipment 2 2 2 2 Radio Link Faults 2 3 2 2 1 The Receive Level Does Not Reach ...

Page 4: ...ocating Methods 3 1 3 1 Performing the Loopback Test 3 1 3 2 Checking the Ethernet OAM Function 3 3 3 2 1 Checking CFM 3 5 3 2 2 Checking EFM 3 13 3 3 Performing the MSTP Single Step Operation 3 16 Chapter 4 Indicators 4 1 Glossary I II SJ 20150804150350 006 2015 09 17 R1 0 ZTE Proprietary and Confidential ...

Page 5: ...ng Describes the common fault analysis including application fault radio link fault TDM service fault Ethernet service fault and network management fault Chapter 3 Fault Locating Methods Describes the common fault locating method including loopback test Ethernet OAM test and MSTP single step operation Chapter 4 Indicators Describes the indicators of the ZXMW NR8120A 8120D system Conventions This m...

Page 6: ...uation Failure to comply can result in serious injury equipment damage or interruption of major services Caution indicates a potentially hazardous situation Failure to comply can result in moderate injury equipment damage or interruption of minor services Note provides additional information about a certain topic II SJ 20150804150350 006 2015 09 17 R1 0 ZTE Proprietary and Confidential ...

Page 7: ...personnel can detect and resolve board faults in a timely manner Steps 1 Log in to the WEB LMT system In the left navigation tree select Home Home The board status information is displayed in the right pane see Figure 1 1 Figure 1 1 Board Status Information 2 Optional If the running indicator of a board is lit red troubleshoot the board fault immediately For detailed information refer to the ZXMW ...

Page 8: ...t Performance Statistics Data 2 Check the performance indexes of the current 15 minutes and verify that the performance indexes are normal For detailed information of each performance index refer to the ZXMW NR8120AD Digital Microwave Transmission System KPI Reference End of Steps 1 1 3 Checking Performance Data of the Past 10 Days This procedure describes how to check the radio link performance d...

Page 9: ...an observe and analyze the alarm information reported from each Network Element NE including the current alarms historical alarms and notifications It helps detect and resolve the faults or potential faults during network operation in a timely manner Note Here the process of checking the current alarms is used as an example to describe how to check alarms Steps 1 Log in to the WEB LMT system In th...

Page 10: ...nd Notification Handling Reference End of Steps 1 1 5 Checking Device Events This procedure describes how to check device events By checking device events in the alarm management window maintenance personnel can detect and resolve the faults or potential faults during network operation in a timely manner Steps 1 Log in to the WEB LMT system In the left navigation tree select Alarm Event The device...

Page 11: ...ify that the air break switch power supply of the portal frame is normal 3 Verify that the rack antenna feeder IDU ODU and lightning protector are well grounded 4 Verify that the power indicators of the following boards of the IDU are in normal status The OPWER indicators of the Radio Core Cross Modem Unit A RCMUA and Radio Modem Expansion A RMEA board End of Steps 1 2 2 Cleaning the Equipment Thi...

Page 12: ...inet bottom clean the equipment layer by layer and extract all the papers l Clean narrow gaps This method is used to clean a board that has a 3 5 mm gap from other boards or the equipment Operation procedure Insert the extension pipe of a special spray gun or a hand held pressure sprayer into the gap and spray wash the board sides l Clean boards without gaps This method is used to clean boards tha...

Page 13: ...t room within the range from 20 to 80 and take waterproof and dampproof measures for the equipment in the rainy season End of Steps 1 3 Quarterly Maintenance 1 3 1 Checking the Receive Level This procedure describes how to check the receive level and the handling methods in case that the receive level is out of the planned range Steps 1 Verify that the ODU receive level is within the planned range...

Page 14: ...i versity mode to eliminate the multipath effect à Adjust the antenna height à Increase the antenna aperture End of Steps 1 3 2 Checking the ODU Installation The procedure describes how to check the Outdoor Unit ODU installation to ensure that the ODU can operate properly and well cooperate with other devices Steps 1 Verify that the installation position and direction of the ODU s adapter meet the...

Page 15: ...ps 1 Verify that the combiner is fastened to the antenna firmly and the four screws are secured 2 Verify that the combiner is within the protection range of the lightning rod Note The protection angle of the antenna s lightning rod must be less than 45 In areas with high mountains or frequent thunderstorm the protection angle of the antenna s lightning rod must be less than 30 3 Verify that the co...

Page 16: ...ll sealed 2 Verify that the connectors of the IF cable are fastened 3 Verify that the IF cable is not broken or twisted and its shielding layer is not exposed 4 Verify that the bending radius of the IF cable is greater than 30 cm 5 Verify that the grounding points of the IF cable comply with the specification The IF cable should be more than 60 m in length and is grounded in the three point ground...

Page 17: ... the IF cable is led from outdoors to indoors if the outdoor IF cable is higher than the feeder window bottom make a waterproof bend near the feeder window otherwise there is no need to make a waterproof bend For operation details refer to the ZXMW NR8120AD Digital Microwave Transmission System Hardware Installation Guide End of Steps 1 11 SJ 20150804150350 006 2015 09 17 R1 0 ZTE Proprietary and ...

Page 18: ...ZXMW NR8120A 8120D Maintenance Guide This page intentionally left blank 1 12 SJ 20150804150350 006 2015 09 17 R1 0 ZTE Proprietary and Confidential ...

Page 19: ...e troubleshooting equipment problems l Troubleshoot local problems before troubleshooting remote problems l Troubleshoot problems below towers before troubleshooting problems above towers Figure 2 1 displays the troubleshooting flow Figure 2 1 Troubleshooting Flow Table of Contents Application Faults 2 2 Radio Link Faults 2 3 TDM Service Faults 2 6 Ethernet Service Faults 2 6 Network Management 2 ...

Page 20: ...CMUD board to verify that the RCMUC or RCMUD board is operating properly l If the RUN indicator is lit red for five seconds the RCMUC or RCMUD board is being started l If the RUN indicator is lit green the RCMUC or RCMUD board is operating properly l If the RUN indicator is not lit green after the RCMUC or RCMUD board is started the RCMUC or RCMUD board may be faulty 6 If the problem still exists ...

Page 21: ...the RUN indicator is lit green the RCMUC or RCMUD board is operating properly l If the RUN indicator is not lit green after the RCMUC or RCMUD board is started the RCMUC or RCMUD board may be faulty 6 If the problem still exists after the previous operations replace the PC 2 2 Radio Link Faults 2 2 1 The Receive Level Does Not Reach the Theoretical Value Perform the following troubleshooting steps...

Page 22: ...ng steps 1 Verify that the actual operating power and transmitting power of the ODUs at the two ends of the radio link are normal In the LMT system if the displayed operating frequency is consistent with the designed value and the difference between the actual transmitting power and the designed value does not exceed 2 dBm the radio link is considered normal otherwise the radio link is abnormal 2 ...

Page 23: ...ooting steps 1 Check incorrect hardware installation and verify that the equipment and antenna feeders are installed properly 2 Check link loop problem due to incorrect protection configuration and modify the 1 1 protection mode to 1 0 no protection mode 3 Check link losing lock due to that the receive level is lower than the threshold value of the high modulation mode and set the working mode to ...

Page 24: ...s Ethernet Services Are Disconnected Perform the following troubleshooting steps 1 Verify that the radio link is operating properly For detailed information refer to 2 2 3 Radio Link Is Disconnected 2 Verify that Jumbo and HC PLA are enabled or disables as what they should be 3 Verify that the GbE interface status indicator of the RCMUA board is in normal status l If the indicator is lit green or ...

Page 25: ... layer 2 switching protocol are in the same subnetwork l If the equipment is working in the layer 3 routing mode verify that the Open Shortest Path First OSPF configuration is correct and verify that the following cases do not exist à There are network management routes missed à Network management services are disconnected due to the equipment s crossing network segments Users can add routes for t...

Page 26: ...ZXMW NR8120A 8120D Maintenance Guide This page intentionally left blank 2 8 SJ 20150804150350 006 2015 09 17 R1 0 ZTE Proprietary and Confidential ...

Page 27: ... and rapidly locates the faulty NEs and faulty boards which facilitates equipment commissioning and debugging In the NR8000 Series WEB LMT system users can set radio link loopbacks including modulation demodulation loopback and IF loopback Time Division Multiplexing TDM loopback and Ethernet loopback Radio Link Loopback Radio link loopback helps check whether the E1 service is operating properly N...

Page 28: ...between the local error bit tester and the local RCMUC RMEA is abnormal and the fault exists between the local error bit tester and the local RCMUC RMEA TDM Loopback The following describes the TDM loopback test procedure 1 Connect the equipment to an error bit tester 2 Log in to the WEB LMT system In the left navigation tree select TDM Port Configuration and set the Port Status of the correspondi...

Page 29: ...o helps check whether the cables connected to the remote service board are normal Outer Loopback The loopback test is implemented at the local electrical port This loopback type is used to check whether the E1 service entering the local service board is normal It also helps check whether the cables connected to the local service board are normal 5 Click the Apply button and verify that the BER is ...

Page 30: ...nt RMEP corresponding to the Local Maintenance association End Point LMEP that reports the CCM loss alarm and initiates the Loopback LB function towards the MAC address to check the network connectivity l If the Loopback Reply LBR message is returned the link is connected l If no LBR message is returned the link is faulty 2 Initiate the Link Trace LT function towards the MAC address found in step ...

Page 31: ...OAM_CFM Performance Test The Performance Test pane is displayed on the right 2 Set the parameters and click the Apply button The performance test function is enabled see Figure 3 4 Figure 3 4 Performance Test Pane For a description of the parameters refer to the following table Parameter Description MD Name Select an MD name from the configured MD list MA Name Select an MA name from the configured...

Page 32: ...nsmitting rate This parameter is valid only when the Operator Type parameter is set to Test Transmission or Test Reception TST Packet Length Sets the packet length This parameter is valid only when the Operator Type parameter is set to Test Transmission or Test Reception TST Test Time Sets the test duration This parameter is valid only when the Operator Type parameter is set to Test Transmission o...

Page 33: ...nicast or Multicast Destination MAC Sets the MAC address of the remote end 5 In the left navigation tree select ETH OAM_CFM Link Trace The Link Trace pane is displayed on the right 6 Set the parameters and click the Apply button The CFM link trace function is enabled see Figure 3 6 Figure 3 6 CFM Link Trace Pane For a description of the parameters refer to the following table Parameter Description...

Page 34: ... 3 7 Figure 3 7 CFM Function Result Pane TEST Button For a description of the query result refer to the following table Parameter Description Valid Result 1 indicates that the result is valid while 0 indicates that the result is invalid An invalid result indicates that unknown errors occur during the calculation process causing the result invalid Normally the displayed query result is valid Source...

Page 35: ... calculates the packet loss rate every an interval that is set when the function is enabled This parameter indicates the packet loss rate within the last interval while Local indicates that the packet loss rate is calculated in the direction from the destination end to the local end Local Average Loss Rate of Packet Indicates the average value of the local packet loss rates within all the interval...

Page 36: ...n is initiated Destination MP ID Displays the MP ID of the destination end of the test Last Two way Delay Displays the bidirectional delay calculated within the last interval Average Two way Delay Displays the average delay of all the calculated delays of the test Average Delay Vibration Displays the average value of all the calculated delay jitters of the test Start Time Displays the starting tim...

Page 37: ...s received in the test Normally the destination end returns an LBR packet to the source end every time it receives an LBM packet According to Number of Sending LBM and Number of Receiving LBR users can determine whether the link between the source end and the destination end is normal Start Time Displays the starting time of the test End Time Displays the ending time of the test e Select an MP rec...

Page 38: ...ddress of the end where the MP that sends the LTR is located Hit Flag Indicates whether the LTM packet reaches the destination end If it is 1 the LTM reaches the destination end If it is 2 the LTM does not reach the destination end If Hit Flag of all the records is 1 and TTL is larger than 0 the number of records displayed is less than 20 users can determine that the link fault is located after th...

Page 39: ...n tree The EFM Global Configuration pane is displayed on the right 2 Set the parameters and click the Apply button see Figure 3 13 Figure 3 13 EFM Global Configuration Example For a description of the parameters refer to the following table Parameter Description EFM Global Configuration Indicates the global switch of the EFM protocol Loopback Timeout Sets the timeout threshold of waiting for the r...

Page 40: ...FM Interface Configuration pane is displayed on the right see Figure 3 14 Figure 3 14 EFM Interface Configuration Pane 4 Click the Add button The EFM Interface Modification pane is displayed see Figure 3 15 Figure 3 15 EFM Interface Configuration Example For a description of the parameters refer to the following table Parameter Description Port select a port from the drop down list box which conta...

Page 41: ...her an error frame period event occurs at the port Errored Frame Period Window Sets the size of the statistics window for EFM s judging whether an error frame period event occurs at the port Errored Frame Seconds Summary Threshold Sets the threshold for EFM s judging whether an error frame seconds summary event occurs at the port Errored Frame Seconds Summary Window Sets the size of the statistics...

Page 42: ...ation path ETH XSTP Global Configuration if Force Version of a device is set to MSTP or RSTP and the device is connected to an STP device the connected port will automatically migrate to the STP mode When the device on which STP is operating is removed the port cannot automatically migrate to the MSTP RSTP mode In this case users can perform the M_Check operation to forcedly make the port migrate ...

Page 43: ... software running stage PS Green 48 V power indicator l Steady on The 48 V power input is normal l Off no power input or out of the input range LINK Green Wireless link status indicator l Steady on The wireless link is in synchronization status l Flashing fast The wireless link is in capture status l Off The wireless link is out of synchronization OPWR Green ODU power indicator l Steady on The ODU...

Page 44: ...oard is operating properly in the software running stage l Steady on in green The CPU is out of control in the software running stage PS Green 48 V power indicator l Steady on The 48 V power input is normal l Off no power input or out of the input range LINK Green Wireless link status indicator l Steady on The wireless link is in synchronization status l Flashing fast The wireless link is in captu...

Page 45: ...or Description Status E1 Green The 16 channel E1 link status l Lit All the 16 E1 lines are normal l Not lit All the 16 E1 lines lose signals l Flashing at 1 Hz Some E1 signals are normal and the others are lost RFAD Board Indicators Name Color Description Status RUN Green Operating status indicator l Lit The board is powered on and is in the non controlled status l Flashing at 1 Hz The fan is oper...

Page 46: ...ZXMW NR8120A 8120D Maintenance Guide This page intentionally left blank 4 4 SJ 20150804150350 006 2015 09 17 R1 0 ZTE Proprietary and Confidential ...

Page 47: ...t DDF Digital Distribution Frame EFM Ethernet in the First Mile IDU Indoor Unit IF intermediate Frequency LB Loopback LBR Loopback Reply LMEP Local Maintenance association End Point LT Link Trace LTR Link Trace Reply MA Maintenance Association MAC Media Access Control MD Maintenance Domain I SJ 20150804150350 006 2015 09 17 R1 0 ZTE Proprietary and Confidential ...

Page 48: ... OSPF Open Shortest Path First PC Personal Computer RCMUA Radio Core Cross Modem Unit A RFA Radio Fan Asset RMEA Radio Modem Expansion A RMEP Remote Maintenance association End Point RSL Received Signal Level RSTP Rapid Spanning Tree Protocol STP Spanning Tree Protocol TDM Time Division Multiplexing UPS Uninterruptible Power Supply II SJ 20150804150350 006 2015 09 17 R1 0 ZTE Proprietary and Confi...

Reviews: