background image

011302/01 

4


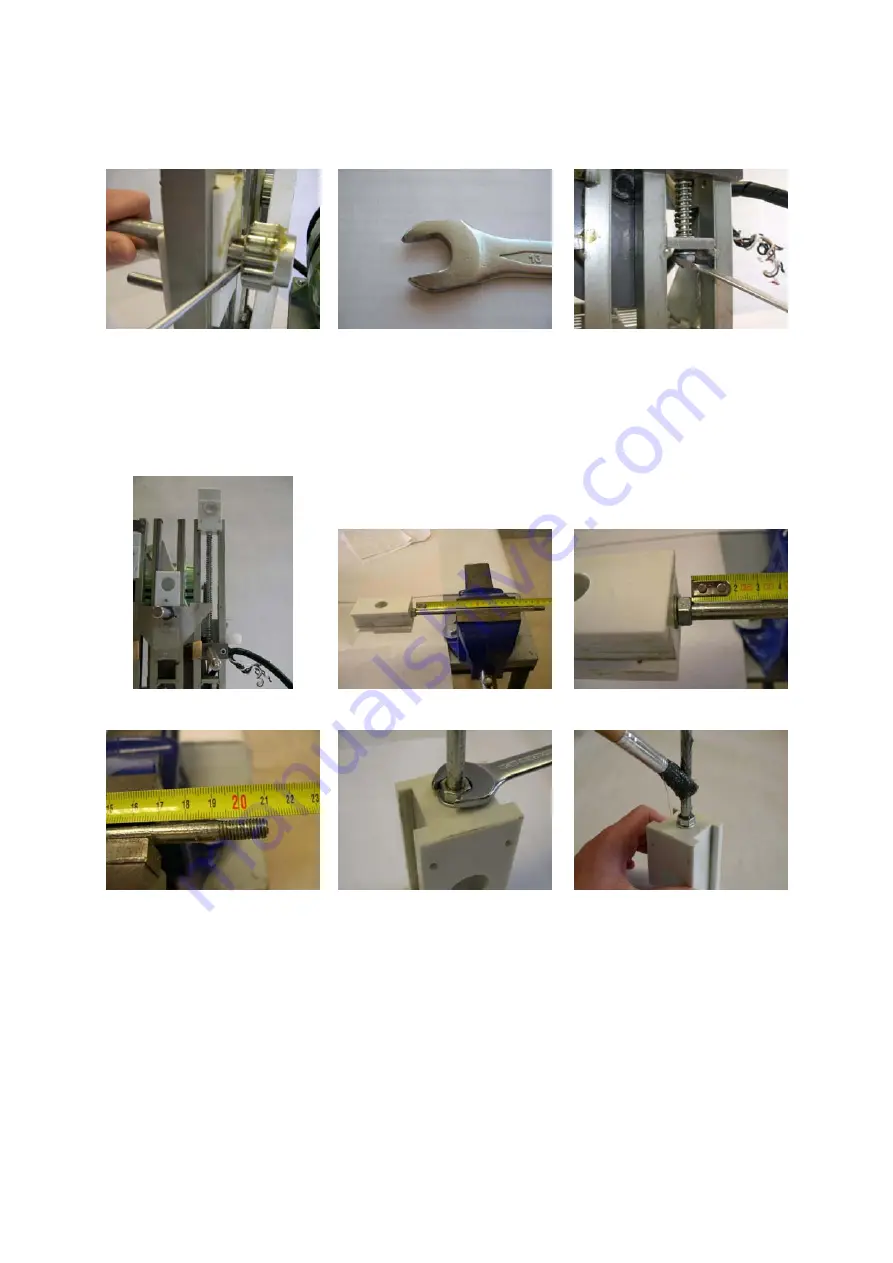
Unscrew the bottom nut from the puller. An open-ended wrench will be required 
(Figs 6e and 6f). 


 6d 

6e 

6f 


Extract the runner with its spring and puller (Fig. 6g). 


ASSEMBLY 


Screw the nut onto the puller, fit the washer and screw the puller onto the runner. 
There should be 210 -211mm free after the nut (Figs. 6h - i - j - k) 


 6g 

6h 

6i 


 6j 

6k 

6l 


Make sure that the puller is as perpendicular to the runner as possible. 


Grease the puller, fit the spring and grease it (Figs. 6l and 6m). 


Grease the operating area (Fig. 6n). 


Summary of Contents for Z05

Page 1: ...len key turning in a clockwise direction reverse or manually in older machines until the cups are in the horizontal position The machine can also be started and stopped when the cups are rising N B en...

Page 2: ...ower supply Fig 2d except the mains supply bridge Fig 2e Extract the electronic circuit board 2 5mm Allen key Fig 2f 2a 2b 2c 2d 2e 2f 3 REPLACING THE ELECTRONIC CIRCUIT BOARD Mark the wires in pairs...

Page 3: ...ING THE BRIDGE Repeat Section 4 without needing to extract the pusher assembly Extract the bottom bolt from the bridge runner M8x35Allen Fig 5a This will release the bridge On fitting the new bridge f...

Page 4: ...d puller Fig 6g ASSEMBLY Screw the nut onto the puller fit the washer and screw the puller onto the runner There should be 210 211mm free after the nut Figs 6h i j k 6g 6h 6i 6j 6k 6l Make sure that t...

Page 5: ...ge with only the bottom bolt without tightening it Apply a little thread locking adhesive e g Loctite 648 only on the M88x35 bolt Fig 6p 6 6o 6p Place the rod in the highest position and fit the pin a...

Page 6: ...the guides should be closed using a clamp Fig 6y If they are stiff they should be opened up using a lever Fig 6z Tighten the bolts and then re check for slackness or tightness Fig 6x In this position...

Page 7: ...d onto the pin fit the key Fig 7k and refit onto the reducer shaft Tighten the bolt Situate the rod at its top position Fit the reducer in position taking care to raise the bearing above the copier Fi...

Page 8: ...ied at the mid point between the two pulleys will cause the belt to give approximately 6 to 8mm Fig 9c If the belt is too tight it will emit a noise if it is too loose in the event of an abrupt accide...

Page 9: ...be displayed on the left hand side of the screen The number displayed corresponds to the tenths of a second delay in stopping the machine thus if the machine needs to be stopped sooner a number lower...

Page 10: ...on the RUBBER STOP Ref 0504024 Figs 10c 10 d 10e 10c 10d 10e 11 BELT CHANGING MACHINES WITH SHOCK ABSORBERS ON THE MOTOR MOUNT If the belt fails on a machine with 20 shock absorbers Fig 11 it is advis...

Page 11: ...oser 12a not activated 12b activated 12c activated Hook on the spring and position the feed paddle rod facing inwards Fig 12d and then fit the rear 12d 12e 3 UNLOCKING THE SELECTOR Machines between No...

Page 12: ...01 12 14 WIRING DIAGRAMS 1 Fuse 2 Power supply switch 3 Electronic circuit board 4 Meter microswitch 5 Micrometer microswitch 6 Micrometer microswitch 7 Motor 8 Condenser 9 Tray microswitch 10 On off...

Reviews: