background image

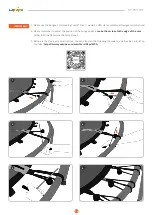
(a) Insert the Steel Bar (#10) into the 

longer mesh sleeve

 on the top of the enclosure net. 

19

1

2

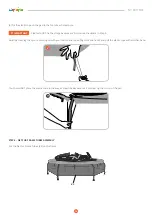
(b) Insert the Steel Bar (#10) into the preformed hole on the U-Pole accordingly. Please be careful and patient in this step, whether 

when you’re looking for the proper angle or trying the best to insert the Steel Bar (#10). Please feel free to email the Zupapa 
Customer Happiness Executives (

official@zupapa.us

) if you have any questions about the assembly. 

3

Congratulations! Your trampoline is completed! 

There are two steps listed as (a) and (b) for inserting the Steel Bar (#10) into both the longer and the shorter mesh sleeve.

STEP 9 - STEEL BAR ASSEMBLY

Summary of Contents for Small Trampoline

Page 1: ...mpoline Read understand and follow guidelines in this manual before dis assembling using your trampoline Email official zupapa us Website https www zupapa us Not for commercial use Recommend for children aged 2 to 8 PLAY ENJOY BOND ...

Page 2: ... the Spam your email Settings if you do not receive a reply as it is probably blocked Our Customer Happiness Executives will always get back to you no later than the timeframe Add the following email address to your CONTACT LIST in case of any blocking Email official zupapa us Visit https www zupapa us for more information About Zupapa 3 Safety Instructions 4 Parts List 6 Assembly 9 Disassembly 20 M...

Page 3: ...assembly instructions Read understand and follow this user manual before assembling and using the trampoline Save this manual for future reference It s the responsibility of the owner and the jumper for potential risks of injuries due to inappropriate use not obeying safety instructions in this manual ZUPAPA SMALL TRAMPOLINE IN YELLOW GREEN 54 inches 66 inches ZUPAPA SMALL TRAMPOLINE IN YELLOW BLU...

Page 4: ...educe the chance of getting pinched To achieve the overall performance at the same time we ve carefully selected top quality materials for each part The pad reaching up to 15 millimeters 15 mm is 5 millimeters 5 mm thicker than others in 10 millimeters 10 mm All the scientifically designed poles are capable of dispersing stress and enhancing stability to the greatest extent are also galvanized for ...

Page 5: ... Do not allow the player to use the structure if you find there are bent tubes torn mat or something else that may cause harm Keep control of the playing time because long time jumping without a break would increase the chance of getting injured Do not allow the player to use the trampoline without supervision Do not allow the player to use the trampoline without attaching the frame pad Properly ti...

Page 6: ...t play on the frame pad Always play on the trampoline mat Do not attempt to somersault because it s dangerous to make your head or neck land on the ground which may cause serious injuries such as paralysis or even death even though you land in the middle of the mat Do not damage the safety net For example do not hit or cut the safety net Do not attempt to jump or climb over the safety net 5 Superv...

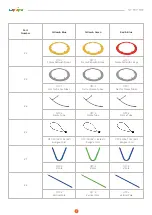
Page 7: ...Do not forget to provide the order number part number quantity and pictures or video clips if applicable so that you can get what you need as soon as possible 1 We ve deleted all parts labeled as 5 from the Parts Lists when upgrading the product 2 The Screw Sets 2 14 are for the 66 inch trampolines only You will NOT receive them if you have a 54 inch one 6 03 PARTS LIST IMPORTANT Part Number Yello...

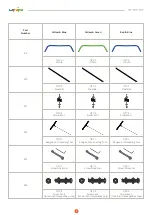
Page 8: ... Pad with Straps QTY 1 Net for Frame Tubes QTY 1 Net for Frame Tubes QTY 1 Net for Frame Tubes QTY 6 Frame Tube QTY 6 Frame Tube QTY 6 Frame Tube QTY 30 54 42 66 Bungee Cord QTY 30 54 42 66 Bungee Cord QTY 30 54 42 66 Bungee Cord QTY 3 V Pole QTY 3 V Pole QTY 3 V Pole QTY 6 Vertical Pole QTY 6 Vertical Pole QTY 6 Vertical Pole ...

Page 9: ...TY 3 Screw Set 1 QTY 3 Screw Set 1 QTY 3 Screw Set 1 QTY 1 Bungee Cord Loading Tool QTY 1 Bungee Cord Loading Tool QTY 1 Bungee Cord Loading Tool QTY 1 Screw Driver Set QTY 1 Screw Driver Set QTY 1 Screw Driver Set QTY 6 Screw Set 2 for 66 inch trampolines only QTY 6 Screw Set 2 for 66 inch trampolines only QTY 6 Screw Set 2 for 66 inch trampolines only ...

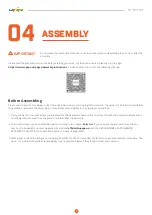
Page 10: ...each out to Zupapa Customer Happiness Executives official zupapa us with the ORDER NUMBER PART NUMBER REQUIRED QUANTITY for each part and photos or videos if applicable 3 Wear gloves and use the Bungee Cord Loading Tool 12 and the Screw Driver Set 13 when you assemble the trampoline The owner or installer should take responsibility for any possible injuries if they forget to wear and use them Please...

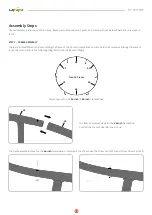
Page 11: ...nch trampolines and the 66 inch trampolines although the layout looks the same Refer to the following diagrams for each size accordingly 10 The frame assembly steps for the 66 inch trampolines Important You should use the Screw Set 2 14 and Screw Driver Set 13 The frame assembly steps for the 54 inch trampoline Connect the Frame Tube 4 one by one Frame Layout for the 54 inch 66 inch Trampolines 4 ...

Page 12: ...n below with three Bungee Cords 6 STEP 2 ATTACH THE MAT WITH ENCLOSURE NET TO THE FRAME Please ensure the bungee cords do NOT cover the holes All the bungee balls should face downward IMPORTANT b Adjust the position of the bungee balls to make them close to the edge of the mat rather than the frame so that the bungee cord will not break or get loose when jumping hole blue ring ...

Page 13: ...d 2 Please remember to adjust the position of the bungee balls to make them close to the edge of the mat rather than the frame see the last picture 3 Below are the step by step instructions You can also scan the following QR code to visit the video tutorial on YouTube https www youtube com watch v rIDFprlWP A IMPORTANT ...

Page 14: ...EMBLY a Place the Pad 2 on the frame Please align all the holes on the mat with the holes on the frame 13 Tip 1 Use the Bungee Cord Loading Tool 12 Tip 2 Always install another bungee cord in the opposite position after the one has been installed so that the tension can averagely distribute Tip 3 Don t install the bungee cords side by side or you ll find it s hard and even unable to finish in the en...

Page 15: ...Tubes 3 on the frame STEP 4 NET FOR FRAME TUBES ASSEMBLY b Tie the elastic rope on the pad to the foot of each steel pole Please do NOT tie the straps because we ll introduce the details in Step 6 IMPORTANT Hold the steel leg that you re working on with your thumb and index finger of one hand and pull the elastic rope with another hand 3 ...

Page 16: ... Tubes 3 into the preformed hole accordingly IMPORTANT 15 There are three steps listed as a b and c STEP 5 V POLE ASSEMBLY a Align the hole of the V pole 7 with the hole on the frame b Insert the Screw Set 1 11 onto the V pole as shown below 7 Screw Set 1 ...

Page 17: ...ick approach please scan the following QR code or visit the page https www youtube com watch v Xrai_aGmnFo There are four steps listed as a b c and d STEP 6 TIE THE STRAPS c Finish the assembly of all V poles as per the steps shown below with the tool Screw Driver Set 13 ...

Page 18: ...7 a Turn the whole trampoline frame upright as shown below 2 3 b Tie the straps on the pad to the preformed rings on the mat accordingly 1 2 3 c Tie the straps on the Net for Frame Tubes 3 to the frame 1 ...

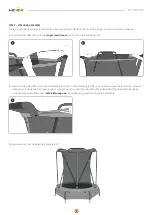
Page 19: ...ame and adjust it to a proper shape Insert the U Pole 9 into the shorter mesh sleeve on the top of the enclosure net STEP 8 U POLE ASSEMBLY Install the Vertical Pole 8 as per the steps shown below STEP 7 VERTICAL POLE ASSEMBLY 2 3 1 ...

Page 20: ...whether when you re looking for the proper angle or trying the best to insert the Steel Bar 10 Please feel free to email the Zupapa Customer Happiness Executives official zupapa us if you have any questions about the assembly 3 Congratulations Your trampoline is completed There are two steps listed as a and b for inserting the Steel Bar 10 into both the longer and the shorter mesh sleeve STEP 9 STEE...

Page 21: ...d use Reuse the trampoline only after you ve replaced all broken parts Punctures holes or tears in the trampoline mat Sagging trampoline mat Loose stitching or any kind of deterioration of the mat Bent or broken frame parts such as the legs Damaged missing or insecurely attached frame pad Protrusions on the frame springs or mat MAINTENANCE 06 Do not move the trampoline from one room to another wit...

Page 22: ...pplied free of charge at ANY TIME Damages caused by weather including but not limited to winds rains snow are excluded from the warranty You can either email Zupapa official zupapa us or the retailer with the inquiry details order number and pictures or videos if applicable if you need to claim for the warranty In case of any blocking we suggest you add Zupapa to your CONTACT LIST in advance Check t...

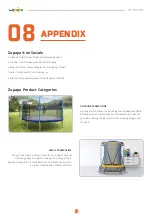
Page 23: ...king for a perfect place for your preschool and school age boys and girls to free up their energy Try a Zupapa trampoline for small kids with the basket hoop which is a great combination of safety and fun 22 Zupapa on Socials Facebook https www facebook com zupapadotus YouTube https www youtube com c Zupapa Instagram https www instagram com zupapa_official Twitter https twitter com zupapa_us Pintere...

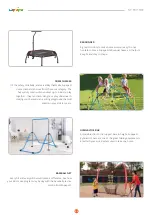
Page 24: ...tion enables up to 6 kids to play together they can climb dangle or play underneath making your backyard an exciting playground that will entertain your kids for years GYMNASTICS BAR Adjustable in both the support base height Zupapa gymnastics bars are one of the great folding equipment to entertain your kids Rest assured to take one home BASEBALL NET Every hit and every pitch would make a differen...

Page 25: ...would love to stay outdoors more than before PADDLE BOARD A necessity for water loving ones The most alluring you can surf together with your furry friends of course if they are not afraid of water and are glad to go surfing with you HAMMOCK STAND Nothing is better than reposing on a Zupapa hammock set while the gentle breeze and warm sunlight give a pat on your body You can imagine how delightful ...

Page 26: ...PLAY ENJOY BOND ...

Reviews: