background image


Additional Functions 


THE MAIN MENU - EVAP TEST 


22  


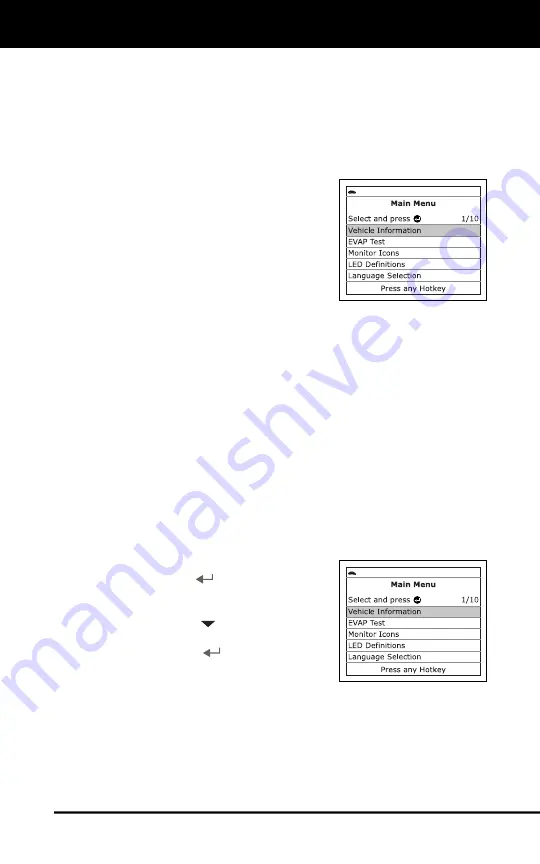
THE MAIN MENU 

In addition to retrieving Diagnostic Trouble Codes (DTCs), you can use 

the  Code  Reader  to  perform  additional  diagnostic  tests,  to  view 

diagnostic  and  vehicle  information  stored  in  your  vehicle's  on-board 

computer, and to configure the Code Reader for your particular needs. 

Additional  tests  and  related  functions  are  accessed  through  the  Main 

Menu. The following functions are available: 

„


Vehicle Information

  –  Displays  the 

Vehicle  Info  menu,  which  lets  you 

retrieve and view reference information 

for the vehicle under test. 

„


EVAP Test

  –  Performs  a  leak  test  for 

the vehicle's EVAP system. 

„


Monitor Icons

 – Shows the full names 

for  the 

I/M MONITOR STATUS

  icons 

shown on the Code Reader’s display. 

„


LED Definitions

  –  Provides  descriptions  of  the  meaning  of  the 

Code Reader 

SYSTEM STATUS

 LEDs. 

„


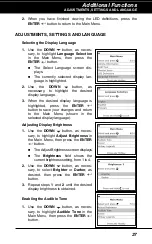
Language Selection

:  Sets  the  display  language  for  the  Code 

Reader to English, French or Spanish. 

„


Adjust Brightness

: Adjusts the brightness of the display screen. 

„


Audible Tone: 

Turns the Code Reader’s audible tone “on” and “off.” 

When turned “on,” a tone sounds each time a button is pressed. 

„


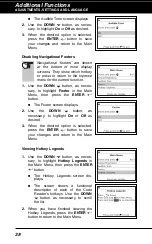
Footer

:  Turns  the  navigational  “footers”  at  the  bottom  of  most 

display screens “on” and “off.” 

„


Hotkeys Legends

:  Shows  functional  descriptions  for  the  Code 

Reader’s hotkeys. 

„


Unit of Measurement

: Sets the Unit of Measurement for the Code 

Reader’s display to USA or metric. 

To access the Main Menu: 

1.


While  linked  to  the  vehicle,  press  and 

hold the 

ENTER


 button. 

„


The Main Menu displays. 

2.


Use  the 

DOWN 

 button,  as  neces-

sary,  to  select  the  desired  option,  then 

press the 

ENTER


 button. 

3.


Available functions are described in the 

following paragraphs. 

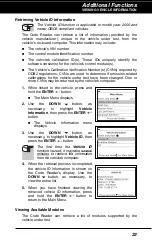
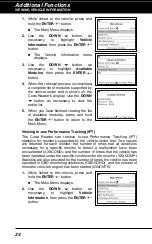
VIEWING VEHICLE INFORMATION 

The 

Vehicle Information

  function  offers  three  options  for  retrieving 

reference information for the vehicle under test; 

Vehicle ID

Available 

Modules

 and 

IPT

 (In-Use Performance Tracking). 

Summary of Contents for ZR4

Page 1: ......

Page 2: ...CODES DTCs 8 OBD2 MONITORS 11 PREPARATION FOR TESTING BEFORE YOU BEGIN 14 USING THE CODE READER CODE RETRIEVAL PROCEDURE 15 ERASING DIAGNOSTIC TROUBLE CODES DTCs 20 ADDITIONAL FUNCTIONS THE MAIN MENU 22 VIEWING VEHICLE INFORMATION 22 EVAP TEST 25 VIEWING MONITOR ICON DESCRIPTIONS 26 VIEWING THE LED MEANING 26 ADJUSTMENTS SETTINGS AND LANGUAGE 27 OBD UPDATER 29 TROUBLESHOOTING 29 WARRANTY AND SERVI...

Page 3: ...tc away from all moving or hot engine parts 4 Put the transmission in PARK for automatic transmission or NEUTRAL for manual transmission and make sure the parking brake is engaged 5 Put blocks in front of and behind the drive wheels 6 Read vehicle service manual before inspecting maintaining or repairing a vehicle 7 Wear ANSI approved safety goggles 8 Never leave the vehicle unattended while runni...

Page 4: ...d 1995 vehicles are OBD2 compliant To find out if a 1994 or 1995 vehicle is OBD2 compliant check the following 1 The Vehicle Emissions Control Information VECI Label This label is located under the hood or by the radiator of most vehicles If the vehicle is OBD2 compliant the label will state OBD II Certified 2 Government Regulations require that all OBD2 compliant vehicles must have a common sixte...

Page 5: ...w screen and or scrolls the LCD display to view DTCs and Freeze Frame data 3 DOWN button When in MENU mode scrolls down through the menu and submenu selection options When LINKED to a vehicle scrolls down through the current display screen to display any additional data 4 ENTER button When in MENU mode confirms the selected option or value 5 GREEN LED Indicates that all engine systems are running ...

Page 6: ...cle s Data Link Connector DLC DISPLAY FUNCTIONS Figure 2 Display Functions See Figure 2 for the locations of items 1 through 10 below 1 I M MONITOR STATUS field Identifies the I M Monitor status area 2 Monitor icons Indicate which Monitors are supported by the vehicle under test and whether or not the associated Monitor has run its diagnostic testing Monitor status When a Monitor icon is solid it ...

Page 7: ...de code number 1 as follows 1 Service should be scheduled and repairs made when convenient This DTC typically has no immediate threat to essential system components in the short term 2 Repair immediately if drivability issues are present Threat to essential system components if not repaired as soon as possible 3 Stop and repair vehicle immediately to prevent interrelated failures Harmful and damag...

Page 8: ...o highlight the desired unit of measurement 4 When the desired unit of measurement is selected press the ENTER button to confirm your selection The Firmware Screen displays for three seconds After the initial language and unit of measurement selections are performed these as well as other settings can be changed as de sired Proceed to ADJUSTMENTS SETTINGS AND LANGUAGE on page 27 for further instru...

Page 9: ...ions are known as Enabling Criteria The requirements and procedures vary for each Monitor Some Monitors only require the ignition key to be turned On for them to run and complete their diagnostic testing Others may require a set of complex procedures such as starting the vehicle when cold bringing it to operating temperature and driving the vehicle under specific conditions before the Monitor can ...

Page 10: ...diagnostic testing Warm up Cycle Vehicle operation after an engine off period where engine temperature rises at least 40 F 22 C from its temperature before starting and reaches at least 160 F 70 C The PCM uses warm up cycles as a counter to automatically erase a specific code and related data from its memory When no faults related to the original problem are detected within a specified number of w...

Page 11: ...and 5th characters are letters or numeric digits 0 thru 9 A thru F They identify the section of the system that is malfunctioning P 0 2 0 1 B C P U Body Chassis Powertrain Network Generic Manufacturer Specific Generic P Codes and Manufacturer Specific B C and U Codes Includes both Generic and Manufacturer Specific Codes 0 1 2 3 Identifies what section of the system is malfunctioning Identifies the...

Page 12: ...MIL On when the failure is first found If the failure causes a severe misfire that may cause damage to the catalytic converter the MIL flashes once per second The MIL continues to flash as long as the condition exists If the condition that caused the MIL to flash is no longer present the MIL will light steady On A DTC is saved in the computer s memory for later retrieval A Freeze Frame of the cond...

Page 13: ...DES DTCs on page 20 before erasing codes from the computer s memory If a Diagnostic Tool or Code Reader is used to erase the codes Freeze Frame data will also be erased OBD2 MONITORS Currently fifteen Monitors are supported by OBD2 systems Additional monitors may be added as a result of Government regulations as the OBD2 system grows and matures Not all vehicles support all fifteen Monitors Additi...

Page 14: ... Filter Monitor OBD2 Reference Table The table below lists current OBD2 Monitors and indicates the following for each Monitor A Monitor Type how often does the Monitor run Continuous or Once per trip B Number of trips needed with a fault present to set a pending DTC C Number of consecutive trips needed with a fault present to command the MIL On and store a DTC D Number of trips needed with no faul...

Page 15: ...ygen Sensor Monitor Once per trip 1 2 1 3 trips 40 Oxygen Sensor Heater Monitor Once per trip 1 2 1 3 trips 40 Exhaust Gas Recirculation EGR Monitor Once per trip 1 2 1 3 trips 40 Evaporative Emissions Controls Monitor Once per trip 1 2 1 3 trips 40 Secondary Air System AIR Monitor Once per trip 1 2 1 3 trips 40 NMHC Monitor Once per trip 1 2 1 3 trips 40 NOx Adsorber Monitor Once per trip 1 2 1 3...

Page 16: ...ke sure mechanical linkages to engine sensors throttle gearshift position transmission etc are secure and properly connected See your vehicle s service manual for locations Check all rubber hoses radiator and steel hoses vacuum fuel for leaks cracks blockage or other damage Make sure all hoses are routed and connected properly Make sure all spark plugs are clean and in good condition Check for dam...

Page 17: ...le connector to the vehicle s DLC The cable connector is keyed and will only fit one way If you have problems connecting the cable connector to the DLC rotate the connector 180 and try again If you still have problems check the DLC on the vehicle and on the Code Reader Refer to your vehicle s service manual to properly check the vehicle s DLC After the Code Reader s test connector is properly conn...

Page 18: ...ck ON to reset the computer Press the ENTER button to continue If the Code Reader cannot link to the vehicle s computer after three attempts the message Contact Technical Support displays Press and hold the ENTER button to return to the Main Menu Turn the ignition off and discon nect the Code Reader Contact Technical Support for assistance 7 After approximately 10 60 seconds the Code Reader will r...

Page 19: ...tal number of codes retrieved and the type of code being displayed Generic Stored Generic Pending Generic Permanent etc The upper right hand corner shows whether or not the displayed code commanded the MIL on and whether Freeze Frame data was stored for the priority code The Diagnostic Trouble Code DTC and related code definition are shown in the lower section of the display In the case of long co...

Page 20: ...mory but the yellow LED is illuminated it may be an indication that some of the Monitors supported by the vehicle have not yet run and completed their diagnostic testing Check the Code Reader s display for confirmation All Monitor icons that are blinking have not yet run and completed their diagnostic testing all Monitor icons that are solid have run and completed their diagnostic testing Red LED ...

Page 21: ... the ENTER button to view other pages of the list 10 If more than one DTC was retrieved and to view Freeze Frame Data press and release the DTC FF button as necessary Each time the DTC FF button is pressed and released the Code Reader will scroll and display the next DTC in sequence until all DTCs in its memory have displayed Freeze Frame Data if available will display after DTC 1 If more than one...

Page 22: ...at might help the technician troubleshoot the problem will also be erased Erase DTCs from the computer s memory as follows When DTCs are erased from the vehicle s computer memory the I M Readiness Monitor Status program resets status of all the Monitors to a not run flashing condition To set all of the Monitors to a DONE status an OBD2 Drive Cycle must be performed Refer to your vehicle s service ...

Page 23: ...t an advisory message shows on the display Start the engine hold vehicle speed at 0 then press the ERASE button to continue If the erase was not successful and ECU error code 22 is not present an advisory message shows on the display Verify that the Code Reader is properly connected to the vehicle s DLC and that the ignition is on then press the ERASE button to continue Erasing DTCs does not fix t...

Page 24: ...ATUS LEDs Language Selection Sets the display language for the Code Reader to English French or Spanish Adjust Brightness Adjusts the brightness of the display screen Audible Tone Turns the Code Reader s audible tone on and off When turned on a tone sounds each time a button is pressed Footer Turns the navigational footers at the bottom of most display screens on and off Hotkeys Legends Shows func...

Page 25: ... have been changed One or more CVNs may be returned by the vehicle s computer 1 While linked to the vehicle press and hold the ENTER button The Main Menu displays 2 Use the DOWN button as necessary to highlight Vehicle Information then press the ENTER button The Vehicle Information menu displays 3 Use the DOWN button as necessary to highlight Vehicle ID then press the ENTER button The first time t...

Page 26: ...TER button to return to the Main Menu Viewing In use Performance Tracking IPT The Code Reader can retrieve In use Performance Tracking IPT statistics for monitors supported by the vehicle under test Two values are returned for each monitor the number of times that all conditions necessary for a specific monitor to detect a malfunction have been encountered XXXCOND and the number of times that the ...

Page 27: ...est function lets you initiate a leak test for the vehicle s EVAP system The Code Reader does not perform the leak test but signals to vehicle s on board computer to initiate the test The vehicle manufacturer determines the criteria and method for stopping the test once it has been started BEFORE using the EVAP Test function refer to the vehicle s service repair manual to determine the procedures ...

Page 28: ...n screen displays The screen shows a list of the 15 Monitor icons along with the full name for each icon Use the DOWN button as necessary to scroll the list 2 When you have finished viewing the Monitor icon descriptions press the ENTER button to return to the Main Menu VIEWING THE LED MEANING The SYSTEM STATUS LEDs on the Code Reader provide a visual indication of the I M Readiness status of the v...

Page 29: ...en the desired display language is highlighted press the ENTER button to save your changes and return to the Main Menu shown in the selected display language Adjusting Display Brightness 1 Use the DOWN button as neces sary to highlight Adjust Brightness in the Main Menu then press the ENTER button The Adjust Brightness screen displays The Brightness field shows the current brightness setting from ...

Page 30: ... neces sary to highlight Footer in the Main Menu then press the ENTER button The Footer screen displays 2 Use the DOWN button as necessary to highlight On or Off as desired 3 When the desired option is selected press the ENTER button to save your changes and return to the Main Menu Viewing Hotkey Legends 1 Use the DOWN button as neces sary to highlight Hotkey Legends in the Main Menu then press th...

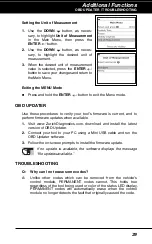
Page 31: ...irmware is current and to perform firmware updates when available 1 Visit www ZurichDiagnostics com download and install the latest version of OBD Updater 2 Connect your tool to your PC using a Mini USB cable and run the OBD Updater software 3 Follow the on screen prompts to install the firmware update If no update is available the software displays the message No updates available TROUBLESHOOTING...

Page 32: ...ot apply to you THIS WARRANTY IS EXPRESSLY IN LIEU OF ALL OTHER WARRANTIES EXPRESS OR IMPLIED INCLUDING THE WARRANTIES OF MERCHANTABILITY AND FITNESS To take advantage of this warranty the product or part must be returned to us with transportation charges prepaid Proof of purchase date and an explanation of the complaint must accompany the merchandise If our inspection verifies the defect we will ...

Page 33: ...63808 ...
Reviews: