background image

18

1.

In order to maintain and prolong the working life of your treadmill, we suggest you

power off for 10 minutes after every 2 hours’ running.

2.

The loose running belt will lead slip when you are running; the tighten running belt

will affect the performance of the motor, also can increase the wearing of the rollers and
running belt. The perfect state is that the belt can be lift from the running deck about
50-75mm.

Belt Middle Placement and Tightness Adjustment

It is very necessary to adjust the belt to the best condition for the better use of the
treadmill and the treadmill can work better.

Belt Middle Placement

Put the motorized treadmill on the level ground.

Let the treadmill run at the speed of 26Km/h, observe the running belt deviating
condition.

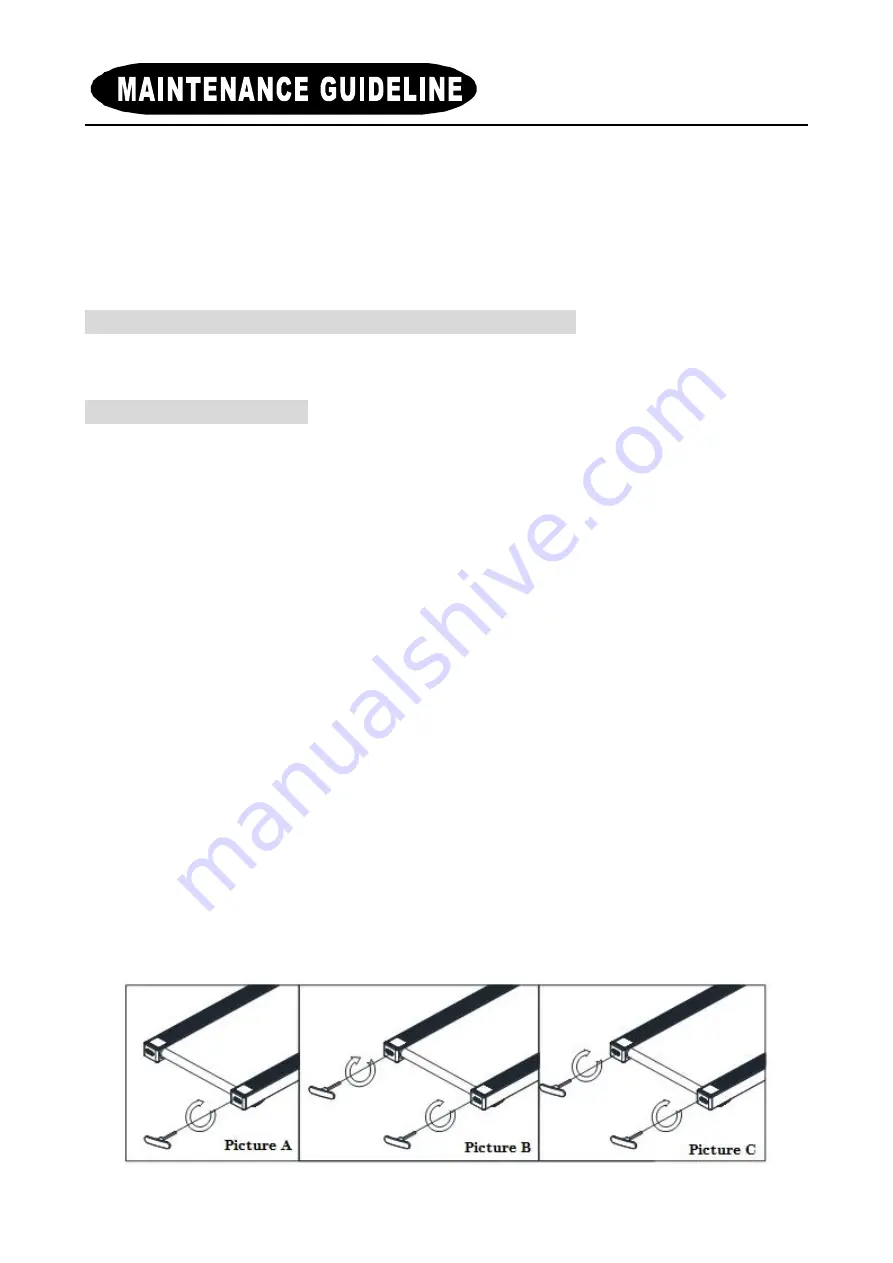
If the running belt deviate to the right, press the stop button and unplug the power,
turn the right side adjusting bolt clockwise by 1/4 circle, plug the power ,press then
start button, make the treadmill run, watch the running belt deviating condition.

Repeat the above steps, until the running belt is in the middle.

Picture A

If the running belt deviate to the left, press the stop button, unplug the power, turn the
left adjusting bolt clockwise by 1/4 circle, plug the power, press start button, make the
treadmill run, watch the deviating condition of the running belt.

Repeat the above steps, until the running belt goes to the middle.

Picture B.

After the above adjustment or a period of time’s use, running belt would become
loosen, need adjustment.

Press the stop button, power switch, and turn the left and right adjusting bolt
clockwise by 1/4 circle, plug power, press start button, make the treadmill run, then
stand on the treadmill to confirm the tightness.

Repeat above steps, until the running belt is moderate in tightness.

picture C.


Summary of Contents for ZX-M8SPO

Page 1: ...Owner s Manual Of The Motorized Treadmill...

Page 2: ...N 04 SAFETY USE ATTENTION 05 ASSEMBLY INSTRUCTION 06 8 TECHNICAL PARAMETERS 9 10 GETTING START 11 12 WARM UP EXERCISE 13 OPERATION INSTRUCTION 14 15 SAFETY EXERCISE 16 MAINTENANCE INSTRUCTION 17 MAINT...

Page 3: ...f this fitness equipment or it may damage 8 PLS place the treadmill on a clear level ground Do not place the treadmill on thick carpet as not to effect with ventilation under the treadmill Also do not...

Page 4: ...cable in the power line gets broken 18 This treadmill is only for home use Notice Strictly according to the assembly instruction to install this product Attention Please read the following instructio...

Page 5: ...arts Free manual repair within one year The following conditions are not under warranty range 1 As a result of abuse neglect accident or unauthorized modification 2 The damage due to incorrect adjustm...

Page 6: ...which should be with the safety grounding line 10A we suggest fit on over current protector to ensure the safety of the user and the treadmill 1 Place the treadmill at the place where is convenient f...

Page 7: ...6 The followings are the parts pictures of a whole treadmill When you open the carton you will find the below spare parts 36 Silicone oil 81 Power line...

Page 8: ...ng to the assemble requirements and there is nothing missing Please read carefully corresponding instructions on the later part of this manual when you operate and use the treadmill First Step Lift th...

Page 9: ...8 After the above steps move the treadmill to proper position supporting wheel can move left right moving wheel can move back and forth...

Page 10: ...Advantage A microcomputer controller Over current and overload function set in the system B LED screen display meter display clearly no effect on any angle of view 0 5 6km h speed range C Buffer syste...

Page 11: ...10...

Page 12: ...e Before do walk exercise please remember it is for your health of a life time and can not irritable not a one night magic EXERCISE FREQUENCY Target is 3 5 times per week do 15 60mins each time It is...

Page 13: ...of fully stretch shoes at the same time sole don t stick foreign matters so as not to carry the object into the running belt and running board to wear the running board and running belt Please wear c...

Page 14: ...t the other leg inward put it close to the inside of the straight leg Try your best to touch the toes by hand keep it for 10 15 seconds then relax Each leg do it three times See picture 2 Crus and Fee...

Page 15: ...ep distance range is 0 00 99 90 when overflow reset to 0 and start again step rang is 0 9999 when overflow reset to 0 and start again 3 speed window when exercise display current speed value speed dis...

Page 16: ...tor can match code After code matched the other monitor of the same model number can not controller this treadmill Five error code reminders error code 1 meter board does not receive signal 2 Er 3 Ove...

Page 17: ...ed or jog speed when you choose speed If you have no experience or can t make sure the best testing speed you can reference below standard Speed 1 3 0 km h weak constitution people Speed 3 0 4 5 km h...

Page 18: ...e electrical outlet before removing the motor cover Remove the motor cover and vacuum under the motor cover at least once a year Running belt and the special lubricating oil of the motorized treadmill...

Page 19: ...right press the stop button and unplug the power turn the right side adjusting bolt clockwise by 1 4 circle plug the power press then start button make the treadmill run watch the running belt deviati...

Page 20: ...19...

Page 21: ...0 Single wire red 200mm 1 7 Signal light fixing seat 1 31 Single wire black 200mm 1 8 Wire compression plate 5 32 Single grounding wire 400mm 1 9 Left cylinder decorative cover 2 33L R Supporting foot...

Page 22: ...oove belt 1 47 Lower signal wire 1 24 Motor upper cover 1 48 Adapter 1 49 Screw M8 12 2 73 Circlip 10 4 50 Screw M8 20 2 74 Washer 9 16 t1 6 3 51 Screw M3 8 30 75 Washer 9 23 t1 6 4 52 Screw M4 15 4 7...

Page 23: ...45 1 89 Cylinder web cover 45 T1 0 427L 2 66 Screw M8 55 2 90 Magnetic ring 1 67 Screw M6 25 2 91 Lower speed start stop handrail wire 800mm 450mm 1 68 Screw M8 32 2 92 Start shortcut sticker 1 69 Sc...

Reviews: