background image

10 


 Button 

name 

Function 

POWER 

Select power-on or stand-by 

2 MUTE 

Mute 

control 

SOURCE 

Select a video source from DTV/AV1/AV2 

4 PREVIEW 

No function 

AUDIO 

Select second language and stereo audio 

ENTER 

To enter the selected channel number 

INFO 

Display digital TV system information 

Digital keys 

Digit buttons to select channels 

RECALL 

Return to the last selected channel 

10  OK 

Select the highlighted item 

11 VOL

X


Select volume up or move the cursor right 

12 VOL

W


Select volume down or move the cursor left 

13 CH


Select channel up or move the cursor up 

14 CH


Select channel down or move the cursor down 

15  Home 

Go to home screen 

16  EPG 

Electronic Program Guide 

17 MANUAL 


No function 

18  MENU 

Enter the setup menu 

19  EXIT 

Exit the current setup 

20  AUTO SCAN 

To scan channels automatically 

21  PLAY/PAUSE  

Select play or pause 

22  FR 


Fast Rewind 

23  FF 


Fast Forward 

24 REC


Start record TV/Radio program or exit recording 

25 Replay 

No 

function 

26  TTX 

To display teletext content 

27  RED BUTTON 

Subtitle key in normal operation mode or the hot 

28  GREEN BUTTON 

Hot key to enter Teletext pages in Teletext mode 

29  YELLOW BUTTON  Select page up in the EPG mode or the hot key to 
30  BLUE BUTTON 

Select page down in the EPG mode or the hot key 


Before attempting to operate your remote control, install the supplied battery. 
 

1.


Rotate the battery cover to the ‘open’ position and pull off the cover.


2.


Insert the supplied battery (or replace with new battery). Please ensure the 
battery is facing the correct way. (+ ive facing up)


3.


Re-fit the battery cover and rotate to closed position. 


Note:

 Replacement Battery is CR2032 (3V) 

(1) 

(2) 

(5) 

(6) 

(8) 

(10) 
(12) 

(13) 

(14) 

(15) 

(17) 

(20) 

(23) 

(22) 


(25) 

(27) 

(28) 

(30) 

(29) 

(16) 

(7) 

(9) 

(3) 

(4) 

(11) 

(18) 

(19) 

(21) 

(24) 

(26) 

Remote Control Operations 

Remote Control Battery Installation 

Summary of Contents for Z-CARTV-HD-IQ

Page 1: ...Owner s Manual...

Page 2: ...y of the openings as they may touch dangerous voltage points or short out parts that could result in a fire or electric shock Do not expose this unit to liquids as this will damage the unit and may ca...

Page 3: ...chased it for further technical support If any foreign object or liquid falls into the in car DVB T receiver we strongly recommend that the in car DVB T receiver is checked by qualified personnel befo...

Page 4: ...2 Using the Menu 21 2 1 1 DVB T TV Radio Menu 21 2 1 2 Channel List 21 2 1 3 Channel Management 22 2 1 4 Auto Search 23 2 1 5 DVB T Audio Settings 23 2 1 6 Channel Information 24 2 1 7 Subtitle 24 2...

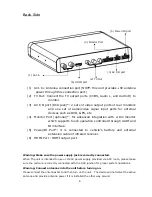
Page 5: ...es if the system is working 3 Power the Power LED indicates if the 12V or 24V power supply has been successfully applied to the device 4 Reset Press the reset button to reset the device 5 USB port Plu...

Page 6: ...ce 5 Power IR Port it is connected to vehicle s battery and external extension cable of infrared receiver 6 HDMI Port HDMI output port Warning Make sure the power supply jack is correctly connected Wh...

Page 7: ...t this cable to pole of the battery 4 Parking status green wire Connect this cable to handbrake switch of your vehicle Keep the cable floating if the parking mode is not enabled 5 ACC red wire Connect...

Page 8: ...out for rear monitor 8 Video Output Video out for rear monitor Monitor Port 1 B output 2 Video GND 3 G output 4 R output 5 Video GND 6 RGB Component Video Out CVBS Video out 7 Audio L output 8 Audio R...

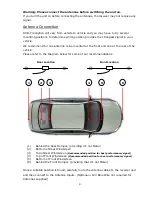
Page 9: ...rear of the vehicle Please refer to the Diagram below for some of our recommendations Rear Location Front Location 1 Behind the Rear Bumper providing it s not Metal 2 Bottom of Rear Windscreen 3 Top...

Page 10: ...hannels automatically 21 PLAY PAUSE Select play or pause 22 FR Fast Rewind 23 FF Fast Forward 24 REC Start record TV Radio program or exit recording 25 Replay No function 26 TTX To display teletext co...

Page 11: ...11 Basic o Power Harness o Remote control o AV Harness o IR Receiver Module o USB extension cable o 2 x Passive Antenna s o iPhone Cable Accessories...

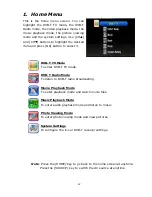
Page 12: ...t it DVB T TV Mode To enter DVB T TV mode DVB T Radio Mode To listen to DVB T radio broadcasting Movie Playback Mode To enter playback mode and watch movie files Music Playback Mode To enter audio pla...

Page 13: ...press the POWER button to turn it on The Operating LED on the unit will illuminate Green when system is ON Blue LED will turn on the IR Receiver Extension if connected NOTE If the Operating LED does...

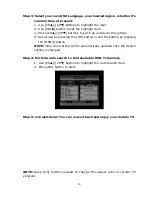
Page 14: ...ne by pressing the OK button or exit the setting by pressing the MENU button NOTE Time zone setting will be automatically updated once the Region setting is changed Step 4 Perform auto search to find...

Page 15: ...dio Listening 1 Press CHS CHT buttons to select the Ratio item and then press OK button to enter the radio mode 2 Press CHS CHT buttons to select your preferred radio channel 3 The radio service will...

Page 16: ...rams can be played back in Music mode Important notes i A recorded program will be stored in a default folder named Recorded_Program The file types will be TSV file for TV program and TSA file for Rad...

Page 17: ...en Use CHS and CHT buttons to scroll up and down the files then select the desired file by pressing OK button Press EXIT button to return NOTE Users can only choose video files under this mode System...

Page 18: ...een Use CHS and CHT buttons to scroll up and down the files then select the desired file by pressing the OK button Press EXIT button to return NOTE users can only choose music files under this mode Vi...

Page 19: ...ppear on screen Use CHS CHT VOLX VOLW buttons to browse the folder then select the desired one by pressing OK button Press EXIT button to return Note users can only choose photo files under this mode...

Page 20: ...press VOLW button to rotate it counterclockwise Slideshow Press PLAY PAUSE to start stop photo slideshow Zoom 1 When viewing a picture press OK to enter zoom mode 2 Press FF to zoom in or press FR to...

Page 21: ...and press OK button The Channel List will appear on screen NOTE you can also press EPG button to enter Channel List while enjoying DVB T TV Radio 2 Press CHS CHT buttons to scroll up down the channel...

Page 22: ...OK button to enter the editing menu for a chosen channel 3 Press EXIT MENU button to exit anytime Skip a Channel 1 After entering the channel editing menu select the SKIP visual button on screen by pr...

Page 23: ...tion NOTE you can also press AUTO SCAN button to enter Automatic Channel Search while enjoying DVB T TV Radio 2 Press OK button to start the channel search 2 1 5 DVB T Audio Settings To select either...

Page 24: ...itle function 1 Browse the TV menu screen using CHS CHT buttons to highlight the Subtitle option Press OK button to enter the Subtitle menu NOTE you can also press RED z button to enter Subtitle while...

Page 25: ...cy in the area and store it in database for next use 1 Browse TV menu using CHS CHT button and press OK button to enter AFS Setting 2 Press VOLX button and use CHS CHT to scroll up down the options 3...

Page 26: ...t 2 Press VOLX button and use CHS CHT to scroll up and down the options 3 Select one by pressing the OK button or exit the setting by pressing the EXIT MENU button 4 After adjusting press EXIT MENU bu...

Page 27: ...ess EXIT MENU button to exit the Display Setting 2 2 4 Version Upgrade To upgrade the user interface software version 1 Insert the USB device containing the software upgrade file into the card slot 2...

Page 28: ...t the setting by pressing the EXIT MENU button 4 After adjusting press EXIT MENU button to exit 2 4 Music Menu On entering Music service press MENU button to invoke music menu Through this menu user c...

Page 29: ...After adjusting press EXIT MENU button to exit the Movie Menu 2 5 2 Audio Selection 1 Press AUDIO button to enter Audio Selection while enjoying Movie playback 2 Use VOLX VOLW buttons to select stere...

Page 30: ...position of the antennas Some TV channels signal quality is too low Perform Auto Search in a known DVB T coverage area Antenna Problem Please check the connection position of the antennas No DVB T se...

Page 31: ...anish Arabic Thai Traditional Chinese Hungarian Simplified Chinese Features DVB T TV Radio Auto Channel Search Multi Language EPG Channel Preview Teletext Subtitle Auto Frequency Switch AFS TV Radio R...

Page 32: ...32 TV out 1 CVBS video out 1 audio L R out Power Input voltage 12 24 V DC Power consumption 5 5 W Dimension and Weight Dimension 185 x 147 2 x 34 mm Weight 750 g...

Page 33: ...Customer will be asked to ship to the nearest service point so the product can be assessed and repaired The product must be packaged appropriately for safe shipment To prove that the product is under...

Page 34: ...34 Distributed by Zylux Distribution Pty Ltd 166 Christmas Street Fairfield VIC 3078 Australia Tel 03 9482 2203 Fax 03 9486 2297 Website www zylux com au Version 1 0...

Reviews: