background image

Chapter 8 Basic Setting

GS1915 Series User’s Guide

96

8.6  Port Setup

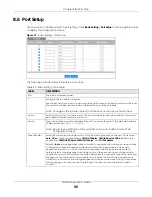
Use this screen to configure Switch port settings. Click 

Basic Setting 

Port Setup 

in the navigation panel 

to display the configuration screen.

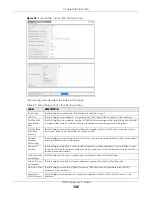
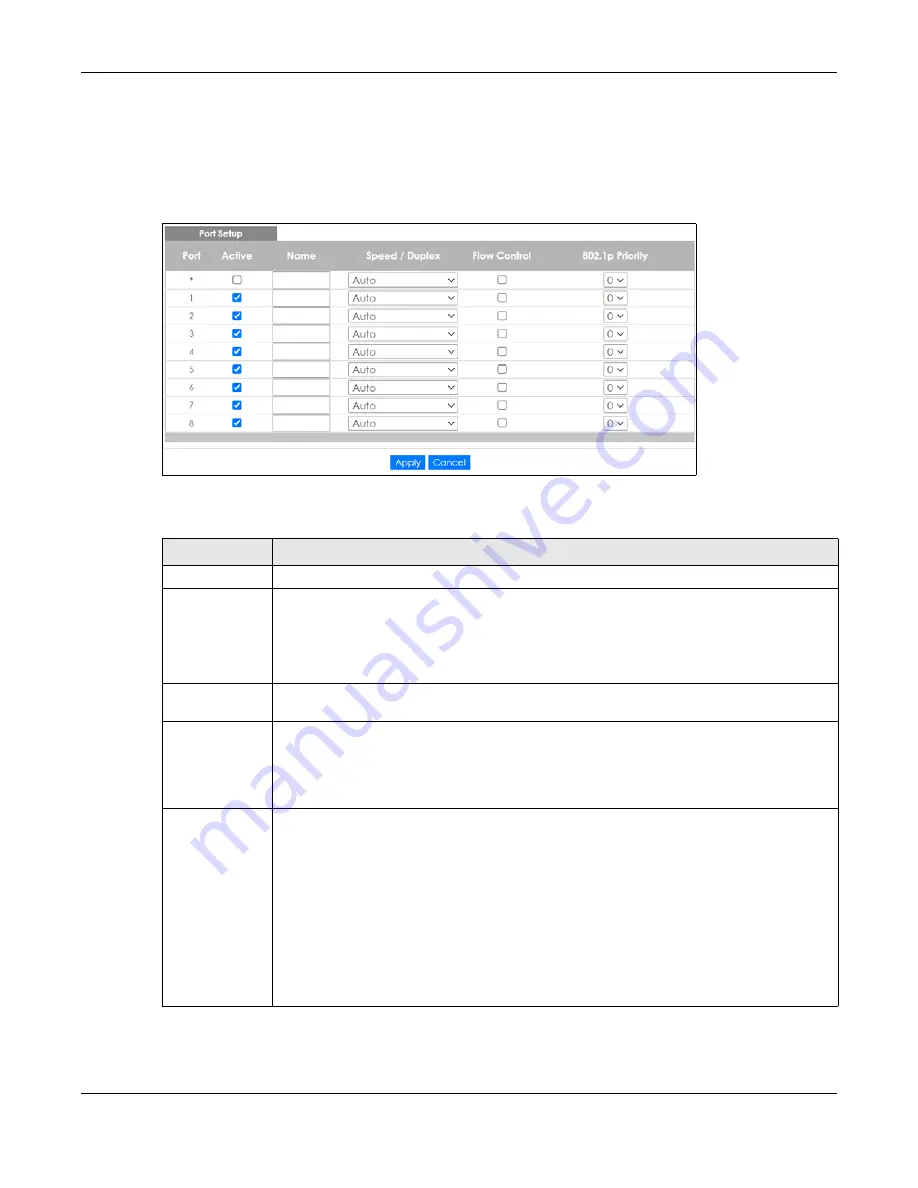
Figure 71   

Basic Setting > Port Setup

The following table describes the labels in this screen.

Table 33   Basic Setting > Port Setup

LABEL

DESCRIPTION

Port

This is the port index number.

*

Settings in this row apply to all ports.

Use this row only if you want to make some settings the same for all ports. Use this row first to set 
the common settings and then make adjustments on a port-by-port basis.

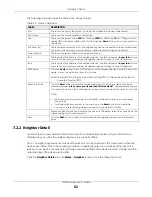
Note: Changes in this row are copied to all the ports as soon as you make them.

Active

Select this check box to enable a port. The factory default for all ports is enabled. A port must 
be enabled for data transmission to occur.

Name

Type a descriptive name that identifies this port. You can enter up to 128 single-byte printable 
characters except [ ? ], [ | ], [ ' ] or [ " ].

Note: Due to space limitations, the port name may be truncated in some Web 

Configurator screens.

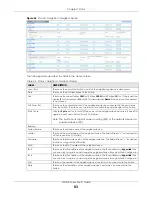
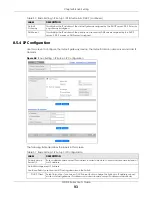
Speed/Duplex

Select the speed and the duplex mode of the Ethernet connection on this port. Choices are 

Auto

10-an

 (10M/auto-negotiation), 

10M/Half Duplex

10M/Full Duplex

100-an

 (100M/auto-

negotiation), 

100M/Half Duplex

100M/Full Duplex

, and 

1G/Full Duplex

.

Selecting 

Auto 

(auto-negotiation) allows one port to negotiate with a peer port automatically 

to obtain the connection speed and duplex mode that both ends support. When auto-
negotiation is turned on, a port on the Switch negotiates with the peer automatically to 
determine the connection speed and duplex mode. If the peer port does not support auto-
negotiation or turns off this feature, the Switch determines the connection speed by detecting 
the signal on the cable and using half duplex mode. When the Switch’s auto-negotiation is 
turned off, a port uses the pre-configured speed and duplex mode when making a connection, 
thus requiring you to make sure that the settings of the peer port are the same in order to 
connect.

Summary of Contents for GS1915 Series

Page 1: ...24 port Gigabit Smart Managed Layer 2 Switch Copyright 2022 Zyxel and or its affiliates All Rights Reserved Management IP Address http setup zyxel or http DHCP assigned IP or http 192 168 1 1 User Name admin Password 1234 Version 4 70 Edition 4 05 2022 ...

Page 2: ...stem Every effort has been made to ensure that the information in this manual is accurate Related Documentation Quick Start Guide The Quick Start Guide shows how to connect the Switch Online Help Click the help link for a description of the fields in the Switch menus Nebula Control Center NCC User s Guide Go to the Nebula Control Center to get this User s Guide on how to configure the Switch using...

Page 3: ...s field labels and field choices are all in bold font A right angle bracket within a screen name denotes a mouse click For example Basic Setting IP Setup IP Configuration Network Proxy Configuration means you first click Basic Setting in the navigation panel then the IP Setup sub menu then IP Configuration and finally Network Proxy Configuration to get to that screen Icons Used in Figures Figures ...

Page 4: ...c MAC Forwarding 133 Static Multicast Forwarding 135 Filtering 138 Spanning Tree Protocol 140 Bandwidth Control 146 Broadcast Storm Control 148 Mirroring 150 Link Aggregation 152 Port Security 159 Time Range 162 Queuing Method 164 Multicast 167 AAA 173 DHCP Snooping 181 Loop Guard 192 Error Disable 195 Green Ethernet 202 Link Layer Discovery Protocol LLDP 204 Differentiated Services 226 DHCP 230 A...

Page 5: ...ew GS1915 Series User s Guide 5 Cluster Management 288 MAC Table 294 ARP Table 297 Path MTU Table 299 Configure Clone 300 IPv6 Neighbor Table 302 Port Status 304 Troubleshooting and Appendices 309 Troubleshooting 310 ...

Page 6: ...Bridging Example 24 1 2 4 High Performance Switching Example 24 1 2 5 IEEE 802 1Q VLAN Application Examples 25 1 3 Ways to Manage the Switch 26 1 4 Good Habits for Managing the Switch 26 Chapter 2 Hardware Installation and Connection 27 2 1 Installation Scenarios 27 2 2 Safety Precautions 27 2 3 Desktop Installation Procedure 27 2 4 Wall Mounting 28 2 4 1 Installation Requirements 28 2 5 Mounting ...

Page 7: ...ON Utility 44 4 3 1 Requirements 44 4 3 2 Run the ZON Utility 45 4 4 Wizard 48 4 4 1 Basic 49 4 4 2 Protection 53 4 4 3 VLAN 56 4 4 4 QoS 57 4 5 Web Configurator Layout 58 4 5 1 Change Your Password 62 4 6 Save Your Configuration 63 4 7 Switch Lockout 63 4 8 Reset the Switch 63 4 8 1 Restore Reset Button 63 4 9 Log Out of the Web Configurator 64 4 10 Help 64 Chapter 5 Initial Setup Example 65 5 1 ...

Page 8: ...8 1 1 What You Can Do 85 8 2 System Information 85 8 3 General Setup 86 8 4 Switch Setup 88 8 4 1 Introduction to VLANs 88 8 4 2 Setting up 89 8 5 IP Setup 90 8 5 1 IP Interfaces 90 8 5 2 IP Status 91 8 5 3 IP Status Details 91 8 5 4 IP Configuration 93 8 5 5 Network Proxy Configuration 95 8 6 Port Setup 96 8 7 PoE Status 97 8 7 1 PoE Time Range Setup 99 8 7 2 PoE Setup 100 8 8 Interface Setup 103...

Page 9: ... 123 9 6 Configure VLAN Port Settings 124 9 7 Voice VLAN 125 9 8 MAC Based VLAN 127 9 9 Vendor ID Based VLAN 128 9 10 Port Based VLAN Setup 130 9 10 1 Configure a Port Based VLAN 130 Chapter 10 Static MAC Forwarding 133 10 1 Overview 133 10 1 1 What You Can Do 133 10 2 Configure Static MAC Forwarding 133 Chapter 11 Static Multicast Forwarding 135 11 1 Static Multicast Forwarding Overview 135 11 1 ...

Page 10: ... Overview 148 15 1 1 What You Can Do 148 15 2 Broadcast Storm Control Setup 148 Chapter 16 Mirroring 150 16 1 Mirroring Overview 150 16 2 Port Mirroring Setup 150 Chapter 17 Link Aggregation 152 17 1 Link Aggregation Overview 152 17 1 1 What You Can Do 152 17 1 2 What You Need to Know 152 17 2 Link Aggregation Status 153 17 3 Link Aggregation Setting 154 17 3 1 Link Aggregation Control Protocol 15...

Page 11: ...ooping VLAN 171 Chapter 22 AAA 173 22 1 Authentication Authorization and Accounting AAA 173 22 1 1 What You Can Do 173 22 1 2 What You Need to Know 173 22 2 AAA Screens 174 22 3 RADIUS Server Setup 174 22 4 AAA Setup 176 22 5 Technical Reference 178 22 5 1 Vendor Specific Attribute 178 22 5 2 Supported RADIUS Attributes 179 22 5 3 Attributes Used for Authentication 180 Chapter 23 DHCP Snooping 181...

Page 12: ... Disable Detect Configuration 199 25 6 Error Disable Recovery Configuration 200 Chapter 26 Green Ethernet 202 26 1 Green Ethernet Overview 202 26 2 Configuring Green Ethernet 202 Chapter 27 Link Layer Discovery Protocol LLDP 204 27 1 LLDP Overview 204 27 2 LLDP MED Overview 205 27 3 LLDP Settings 206 27 4 LLDP Local Status 207 27 4 1 LLDP Local Port Status Detail 208 27 5 LLDP Remote Status 211 27...

Page 13: ...iguring DHCPv4 Global Relay 234 29 4 4 Configure DHCPv4 Global Relay Port 235 29 4 5 Global DHCP Relay Configuration Example 236 29 4 6 DHCPv4 VLAN Setting 237 29 4 7 Configure DHCPv4 VLAN Port 238 29 4 8 Example DHCP Relay for Two VLANs 239 29 5 DHCPv6 Relay 240 Chapter 30 ARP Setup 242 30 1 ARP Overview 242 30 1 1 What You Can Do 242 30 1 2 What You Need to Know 242 30 2 ARP Setup 244 30 2 1 ARP...

Page 14: ...l Overview 259 32 1 1 What You Can Do 259 32 2 Access Control Main Settings 259 32 3 Configure SNMP 260 32 3 1 Configure SNMP Trap Group 261 32 3 2 Enable or Disable Sending of SNMP Traps on a Port 262 32 3 3 Configure SNMP User 263 32 4 Set Up Login Accounts 265 32 5 Service Access Control 266 32 6 Remote Management 267 32 7 Account Security 268 32 8 Technical Reference 270 32 8 1 About SNMP 270 ...

Page 15: ...er 37 MAC Table 294 37 1 MAC Table Overview 294 37 1 1 What You Can Do 294 37 1 2 What You Need to Know 294 37 2 Viewing the MAC Table 295 Chapter 38 ARP Table 297 38 1 Overview 297 38 1 1 What You Can Do 297 38 1 2 What You Need to Know 297 38 2 Viewing the ARP Table 297 Chapter 39 Path MTU Table 299 39 1 Path MTU Overview 299 39 2 Viewing the Path MTU Table 299 Chapter 40 Configure Clone 300 40 ...

Page 16: ...Utilization 308 Part III Troubleshooting and Appendices 309 Chapter 43 Troubleshooting 310 43 1 Power Hardware Connections and LEDs 310 43 2 Switch Access and Login 311 43 3 Switch Configuration 313 Appendix A Customer Support 314 Appendix B Common Services 319 Appendix C IPv6 322 Appendix D Legal Information 331 Index 336 ...

Page 17: ...17 PART I User s Guide ...

Page 18: ...nd provisioned by the Zyxel Nebula Control Center NCC When the Switch is in standalone mode it can be configured and managed by the Web Configurator The following table describes the hardware features of the Switch by model Table 1 GS1915 Series Comparison Table FEATURES GS1915 8 GS1915 8EP GS1915 24E GS1915 24EP Number of 10 100 1000 Mbps Ethernet ports 8 8 24 24 Number of 10 100 1000 Mbps PoE po...

Page 19: ... or configure and manage the Switch directly in standalone mode The Nebula Control Center NCC is an alternative cloud based network management system that allows you to remotely manage and monitor the Switch You may also access a minimized version of the Web Configurator in cloud mode Nebula Cloud Management To have Nebula manage the Switch you must first register it at the Nebula web portal at ht...

Page 20: ... Click Get Started in the Nebula web portal Enter your myZyxel account information You will be redirected to another screen where you can sign up for a myZyxel account if you do not have one 3 Create an organization and a site using the Nebula setup wizard or select an existing organization 4 Register the Switch by entering its Registration MAC Address and serial number and assign it to the site T...

Page 21: ...l Center https nebula zyxel com 2 Go to the Organization wide Configure License inventory Devices screen 3 Select the Switch you want to remove unregister from the organization 4 Click Actions then click Remove from organization It will take a while for the Switch to reboot and reset to factory default 1 1 3 ZON Utility With its built in Web Configurator including the Neighbor Management feature S...

Page 22: ...The following table describes the PoE features of the Switch by model 1 2 Example Applications This section shows a few examples of using the Switch in various network environments Note that the Switch in the figure is just an example Switch and not your actual Switch Table 3 GS1915 Series Models and PoE Features POE FEATURES GS1915 8EP GS1915 24EP IEEE 802 3af PoE Yes Yes IEEE 802 3at PoE Yes Yes...

Page 23: ...2 PoE Example Application 1 2 2 Backbone Example Application The Switch is an ideal solution for small networks where rapid growth can be expected in the near future The Switch can be used standalone for a group of heavy traffic users You can connect computers and servers directly to the Switch s port or connect other switches to the Switch In this example all computers can share high speed applic...

Page 24: ...andwidth can connect to high speed department servers through the Switch You can provide a super fast uplink connection by using a Gigabit Ethernet or SFP port on the Switch Moreover the Switch eases supervision and maintenance by allowing network managers to centralize multiple servers at a single location Figure 4 Bridging Application 1 2 4 High Performance Switching Example The Switch is ideal ...

Page 25: ...rmance Switched Workgroup Application 1 2 5 IEEE 802 1Q VLAN Application Examples A VLAN Virtual Local Area Network allows a physical network to be partitioned into multiple logical networks Stations on a logical network belong to one or more groups With VLAN a station cannot directly talk to or hear from stations that are not in the same groups unless such traffic first goes through a router 1 2 ...

Page 26: ...Management Cluster Management allows you to manage multiple switches through one switch called the cluster manager See Chapter 36 on page 288 ZON Utility ZON Utility is a program designed to help you deploy and perform initial setup on a network more efficiently See Section 4 3 on page 44 1 4 Good Habits for Managing the Switch Do the following regularly to make the Switch more secure and to manag...

Page 27: ...om of the Switch and at least 5 cm of clearance on all four sides of the Switch This allows air circulation for cooling Do NOT block the ventilation holes nor store cables or power cords on the Switch Allow clearance for the ventilation holes to prevent your Switch from overheating This is especially crucial when your Switch does not have fans Overheating could affect the performance of your Switc...

Page 28: ...Make sure there is a power outlet nearby Cautions Avoid stacking fanless Switches to prevent overheating Ensure enough clearance around the Switch to allow air circulation for cooling Do NOT remove the rubber feet as it provides space for air circulation 2 4 Wall Mounting The Switch can be mounted on a wall You may need screw anchors if mounting on a concrete or brick wall 2 4 1 Installation Requi...

Page 29: ...es for the screw anchors into the wall Push the anchors into the full depth of the holes then insert the screws into the anchors Do NOT insert the screws all the way in leave a small gap of about 0 5 cm If not using screw anchors use a screwdriver to insert the screws into the wall Do NOT insert the screws all the way in leave a gap of about 0 5 cm 4 Make sure the screws are fastened well enough t...

Page 30: ...t be facing up or down as this position is less safe 2 5 Mounting the Switch on a Rack The Switch can be mounted on an EIA standard size 19 inch rack or in a wiring closet with other equipment Follow the steps below to mount your Switch on a standard EIA rack using a rack mounting kit Note Make sure there is enough clearance between each equipment on the rack for air circulation 2 5 1 Installation...

Page 31: ...ng the Mounting Brackets to the Switch 1 Position a mounting bracket on one side of the Switch lining up the four screw holes on the bracket with the screw holes on the side of the Switch Figure 8 Attaching the Mounting Brackets 2 Using a 2 Philips screwdriver install the M3 flat head screws through the mounting bracket holes into the Switch 3 Repeat steps 1 and 2 to install the second mounting br...

Page 32: ...h on a Rack 2 Using a 2 Philips screwdriver install the M5 flat head screws through the mounting bracket holes into the rack Note Make sure you tighten all the four screws to prevent the Switch from getting slanted 3 Repeat steps 1 and 2 to attach the second mounting bracket on the other side of the rack ...

Page 33: ...3 Front Panel GS1915 24EP The following table describes the ports Table 5 Panel Connections CONNECTOR DESCRIPTION 8 24 1000Base T RJ 45 Ethernet Ports These are 10 100 1000Base T auto negotiating and auto crossover Ethernet ports Connect these ports to a computer a hub a router or an Ethernet switch 8 12 1000Base T RJ 45 PoE Ports These are 10 100 1000Base T auto negotiating and auto crossover Eth...

Page 34: ...gs for the Gigabit ports on the Switch are Speed Auto Duplex Auto Flow control Off Link Aggregation Disabled 3 1 1 2 Auto crossover All ports support auto crossover that is auto MDIX ports Media Dependent Interface Crossover so you may use either a straight through Ethernet cable or crossover Ethernet cable for all Gigabit port connections Auto crossover ports automatically sense whether they need...

Page 35: ...s protective earthing terminals are valid terminals Installation of Ethernet cables must be separate from AC power lines To avoid electric surge and electromagnetic interference use a different electrical conduit or raceway tube trough or enclosed conduit for protecting electric wiring that is 15 cm apart or as specified by your country s electrical regulations Any device that is located outdoors ...

Page 36: ...The grounding terminal of the server rack or on site grounding terminal must also be grounded and connected to the building s main grounding electrode Make sure the grounding terminal is connected to the buildings grounding electrode and has an earth resistance of less than 10 ohms or according to your country s electrical regulations Figure 20 Connecting to the Building s Main Grounding Electrode...

Page 37: ...talled it in a rack Note Use the included power cord for the AC power connection 1 Connect the female end of the power cord to the AC power socket 2 Connect the other end of the cord to a power outlet Disconnecting the Power The power input connectors can be disconnected from the power source individually 1 Disconnect the power cord from the power outlet 2 Disconnect the power cord from the AC pow...

Page 38: ...is disabled in Basic Setting Cloud Management in the Switch Web Configurator Ethernet Ports and PoE LNK ACT Green On The link to an Ethernet network is up Blinking The Switch is transmitting or receiving to or from an Ethernet network Off The link to an Ethernet network is down PoE Mode GS1915 8EP GS1915 24EP Green On Power is supplied through the Ethernet port Off There is no power supplied Note ...

Page 39: ...39 PART II Technical Reference ...

Page 40: ...r 2 The Switch is a DHCP client by default Type http DHCP assigned IP in the Location or Address field Press ENTER Note You can always use the domain name setup zyxel to access the Web Configurator whether the Switch is using a DHCP assigned IP or static IP address This requires your PC to be directly connected to the Switch Make sure your PC can connect to a DNS server via the switch If the Switc...

Page 41: ...n a new tab or window The NCC is a cloud based network management system that allows you to remotely manage and monitor the Switch See the Section on page 20 for information on changing your Switch to Nebula Cloud management Figure 22 Visit Nebula 5 Alternatively click Login to log into the Web Configurator to manage the Switch directly The default user name is admin and associated default passwor...

Page 42: ...up Wizard screen will overwrite the existing settings Otherwise click the Exit button You can select the Ignore this wizard next time check box and click Apply Save if you do not want the Setup Wizard screen to appear the next time you log in If you want to open the Setup Wizard screen later click the Wizard icon in the upper right hand corner of the Web Configurator Figure 23 Web Configurator Wiz...

Page 43: ...th the admin user name You cannot change the default administrator user name Old Password Enter the existing system password 1234 is the default password when shipped New Password Enter your new system password Up to 32 characters are allowed for the new password except space or Retype to confirm Re enter your new system password for confirmation General Setting Use this section to specify the SNM...

Page 44: ...4 bit versions Windows 8 1 both 32 bit 64 bit versions Windows 10 both 32 bit 64 bit versions Note To check for your Windows operating system version right click on My Computer Properties on your computer You should see this information in the General tab Get Community Enter the Get Community string which is the password for the incoming Get and GetNext requests from the management station The Get...

Page 45: ...ility you will see if your device and firmware version support the ZON Utility Click the OK button to close this screen Figure 26 Supported Devices and Versions If you want to check the supported models and firmware versions later you can click the Show information about ZON icon in the upper right of the screen Then select the Supported model and firmware version link If your device is not listed...

Page 46: ...lity Screen 3 Select a network adapter to which your supported devices are connected Figure 28 Network Adapter 4 Click the Go button for the ZON Utility to discover all supported devices in your network Figure 29 Discovery 5 The ZON Utility screen shows the devices discovered ...

Page 47: ...restart the selected devices This may be useful when troubleshooting or upgrading new firmware 4 Reset Configuration to Default Use this icon to reload the factory default configuration file This means that you will lose all previous configurations 5 Locator LED Use this icon to locate the selected device by causing its Locator LED to blink 6 Web GUI Use this to access the selected device Web Conf...

Page 48: ...eld displays an icon of the kind of device discovered Model This field displays the model name of the discovered device Firmware Version This field displays the firmware version of the discovered device MAC Address This field displays the MAC address of the discovered device IP Address This field displays the IP address of an internal interface on the discovered device that first received a ZDP di...

Page 49: ...ring to set a new host name The host name should not contain or IP Interface Select DHCP Client if the Switch is connected to a router with the DHCP server enabled You then need to check the router for the IP address assigned to the Switch in order to access the Switch s Web Configurator again Select Static IP Address when the Switch is NOT connected to a router or you want to assign it a fixed IP...

Page 50: ...ad of an IP address Next Click Next to show the next screen Cancel Click Cancel to exit this screen without saving Table 11 Wizard Basic Step 2 Password LABEL DESCRIPTION Administrator s Password Current password Type the existing system password 1234 is the default password when shipped New password Enter your new system password Up to 32 characters are allowed for the new password except space o...

Page 51: ...management station The Get Community string is only used by SNMP managers using SNMP version 2c or lower Set Community Enter the Set Community string which is the password for the incoming Set requests from the management station The Set Community string is only used by SNMP managers using SNMP version 2c or lower Trap Community Enter the Trap Community string which is the password sent with each ...

Page 52: ...mbers of a trunk group Select LACP if the ports are configured to join a trunk group through LACP Previous Click Previous to show the previous screen Next Click Next to show the next screen Cancel Click Cancel to exit this screen without saving Table 13 Wizard Basic Step 4 Summary LABEL DESCRIPTION Setup IP Host Name This field displays a host name IP Interface This field displays whether the WAN ...

Page 53: ...s password and activate SNMP New Password This field displays asterisks when a new password has been created SNMP This field displays whether the Switch acts as an SNMP agent Version This field displays the SNMP version for the Switch Get Community This field displays the Get Community string Set Community This field displays the Set Community string Trap Community This field displays the Trap Com...

Page 54: ...e After clicking Next the Broadcast Storm Control screen appears Table 14 Wizard Protection Step 1 Loop Guard LABEL DESCRIPTION Loop Guard Select all ports Select all ports to enable the loop guard feature on all ports You can select a port by clicking it Next Click Next to show the next screen Cancel Click Cancel to exit this screen without saving ...

Page 55: ... Wizard Protection Step 2 Broadcast Storm Control LABEL DESCRIPTION Broadcast Storm Control Select all ports Select all ports to apply settings on all ports You can select a port by clicking it Broadcast pkt s Specify how many broadcast packets the port receives per second Previous Click Previous to show the previous screen Next Click Next to show the next screen Cancel Click Cancel to exit this s...

Page 56: ...Step 3 Summary LABEL DESCRIPTION Summary Loop Guard If the loop guard feature is enabled on a port the Switch will prevent loops on this port Broadcast Storm Control If the broadcast storm control feature is enabled on a port the number of broadcast packets the Switch receives per second will be limited on this port Previous Click Previous to show the previous screen Finish Review the information ...

Page 57: ...SCRIPTION VLAN Setting Default VLAN 1 Access Untagged port After you create a VLAN and select the VLAN ID from the drop down list box select ports and use the right arrow to add them as the untagged ports to a VLAN group VLAN member port VLAN Type a number between 2 and 4094 to create a VLAN Trunk Tagged port Select ports and use the downward arrow to add them as the tagged ports to the VLAN group...

Page 58: ...icking it High Select ports and click the High button so they will have high priority The port s IEEE 802 1p priority level will be set to 5 Use the Basic Setting Port Setup screen to adjust the value Medium Select ports and click the Medium button and so they will have medium priority The port s IEEE 802 1p priority level will be set to 3 Use the Basic Setting Port Setup screen to adjust the valu...

Page 59: ... Click this link to save your configuration into the Switch s non volatile memory Non volatile memory is the configuration of your Switch that stays the same even if the Switch s power is turned off D Click this link to go to the status page of the Switch E Click this icon to open the wizard screen where you can configure the Switch s IP login password SNMP community link aggregation and so on F C...

Page 60: ...tion Panel Sub links Overview BASIC SETTING ADVANCED APPLICATION IP APPLICATION MANAGEMENT Table 20 Navigation Panel Links LINK DESCRIPTION Basic Setting System Info This link takes you to a screen that displays general system information General Setup This link takes you to a screen where you can configure general identification information about the Switch Switch Setup This link takes you to a s...

Page 61: ... to screens where you can copy traffic from one port or ports to another port in order that you can examine the traffic from the first port without interference Link Aggregation This link takes you to screens where you can logically aggregate physical links to form one logical higher bandwidth link Port Security This link takes you to a screen where you can activate MAC address learning and set th...

Page 62: ...n System Log This link takes you to a screen where you can view system logs Syslog Setup This link takes you to a screen where you can setup system logs and a system log server Cluster Management This link takes you to screens where you can configure clustering management and view its status MAC Table This link takes you to a screen where you can view the MAC addresses and types of devices attache...

Page 63: ... as a member The CPU port is the management port of the Switch 3 Filter all traffic to the CPU port 4 Disable all ports 5 Misconfigure the text configuration file 6 Forget the password and or IP address 7 Prevent all services from accessing the Switch 8 Change a service port number but forget it 9 You forgot to log out of the Switch from a computer before logging in again on another computer Note ...

Page 64: ...have to log in with your password again after you log out This is recommended after you finish a management session for security reasons Figure 43 Web Configurator Logout Screen 4 10 Help The Web Configurator s online help has descriptions of individual screens and some supplementary information Click the Help link from a Web Configurator screen to view an online help description of that screen ...

Page 65: ...Set Port VID Configure Switch Management IP Address 5 1 1 Create a VLAN VLANs confine broadcast frames to the VLAN group in which the ports belongs You can do this with port based VLAN or tagged static VLAN with fixed port members In this example you want to configure port 1 as a member of VLAN 2 Figure 44 Initial Setup Network Example VLAN 1 Click Advanced Application VLAN VLAN Configuration in t...

Page 66: ...network is connected to port 1 on the Switch select Fixed to configure port 1 to be a permanent member of the VLAN only 4 To ensure that VLAN unaware devices such as computers and hubs can receive frames properly clear the TX Tagging check box to set the Switch to remove VLAN tags before sending 5 Click Add to save the settings to the run time memory Settings in the run time memory are lost when t...

Page 67: ...panel Then click the VLAN Port Setup link 2 Enter 2 in the PVID field for port 1 and click Apply to save your changes back to the run time memory Settings in the run time memory are lost when the Switch s power is turned off 5 1 3 Configure Switch Management IP Address If the Switch fails to obtain an IP address from a DHCP server the Switch will use 192 168 1 1 as the management IP address You ca...

Page 68: ... sure your computer is in the same subnet as the Switch 2 Open your web browser and enter 192 168 1 1 the default IP address in the address bar to access the Web Configurator See Section 4 2 on page 40 for more information 3 Click Basic Setting IP Setup IP Configuration in the navigation panel 4 Configure the related fields in the IP Setup screen ...

Page 69: ... 0 as the subnet mask 6 In the VID field enter the ID of the VLAN group to which you want this management IP address to belong This is the same as the VLAN ID you configure in the Static VLAN screen 7 Click Add to save your changes back to the run time memory Settings in the run time memory are lost when the Switch s power is turned off ...

Page 70: ... IP addresses to all devices in VLAN network V Create a VLAN containing ports 4 5 and 6 Connect a computer M to the Switch for management Figure 47 Tutorial DHCP Snooping Tutorial Overview The settings in this tutorial are as the following 1 Access the Switch through http 192 168 1 1 by default Log into the Switch by entering the user name default admin and password default 1234 Table 21 Tutorial ...

Page 71: ...rol field as shown Figure 48 Tutorial Create a VLAN and Add Ports to It 3 Go to Advanced Application VLAN VLAN Configuration VLAN Port Setup and set the PVID of the ports 4 5 and 6 to 100 This tags untagged incoming frames on ports 4 5 and 6 with the tag 100 Figure 49 Tutorial Tag Untagged Frames 4 Go to Advanced Application DHCP Snooping Configure activate and specify VLAN 100 as the DHCP VLAN as...

Page 72: ...because they are connected to DHCP clients Click Apply Figure 51 Tutorial Set the DHCP Server Port to Trusted 7 Go to Advanced Application DHCP Snooping Configure VLAN show VLAN 100 by entering 100 in the VLAN Search by VID field and click Search Then select Yes in the Enabled field of the VLAN 100 entry shown at the bottom section of the screen Click Apply If you want to add more information in t...

Page 73: ...the DHCP snooping binding table as shown next 6 3 How to Use DHCPv4 Relay on the Switch This tutorial describes how to configure your Switch to forward DHCP client requests to a specific DHCP server The DHCP server can then assign a specific IP address based on the information in the DHCP requests 6 3 1 DHCP Relay Tutorial Introduction In this example you have configured your DHCP server 192 168 2...

Page 74: ...memory Figure 54 Tutorial Set VLAN Type to 802 1Q 3 Click Advanced Application VLAN VLAN Configuration Static VLAN Setup 4 In the Static VLAN screen select ACTIVE enter a descriptive name VLAN 102 for example in the Name field and enter 102 in the VLAN Group ID field 5 Select Fixed to configure port 2 to be a permanent member of this VLAN 6 Clear the TX Tagging check box to set the Switch to remov...

Page 75: ...the VLAN Port Setup link in the VLAN Configuration screen Figure 56 Tutorial Click the VLAN Port Setting Link 9 Enter 102 in the PVID field for port 2 to add a tag to incoming untagged frames received on that port so that the frames are forwarded to the VLAN group that the tag defines 10 Click Apply to save your changes back to the run time memory ...

Page 76: ...al link to open the DHCP Relay screen 2 Select the Active check box 3 Enter the DHCP server s IP address 192 168 2 3 in this example in the Remote DHCP Server 1 field 4 Select default1 or default2 in the Option 82 Profile field 5 Click Apply to save your changes back to the run time memory Figure 58 Tutorial Set DHCP Server and Relay Information 6 Click the Save link in the upper right of the Web ...

Page 77: ... Client A is connected to the Switch s port 2 in VLAN 102 2 You configured the correct VLAN ID port number and system name for DHCP relay on both the DHCP server and the Switch 3 You clicked the Save link on the Switch to have your settings take effect ...

Page 78: ...u can also display other status screens for more information Use the Neighbor screen Section 7 2 1 on page 81 to view a summary and manage Switch s neighbor devices Use the Neighbor Detail screen Section 7 2 2 on page 82 to view more detailed information on the Switch s neighbor devices 7 2 Status The Status screen displays when you log into the Switch or click Status at the top right of the Web C...

Page 79: ... Firmware Version This field displays the version number and date of the firmware the Switch is currently running System Time This field displays the current date and time in the UAG The format is mm dd yyyy hh mm ss Serial Number This field displays the serial number of this Switch The serial number is used for device tracking and control System Up Time This field displays how long the Switch has...

Page 80: ... the firmware the Switch is currently running Ethernet Address This field refers to the Ethernet MAC Media Access Control address of the Switch CPU Utilization CPU utilization quantifies how busy the system is Current displays the current percentage of CPU utilization Memory Utilization Memory utilization shows how much DRAM memory is available and in use It also displays the current percentage of...

Page 81: ...r the switch button to go to the Basic Setting Cloud Management screen You can enable disable NCC Discovery or view the NCC connection status in the Cloud Management screen 1 Internet Green The Switch is connected to the Internet Orange The Switch is not connected to the Internet 2 Nebula Green The Switch is connected to NCC Orange The Switch is not connected to NCC 3 Registration Green The Switch...

Page 82: ... within the power budget of the Switch System Name This shows the system name of the neighbor device IPv4 This shows the IPv4 address of the neighbor device The IPv4 address is a hyper link that you can click to log into and manage the neighbor device through its Web Configurator IPv6 This shows the IPv6 address of the neighbor device The IPv6 address is a hyper link that you can click to log into...

Page 83: ...n button from 5 to 0 starts Note The Switch must support power sourcing PSE or the network device is a powered device PD Remote System Name This shows the system name of the neighbor device Model This shows the model name of the neighbor device This field will show for devices that do not support the ZON utility Firmware This shows the firmware version of the neighbor device This field will show f...

Page 84: ... warning message Are you sure you want to load factory default appears prompting you to confirm the action After confirming the action a count down button from 5 to 0 starts Note The Switch must support power sourcing PSE or the network device is a powered device PD If multiple neighbor devices use the same port the Reset button is not available You can only reset Zyxel powered devices that suppor...

Page 85: ...Switch IP address default gateway device management VLAN ID and proxy server Use the Port Setup screen Section 8 6 on page 96 to configure Switch port settings Use the PoE Setup screens Section 8 7 on page 97 to view the current amount of power that PDs are receiving from the Switch and set the priority levels for the Switch in distributing power to PDs This screen is available for PoE models only...

Page 86: ... support information in the website ZyNOS F W Version This field displays the version number of the Switch s current firmware including the date created Ethernet Address This field refers to the Ethernet MAC Media Access Control address of the Switch CPU Utilization CPU utilization quantifies how busy the system is Current displays the current percentage of CPU utilization Memory Utilization Memor...

Page 87: ...e main differences between them are the time format When you select the Daytime RFC 867 format the Switch displays the day month year and time with no time zone adjustment When you use this format it is recommended that you use a Daytime timeserver within your geographical time zone Time RFC 868 format displays a 4 byte integer giving the total number of seconds since 1970 1 1 at 0 0 0 NTP RFC 130...

Page 88: ...n the second Sunday of March Each time zone in the United States starts using Daylight Saving Time at 2 A M local time So in the United States you would select Second Sunday March and 2 00 Daylight Saving Time starts in the European Union on the last Sunday of March All of the time zones in the European Union start using Daylight Saving Time at the same moment 1 A M GMT or UTC So in the European U...

Page 89: ...this screen Figure 64 Basic Setting Switch Setup The following table describes the labels in this screen Table 27 Basic Setting Switch Setup LABEL DESCRIPTION VLAN Type Choose 802 1Q or Port Based The Advanced Application VLAN Setup screen changes depending on whether you choose 802 1Q VLAN type or Port Based VLAN type in this screen MAC Address Learning MAC address learning reduces outgoing traff...

Page 90: ...eight priority levels On the Switch traffic assigned to higher index queues gets through faster while traffic in lower index queues is dropped if the network is congested Priority Level The following descriptions are based on the traffic types defined in the IEEE 802 1d standard which incorporates the 802 1p To map a priority level to a physical queue select a physical queue from the drop down men...

Page 91: ... Server This field displays the IP address of the DNS server Source This field displays whether the DNS server address is configured manually Static or obtained automatically using DHCPv4 Note If DNS server is not configured or configuration is deleted the system automatically uses the default Backup server IP Interface Index This field displays the index number of an entry IP Address This field d...

Page 92: ...entification number to which an IP routing domain belongs IP Address This is the IP address of your Switch in dotted decimal notation for example 192 168 1 1 IP Subnet Mask This is the IP subnet mask of your Switch in dotted decimal notation for example 255 255 255 0 Lease Time This displays the length of time in seconds that this interface can use the current dynamic IP address from the DHCP serv...

Page 93: ...e primary and secondary DNS servers assigned by the DHCP server 0 0 0 0 means no DNS server is assigned Table 30 Basic Setting IP Setup IP Status Details DHCP continued LABEL DESCRIPTION Table 31 Basic Setting IP Setup IP Configuration LABEL DESCRIPTION Domain Name Server 1 2 Enter a domain name server IPv4 address in order to be able to use a domain name instead of an IP address Default Managemen...

Page 94: ...igation panel to save your changes to the non volatile memory when you are done configuring Cancel Click Cancel to reset the fields to your previous configuration Management IP Address Use these fields to set the settings for the management port IP Address Enter the IP address for managing the Switch by the members of the VLAN specified in the VID field below IP Subnet Mask Enter the IP subnet mas...

Page 95: ...a proxy server Server Enter the IP address dotted decimal notation or host name of the proxy server When entering the host name up to 128 alphanumeric characters are allowed for the Server except or Port Enter the port number of the proxy server 1 65535 Authentication Select this option to enable proxy server authentication using a Username and Password Username Enter a login user name from the pr...

Page 96: ...single byte printable characters except or Note Due to space limitations the port name may be truncated in some Web Configurator screens Speed Duplex Select the speed and the duplex mode of the Ethernet connection on this port Choices are Auto 10 an 10M auto negotiation 10M Half Duplex 10M Full Duplex 100 an 100M auto negotiation 100M Half Duplex 100M Full Duplex and 1G Full Duplex Selecting Auto ...

Page 97: ...ws buffer memory causing packet discards and frame losses Flow Control is used to regulate transmission of signals to match the bandwidth of the receiving port The Switch uses IEEE 802 3x flow control in full duplex mode and backpressure flow control in half duplex mode IEEE 802 3x flow control is used in full duplex mode to send a pause signal to the sending port causing it to temporarily stop se...

Page 98: ...ured in Basic Setting PoE Setup PoE Setup PoE Usage Threshold This field displays the percentage of PoE usage The Switch will generate a trap and or a log when the usage exceeds the specified threshold Consuming Power W This field displays the amount of power the Switch is currently supplying to the connected PoE enabled devices Allocated Power W This field displays the total amount of power the S...

Page 99: ...tal PoE power budget on the Switch you can set the priority to allow the Switch to provide power to ports with higher priority first Critical has the highest priority High has the Switch assign power to the port after all critical priority ports are served Low has the Switch assign power to the port after all critical and high priority ports are served Power Up This field displays the PoE standard...

Page 100: ...to provide power on the port To select more than one schedule press SHIFT and select the choices at the same time Apply Click Apply to save your changes to the Switch s run time memory The Switch loses these changes if it is turned off or loses power so use the Save link on the top navigation panel to save your changes to the non volatile memory when you are done configuring Clear Click Clear to c...

Page 101: ...Chapter 8 Basic Setting GS1915 Series User s Guide 101 Figure 75 Basic Setting PoE Setup PoE Setup ...

Page 102: ...he PoE usage threshold Situation 3 Trap sent if total usage power decreases below the PoE usage threshold only if previous total power usage exceeded the PoE usage threshold and a trap was sent Note If the MIB Trap is ON you must also configure SNMP trap destination Management Access Control SNMP SNMP trap group Management Access Control SNMP Trap Group and SNMP trap port Management Access Control...

Page 103: ...at High Power over Ethernet standard and can supply power of up to 30 W per Ethernet port IEEE 802 3at is also known as PoE or PoE Plus An IEEE 802 3at compatible device is referred to as Type 2 Power Class 4 High Power can only be used by Type 2 devices If the connected PD requires a Class 4 current when it is turned on it will be powered up in this mode Force 802 3at the Switch offers power of u...

Page 104: ...ation VLAN screens Add Click this to create a new entry This saves your changes to the Switch s run time memory The Switch loses these changes if it is turned off or loses power so use the Save link on the top navigation panel to save your changes to the non volatile memory when you are done configuring Cancel Click Cancel to reset the fields to your previous configuration Index This field display...

Page 105: ...reen opens Table 38 Basic Setting IPv6 LABEL DESCRIPTION IPv6 Status Domain Name Server This field displays the IP address of the DNS server Source This field displays whether the DNS server address is configured manually Static or obtained automatically using DHCPv6 IPv6 Table Index This field displays the index number of an IPv6 interface Click on an index number to view more interface details I...

Page 106: ...s of up to the bucket size can be transmitted 0 means no limit Stateless Address Autoconfig This field displays whether the Switch s interface can automatically generate a link local address through stateless auto configuration Link Local Address This field displays the Switch s link local IP address and prefix generated by the interface It also shows whether the IP address is preferred which mean...

Page 107: ... but an IA_TA option does not The DHCPv6 server uses T1 and T2 to control the time at which the client contacts with the server to extend the lifetimes on any addresses in the IA_NA before the lifetimes expire T2 This field displays the DHCPv6 T2 timer If the time T2 is reached and the server does not respond the Switch sends a Rebind message to any available server State This field displays the s...

Page 108: ...e Switch IPv6 Interface Setup Click the link to go to a screen where you can enable an IPv6 interface on the Switch IPv6 Addressing IPv6 Link Local Address Setup Click the link to go to a screen where you can configure the IPv6 link local address for an interface IPv6 Global Address Setup Click the link to go to a screen where you can configure the IPv6 global address for an interface IPv6 Neighbo...

Page 109: ...o the bucket size can be transmitted 0 means no limit Apply Click Apply to save your changes to the Switch s run time memory The Switch loses these changes if it is turned off or loses power so use the Save link on the top navigation panel to save your changes to the non volatile memory when you are done configuring Cancel Click Cancel to begin configuring this screen afresh Clear Click Clear to r...

Page 110: ... LABEL DESCRIPTION Table 43 Basic Setting IPv6 IPv6 Configuration IPv6 Link Local Address Setup LABEL DESCRIPTION Interface Select the IPv6 interface you want to configure Link Local Address Manually configure a static IPv6 link local address for the interface Default Gateway Set the default gateway IPv6 address for the interface When an interface cannot find a routing information for a frame s de...

Page 111: ...me Server values in this screen to their last saved values Interface Select the IPv6 interface you want to configure IPv6 Global Address Manually configure a static IPv6 global address for the interface Prefix Length Specify an IPv6 prefix length that specifies how many most significant bits start from the left in the address compose the network address EUI 64 Select this option to have the interf...

Page 112: ...ou want to configure DAD Attempts The Switch uses Duplicate Address Detection DAD with neighbor solicitation and advertisement messages to check whether an IPv6 address is already in use before assigning it to an interface Specify the number of consecutive neighbor solicitations from 0 to 600 the Switch sends for this interface Enter 0 to turn off DAD NS Interval Specify the time interval from 100...

Page 113: ... supports the VLAN interface type for IPv6 at the time of writing Interface ID Specify a unique identification number from 1 to 4094 for the interface A static IPv6 neighbor entry displays in the Management IPv6 Neighbor Table screen only when the interface ID is also created in the Basic Setup Interface Setup screen To have IPv6 function properly you should configure a static VLAN with the same I...

Page 114: ...hbor Setup continued LABEL DESCRIPTION Table 47 Basic Setting IPv6 IPv6 Configuration DHCPv6 Client Setup LABEL DESCRIPTION Interface Select the IPv6 interface you want to configure IA Type Select IA NA to set the Switch to get a non temporary IP address from the DHCPv6 server for this interface Optionally you can also select Rapid Commit to have the Switch send its DHCPv6 Solicit message with a R...

Page 115: ...e factory defaults Index This is the interface index number Click an index number to change the settings Interface This is the name of the IPv6 interface you created IA NA This field displays whether the Switch obtains a non temporary IP address from the DHCPv6 server Rapid Commit This field displays whether the Switch obtains information from the DHCPv6 server by a rapid two message exchange DNS ...

Page 116: ...d Management LABEL DESCRIPTION Nebula Control Center NCC Discovery Select this to turn on NCC discovery on the Switch Apply Click Apply to save your changes to the Switch s run time memory The Switch loses these changes if it is turned off or loses power so use the Save link on the top navigation panel to save your changes to the non volatile memory when you are done configuring ...

Page 117: ... number and MAC address for handy NCC registration of the Switch using the Nebula Mobile app First download the app from the Google Play store for Android devices or the App Store for iOS devices and create an organization and site Cancel Click Cancel to begin configuring this screen afresh Connection Status This field displays The Switch Internet connection status The connection status between th...

Page 118: ... the Switch when you change ports The Switch will forward the packets based on the source MAC address you set up previously Use the Vendor ID Based VLAN Setup screen Section 9 9 on page 128 to set up VLANs that allow you to group untagged packets into logical VLANs based on the source MAC address of the packet You can specify a mask for the MAC address to create a MAC address filter and enter a we...

Page 119: ...ch first decides where to forward the frame and then inserts a VLAN tag reflecting the ingress port s default VID The default PVID is VLAN 1 for all ports but this can be changed A broadcast frame or a multicast frame for a multicast group that is known by the system is duplicated only on ports that are members of the VID except the ingress port itself thus confining the broadcast to a specific do...

Page 120: ...ing Switch Setup screen Figure 89 Basic Setting Switch Setup Select VLAN Type 802 1Q Static VLAN Make sure 802 1Q is selected in the Basic Setting Switch Setup screen Use a static VLAN to decide whether an incoming frame on a port should be sent to a VLAN group as normal depending on its VLAN tag sent to a group whether it has a VLAN tag or not blocked from a VLAN group regardless of its VLAN tag ...

Page 121: ...he Switch The Number of Search Results This is the number of VLANs that match the searching criteria and display in the list below This field displays only when you use the Search button to look for certain VLANs Index This is the VLAN index number Click an index number to view more VLAN details VID This is the VLAN identification number that was configured in the corresponding VLAN configuration ...

Page 122: ...ber This column displays the ports that are participating in a VLAN A tagged port is marked as T an untagged port is marked as U and ports not participating in a VLAN are marked as Elapsed Time This field shows how long it has been since a normal VLAN was registered or a static VLAN was set up Status This field shows how this VLAN was added to the Switch Static added as a permanent entry Table 51 ...

Page 123: ...ists of up to 64 printable characters The string should not contain or VLAN Group ID Enter the VLAN ID for this static entry the valid range is between 1 and 4094 Note Do NOT add a VLAN ID that has been used in the Voice VLAN Setup Port The port number identifies the port you are configuring Settings in this row apply to all ports Use this row only if you want to make some settings the same for al...

Page 124: ...rned off or loses power so use the Save link on the top navigation panel to save your changes to the non volatile memory when you are done configuring Cancel Click Cancel to begin configuring this screen afresh Clear Click Clear to start configuring the screen again VID This field displays the ID number of the VLAN group Click the number to edit the VLAN settings Active This field indicates whethe...

Page 125: ...elected the Switch discards incoming frames on a port for VLANs that do not include this port in its member set Clear this check box to disable ingress filtering PVID A PVID Port VLAN ID is a tag that adds to incoming untagged frames received on a port so that the frames are forwarded to the VLAN group that the tag defines Enter a number between 1and 4094 as the port VLAN ID Acceptable Frame Type ...

Page 126: ...alue you assign the higher the priority for this voice traffic Apply Click Apply to save your changes to the Switch s run time memory The Switch loses these changes if it is turned off or loses power so use the Save link on the top navigation panel to save your changes to the non volatile memory when you are done configuring Cancel Click Cancel to begin configuring this section afresh Clear Click ...

Page 127: ...lowing screen Figure 96 Advanced Application VLAN VLAN Configuration MAC Based VLAN Setup Description Enter a description up to 32 characters excluding or for the Voice VLAN device For example Siemens Add Click Add to save your changes to the Switch s run time memory The Switch loses these changes if it is turned off or loses power so use the Save link on the top navigation panel to save your chan...

Page 128: ... the VLAN Configuration screen to see the following screen Table 55 Advanced Application VLAN VLAN Configuration MAC Based VLAN Setup LABEL DESCRIPTION Name Enter a name up to 32 alphanumeric characters excluding or for the MAC based VLAN entry MAC Address Enter a MAC address that is bind to the MAC based VLAN entry This is the source MAC address of the data packet that is looked up when untagged ...

Page 129: ...at is associated with the vendor ID based VLAN entry Priority Select the priority level that the Switch assigns to frames belonging to this VLAN The higher the numeric value you assign the higher the priority for this vendor ID based VLAN entry Weight Enter a number between 0 and 255 to specify the rule s weight This is to decide the priority in which the rule is applied The higher the number the ...

Page 130: ...to the Switch on which they were created Note When you activate port based VLAN the Switch uses a default VLAN ID of 1 You cannot change it Note In screens such as IP Setup and Filtering that require a VID you must enter 1 as the VID The port based VLAN setup screen is shown next The CPU management port forms a VLAN with all Ethernet ports 9 10 1 Configure a Port Based VLAN Select Port Based as th...

Page 131: ...Chapter 9 VLAN GS1915 Series User s Guide 131 Figure 98 Advanced Application VLAN Port Based VLAN Setup All Connected Figure 99 Advanced Application VLAN Port Based VLAN Setup Port Isolation ...

Page 132: ...that is a port through which a data packet enters If you wish to allow two subscriber ports to talk to each other you must define the ingress port for both ports The numbers in the top row denote the incoming port for the corresponding port listed on the left its outgoing port CPU refers to the Switch management port By default it forms a VLAN with all Ethernet ports If it does not form a VLAN wit...

Page 133: ...e Static MAC Forwarding A static MAC address is an address that has been manually entered in the MAC address table Static MAC addresses do not age out When you set up static MAC address rules you are setting static MAC addresses for a port This may reduce the need for broadcasting Static MAC address forwarding together with port security allow only computers in the MAC address table on a port to a...

Page 134: ... the Save link on the top navigation panel to save your changes to the non volatile memory when you are done configuring Cancel Click Cancel to reset the fields to their last saved values Clear Click Clear to begin configuring this screen afresh Index Click an index number to modify a static MAC address rule for a port Active This field displays whether this static MAC address forwarding rule is a...

Page 135: ... table This identifies the destination of the multicast content Multicast IPv4 addresses uses the Class D IP addresses range 224 0 0 0 to 239 255 255 255 Multicast MAC addresses have a 1 as the last binary bit of the first octet pair for example 01 00 5e 00 00 0A Static multicast addresses do not age out See IP Multicast Addresses on page 167 for more information on IP multicast addresses Note Sta...

Page 136: ...without deleting it by clearing this check box Name Enter a descriptive name up to 32 single byte printable characters except or for this static multicast MAC address forwarding rule This is for identification only MAC Address Enter a multicast MAC address which identifies the multicast group The last binary bit of the first octet pair in a multicast MAC address must be 1 For example the first oct...

Page 137: ...address rule for ports Active This field displays whether a static multicast MAC address forwarding rule is active Yes or not No You may temporarily deactivate a rule without deleting it Name This field displays the descriptive name for identification purposes for a static multicast MAC address forwarding rule MAC Address This field displays the multicast MAC address that identifies a multicast gr...

Page 138: ...urce and or destination MAC addresses and VLAN group ID 12 1 1 What You Can Do Use the Filtering screen Section 12 2 on page 138 to create rules for traffic going through the Switch 12 2 Configure a Filtering Rule Use this screen to create rules for traffic going through the Switch Click Advanced Application Filtering in the navigation panel to display the screen as shown next Figure 103 Advanced ...

Page 139: ...r to update an existing one This saves your changes to the Switch s run time memory The Switch loses these changes if it is turned off or loses power so use the Save link on the top navigation panel to save your changes to the non volatile memory when you are done configuring Cancel Click Cancel to reset the fields to your previous configuration Clear Click Clear to clear the fields to the factory...

Page 140: ... R STP compliant switches in your network to ensure that only one path exists between any two stations on the network The Switch uses IEEE 802 1w RSTP Rapid Spanning Tree Protocol that allows faster convergence of the spanning tree than STP while also being backwards compatible with STP only aware bridges In RSTP topology change information is directly propagated throughout the network from the de...

Page 141: ...ts transmitted from the root bridge If a bridge does not get a Hello BPDU after a predefined interval Max Age the bridge assumes that the link to the root bridge is down This bridge then initiates negotiations with other bridges to reconfigure the network to re establish a valid network topology STP Port States STP assigns five port states to eliminate packet looping A bridge port is not allowed t...

Page 142: ...t and Our Bridge if the Switch is the root switch Hello Time second This is the time interval in seconds at which the root switch transmits a configuration message The root bridge determines Hello Time Max Age and Forwarding Delay Max Age second This is the maximum time in seconds the Switch can wait without receiving a configuration message before attempting to reconfigure Forwarding Delay second...

Page 143: ...o the LAN segment All the ports on a root bridge root switch are designated ports Alternate A blocked port which has a best alternate path to the root bridge This path is different from using the root port The port moves to the forwarding state when the designated port for the LAN segment fails Backup A blocked port which has a backup or redundant path to a LAN segment where a designated port is a...

Page 144: ... the time interval in seconds between BPDU Bridge Protocol Data Units configuration message generations by the root switch The allowed range is 1 to 10 seconds Max Age This is the maximum time in seconds the Switch can wait without receiving a BPDU before attempting to reconfigure All Switch ports except for designated ports should receive BPDUs at regular intervals Any port that ages out STP info...

Page 145: ...t becomes a non edge port as soon as it receives a Bridge Protocol Data Unit BPDU Priority Configure the priority for each port here Priority decides which port should be disabled when more than one port forms a loop in a switch Ports with a higher priority numeric value are disabled first The allowed range is between 0 and 255 and the default value is 128 Path Cost Path cost is the cost of transm...

Page 146: ...fining a maximum allowable bandwidth for incoming and or out going traffic flows on a port 14 1 1 What You Can Do Use the Bandwidth Control screen Section 14 2 on page 146 to limit the bandwidth for traffic going through the Switch 14 2 Bandwidth Control Setup Click Advanced Application Bandwidth Control in the navigation panel to bring up the screen as shown next Figure 106 Advanced Application B...

Page 147: ... as you make them Active Select this check box to activate ingress rate limits on this port Ingress Rate Specify the maximum bandwidth allowed in kilobits per second Kbps for the incoming traffic flow on a port Note Ingress rate bandwidth control applies to layer 2 traffic only Active Select this check box to activate egress rate limits on this port Egress Rate Specify the maximum bandwidth allowe...

Page 148: ... and or DLF packets is reached per second the subsequent packets are discarded Enable this feature to reduce broadcast multicast and or DLF packets in your network You can specify limits for each packet type on each port 15 1 1 What You Can Do Use the Broadcast Storm Control screen Section 15 2 on page 148 to limit the number of broadcast multicast and destination lookup failure DLF packets the Sw...

Page 149: ...tments on a port by port basis Note Changes in this row are copied to all the ports as soon as you make them Broadcast pkt s Select this option and specify how many broadcast packets the port receives per second Multicast pkt s Select this option and specify how many multicast packets the port receives per second DLF pkt s Select this option and specify how many destination lookup failure DLF pack...

Page 150: ...to a monitor port the port you copy the traffic to in order that you can examine the traffic from the monitor port without interference 16 2 Port Mirroring Setup Click Advanced Application Mirroring in the navigation panel to display the Mirroring screen Use this screen to select a monitor port and specify the traffic flow to be copied to the monitor port Figure 108 Advanced Application Mirroring ...

Page 151: ...rts Use this row only if you want to make some settings the same for all ports Use this row first to set the common settings and then make adjustments on a port by port basis Note Changes in this row are copied to all the ports as soon as you make them Mirrored Select this option to mirror the traffic on a port Direction Specify the direction of the traffic to mirror by selecting from the drop dow...

Page 152: ... transmitting data as one logical link in the trunk group and so on Use the Link Aggregation Setting screen Section 17 3 on page 154 to configure static link aggregation Use the Link Aggregation Control Protocol screen Section 17 3 1 on page 156 to enable Link Aggregation Control Protocol LACP 17 1 2 What You Need to Know The Switch supports both static and dynamic link aggregation Note In a prope...

Page 153: ...pology loops Link Aggregation ID LACP aggregation ID consists of the following information1 17 2 Link Aggregation Status Click Advanced Application Link Aggregation in the navigation panel The Link Aggregation Status screen displays by default See Section 17 1 on page 152 for more information Figure 109 Advanced Application Link Aggregation Status Table 68 Link Aggregation ID Local Switch SYSTEM P...

Page 154: ...ity and port number The ID displays only when there is a port belonging to this trunk group and LACP is also enabled for this group Criteria This shows the outgoing traffic distribution algorithm used in this trunk group Packets from the same source and or to the same destination are sent over the same link within the trunk src mac means the Switch distributes traffic based on the packet s source ...

Page 155: ...outer the packet s destination or source MAC address will be changed In this case set the Switch to distribute traffic based on its IP address to make sure port trunking can work properly Select src mac to distribute traffic based on the packet s source MAC address Select dst mac to distribute traffic based on the packet s destination MAC address Select src dst mac to distribute traffic based on a...

Page 156: ... the Switch s run time memory The Switch loses these changes if it is turned off or loses power so use the Save link on the top navigation panel to save your changes to the non volatile memory when you are done configuring Cancel Click Cancel to begin configuring this screen afresh Table 71 Advanced Application Link Aggregation Link Aggregation Setting continued LABEL DESCRIPTION Table 72 Advanced...

Page 157: ...P Active Select this option to enable LACP for a trunk Port This field displays the port number Settings in this row apply to all ports Use this row only if you want to make some settings the same for all ports Use this row first to set the common settings and then make adjustments on a port by port basis Note Changes in this row are copied to all the ports as soon as you make them LACP Timeout Ti...

Page 158: ...k Aggregation Setting In this screen activate trunk group T1 select the traffic distribution algorithm used by this group and select the ports that should belong to this group as shown in the figure below Click Apply when you are done Figure 113 Trunking Example Configuration Screen Your trunk group 1 T1 configuration is now complete ...

Page 159: ...dresses in total with no limit on individual ports other than the sum cannot exceed 8k For maximum port security enable this feature disable MAC address learning and configure static MAC addresses for a port It is not recommended you disable port security together with MAC address learning as this will result in many broadcasts By default MAC address learning is still enabled even though the port ...

Page 160: ...row first to set the common settings and then make adjustments on a port by port basis Note Changes in this row are copied to all the ports as soon as you make them Active Select this check box to enable the port security feature on this port The Switch forwards packets whose MAC addresses is in the MAC address table on this port Packets with no matching MAC addresses are dropped Clear this check ...

Page 161: ...y The Switch loses these changes if it is turned off or loses power so use the Save link on the top navigation panel to save your changes to the non volatile memory when you are done configuring Cancel Click Cancel to begin configuring this screen afresh Table 73 Advanced Application Port Security continued LABEL DESCRIPTION ...

Page 162: ...dules One time schedules are effective only once while recurring schedules usually repeat Both types of schedules are based on the current date and time in the Switch 19 1 1 What You Can Do Use the Time Range screen Section 19 2 on page 162 to view or define a schedule on the Switch 19 2 Configuring Time Range Click Advanced Application Time Range in the navigation panel to display the screen as s...

Page 163: ...elect the day of the week hour and minute when the schedule begins and ends respectively Select the second option if you want to define a recurring schedule for multiple non consecutive time periods You need to select each day of the week the recurring schedule is effective You also need to specify the hour and minute when the schedule begins and ends each day The schedule begins and ends in the s...

Page 164: ... Q6 empties and then traffic is transmitted on Q5 and so on If higher priority queues never empty then traffic on lower priority queues never gets sent SPQ does not automatically adapt to changing network requirements Weighted Fair Queuing Weighted Fair Queuing is used to guarantee each queue s minimum bandwidth based on its bandwidth weight portion the number you configure in the Weight field whe...

Page 165: ...d returns to queues that have not yet emptied 20 2 Configuring Queuing Use this screen to set priorities for the queues of the Switch This distributes bandwidth across the different traffic queues Click Advanced Application Queuing Method in the navigation panel Figure 116 Advanced Application Queuing Method The following table describes the labels in this screen Table 75 Advanced Application Queu...

Page 166: ...ith larger weights get more service than queues with smaller weights Weight When you select WFQ or WRR enter the queue weight here Bandwidth is divided across the different traffic queues according to their weights Hybrid SPQ Lowest Queue This field is applicable only when you select WFQ or WRR Select a queue Q0 to Q7 to have the Switch use SPQ to service the subsequent queues after and including ...

Page 167: ...nooping screen Section 21 3 1 on page 169 to enable IGMP snooping to forward group multicast traffic only to ports that are members of that group Use the IGMP Snooping VLAN screen Section 21 3 2 on page 171 to perform IGMP snooping on VLANs 21 1 2 What You Need to Know Read on for concepts on Multicasting that can help you configure the screens in this chapter IP Multicast Addresses In IPv4 a mult...

Page 168: ...s auto mode Alternatively you can specify the VLANs that IGMP snooping should be performed on This is referred to as fixed mode In fixed mode the Switch does not learn multicast group membership of any VLANs other than those explicitly added as an IGMP snooping VLAN 21 2 Multicast Setup Use this screen to configure IGMP for IPv4 Click Advanced Application Multicast in the navigation panel Figure 1...

Page 169: ...ulticast IPv4 Multicast LABEL DESCRIPTION Index This is the index number of the entry VID This field displays the multicast VLAN ID Port This field displays the port number that belongs to the multicast group Multicast Group This field displays IP multicast group addresses Table 78 Advanced Application Multicast IPv4 Multicast IGMP Snooping LABEL DESCRIPTION IGMP Snooping Use these settings to con...

Page 170: ...rd a packet with the destination IP address within this range to other networks See the IANA web site for more information The layer 2 multicast MAC addresses used by Cisco layer 2 protocols 01 00 0C CC CC CC and 01 00 0C CC CC CD are also included in this group Specify the action to perform when the Switch receives a frame with a reserved multicast address Select Drop to discard the frames Select...

Page 171: ...t as an IGMP query port if the port receives IGMP query packets Select Fixed to have the Switch always use the port as an IGMP query port Select this when you connect an IGMP multicast server to the port Select Edge to stop the Switch from using the port as an IGMP query port The Switch will not keep any record of an IGMP router being connected to this port The Switch does not forward IGMP join or...

Page 172: ...ion of the screen to add VLANs on which the Switch is to perform IGMP snooping Name Enter the descriptive name of the VLAN for identification purposes The string should not contain or VID Enter the ID of a static VLAN the valid range is between 1 and 4094 Add Click this to create a new entry or to update an existing one This saves your changes to the Switch s run time memory The Switch loses these...

Page 173: ...ds used to authenticate users accessing the Switch and which database the Switch should use first 22 1 2 What You Need to Know Authentication is the process of determining who a user is and validating access to the Switch The Switch can authenticate users who try to log in based on user accounts configured on the Switch itself The Switch can also use an external authentication server to authentica...

Page 174: ...ed to the memory capacity of the device In essence RADIUS authentication allows you to validate an unlimited number of users from a central location 22 2 AAA Screens The AAA screens allow you to enable authentication and authorization or both of them on the Switch First configure your authentication server settings and then set up the authentication priority activate authorization Click Advanced A...

Page 175: ...robin to alternate between the RADIUS servers that it sends authentication requests to Timeout Specify the amount of time in seconds that the Switch waits for an authentication request response from the RADIUS server If you are using two RADIUS servers then the timeout value is divided between the two RADIUS servers For example if you set the timeout value to 30 seconds then the Switch waits for a...

Page 176: ...nting server in dotted decimal notation UDP Port The default port of a RADIUS accounting server for accounting is 1813 You need not change this value unless your network administrator instructs you to do so Shared Secret Specify a password up to 32 alphanumeric characters except or as the key to be shared between the external RADIUS accounting server and the Switch This key is not sent over the ne...

Page 177: ...or administrator accounts specify them in the Method 2 field Select local to have the Switch check the administrator accounts configured in the Access Control Logins screen Select radius to have the Switch check the administrator accounts configured through your RADIUS server Authorization Use this section to configure authorization settings on the Switch Type Set whether the Switch provides the f...

Page 178: ...tribute identifying the setting you want to modify Vendor data A value you want to assign to the setting Note Refer to the documentation that comes with your RADIUS server on how to configure VSAs for users authenticating through the RADIUS server The following table describes the VSAs supported on the Switch Broadcast Select this to have the Switch send accounting information to all configured ac...

Page 179: ...utes used by authentication functions on the Switch In cases where the Table 82 Supported VSAs FUNCTION ATTRIBUTE Ingress Bandwidth Assignment Vendor Id 890 Vendor Type 1 Vendor data ingress rate Kbps in decimal format Egress Bandwidth Assignment Vendor Id 890 Vendor Type 2 Vendor data egress rate Kbps in decimal format Privilege Assignment Vendor ID 890 Vendor Type 3 Vendor Data shell priv lvl N ...

Page 180: ...d for Authenticating Privilege Access User Name The format of the User Name attribute is enab where is the privilege level 1 14 User Password NAS Identifier NAS IP Address 22 5 3 2 Attributes Used to Login Users User Name User Password NAS Identifier NAS IP Address 22 5 3 3 Attributes Used by the IEEE 802 1x Authentication User Name NAS Identifier NAS IP Address NAS Port NAS Port Type This value i...

Page 181: ...ur network 23 1 1 What You Can Do Use the DHCP Snooping screen Section 23 2 on page 181 to look at various statistics about the DHCP snooping database Use this DHCP Snooping Configure screen Section 23 3 on page 184 to enable DHCP snooping on the Switch not on specific VLAN specify the VLAN where the default DHCP server is located and configure the DHCP snooping database Use the DHCP Snooping Port...

Page 182: ...CP Snooping The following table describes the labels in this screen Table 84 Advanced Application DHCP Snooping LABEL DESCRIPTION Database Status This section displays the current settings for the DHCP snooping database You can configure them in the DHCP Snooping Configure screen Agent URL This field displays the location of the DHCP snooping database ...

Page 183: ...e DHCP snooping database unsuccessfully Last failed reason This field displays the reason the Switch updated the DHCP snooping database unsuccessfully This section displays historical information about the number of times the Switch successfully or unsuccessfully read or updated the DHCP snooping database Total attempts This field displays the number of times the Switch has tried to access the DHC...

Page 184: ... leases This field displays the number of bindings the Switch ignored because the lease time had already expired Unsupported vlans This field displays the number of bindings the Switch ignored because the VLAN ID does not exist anymore Last ignored time This field displays the last time the Switch ignored any bindings for any reason from the DHCP binding database Total ignored bindings counters Th...

Page 185: ...ts from different VLAN Select Disable if you do not want the Switch to forward DHCP packets to a specific VLAN Database If Timeout interval is greater than Write delay interval it is possible that the next update is scheduled to occur before the current update has finished successfully or timed out In this case the Switch waits to start the next update until it completes the current one Agent URL ...

Page 186: ... to load it You can use this to load dynamic bindings from a different DHCP snooping database than the one specified in Agent URL When the Switch loads dynamic bindings from a DHCP snooping database it does not discard the current dynamic bindings first If there is a conflict the Switch keeps the dynamic binding in volatile memory and updates the Binding collisions counter in the DHCP Snooping scr...

Page 187: ... port Untrusted Trusted ports are connected to DHCP servers or other switches and the Switch discards DHCP packets from trusted ports only if the rate at which DHCP packets arrive is too high Untrusted ports are connected to subscribers and the Switch discards DHCP packets from untrusted ports in the following situations The packet is a DHCP server packet for example OFFER ACK or NACK The source M...

Page 188: ...Enabled Select Yes to enable DHCP snooping on the VLAN You still have to enable DHCP snooping on the Switch and specify trusted ports Note If DHCP is enabled and there are no trusted ports DHCP requests will not succeed Option 82 Profile Select a pre defined DHCP option 82 profile that the Switch applies to all ports in the specified VLANs The Switch adds the information such as slot number port n...

Page 189: ... 3 5 and 7 Option 82 Profile Select a pre defined DHCP option 82 profile that the Switch applies to the specified ports in this VLAN The Switch adds the information such as slot number port number VLAN ID and or system name specified in the profile to DHCP requests that it broadcasts to the DHCP VLAN if specified or VLAN You can specify the DHCP VLAN in the DHCP Snooping Configure screen The profi...

Page 190: ... external TFTP server If you set up the DHCP snooping database the Switch can reload the dynamic bindings from the DHCP snooping database after the Switch restarts You can configure the name and location of the file on the external TFTP server The file has the following format Figure 130 DHCP Snooping Database File Format The initial checksum helps distinguish between the bindings in the latest up...

Page 191: ...ing for each source VLAN This setting is independent of the DHCP relay settings 23 4 1 4 Configuring DHCP Snooping Follow these steps to configure DHCP snooping on the Switch 1 Enable DHCP snooping on the Switch 2 Enable DHCP snooping on each VLAN and configure DHCP relay option 82 3 Configure trusted and untrusted ports and specify the maximum number of DHCP packets that each port can receive per...

Page 192: ...on the edge of your network This can occur when a port is connected to a Switch that is in a loop state Loop state occurs as a result of human error It happens when two ports on a switch are connected with the same cable When a switch in loop state sends out broadcast messages the messages loop back to the switch and are re broadcast again and again causing a broadcast storm If a switch not in loo...

Page 193: ...returns to port N on A The Switch then shuts down port N to ensure that the rest of the network is not affected by the switch in loop state Figure 133 Loop Guard Probe Packet The Switch also shuts down port N if the probe packet returns to switch A on any other port In other words loop guard also protects against standard network loops The following figure illustrates three switches forming a loop...

Page 194: ...w only if you want to make some settings the same for all ports Use this row first to set the common settings and then make adjustments on a port by port basis Note Changes in this row are copied to all the ports as soon as you make them Active Select this check box to enable the loop guard feature on this port The Switch sends broadcast and multicast probe packets from this port to check if the s...

Page 195: ...op guard or CPU protection allow the Switch to shut down a port or discard specific packets on a port when an error is detected on the port For example if the Switch detects that packets sent out the ports loop back to the Switch the Switch can shut down the ports automatically After that you need to enable the ports or allow the packets on a port manually through the Web Configurator or the comma...

Page 196: ...to Errdisable Status in the Advanced Application Errdisable screen to display the screen as shown Table 90 Advanced Application Errdisable LABEL DESCRIPTION Errdisable Status Click this link to view whether the Switch detected that control packets exceeded the rate limit configured for a port or a port is disabled according to the feature requirements and what action you configure and related info...

Page 197: ...et the specified ports to handle ARP BPDU or IGMP packets instead of ignoring them if the ports is in inactive reason mode Errdisable Status Port This is the number of the port on which you want to configure Errdisable Status Cause This displays the type of the control packet received on the port or the feature enabled on the port and causing the Switch to take the specified action Active This fie...

Page 198: ...rol packets such as BPDU on the port rate limitation The Switch drops the additional control packets the ports has to handle in every one second Rate This field displays how many control packets this port can receive or transmit per second It can be adjusted in CPU Protection 0 means no rate limit Status This field displays the errdisable status Forwarding The Switch is forwarding packets Rate lim...

Page 199: ...ed to all the ports as soon as you make them Rate Limit pkt s Enter a number from 0 to 256 to specify how many control packets this port can receive or transmit per second 0 means no rate limit You can configure the action that the Switch takes when the limit is exceeded Apply Click Apply to save your changes to the Switch s run time memory The Switch loses these changes if it is turned off or los...

Page 200: ...o the Switch s run time memory The Switch loses these changes if it is turned off or loses power so use the Save link on the top navigation panel to save your changes to the non volatile memory when you are done configuring Cancel Click Cancel to begin configuring this screen afresh Table 93 Advanced Application Errdisable Errdisable Detect continued LABEL DESCRIPTION Table 94 Advanced Application...

Page 201: ... to the Switch s run time memory The Switch loses these changes if it is turned off or loses power so use the Save link on the top navigation panel to save your changes to the non volatile memory when you are done configuring Cancel Click Cancel to begin configuring this screen afresh Table 94 Advanced Application Errdisable Errdisable Recovery continued LABEL DESCRIPTION ...

Page 202: ...e sent a WAKE signal is sent to the link partner to return the link to active mode Auto Power Down Auto Power Down turns off almost all functions of the port s physical layer functions when the link is down so the port only uses power to check for a link up pulse from the link partner After the link up pulse is detected the port wakes up from Auto Power Down and operates normally Short Reach Tradi...

Page 203: ...e same for all ports Use this row first and then make adjustments to each port if necessary Changes in this row are copied to all the ports as soon as you make them EEE Select this to activate Energy Efficient Ethernet on this port Auto Power Down Select this to activate Auto Power Down on this port Short Reach Select this to activate Short Reach on this port Apply Click Apply to save your changes...

Page 204: ...he form of TLV Type Length Value Device information carried in the received LLDPDUs is stored in the standard MIB The Switch supports these basic management TLVs End of LLDPDU mandatory Chassis ID mandatory Port ID mandatory Time to Live mandatory Port Description optional System Name optional System Description optional System Capabilities optional Management Address optional The Switch also supp...

Page 205: ...nd easy trouble shooting for mis configured IP addresses There are three classes of endpoint devices that the LLDP MED supports Class I IP Communications Controllers or other communication related servers Class II Voice Gateways Conference Bridges or Media Servers Class III IP Phones PC based Softphones End user Communication Appliances supporting IP Media The following figure shows that with the ...

Page 206: ...n next Figure 144 Advanced Application LLDP The following table describes the labels in this screen Table 96 Advanced Application LLDP LABEL DESCRIPTION LLDP LLDP Local Status Click here to show a screen with the Switch s LLDP information LLDP Remote Status Click here to show a screen with LLDP information from the neighboring devices LLDP Configuration Click here to show a screen to configure LLD...

Page 207: ...MED LLDP MED Configuration Click here to show a screen to configure LLDP MED Link Layer Discovery Protocol for Media Endpoint Devices parameters LLDP MED Network Policy Click here to show a screen to configure LLDP MED Link Layer Discovery Protocol for Media Endpoint Devices network policy parameters LLDP MED Location Click here to show a screen to configure LLDP MED Link Layer Discovery Protocol ...

Page 208: ...itch System Capabilities Supported Bridge System Capabilities Enabled Bridge Management Address TLV The Management Address TLV identifies an address associated with the local LLDP agent that may be used to reach higher layer entities to assist discovery by network management The TLV may also include the system interface number and an object identifier OID that are associated with this management a...

Page 209: ...GS1915 Series User s Guide 209 Figure 146 Advanced Application LLDP LLDP Local Status LLDP Local Port Status Detail ...

Page 210: ...ation AN Enabled The current auto negotiation status of the port AN Advertised Capability The auto negotiation capabilities of the port Oper MAU Type The current Medium Attachment Unit MAU type of the port Link Aggregation TLV The Link Aggregation TLV indicates whether the link is capable of being aggregated whether the link is currently in an aggregation and if in an aggregation the port identifi...

Page 211: ...ocation Identifier Number Table 98 Advanced Application LLDP LLDP Local Status LLDP Local Port Status Detail continued LABEL DESCRIPTION Table 99 Advanced Application LLDP LLDP Remote Status LABEL DESCRIPTION Index The index number shows the number of remote devices that are connected to the Switch Click on an index number to view the detailed LLDP status for this remote device in the LLDP Remote ...

Page 212: ...rt Status Detail Basic TLV LABEL DESCRIPTION Local Port This displays the number of the Switch s port to which the remote device is connected Basic TLV Chassis ID TLV Chassis ID Subtype this displays how the chassis of the remote device is identified Chassis ID this displays the chassis ID of the remote device The chassis ID is identified by the chassis ID subtype Port ID TLV Port ID Subtype this ...

Page 213: ...m Capabilities TLV This displays whether the system capabilities are enabled and supported on the remote device System Capabilities Supported System Capabilities Enabled Management Address TLV This displays the management address IPv4 and IPv6 of the remote device Management Address Subtype Management Address Interface Number Subtype Interface Number Object Identifier Table 100 Advanced Applicatio...

Page 214: ...d Application LLDP LLDP Remote Status LLDP Remote Port Status Detail Dot1 and Dot3 TLV LABEL DESCRIPTION Dot1 TLV Port VLAN ID TLV This displays the VLAN ID of this port on the remote device Port Protocol VLAN ID TLV This displays the IEEE 802 1 Port Protocol VLAN ID TLV which indicates whether the VLAN ID and whether it is enabled and supported on the port of remote Switch which sent the LLDPDU P...

Page 215: ... negotiation capabilities of the port Oper MAU Type The current Medium Attachment Unit MAU type of the port Link Aggregation TLV The Link Aggregation TLV indicates whether the link is capable of being aggregated whether the link is currently in an aggregation and if in an aggregation the port identification of the aggregation Aggregation Capability The current aggregation capability of the port Ag...

Page 216: ...Chapter 27 Link Layer Discovery Protocol LLDP GS1915 Series User s Guide 216 Figure 150 Advanced Application LLDP LLDP Remote Status LLDP Remote Port Status Detail MED TLV ...

Page 217: ...ase LCI latitude and longitude coordinates of the Location Configuration Information LCI Civic LCI IETF Geopriv Civic Address based Location Configuration Information ELIN Emergency Location Identifier Number Inventory TLV The majority of IP Phones lack support of management protocols such as SNMP so LLDP MED inventory TLVs are used to provide their inventory information to the Network Connectivit...

Page 218: ...ded when its corresponding TTL expires The TTL value is to multiply the TTL multiplier by the LLDP packets transmitting interval Transmit Delay Enter the delay in seconds between successive LLDPDU transmissions initiated by value or status changes in the Switch MIB Reinitialize Delay Enter the number of seconds for LLDP to wait before initializing on a port Apply Click Apply to save your changes t...

Page 219: ...ile memory when you are done configuring Cancel Click Cancel to begin configuring this screen afresh Table 103 Advanced Application LLDP LLDP Configuration continued LABEL DESCRIPTION Table 104 Advanced Application LLDP LLDP Configuration Basic TLV Setting LABEL DESCRIPTION Port This displays the Switch s port number Use this row to make the setting the same for all ports Use this row first and th...

Page 220: ...N Port This displays the Switch s port number Use this row to make the setting the same for all ports Use this row first and then make adjustments to each port if necessary Changes in this row are copied to all the ports as soon as you make them Dot1 TLV Port VLAN ID Select the check boxes to enable or disable the sending of IEEE 802 1 Port VLAN ID TLVs on the ports All check boxes in this column ...

Page 221: ...all ports simultaneously Use this row to make the setting the same for all ports Use this row first and then make adjustments to each port if necessary Changes in this row are copied to all the ports as soon as you make them Notification Topology Change Select to enable LLDP MED topology change traps on this port MED TLV Setting Location Select to enable transmitting LLDP MED location TLV Network ...

Page 222: ...defined from 0 through 63 with the 0 representing use of the default DSCP value Priority Enter the priority value for the network policy Add Click Add after finish entering the network policy information A summary table will list all the Switch you have added Cancel Click Cancel to begin entering the information afresh Index This field displays the of index number of the network policy Click an in...

Page 223: ...P MED Network Policy continued LABEL DESCRIPTION Table 108 Advanced Application LLDP LLDP MED Location LABEL DESCRIPTION Port Enter the port number you want to set up the location within the LLDP MED network Location Coordinates The LLDP MED uses geographical coordinates and Civic Address to set the location information of the remote device Geographical based coordinates includes latitude longitud...

Page 224: ...eet Direction Street Suffix Trailing Street Suffix House Number House Number Suffix Landmark Additional Location Name Zip Code Building Unit Floor Room Number Place Type Postal Community Name Post Office Box Additional Code ELIN Number Enter a numerical digit string corresponding to the ELIN identifier which is used during emergency call setup to a traditional CAMA or ISDN trunk based PSAP The val...

Page 225: ...n Identification Number ELIN which is used to identify endpoint devices when they issue emergency call services The valid length is form 10 to 25 characters Select an entry s check box to select a specific entry Otherwise select the check box in the table heading row to select all entries Delete Check the locations that you want to remove then click the Delete button Cancel Click Cancel to clear t...

Page 226: ...fServ screen Section 28 2 on page 227 to activate DiffServ to apply marking rules or IEEE 802 1p priority mapping on the Switch Use the DSCP Setting screen Section 28 3 1 on page 229 to change the DSCP IEEE 802 1p mapping 28 1 1 What You Need to Know Read on for concepts on Differentiated Services that can help you configure the screens in this chapter DSCP and Per Hop Behavior DiffServ defines a ...

Page 227: ...marking rules A network administrator can then apply various traffic policies to the traffic flows An example traffic policy is to give higher drop precedence to one traffic flow over others In our example packets in the Bronze traffic flow are more likely to be dropped when congestion occurs than the packets in the Platinum traffic flow as they move across the DiffServ network Figure 158 DiffServ...

Page 228: ...a port on the Switch Settings in this row apply to all ports Use this row only if you want to make some settings the same for all ports Use this row first to set the common settings and then make adjustments on a port by port basis Changes in this row are copied to all the ports as soon as you make them Active Select Active to enable Diffserv on the port Apply Click Apply to save your changes to t...

Page 229: ... 111 IP Application DiffServ DSCP Setting LABEL DESCRIPTION 0 63 This is the DSCP classification identification number To set the IEEE 802 1p priority mapping select the priority level from the drop down list box Apply Click Apply to save your changes to the Switch s run time memory The Switch loses these changes if it is turned off or loses power so use the Save link on the top navigation panel t...

Page 230: ...on 82 profile to certain ports on the Switch Use the VLAN Setting screen Section 29 4 6 on page 237 to configure your DHCPv4 settings based on the VLAN domain of the DHCPv4 clients Use the DHCPv4 VLAN Port screen Section 29 4 7 on page 238 to apply a different DHCP option 82 profile to certain ports in a VLAN Use the DHCPv6 Relay screen Section 29 5 on page 240 to enable and configure DHCPv6 relay...

Page 231: ...P Application DHCP DHCPv4 The following table describes the labels in this screen 29 4 DHCPv4 Relay Configure DHCP relay on the Switch if the DHCP clients and the DHCP server are not in the same broadcast domain During the initial IP address leasing the Switch helps to relay network information such as the IP address and subnet mask between a DHCP client and a DHCP server Once the DHCP client obta...

Page 232: ...stem Name of the Switch if you select this option You can change the System Name in Basic Setting General Setup The following describes the DHCP relay agent information that the Switch sends to the DHCP server 29 4 1 1 DHCPv4 Relay Agent Information Format A DHCP Relay Agent Information option has the following format i1 i2 and iN are DHCP relay agent sub options which contain additional informati...

Page 233: ...e N 1 byte MAC Address or String Table 117 IP Application DHCP DHCPv4 Option 82 Profile LABEL DESCRIPTION Name Enter a descriptive name for the profile for identification purposes You can use up to 32 single byte printable characters Circuit ID Use this section to configure the Circuit ID sub option to include information that is specific to the relay agent the Switch Enable Select this option to ...

Page 234: ...es power so use the Save link on the top navigation panel to save your changes to the non volatile memory when you are done configuring Cancel Click Cancel to reset the fields to their last saved values Profile Name This field displays the descriptive name of the profile Click the name to change the settings Circuit ID This section displays the Circuit ID sub option including information that is s...

Page 235: ...the non volatile memory when you are done configuring Cancel Click Cancel to begin configuring this screen afresh Table 119 IP Application DHCP DHCPv4 Global Port LABEL DESCRIPTION Port Enter the number of ports to which you want to apply the specified DHCP option 82 profile You can enter multiple ports separated by no space comma or hyphen For example enter 3 5 for ports 3 4 and 5 Enter 3 5 7 for...

Page 236: ...CP server This allows the DHCP server to assign the appropriate IP address according to the VLAN ID Index This field displays a sequential number for each entry Click an index number to change the settings Port This field displays the ports to which the Switch applies the settings Profile Name This field displays the DHCP option 82 profile that the Switch applies to the ports Select an entry s che...

Page 237: ... to which these DHCP settings apply Relay Use this section if you want to configure the Switch to function as a DHCP relay for this VLAN Remote DHCP Server 1 3 Enter the IP address of a DHCP server in dotted decimal notation Option 82 Profile Select a pre defined DHCP option 82 profile that the Switch applies to all ports in this VLAN The Switch adds the Circuit ID sub option and or Remote ID sub ...

Page 238: ...ove them Cancel Click Cancel to clear the check boxes Table 120 IP Application DHCP DHCPv4 VLAN continued LABEL DESCRIPTION Table 121 IP Application DHCP DHCPv4 VLAN Port LABEL DESCRIPTION VID Enter the ID number of the VLAN you want to configure here Port Enter the number of ports to which you want to apply the specified DHCP option 82 profile You can enter multiple ports separated by no space co...

Page 239: ...t applicable to clear the fields above Clear Click Clear to reset the fields to the factory defaults Index This field displays a sequential number for each entry Click an index number to change the settings VID This field displays the VLAN to which the ports belongs Port This field displays the ports to which the Switch applies the settings Profile Name This field displays the DHCP option 82 profi...

Page 240: ...d the interface ID option to the Relay Forward DHCPv6 messages The remote ID option carries a user defined string such as the system name The interface ID option provides slot number port information and the VLAN ID to the DHCPv6 server The remote ID option if any is stripped from the Relay Reply messages before the relay agent sends the packets to the clients The DHCPv6 server copies the interfac...

Page 241: ...te an existing one This saves your changes to the Switch s run time memory The Switch loses these changes if it is turned off or loses power so use the Save link on the top navigation panel to save your changes to the non volatile memory when you are done configuring Cancel Click Cancel to reset the fields to their last saved values Clear Click Clear to reset the fields to the factory defaults VID...

Page 242: ...ts the request to all the devices on the LAN The Switch fills in its own MAC and IP address in the sender address fields and puts the known IP address of the target in the target IP address field In addition the Switch puts all ones in the target MAC field FF FF FF FF FF FF is the Ethernet broadcast address The replying device which is either the IP address of the device being sought or the router...

Page 243: ...o the IP address of the device that sends this request and the destination MAC address field is set to the broadcast address There will be no reply to a gratuitous ARP request A device may send a gratuitous ARP packet to detect IP collisions If a device restarts or its MAC address is changed it can also use gratuitous ARP to inform other devices in the same network to update their ARP table with t...

Page 244: ...n as shown Click the link next to ARP Learning to open a screen where you can set the ARP learning mode for each port Figure 173 IP Application ARP Setup 30 2 1 ARP Learning Use this screen to configure each port s ARP learning mode Click the link next to ARP Learning in the IP Application ARP Setup screen to display the screen as shown next ...

Page 245: ...Learning Mode Select the ARP learning mode the Switch uses on the port Select ARP Reply to have the Switch update the ARP table only with the ARP replies to the ARP requests sent by the Switch Select Gratuitous ARP to have the Switch update its ARP table with either an ARP reply or a gratuitous ARP request Select ARP Request to have the Switch update the ARP table with both ARP replies gratuitous ...

Page 246: ...n Section 31 2 1 on page 248 to reset the configuration to the Zyxel default configuration settings Use the Save Configuration screen Section 31 2 2 on page 248 to save the current configuration settings to a specific configuration file on the Switch Use the Reboot System screen Section 31 2 3 on page 248 to restart the Switch without physically turning the power off and load a specific configurat...

Page 247: ...guration file Reboot System Click Config 1 to reboot the Switch and load Configuration 1 on the Switch Click Config 2 to reboot the Switch and load Configuration 2 on the Switch Click Factory Default to reboot the Switch and load the Zyxel factory default configuration settings on the Switch Click Custom Default to reboot the system and load a saved Custom Default configuration file on the Switch ...

Page 248: ...rrent configuration settings permanently to Configuration 1 on the Switch These configurations are set up according to your network environment Click Config 2 to save the current configuration settings permanently to Configuration 2 on the Switch These configurations are set up according to your network environment Click Custom Default to save the current configuration settings permanently to a cu...

Page 249: ... file was not saved clicking Custom Default loads the factory default configuration on the Switch 31 2 4 Factory Default Follow the steps below to reset the Switch back to the factory defaults 1 Click the Factory Default button 2 Click OK to continue or Cancel to abort Figure 177 Load Factory Default Confirmation If you want to access the Switch Web Configurator again you may need to change the IP...

Page 250: ...ce Be sure to upload the correct model firmware as uploading the wrong model firmware may damage your device Click Management Maintenance Firmware Upgrade to view the screen as shown next Figure 179 Management Maintenance Firmware Upgrade The top of firmware upgrade screen shows which firmware version is currently running on the Switch Enter the path and file name of the firmware file you wish to ...

Page 251: ...tting Firmware 1 shows its version number and model code and MM DD YYYY creation date Firmware 2 shows its version number and model code and MM DD YYYY creation date Current Boot Image This displays which firmware is currently in use on the Switch Firmware 1 or Firmware 2 Config Boot Image Select which firmware Firmware 1 or Firmware 2 should load click Apply and reboot the Switch to see changes y...

Page 252: ...Save As to save the file to a specific place If a dialog box pops up asking whether you want to open or save the file click Save or Save File to download it to the default downloads folder on your computer If a Save As screen displays after you click Save or Save File choose a location to save the file on your computer from the Save in drop down list box and type a descriptive name for it in the F...

Page 253: ...x The Mbuf log report is stored in flash permanent memory For example Mbuf 50 means a log will be created when the Mbuf utilization is over 50 The higher the Mbuf threshold number the fewer logs will be created and the less data technical support will have to analyze and vice versa Apply Click Apply to save your changes to the Switch s run time memory The Switch loses these changes if it is turned...

Page 254: ...nfigurator See Section 32 8 3 on page 275 for more information about HTTPS Certificates are based on public private key pairs A certificate contains the certificate owner s identity and public key Certificates provide a way to exchange public keys for use in authentication Click Management Maintenance Certificates to open the following screen Use this screen to import the Switch s CA signed certif...

Page 255: ...hority from your computer to the Switch Service This field displays the service type that this certificate is for Subject This field displays identifying information about the certificate s owner such as CN Common Name OU Organizational Unit or department O Organization or company and C Country It is recommended that each certificate have unique subject information Issuer This field displays ident...

Page 256: ...rom the Switch using FTP commands First understand the filename conventions 31 8 2 Filename Conventions The configuration file also known as the romfile or ROM contains the Zyxel factory default configuration settings in the screens such as password Switch setup IP Setup and so on Once you have customized the Switch s settings they can be saved back to your computer under a filename of your choosi...

Page 257: ...Switch 3 Press ENTER when prompted for a user name 4 Enter your password as requested the default is 1234 5 Enter bin to set transfer mode to binary 6 Use put to transfer files from the computer to the Switch for example put firmware bin ras transfers the firmware on your computer firmware bin to the Switch and renames it to ras Similarly put config cfg config transfers the configuration file on y...

Page 258: ... 129 General Commands for GUI based FTP Clients COMMAND DESCRIPTION Host Address Enter the address of the host server Login Type Anonymous This is when a user I D and password is automatically supplied to the server for anonymous access Anonymous logins will work only if your ISP or service administrator has enabled this option Normal The server requires a unique User ID and Password to login Tran...

Page 259: ...ntication with managers using SNMP v3 and associate them to SNMP groups Use the Logins screens Section 32 4 on page 265 to assign which users can access the Switch through Web Configurator at any one time Use the Service Access Control screen Section 32 5 on page 266 to decide what services you may use to access the Switch Use the Remote Management screen Section 32 6 on page 267 to specify a grou...

Page 260: ...this link to configure your SNMP settings Logins Click this link to assign which users can access the Switch through Web Configurator at any one time Service Access Control Click this link to decide what services you may use to access the Switch Remote Management Click this link to specify a group of one or more trusted computers from which an administrator may use a service to manage the Switch A...

Page 261: ...e Set Community string which is the password for incoming Set requests from the management station The Set Community string is only used by SNMP managers using SNMP version 2c or lower Trap Community Enter the Trap Community string which is the password sent with each trap to the SNMP manager The Trap Community string is only used by SNMP managers using SNMP version 2c or lower Trap Destination Us...

Page 262: ...pe Select the categories of SNMP traps that the Switch is to send to the SNMP manager Options Select the individual SNMP traps that the Switch is to send to the SNMP station The traps are grouped by category Selecting a category automatically selects all of the category s traps Clear the check boxes for individual traps that you do not want the Switch to send to the SNMP station Clearing a categor...

Page 263: ... box to enable the trap type of SNMP traps on this port The Switch sends the related traps received on this port to the SNMP manager Clear this check box to disable the sending of SNMP traps on this port Apply Click Apply to save your changes to the Switch s run time memory The Switch loses these changes if it is turned off or loses power so use the Save link on the top navigation panel to save yo...

Page 264: ...Model VACM group SNMP managers in one group are assigned common access rights to MIBs Specify in which SNMP group this user is admin Members of this group can perform all types of system configuration including the management of administrator accounts readwrite Members of this group have read and write rights meaning that the user can create and edit the MIBs on the Switch except the user account ...

Page 265: ... privilege level Click Management Access Control Logins to view the screen as shown Figure 191 Management Access Control Logins Note The input string in any field of this screen should not contain or In the Password fields space is also not allowed The following table describes the labels in this screen Delete Click Delete to remove the selected entry from the summary table Cancel Click Cancel to ...

Page 266: ... 13 Configure features except for login accounts SNMP user accounts the authentication method sequence and authorization settings multiple logins administrator and enable passwords and configuration information display 14 Configure login accounts SNMP user accounts the authentication method sequence and authorization settings multiple logins and administrator and enable passwords and display confi...

Page 267: ... the new port number for that service Timeout Enter how many minutes from 1 to 255 a management session can be left idle before the session times out After it times out you have to log in with your password again Very long idle timeouts may have security risks Login Timeout The Telnet or SSH server do not allow multiple user logins at the same time Enter how many seconds from 30 to 300 seconds a l...

Page 268: ...se a service to manage the Switch Active Select this check box to activate this secured client set Clear the check box if you wish to temporarily disable the set without deleting it Start Address End Address Configure the IP address range of trusted computers from which you can manage this Switch The Switch checks if the client IP address of a computer requesting a service or protocol matches the ...

Page 269: ...SNMP user authentication in the Authentication field and the password for the encryption method for SNMP communication in the Privacy field Note The passwords will appear as encrypted text when Password Encryption is Active Click Management Access Control Account Security to view the screen as shown next Click Access Control to return to the Access Control screen Figure 194 Management Access Contr...

Page 270: ...ement software module that resides in a managed Switch the Switch An agent translates the local management information from the managed Switch into a form compatible with SNMP The manager is the console through which network administrators perform network management functions It executes applications that control and monitor managed devices Display Select which specific information to display in p...

Page 271: ...cts that is organized according to hierarchy The objects define the attributes of the managed device which includes the names status access rights and data types Each object can be addressed through an object identifier OID MIBs let administrators collect statistics and monitor status and performance The Switch uses standard public RFC defined MIBs for standard functionality To view a list of stan...

Page 272: ... This trap is sent when the Ethernet link is down lldp lldpRemTablesChange 1 0 8802 1 1 2 0 0 1 The trap is sent when entries in the remote database have any updates Link Layer Discovery Protocol LLDP defined as IEEE 802 1ab enables LAN devices that support LLDP to exchange their configured settings This helps eliminate configuration mismatch issues Table 143 SNMP AAA Traps OPTION OBJECT LABEL OBJ...

Page 273: ...ow SSH Works The following table summarizes how a secure connection is established between two remote hosts Table 145 SNMP Switch Traps OPTION OBJECT LABEL OBJECT ID DESCRIPTION stp STPNewRoot 1 3 6 1 2 1 17 0 1 This trap is sent when the STP root switch changes STPTopologyChange 1 3 6 1 2 1 17 0 2 This trap is sent when the STP topology changes rmon RmonRisingAlarm 1 3 6 1 2 1 16 0 1 This trap is...

Page 274: ...cryption Method Once the identification is verified both the client and server must agree on the type of encryption method to use 3 Authentication and Data Transmission After the identification is verified and data encryption activated a secure tunnel is established between the client and the server The client then sends its authentication information user name and password to the server to log in...

Page 275: ...h must always authenticate itself to the SSL client the computer which requests the HTTPS connection with the Switch whereas the SSL client only should authenticate itself when the SSL server requires it to do so Authenticating client certificates is optional and if selected means the SSL client must send the Switch a certificate You must apply for a certificate for the browser from a Certificate ...

Page 276: ... access is blocked Figure 199 Security Alert Dialog Box Internet Explorer 6 Internet Explorer 7 later version When you attempt to access the Switch HTTPS server a screen with the message There is a problem with this website s security certificate may display If that is the case click Continue to this website not recommended to proceed to the Web Configurator login screen Figure 200 Security Certif...

Page 277: ...he on screen instructions to install the certificate in your browser Figure 202 Certificate Internet Explorer 11 Mozilla Firefox Warning Messages When you attempt to access the Switch HTTPS server a Your connection is not secure screen may display If that is the case click I Understand the Risks and then the Add Exception button EXAMPLE EXAMPLE ...

Page 278: ... Series User s Guide 278 Figure 203 Security Alert Mozilla Firefox Confirm the HTTPS server URL matches Click Confirm Security Exception to proceed to the Web Configurator login screen Figure 204 Security Alert Mozilla Firefox EXAMPLE ...

Page 279: ...e case click Advanced and then Proceed to x x x x unsafe to proceed to the Web Configurator login screen Figure 205 Security Alert Google Chrome 58 0 3029 110 32 8 4 1 Main Settings After you accept the certificate and enter the login user name and password the Switch main screen appears The lock displayed in the bottom right of the browser status bar or next to the website address denotes a secur...

Page 280: ...GS1915 Series User s Guide 280 Figure 206 Example Lock Denoting a Secure Connection EXAMPLE ...

Page 281: ...he Diagnostic screen You can use this screen to help you identify problems 33 2 Diagnostic Click Management Diagnostic in the navigation panel to open this screen Use this screen to ping IP addresses run a traceroute perform port tests or show the Switch s location between devices Figure 207 Management Diagnostic ...

Page 282: ...e Time To Live TTL value for the ICMP Echo Request packets This is to set the maximum number of the hops routers a packet can travel through Each router along the path will decrement the TTL value by one and forward the packets When the TTL value becomes zero and the destination is not found the router drops the packets and informs the sender Wait Time Specify how many seconds the Switch waits for...

Page 283: ...us is Open or Short Check the Distance to fault This shows Unsupported if the Switch chipset does not support to show the cable length Distance to fault This displays the distance between the port and the location where the cable is open or shorted This shows N A if the Pair status is Ok This shows Unsupported if the Switch chipset does not support to show the distance Table 146 Management Diagnos...

Page 284: ...n a log reaches the maximum number of log messages new log messages automatically overwrite existing log messages starting with the oldest existing log message first Figure 208 Management System Log The summary table shows the time the log message was recorded and the reason the log message was generated Click Refresh to update this screen Click Clear to clear the whole log regardless of what is c...

Page 285: ...els 35 1 1 What You Can Do Use the Syslog Setup screen Section 35 2 on page 285 to configure the device s system logging settings and configure a list of external syslog servers 35 2 Syslog Setup The syslog feature sends logs to an external syslog server Use this screen to configure the device s system logging settings and configure a list of external syslog servers Click Management Syslog Setup i...

Page 286: ...changes to the Switch s run time memory The Switch loses these changes if it is turned off or loses power so use the Save link on the top navigation panel to save your changes to the non volatile memory when you are done configuring Cancel Click Cancel to begin configuring this screen afresh Syslog Server Setup Active Select this check box to have the device send logs to this syslog server Clear t...

Page 287: ...er to edit the entry Active This field displays Yes if the device is to send logs to the syslog server No displays if the device is not to send logs to the syslog server IP Address This field displays the IP address of the syslog server UDP Port This field displays the port of the syslog server Log Level This field displays the severity level of the logs that the device is to send to this syslog s...

Page 288: ...her switches on the upper floors of the building are cluster members Figure 210 Clustering Application Example 36 1 1 What You Can Do Use the Cluster Management Status screen Section 36 2 on page 289 to view the role of the Switch within the cluster and to access a cluster member Switch s Web Configurator Table 149 Zyxel Clustering Management Specifications Maximum number of cluster members 24 Clu...

Page 289: ...ot through the cluster manager None neither a manager nor a member of a cluster Manager This field displays the cluster manager Switch s hardware MAC address The Number of Member This field displays the number of switches that make up this cluster The following fields describe the cluster member switches Index You can manage cluster member switches through the cluster manager Switch Each number in...

Page 290: ...then its Status is displayed as Error in the Cluster Management Status screen and a warning icon appears in the member summary list below Name Type a name to identify the Clustering Manager You may use up to 32 printable characters spaces are allowed VID This is the VLAN ID and is only applicable if the Switch is set to 802 1Q VLAN All switches must be directly connected and in the same VLAN group...

Page 291: ... be managed from the Cluster Manager Its Status is displayed as Error in the Cluster Management Status screen If multiple devices have the same password then hold SHIFT and click those switches to select them Then enter their common Web Configurator password Add Click Add to save your changes to the Switch s run time memory The Switch loses these changes if it is turned off or loses power so use t...

Page 292: ...Figure 213 Cluster Management Cluster Member Web Configurator Screen 36 4 1 1 Uploading Firmware to a Cluster Member Switch You can use FTP to upload firmware to a cluster member switch through the cluster manager switch as shown in the following example example ...

Page 293: ...K ftp 297 bytes received in 0 00Seconds 297000 00Kbytes sec ftp bin 200 Type I OK ftp put 470ACAQ0 bin fw 00 a0 c5 01 23 46 200 Port command okay 150 Opening data connection for STOR fw 00 a0 c5 01 23 46 226 File received OK ftp 262144 bytes sent in 0 63Seconds 415 44Kbytes sec ftp Table 152 FTP Upload to Cluster Member Example FTP PARAMETER DESCRIPTION User Enter admin Password The Web Configurat...

Page 294: ...itch uses the MAC Table to determine how to forward frames See the following figure 1 The Switch examines a received frame and learns the port on which this source MAC address came 2 The Switch checks to see if the frame s destination MAC address matches a source MAC address already learned in the MAC Table If the Switch has already learned the port for this MAC address then it forwards the frame ...

Page 295: ...e Use this screen to search specific MAC addresses You can also directly add dynamic MAC addresses into the static MAC forwarding table or MAC filtering table from the MAC table using this screen Click Management MAC Table in the navigation panel to display the following screen Figure 216 Management MAC Table ...

Page 296: ...Select PORT to display and arrange the data according to port number Transfer Type Select Dynamic to MAC forwarding and click the Transfer button to change all dynamically learned MAC address entries in the summary table below into static entries They also display in the Advanced Application Static MAC Forwarding screen Select Dynamic to MAC filtering and click the Transfer button to change all dy...

Page 297: ... it finds the address it sends it to the device If no entry is found for the IP address ARP broadcasts the request to all the devices on the LAN The Switch fills in its own MAC and IP address in the sender address fields and puts the known IP address of the target in the target IP address field In addition the Switch puts all ones in the target MAC field FF FF FF FF FF FF is the Ethernet broadcast...

Page 298: ...ARP entries according to the condition you specified Cancel Click Cancel to return the fields to the factory defaults Index This is the ARP table entry number IP Address This is the IP address of a device connected to a Switch port with the corresponding MAC address below MAC Address This is the MAC address of the device with the corresponding IP address above VID This field displays the VLAN to w...

Page 299: ...een to view IPv6 path MTU information on the Switch Click Management Path MTU Table in the navigation panel to display the screen as shown Figure 218 Management Path MTU Table The following table describes the labels in this screen Table 155 Management Path MTU Table LABEL DESCRIPTION Path MTU aging time This field displays how long an entry remains in the Path MTU table before it ages out and nee...

Page 300: ...you how you can copy the settings of one port onto other ports 40 2 Configure Clone Cloning allows you to copy the basic and advanced settings from a source port to a destination port or ports Click Management Configure Clone to open the following screen Figure 219 Management Configure Clone ...

Page 301: ...indicates that ports 2 through 6 are the destination ports Select to apply all settings to the port Use this first to select the common settings and then remove the settings you do not want copied Basic Setting Select which port settings you configured in the Basic Setting menus should be copied to the destination ports Advanced Application Select which port settings you configured in the Advanced...

Page 302: ... Neighbor Setup screen When the Switch needs to send a packet it first consults other table to determine the next hop Once the next hop IPv6 address is known the Switch looks into the neighbor table to get the link layer address and sends the packet when the neighbor is reachable If the Switch cannot find an entry in the neighbor table or the state for the neighbor is not reachable it starts the a...

Page 303: ... initial request The field displays this also when the Switch receives an unrequested response from the neighbor s interface delay D The neighboring interface is no longer known to be reachable and traffic has been sent to the neighbor recently The Switch delays sending request packets for a short to give upper layer protocols a chance to determine reachability probe P The Switch is sending reques...

Page 304: ...describes the labels in this screen Table 158 Management Port Status LABEL DESCRIPTION Port This identifies the Ethernet port Click a port number to display the Port Details screen Name This is the name you assigned to this port in the Basic Setting Port Setup screen Link This field displays the speed either 10M for 10 Mbps 100M for 100 Mbps or 1G for 1 Gbps and the duplex F for full duplex or H f...

Page 305: ...xPkts This field shows the number of transmitted frames on this port RxPkts This field shows the number of received frames on this port Errors This field shows the number of received errors on this port Tx kB s This field shows the number of kilobytes per second transmitted on this port Rx kB s This field shows the number of kilobytes per second received on this port Up Time This field shows the t...

Page 306: ...eld displays Down if the port is not connected to any device State If STP Spanning Tree Protocol is enabled this field displays the STP state of the port If STP is disabled this field displays FORWARDING if the link is up otherwise it displays STOP When LACP Link Aggregation Control Protocol and STP are in blocking state it displays Blocking LACP This field shows if LACP is enabled on this port or...

Page 307: ... one collision Multiple This is a count of successfully transmitted packets for which transmission was inhibited by more than one collision Excessive This is a count of packets for which transmission failed due to excessive collisions Excessive collision is defined as the number of maximum collisions before the retransmission count is reset Late This is the number of times a late collision is dete...

Page 308: ...ber of packets including bad packets received that were between 1519 octets and the maximum frame size The maximum frame size varies depending on your switch model Table 159 Management Port Status Port Details continued LABEL DESCRIPTION Table 160 Management Port Status Utilization LABEL DESCRIPTION Port This identifies the Ethernet port Link This field displays the speed either 10M for 10 Mbps 10...

Page 309: ...309 PART III Troubleshooting and Appendices ...

Page 310: ... 2 Make sure the power adapter or cord is connected to the Switch and plugged in to an appropriate power source Make sure the power source is turned on 3 Disconnect and re connect the power adapter or cord to the Switch 4 If the problem continues contact the vendor One of the LEDs does not behave as expected 1 Make sure you understand the normal behavior of the LED See Section 3 3 on page 37 2 Che...

Page 311: ...fter performing step 3 and you want to use the Cloud management mode make sure the Switch is registered in your organization and site in the NCC portal To register the Switch again scan the QR code using the Zyxel Nebula Mobile app See the Section on page 20 for more information on using the app to register the Switch I forgot the IP address for the Switch 1 The default IP address is http DHCP ass...

Page 312: ...with the default IP address See Section 4 8 on page 63 6 If the problem continues contact the vendor or try the advanced suggestion Advanced Suggestion Try to access the Switch using another service such as Telnet If you can access the Switch check the remote management settings to find out why the Switch does not respond to HTTP Pop up Windows JavaScripts and Java Permissions In order to use the ...

Page 313: ...Configurator to save the configuration permanently See also Section 31 2 2 on page 248 for more information about how to save your configuration I accidentally unplugged the Switch I am not sure which configuration file will be loaded If you plug the power cable back to the Switch it will reboot and load the configuration file that was used the last time For example if Config 1 was used on the Swi...

Page 314: ...com index shtml for the latest information Please have the following information ready when you contact an office Required Information Product model and serial number Warranty Information Date that you received your device Brief description of the problem and the steps you took to solve it Corporate Headquarters Worldwide Taiwan Zyxel Communications Corporation https www zyxel com Asia China Zyxel...

Page 315: ...k Philippines Zyxel Philippines http www zyxel com ph Singapore Zyxel Singapore Pte Ltd http www zyxel com sg Taiwan Zyxel Communications Corporation https www zyxel com tw zh Thailand Zyxel Thailand Co Ltd https www zyxel com th th Vietnam Zyxel Communications Corporation Vietnam Office https www zyxel com vn vi Europe Belarus Zyxel BY https www zyxel by Bulgaria Zyxel България https www zyxel co...

Page 316: ... https www zyxel com fi fi France Zyxel France https www zyxel fr Germany Zyxel Deutschland GmbH https www zyxel com de de Hungary Zyxel Hungary SEE https www zyxel com hu hu Italy Zyxel Communications Italy https www zyxel com it it Netherlands Zyxel Benelux https www zyxel com nl nl Norway Zyxel Communications https www zyxel com no no Poland Zyxel Communications Poland https www zyxel com pl pl...

Page 317: ...k Spain Zyxel Communications ES Ltd https www zyxel com es es Sweden Zyxel Communications https www zyxel com se sv Switzerland Studerus AG https www zyxel ch de https www zyxel ch fr Turkey Zyxel Turkey A S https www zyxel com tr tr UK Zyxel Communications UK Ltd https www zyxel com uk en Ukraine Zyxel Ukraine http www ua zyxel com South America Argentina Zyxel Communications Corporation https ww...

Page 318: ...ations Corporation https www zyxel com co es Ecuador Zyxel Communications Corporation https www zyxel com co es South America Zyxel Communications Corporation https www zyxel com co es Middle East Israel Zyxel Communications Corporation http il zyxel com North America USA Zyxel Communications Inc North America Headquarters https www zyxel com us en ...

Page 319: ...ions in which this service is used Table 161 Commonly Used Services NAME PROTOCOL PORT S DESCRIPTION AH IPSEC_TUNNEL User Defined 51 The IPSEC AH Authentication Header tunneling protocol uses this service AIM New ICQ TCP 5190 AOL s Internet Messenger service It is also used as a listening port by ICQ AUTH TCP 113 Authentication protocol used by some servers BGP TCP 179 Border Gateway Protocol BOOT...

Page 320: ...that sends out ICMP echo requests to test whether or not a remote host is reachable POP3 TCP 110 Post Office Protocol version 3 lets a client computer get e mail from a POP3 server through a temporary connection TCP IP or other PPTP TCP 1723 Point to Point Tunneling Protocol enables secure transfer of data over public networks This is the control channel PPTP_TUNNEL GRE User Defined 47 PPTP Point ...

Page 321: ...S UDP 49 Login Host Protocol used for Terminal Access Controller Access Control System TELNET TCP 23 Telnet is the login and terminal emulation protocol common on the Internet and in UNIX environments It operates over TCP IP networks Its primary function is to allow users to log into remote host systems TFTP UDP 69 Trivial File Transfer Protocol is an Internet file transfer protocol similar to FTP...

Page 322: ... 1a2f 0015 2001 db8 1a2f 0 0 15 or 2001 db8 0 0 1a2f 15 Prefix and Prefix Length Similar to an IPv4 subnet mask IPv6 uses an address prefix to represent the network address An IPv6 prefix length specifies how many most significant bits start from the left in the address compose the network address The prefix length is written as x where x is a number For example 2001 db8 1a2b 15 1a2f 0 32 means th...

Page 323: ...owing table describes some of the predefined multicast addresses The following table describes the multicast addresses which are reserved and cannot be assigned to a multicast group Table 163 Predefined Multicast Address MULTICAST ADDRESS DESCRIPTION FF01 0 0 0 0 0 0 1 All hosts on a local node FF01 0 0 0 0 0 0 2 All routers on a local node FF02 0 0 0 0 0 0 1 All hosts on a local connected link FF...

Page 324: ...ing UDP Each DHCP client and server has a unique DHCP Unique IDentifier DUID which is used for identification when they are exchanging DHCPv6 messages The DUID is generated from the MAC address time vendor assigned ID and or the vendor s private enterprise number registered with the IANA It should not change over time even after you reboot the device Identity Association An Identity Association IA...

Page 325: ...d uplink router for its LAN The Switch uses the received IPv6 prefix for example 2001 db2 48 to generate its LAN IP address Through sending Router Advertisements RAs regularly by multicast the Switch passes the IPv6 prefix information to its LAN hosts The hosts then can use the prefix to generate their IPv6 addresses ICMPv6 Internet Control Message Protocol for IPv6 ICMPv6 or ICMP for IPv6 is defi...

Page 326: ... as the next hop Otherwise the Switch determines the next hop from the default router list or routing table Once the next hop IP address is known the Switch looks into the neighbor cache to get the link layer address and sends the packet when the neighbor is reachable If the Switch cannot find an entry in the neighbor cache or the state for the neighbor is not reachable it starts the address resol...

Page 327: ... DHCPv6 for IP address assignment you have to additionally install a DHCPv6 client software on your Windows XP Note If you use static IP addresses or Router Advertisement for IPv6 address assignment in your network ignore this section This example uses Dibbler as the DHCPv6 client To enable DHCPv6 client on your computer 1 Install Dibbler and select the DHCPv6 client option on your computer 2 Afte...

Page 328: ...Example Enabling IPv6 on Windows 7 Windows 7 supports IPv6 by default DHCPv6 is also enabled when you enable IPv6 on a Windows 7 computer To enable IPv6 in Windows 7 1 Select Control Panel Network and Sharing Center Local Area Connection 2 Select the Internet Protocol Version 6 TCP IPv6 check box to enable it 3 Click OK to save the change ...

Page 329: ... DHCPv6 is enabled when you enable IPv6 on a Windows 10 PC To enable IPv6 in Windows 10 1 Select Control Panel Network and Sharing Center 2 On the left side of the Network and Sharing Center select Change adapter settings 3 Right click your network connection and select Properties C ipconfig Windows IP Configuration Ethernet adapter Local Area Connection Connection specific DNS Suffix IPv6 Address...

Page 330: ...your computer 1 Select Start Settings Network Internet 2 On the left side of the Network Internet select Ethernet Then select the Ethernet network you are connected to 3 Under IP assignment select Edit 4 Under Edit IP settings select Automatic DHCP or Manual Then click Save When you select Automatic DHCP the IP address settings and DNS server address setting are set automatically by your router Wh...

Page 331: ...ject to the following two conditions 1 This Switch may not cause harmful interference 2 This Switch must accept any interference received including interference that may cause undesired operations Changes or modifications not expressly approved by the party responsible for compliance could void the user s authority to operate the equipment This equipment has been tested and found to comply with th...

Page 332: ...and electronic Switch For detailed information about recycling of this product please contact your local city office your household waste disposal service or the store where you purchased the product Use ONLY power wires of the appropriate wire gauge for your Switch Connect it to a power supply of the correct voltage Fuse Warning Replace a fuse only with a fuse of the same type and rating The POE ...

Page 333: ...itpunkt der Entsorgung wird die getrennte Sammlung von Produkt und oder seiner Batterie dazu beitragen natürliche Ressourcen zu sparen und die Umwelt und die menschliche Gesundheit zu schützen El símbolo de abajo indica que según las regulaciones locales su producto y o su batería deberán depositarse como basura separada de la doméstica Cuando este producto alcance el final de su vida útil llévelo...

Page 334: ...壞 請從插座拔除 若您還繼續插電使用 會有觸電死亡的風險 請勿試圖修理電源變壓器或電源變壓器的纜線 若有毀損 請直接聯絡您購買的店家 購買 個新的電源變壓器 請勿將此設備安裝於室外 此設備僅適合放置於室內 請勿隨 般垃圾丟棄 請參閱產品背貼上的設備額定功率 請參考產品型錄或是彩盒上的作業溫度 設備必須接地 接地導線不允許被破壞或沒有適當安裝接地導線 如果不確定接地方式是否符合要求可聯繫相應的電氣檢驗機構檢驗 如果您提供的系統中有提供熱插拔電源 連接或斷開電源請遵循以下指導原則 先連接電源線至設備連 再連接電源 先斷開電源再拔除連接至設備的電源線 如果系統有多個電源 需拔除所有連接至電源的電源線再關閉設備電源 產品沒有斷電裝置或者採用電源線的插頭視為斷電裝置的 部分 以下警語將適用 對永久連接之設備 在設備外部須安裝可觸及之斷電裝置 對插接式之設備 插座必須接近安裝之地點而且是易於觸及的 A...

Page 335: ... with damaged by an act of God or subjected to abnormal working conditions Note Repair or replacement as provided under this warranty is the exclusive remedy of the purchaser This warranty is in lieu of all other warranties express or implied including any implied warranty of merchantability or fitness for a particular use or purpose Zyxel shall in no event be held liable for indirect or consequen...

Page 336: ...Setting Wizard 132 applications backbone 23 bridging 24 IEEE 802 1Q VLAN 25 PoE 23 switched workgroup 24 ARP how it works 242 learning mode 242 overview 242 setup 244 ARP Address Resolution Protocol 297 ARP Learning screen 244 ARP Setup screen 244 ARP Table screen 297 ARP Reply 242 ARP Request 243 ATM Asynchronous Transmission Mode 25 authentication setup 176 authentication authorization and accou...

Page 337: ...ile backup 252 restore 251 save 248 Configure Clone screen 300 contact information 314 copying port settings see port cloning copyright 331 CoS 226 CPU management port 130 CPU protection 195 crossover Ethernet cable 34 current date 88 current time 87 customer support 314 D date current 88 daylight saving time 88 DHCP configuration options 230 Dynamic Host Configuration Protocol 230 modes 230 Relay...

Page 338: ...324 dynamic link aggregation 152 E egress port 132 egress rate 147 electrical inspection authority 36 electrician 37 EMC statement 331 Environment Statement 333 Errdisable Detect screen 199 Errdisable Recovery screen 200 Errdisable screen 196 errdisable status 198 error disable 195 control packets 197 CPU protection 198 detect 199 recovery 200 status 196 error disable recovery 195 Ethernet broadca...

Page 339: ... Internet Assigned Number Authority 319 Identity Association IA 324 IEEE 802 3af 22 IEEE 802 3at 22 IEEE 802 3az 202 IEEE standard 22 IGMP leave timeout fast 170 IGMP snooping 167 IGMP snooping and VLANs 168 ingress port 132 ingress rate 147 initial setup 65 Innovation Science and Economic Development Canada ICES statement 331 installation air circulation 27 desktop 27 freestanding 27 rack mountin...

Page 340: ...EDs 37 limit MAC address learning 160 link aggregation 52 152 dynamic 152 ID information 153 setup 154 traffic distribution algorithm 154 traffic distribution type 155 trunk group 152 link aggregation trunking example 24 Link Aggregation Control Protocol LACP 152 Link Aggregation screen Wizard 51 Link Layer Discovery Protocol 204 LLDP 204 basic TLV 219 global settings 218 local port status 208 org...

Page 341: ...aximum transmission unit 299 Maximum Transmission Unit MTU 106 Mbuf Memory Buffer 253 MDIX Media Dependent Interface Crossover 34 Media Access Control 86 Memory Buffer 253 MIB and SNMP 271 supported MIBs 271 MIB Management Information Base 271 mirroring ports 150 monitor port 150 mounting brackets attaching 31 MTU 299 MTU Multi Tenant Unit 88 multicast IP addresses 167 setup 168 multicast IP addre...

Page 342: ... Setting Wizard 132 port mirroring 150 port redundancy 152 Port screen DHCP snooping 188 DHCPv4 Global Relay 235 DHCPv4 VLAN 238 port security 159 address learning 160 limit MAC address learning 160 setup 159 Port Setup screen 96 port status 304 port details 305 port utilization 308 port utilization 308 Port VID PVID 66 port VLAN ID see PVID 125 port VLAN trunking 119 port based VLAN 130 all conne...

Page 343: ...5 Round Robin Scheduling 164 Router Advertisement RA 325 routing domain 90 RSTP configuration 143 rubber feet 18 attach 28 running configuration 248 erase 248 reset 248 S safety precautions using the Switch 27 safety warnings 332 save configuration 63 248 Save link 63 schedule one time 162 recurring 162 type 163 screw anchors using 29 screw specification for wall mounting 28 Secure Shell see SSH s...

Page 344: ... 144 path cost 140 145 port priority 145 port role 143 port state 141 143 root port 141 status 142 terminology 140 vs loop guard 192 STP Path Cost 141 straight through Ethernet cable 34 subnet masking 324 Switch DHCP client 40 fanless type usage precaution 27 fan type usage precaution 27 switch lockout 63 Switch reset 63 Switch Setup screen 88 Switch s QR code 20 syslog 285 protocol 285 settings 2...

Page 345: ... filtering 125 introduction 88 118 number of VLANs 121 port number 122 port settings 124 port based 132 port based VLAN 130 port based isolation 132 port based wizard 132 PVID 125 static VLAN 123 status 120 121 122 tagged 118 trunking 119 125 type 89 120 VLAN Virtual Local Area Network 88 VLAN ID 118 VLAN member port 57 VLAN number 92 94 VLAN setting Wizard 56 VLAN Setting screen 239 DHCPv4 237 VL...

Page 346: ...um hardware requirements 45 network adapter select 46 password prompt 47 run 45 supported firmware version 45 supported models 45 Switch IP address 40 ZON utility use for troubleshooting 311 ZyNOS Zyxel Network Operating System 256 Zyxel AP Configurator ZAC 48 Zyxel Discovery Protocol ZDP 44 Zyxel Nebula Mobile App register the Switch 20 Zyxel One Network ZON Utility 21 ...

Reviews: