Chapter 3 Hardware Panels
XMG1930 Series User’s Guide
37
4
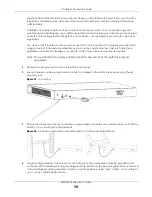
Press the transceiver firmly until it clicks into place.
5
The Switch automatically detects the installed transceiver. Check the LEDs to verify that it is functioning
properly.
6
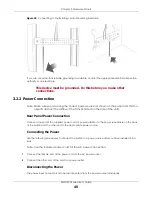
Remove the dust plugs from the transceiver and cables (dust plug styles vary).
7
Identify the signal transmission direction of the
fi
ber optic cables and the transceiver. Insert the
fi
ber
optic cable into the transceiver.
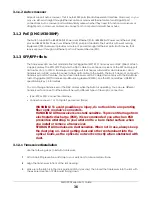
Figure 13
Latch in the Lock Position
Figure 14
Transceiver Installation Example
Figure 15
Connecting the Fiber Optic Cables
3.1.3.2 Transceiver Removal
Use the following steps to remove an SFP transceiver.
1
Attach an ESD preventive wrist strap to your wrist and to a bare metal surface on the chassis.
2
Remove the fiber optic cables from the transceiver.
3
Pull out the latch and down to unlock the transceiver (latch styles vary).
Note: Make sure the transceiver’s latch is pushed all the way down, so the transceiver can be
pulled out successfully.
4
Pull the latch, or use your thumb and index
fi
nger to grasp the tabs on both sides of the transceiver, and
carefully slide it out of the slot.
Note: Do NOT pull the transceiver out by force. You could damage it. If the transceiver will not
slide out, grasp the tabs on both sides of the transceiver with a slight up or down motion
and carefully slide it out of the slot. If unsuccessful, contact Zyxel Support to prevent
damage to your Switch and transceiver.


