Chapter 11 Static Multicast Forwarding
XMG1930 Series User’s Guide
143
11.4 Configure a Static Multicast IPv4 Address
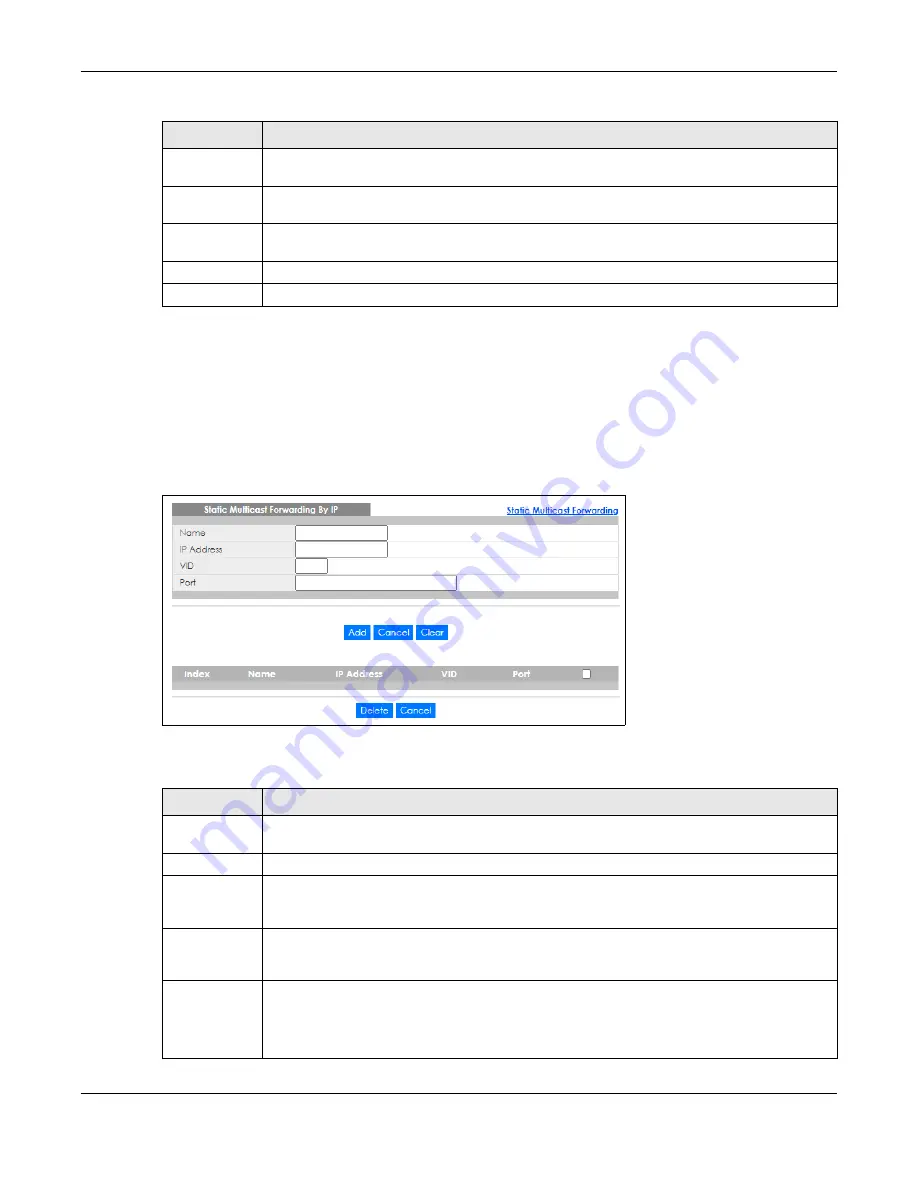
Use this screen to configure ports and VLAN to receive the multicast stream with this multicast IPv4
address. Click the
Static Multicast Forwarding By IP
link in the
Static Multicast Forwarding
screen as
shown next.
Figure 104
Advanced Application > Static Multicast Forwarding > Static Multicast Forwarding By IP
The following table describes the labels in this screen.
VID
This field displays the ID number of a VLAN group to which frames containing the specified
multicast MAC address will be forwarded.
Port
This field displays the ports within an identified VLAN group to which frames containing the
specified multicast MAC address will be forwarded.
Select an entry’s check box to select a specific entry. Otherwise, select the check box in the
table heading row to select all entries.
Delete
Click
Delete
to remove the selected entry from the summary table.
Cancel
Click
Cancel
to clear the check boxes.
Table 61 Advanced Application > Static Multicast Forwarding > Static Multicast Forwarding By MAC
LABEL
DESCRIPTION
Table 62 Advanced Application > Static Multicast Forwarding > Static Multicast Forwarding By IP
LABEL
DESCRIPTION
Name
Enter a descriptive name (up to 32 single-byte printable characters except [ ? ], [ | ], [ ' ], [ " ] or [
, ]) for this static multicast IPv4 address forwarding rule. This is for identification only.
IP Address
Enter a multicast IPv4 address (224.0.0.0 – 239.255.255.255) which identifies the multicast group.
VID
You can forward frames with matching destination multicast IPv4 address to ports within a VLAN
group. Enter the ID that identifies the VLAN group here. If you do NOT have a specific target
VLAN, enter 1.
Port
Enter the ports where frames with destination multicast IPv4 address that matched the entry
above are forwarded. You can enter multiple ports separated by (no space) comma (,) or
hyphen (–). For example, enter “3–5” for ports 3, 4, and 5. Enter “3,5,7” for ports 3, 5, and 7.
Add
Click this to create a new entry or to update an existing one.
This saves your rule to the Switch’s run-time memory. The Switch loses this rule if it is turned off or
loses power, so use the
Save
link on the top navigation panel to save your changes to the non-
volatile memory when you are done configuring.


