background image

Chapter 4 The Web Configurator

NSW Series User’s Guide

28

4.5  Switc h Lo c ko ut   

You could block yourself (and all others) from managing the NSW if you do one of the following:

1

Delete the management VLAN (default is VLAN 1).

2

Delete all port-based VLANs with the CPU port as a member. The “CPU port” is the management port of 
the NSW.

3

Filter all traffic to the CPU port.

4

Disable all ports.

5

Misconfigure the text configuration file.

6

Forget the password and/or IP address.

7

Prevent all services from accessing the NSW. 

8

Change a service port number but forget it.

Note: Be careful not to lock yourself and others out of the NSW. 

4.6  Re se tting  the  NSW   

You can reset your NSW via the web configurator, or the reset button on the front panel according to 
the NSW you’re using.

4.7  Lo g g ing  O ut o f the  We b  C o nfig ura to r 

Click 

Lo g o ut

 in a screen to exit the web configurator. You have to log in with your password again after 

you log out. This is recommended after you finish a management session for security reasons.

You also have to log in with your password again, when the NSW times out.

Fig ure  28   

Web Configurator: Logout Screen 

Summary of Contents for NSW Series

Page 1: ...8 NSW200 28P Nebula Cloud Managed PoE Switch Copyright 2017 Zyxel Communications Corporation LAN IP Address http DHCP assigned IP or a configured static IP address User name admin Password Assigned by the NCC when the NSW is registered with the NCC or 1234 Version 1 00 Edition 2 04 2017 ...

Page 2: ... see due to differences in release versions or your computer operating system Every effort has been made to ensure that the information in this manual is accurate Re late d Doc ume ntation Quick Start Guide The Quick Start Guide shows how to connect the managed device such as the Nebula AP gateway or security gateway Online Help Click the help link for a description of the fields in the NSW menus ...

Page 3: ...ts Ove rvie w Use r s Guide 7 Getting to Know Your NSW 8 Hardware Installation and Connection 13 Hardware Panels 17 T e c hnic al Re fe re nc e 24 The Web Configurator 25 Status 30 Basic Setting 32 VLAN 42 Maintenance 49 Diagnostic 58 Troubleshooting 60 ...

Page 4: ...o Manage the NSW 11 1 4 Good Habits for Managing the NSW 12 Chapte r 2 Hardware Installation and Conne c tion 13 2 1 Installation Scenarios 13 2 2 Desktop Installation Procedure 13 2 3 Mounting the NSW on a Rack 14 2 3 1 Rack mounted Installation Requirements 14 2 3 2 Attaching the Mounting Brackets to the NSW 14 2 3 3 Mounting the NSW on a Rack 15 Chapte r 3 Hardware Pane ls 17 3 1 Front Panel 17...

Page 5: ...us 30 5 1 Status 30 Chapte r 6 Basic Se tting 32 6 1 Overview 32 6 1 1 What You Can Do 32 6 2 System Information 32 6 3 IP Setup for NSW100 Series 34 6 4 IP Setup for NSW200 28P 35 6 4 1 Management IP Address 35 6 4 2 IP Status Details 36 6 4 3 IP Configurations 37 6 5 Port Setup 39 6 6 DNS 41 Chapte r 7 VL AN 42 7 1 Overview 42 7 1 1 What You Can Do 42 7 2 VLAN Status 42 7 2 1 VLAN Details 43 7 3...

Page 6: ... a Configuration File 54 8 6 Tech Support 54 8 7 Technical Reference 55 8 7 1 FTP Command Line 55 8 7 2 Filename Conventions 55 8 7 3 FTP Command Line Procedure 56 8 7 4 GUI based FTP Clients 57 Chapte r 9 Diagnostic 58 9 1 Overview 58 9 2 Diagnostic 58 Chapte r 10 T rouble shooting 60 10 1 Power Hardware Connections and LEDs 60 10 2 NSW Access and Login 61 10 3 NSW Configuration 62 Appendix A Cus...

Page 7: ...7 PART I Use r s Guide ...

Page 8: ...ns Table 1 The NSW Series Comparison Table MODEL NSW100 10P NSW100 10 NSW100 28P NSW100 28 NSW200 28P Total Port Number 10 10 28 28 28 10 100 1000Base T Port Ports 1 8 Ports 1 24 10 100 1000 Mbps PoE Port Ports 1 8 Ports 1 24 Ports 1 24 Combo Port Gigabit Ports Ethernet Transceiver Slots 100 1000 Mbps SFP Ports 9 10 Ports 9 10 Ports 25 28 Ports 25 28 Transceiver Slot 1000 Mbps 10G SFP DAC Ports 25...

Page 9: ...can check the system settings via the Web Configurator the ZON Zyxel One Network utility and the console port 1 2 Applic ations This section shows a few examples of using the NSW in various network environments 1 2 1 Bac kbone Applic ation The NSW is an ideal solution for small networks where rapid growth can be expected in the near future The NSW can be used standalone for a group of heavy traffi...

Page 10: ...leviate bandwidth contention and eliminate server and network bottlenecks All users that need high bandwidth can connect to high speed department servers via the NSW You can provide a super fast uplink connection by using a Gigabit Ethernet mini GBIC port on the NSW Moreover the NSW eases supervision and maintenance by allowing network managers to centralize multiple servers at a single location F...

Page 11: ...ny time by adding moving or changing ports without any re cabling Shared resources such as a server can be used by all ports in the same VLAN as the server In the following figure only ports that need access to the server need to be part of VLAN 1 Ports can belong to other VLAN groups too Figure 4 Shared Server Using VLAN Example 1 3 Ways to Manage the NSW Use any of the following methods to manag...

Page 12: ...different types of characters such as numbers and letters Write down the password and put it in a safe place Back up the configuration and make sure you know how to restore it Restoring an earlier working configuration may be useful if the device becomes unstable or even crashes If you forget your password you will have to reset the NSW to its factory default settings If you backed up an earlier c...

Page 13: ...specially important for enclosed rack installations 2 2 De sktop Installation Proc e dure 1 Make sure the NSW is clean and dry 2 Set the NSW on a smooth level surface strong enough to support the weight of the NSW and the connected cables Make sure there is a power outlet nearby 3 Make sure there is enough clearance around the NSW to allow air circulation and the attachment of cables and the power...

Page 14: ...iver Four M5 flat head screws and a 2 Philips screwdriver Failure to use the prope r sc re ws may damage the unit 2 3 1 1 Pre c autions Make sure the rack will safely support the combined weight of all the equipment it contains Make sure the position of the NSW does not make the rack unstable or top heavy Take all necessary precautions to anchor the rack securely before installing the unit 2 3 2 A...

Page 15: ...les into the NSW 3 Repeat steps 1 and 2 to install the second mounting bracket on the other side of the NSW 4 You may now mount the NSW on a rack Proceed to the next section 2 3 3 Mounting the NSW on a Rac k 1 Position a mounting bracket that is already attached to the NSW on one side of the rack lining up the two screw holes on the bracket with the screw holes on the side of the rack Figure 8 Mou...

Page 16: ... 28P 2 Using a 2 Philips screwdriver install the M5 flat head screws through the mounting bracket holes into the rack 3 Repeat steps 1 and 2 to attach the second mounting bracket on the other side of the rack Note Make sure you tighten all the four screws to prevent the NSW from getting slanted ...

Page 17: ...age 8 for detailed information about port features of the NSW Series 3 1 Front Pane l The following figures show the front panels of the NSW Figure 10 Front Panel NSW100 10P Figure 11 Front Panel NSW100 10 Figure 12 Front Panel NSW100 28P Figure 13 Front Panel NSW100 28 Figure 14 Front Panel NSW200 28P 3 1 1 Gigabit Ethe rne t Ports See Table 1 on page 8 for detailed information about port feature...

Page 18: ...or the Gigabit ports on the NSW are Speed Auto Duplex Auto Flow control Off Link Aggregation Disabled 3 1 1 2 Auto c rossove r All ports are auto crossover that is auto MDIX ports Media Dependent Interface Crossover so you may use either a straight through Ethernet cable or crossover Ethernet cable for all Gigabit port connections Auto crossover ports automatically sense whether they need to funct...

Page 19: ...e s INF 8074i specification Rev 1 0 for details You can change transceivers or the DAC cables while the NSW is operating You can use different transceivers to connect to Ethernet switches with different types of fiber optic connectors Type SFP connection interface Connection speed 100 1000 Megabit per second Mbps Type SFP DAC connection interface Connection speed 1 or 10 Gigabit per second Gbps T ...

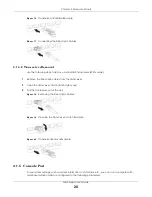
Page 20: ...emove the fiber optic cables from the transceiver 2 Open the transceiver s latch latch styles vary 3 Pull the transceiver out of the slot Figure 18 Removing the Fiber Optic Cables Figure 19 Opening the Transceiver s Latch Example Figure 20 Transceiver Removal Example 3 1 5 Console Port To see system settings such as system information VLAN status etc you can use a computer with terminal emulation ...

Page 21: ...igure 21 Rear Panel NSW100 10P Figure 22 Rear Panel NSW100 10 Figure 23 Rear Panel NSW100 28P Figure 24 Rear Panel NSW100 28 Figure 25 Rear Panel NSW200 28P 3 2 1 Powe r Conne c tor Note Make sure you are using the correct power source as shown on the panel To connect power to the NSW insert the female end of the power cord to the AC power receptacle on the rear panel Connect the other end of the ...

Page 22: ...device temperature wrong voltage or abnormal fan speed Blinking If the alarm LED is blinking red with the system LED blinking green it means the NSW cannot connect to the Nebula Control Center Off The system is functioning normally Locator Blue Blinking Shows the actual location of the NSW between several devices in a rack The default timer is 30 minutes when you are configuring the NSW Off The lo...

Page 23: ...the power supplied budget Amber On PoE power usage is more than 95 percent of the power supplied budget Off PoE power usage is below 80 percent of the power supplied budget Locator Blue Blinking Shows the actual location of the NSW between several devices in a rack The default timer is 30 minutes when you are configuring the NSW Off The locator is not functioning or malfunctioning 10 100 1000Base ...

Page 24: ...24 PART II T e c hnic al Re fe re nc e ...

Page 25: ...e Web pop up blocking is enabled by default in Windows XP SP Service Pack 2 JavaScript enabled by default Java permissions enabled by default 4 2 Syste m L ogin 1 Start your web browser 2 The NSW is a DHCP client by default Type http DHCP assigned IP in the L oc ation or Addre ss field Press ENTER If the NSW is not connected to a DHCP server type http and the static IP address of the NSW in the L ...

Page 26: ...enu items to open submenu links and then click on a submenu link to open the screen in the main window B C D E F These are quick links which allow you to perform certain tasks no matter which screen you are currently working in B Click this link to update the information in the screen you are viewing currently C Click this link to save your configuration into the NSW s nonvolatile memory Nonvolati...

Page 27: ...is link takes you to a screen where you can configure DNS domain name server IP addresses Advanced Application VLAN This link takes you to screens where you can configure port based or 802 1Q VLAN You can also configure a protocol based VLAN or a subnet based VLAN in these screens VLAN Status This link takes you to a screen where you can view and search all VLAN groups VLAN Detail This link takes ...

Page 28: ...P address 7 Prevent all services from accessing the NSW 8 Change a service port number but forget it Note Be careful not to lock yourself and others out of the NSW 4 6 Re se tting the NSW You can reset your NSW via the web configurator or the reset button on the front panel according to the NSW you re using 4 7 L ogging Out of the We b Configurator Click L ogout in a screen to exit the web configu...

Page 29: ...ies User s Guide 29 4 8 He lp The web configurator s online help has descriptions of individual screens and some supplementary information Click the He lp link from a web configurator screen to view an online help description of that screen ...

Page 30: ...e NSW in Nebula Control Center preferable or myZyxel com If you register the NSW in myZyxel com but didn t create an organization in Nebula Control Center yet then you will need to register the NSW in Nebula Control Center again An unregistered NSW cannot be managed by Nebula Control Center Boot Version This field displays the version number and date of the boot module that is currently on the NSW...

Page 31: ...k this link to go to the Basic Se tting Syste m Info screen to check other detailed information such as system resource usage and the NSW temperature fan speeds or voltage IP Address Information IPv4 Address This field displays the NSW s current IPv4 address 0 0 0 0 means no IP address is assigned Subnet Mask This field displays the NSW s subnet mask 0 0 0 0 means no subnet mask is assigned Defaul...

Page 32: ...tion 6 3 on page 34 to configure the NSW IP address default gateway device and the management VLAN ID Care fully manage the IP addre ss of the NSW Se rie s to e nsure manage me nt c onne c tivity with the NCC Use the Port Se tup screen Section 6 5 on page 39 to configure the NSW port settings Use the DNS screen Section 6 6 on page 41 to configure the default domain name server 6 2 Syste m Informat...

Page 33: ...er of the NSW s current firmware including the date created Ethernet Address This field refers to the Ethernet MAC Media Access Control address of the NSW CPU Utilization CPU utilization quantifies how busy the system is Curre nt displays the current percentage of CPU utilization Memory Utilization Memory utilization shows how much DRAM memory is available T otal byte and in use Use d byte It also...

Page 34: ...erature threshold Each fan has a sensor that is capable of detecting and reporting if the fan speed falls below the threshold shown Current This field displays this fan s current speed in Revolutions Per Minute RPM MAX This field displays this fan s maximum speed measured in Revolutions Per Minute RPM MIN This field displays this fan s minimum speed measured in Revolutions Per Minute RPM 41 is dis...

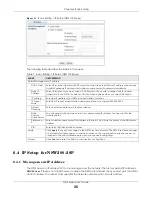
Page 35: ...ion if you don t have a DHCP server or if you wish to assign static IP address information to the NSW You need to fill in the following fields when you select this option IP Address Enter the IP address of your NSW in dotted decimal notation IP Subnet Mask Enter the IP subnet mask in dotted decimal notation for example 255 255 255 0 Default Gateway Enter the default gateway of the Zyxel device Sta...

Page 36: ... IP Address This field displays IP address of the NSW IP Subnet Mask This field displays the subnet mask of the NSW VID This field displays the VLAN identification number of the NSW Type This shows whether this IP address is dynamically assigned from a DHCP server or manually assigned Static Renew Click this to renew the dynamic IP address Release Click this to release the dynamic IP address Table...

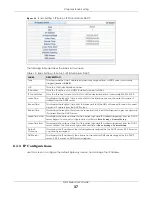
Page 37: ... address from the DHCP server Renew Time This displays the length of time from the lease start that the NSW will request to renew its current dynamic IP address from the DHCP server Rebind Time This displays the length of time from the lease start that the NSW will request to get any dynamic IP address from the DHCP server Lease Time Start This displays the date and time that the current dynamic I...

Page 38: ...utomatically Static IP Address Select this option if you don t have a DHCP server or if you wish to assign static IP address information to the NSW You need to fill in the following fields when you select this option IP Address Enter the IP address of your NSW in dotted decimal notation IP Subnet Mask Enter the IP subnet mask in dotted decimal notation for example 255 255 255 0 VID Enter the VLAN ...

Page 39: ...re 36 Basic Setting Port Setup Select an entry s check box to select a specific entry Otherwise select the check box in the table heading row to select all entries Delete Click De le te to remove the selected entry from the summary table Note Deleting all IP subnets locks you out of the NSW Cancel Click Canc e l to clear the check boxes Table 11 Basic Setting IP Setup IP Configuration continued L ...

Page 40: ...e the NSW determines the connection speed by detecting the signal on the cable and using half duplex mode When the NSW s auto negotiation is turned off a port uses the pre configured speed and duplex mode when making a connection thus requiring you to make sure that the settings of the peer port are the same in order to connect 802 1p Priority This priority value is added to incoming frames withou...

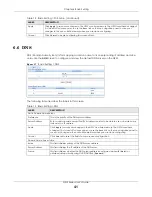
Page 41: ...ESCRIPT ION Table 13 Basic Setting DNS L ABEL DESCRIPT ION Static Domain Name Server Preference This is the priority of the DNS server address Server Address Enter a domain name server IPv6 IPv4 address in order to be able to use a domain name instead of an IP address Apply Click Apply to save your changes to the NSW s run time memory The NSW loses these changes if it is turned off or loses power ...

Page 42: ...n 7 2 1 on page 43 to view detailed port settings and status of the VLAN group Use the Static VL AN screen Section 7 4 on page 44 to configure and view 802 1Q VLAN parameters for the NSW Use the VL AN Port Se tting screen Section 7 5 on page 46 to configure the static VLAN IEEE 802 1Q settings on a port 7 2 VL AN Status Use this screen to view and search all VLAN groups Click Advanc e d Applic ati...

Page 43: ...or certain VLANs Index This is the VLAN index number Click on an index number to view more VLAN details VID This is the VLAN identification number that was configured in the Static VL AN screen Elapsed Time This field shows how long it has been since a normal VLAN was registered or a static VLAN was set up Status This field shows how this VLAN was added to the NSW Static added as a permanent entry...

Page 44: ...o a VLAN group as normal depending on its VLAN tag sent to a group whether it has a VLAN tag or not blocked from a VLAN group regardless of its VLAN tag You can also tag all outgoing frames that were previously untagged from a port with the specified VID Use this screen to configure a static VLAN for the NSW Click the Static VL AN Se tup link in the VL AN Configuration screen to display the screen...

Page 45: ...Chapter 7 VLAN NSW Series User s Guide 45 Figure 41 Advanced Application VLAN VLAN Configuration Static VLAN Setup ...

Page 46: ...you make them Control Select Norma l for the port to dynamically join this VLAN group using GVRP This is the default selection Select Fixe d for the port to be a permanent member of this VLAN group Tagging Select T X T agging if you want the port to tag all outgoing frames transmitted with this VLAN Group ID Add Click Add to save your changes to the NSW s run time memory The NSW loses these change...

Page 47: ...ttings in this row apply to all ports Use this row only if you want to make some settings the same for all ports Use this row first to set the common settings and then make adjustments on a port by port basis Note Changes in this row are copied to all the ports as soon as you make them PVID A PVID Port VLAN ID is a tag that adds to incoming untagged frames received on a port so that the frames are...

Page 48: ...ss through the NSW Apply Click Apply to save your changes to the NSW s run time memory The NSW loses these changes if it is turned off or loses power so use the Save link on the top navigation panel to save your changes to the non volatile memory when you are done configuring Cancel Click Ca nc e l to begin configuring this screen afresh Table 18 Advanced Application VLAN VLAN Configuration VLAN P...

Page 49: ...2 to upload the latest firmware Use the Re store Configuration screen Section 8 4 on page 53 to upload a stored device configuration file Use the Bac kup Configuration screen Section 8 5 on page 54 to save your configurations for later use Use the T e c h Support screen Section 8 6 on page 54 to create reports for customer support if there are problems with the NSW 8 2 T he Mainte nanc e Sc re e n...

Page 50: ...creen Restore Configuration Click Clic k He re to go to the Re store Configuration screen Backup Configuration Click Clic k He re to go to the Bac kup Configuration screen Erase Running Configuration Click Clic k He re to remove the running configuration on the NSW The username password system logs and memory logs are not removed Save Configuration Click Config 1 to save the current configuration ...

Page 51: ...you to restart the NSW without physically turning the power off It also allows you to load configuration one Config 1 configuration two Config 2 or the factory default configuration when you reboot Follow the steps below to reboot the NSW 1 In the Mainte nanc e screen click the Config 1 button next to Re boot Syste m to reboot and load configuration one The following screen displays Figure 45 Rebo...

Page 52: ...e and version to your computer before uploading to the device Be sure to upload the c orre c t mode l firmware as uploading the wrong mode l firmware may damage your de vic e Click Manage me nt Mainte nanc e Firmware Upgrade to view the screen as shown next Figure 47 Management Maintenance Firmware Upgrade Type the path and file name of the firmware file you wish to upload to the NSW in the File P...

Page 53: ...ings Firmware 1 shows its version number and model code and MM DD YYYY creation date Firmwa re 2 shows its version number and model code and MM DD YYYY creation date Current Boot Image This displays which firmware is currently in use on the NSW Firmware 1 or Firmwa re 2 Config Boot Image Select which firmware Firmware 1 or Firmware 2 should load click Apply and reboot the NSW to see changes you wi...

Page 54: ... to save the file to a specific place If a dialog box pops up asking whether you want to open or save the file click Save or Save File to download it to the default downloads folder on your computer If a Save As screen displays after you click Save or Save File choose a location to save the file on your computer from the Save in drop down list box and type a descriptive name for it in the File nam...

Page 55: ...og report is stored in flash memory If the All log report is too large you can download the log reports separately below Crash Click Download to see the crash log report The log will include information of the last crash and is stored in flash memory CPU history Click Download to see the CPU history log report The 7 days log is stored in RAM and you will need to save it otherwise it will be lost w...

Page 56: ...8 7 3 FT P Command L ine Proc e dure 1 Launch the FTP client on your computer 2 Enter open followed by a space and the IP address of your NSW 3 Press ENTER when prompted for a username 4 Enter your password as requested the default is assigned by the NCC when the NSW is registered with the NCC or 1234 5 Enter bin to set transfer mode to binary 6 Use put to transfer files from the computer to the N...

Page 57: ...user I D and password is automatically supplied to the server for anonymous access Anonymous logins will work only if your ISP or service administrator has enabled this option Normal The server requires a unique User ID and Password to login Transfer Type Transfer files in either ASCII plain text format or in binary mode Configuration and firmware files should be transferred in binary mode Initial...

Page 58: ...P addresses run a traceroute perform port tests or show the NSW s location between devices Figure 51 Management Diagnostic The following table describes the labels in this screen Table 23 Management Diagnostic L ABEL DESCRIPT ION Ping Test IPv4 NSW100 Series only Select this option if you want to ping an IPv4 address and select vlan to specify the ID number of the VLAN to which the Switch is to se...

Page 59: ...cify here TTL Enter the Time To Live TTL value for the ICMP Echo Request packets This is to set the maximum number of the hops routers a packet can travel through Each router along the path will decrement the TTL value by one and forward the packets When the TTL value becomes zero and the destination is not found the router drops the packets and informs the sender Wait Time Specify how many second...

Page 60: ...W 2 Make sure the power adaptor or cord is connected to the NSW and plugged in to an appropriate power source Make sure the power source is turned on 3 Disconnect and re connect the power adaptor or cord to the NSW 4 If the problem continues contact the vendor One of the LEDs does not behave as expected 1 Make sure you understand the normal behavior of the LED See Section 3 3 on page 22 2 Check th...

Page 61: ...ator 1 Make sure you are using the correct IP address The default IP address is http DHCP assigned IP If you changed the IP address use the new IP address If you changed the IP address and have forgotten it see the troubleshooting suggestions for I forgot the IP address for the NSW 2 Check the hardware connections and make sure the LEDs are behaving as expected See Section 3 3 on page 22 3 Make su...

Page 62: ...ation I cannot access the NCC portal Check that you are using the correct URL NCC https nebula zyxel com Make sure your computer s Ethernet card is installed and functioning properly Check that you have Internet access In your computer click Start All Programs Ac c e ssorie s and then Command Prompt In the Command Prompt window type ping followed by a website such as zyxel com If you get a reply t...

Page 63: ... information Please have the following information ready when you contact an office Re quire d Information Product model and serial number Warranty Information Date that you received your device Brief description of the problem and the steps you took to solve it Corporate He adquarte rs Worldwide T aiwan Zyxel Communications Corporation http www zyxel com Asia China Zyxel Communications Shanghai C...

Page 64: ...pk Philippine s Zyxel Philippines http www zyxel com ph Singapore Zyxel Singapore Pte Ltd http www zyxel com sg T aiwan Zyxel Communications Corporation http www zyxel com tw zh T hailand Zyxel Thailand Co Ltd http www zyxel co th Vie tnam Zyxel Communications Corporation Vietnam Office http www zyxel com vn vi Europe Austria Zyxel Deutschland GmbH http www zyxel de Be larus Zyxel BY http www zyxe...

Page 65: ...c h Re public Zyxel Communications Czech s r o http www zyxel cz De nmark Zyxel Communications A S http www zyxel dk Estonia Zyxel Estonia http www zyxel com ee et Finland Zyxel Communications http www zyxel fi Franc e Zyxel France http www zyxel fr Ge rmany Zyxel Deutschland GmbH http www zyxel de Hungary Zyxel Hungary SEE http www zyxel hu Italy Zyxel Communications Italy http www zyxel it ...

Page 66: ...lux http www zyxel nl Norway Zyxel Communications http www zyxel no Poland Zyxel Communications Poland http www zyxel pl Romania Zyxel Romania http www zyxel com ro ro Russia Zyxel Russia http www zyxel ru Slovakia Zyxel Communications Czech s r o organizacna zlozka http www zyxel sk Spain Zyxel Communications ES Ltd http www zyxel es Swe de n Zyxel Communications http www zyxel se Switze rland St...

Page 67: ...e http www ua zyxel com L atin Ame ric a Arge ntina Zyxel Communication Corporation http www zyxel com ec es Brazil Zyxel Communications Brasil Ltda https www zyxel com br pt Ec uador Zyxel Communication Corporation http www zyxel com ec es Middle East Israe l Zyxel Communication Corporation http il zyxel com homepage shtml Middle East Zyxel Communication Corporation http www zyxel com me en ...

Page 68: ... s Guide 68 North Ame ric a USA Zyxel Communications Inc North America Headquarters http www zyxel com us en Oc e ania Australia Zyxel Communications Corporation http www zyxel com au en Afric a South Afric a Nology Pty Ltd http www zyxel co za ...

Page 69: ... the following two conditions 1 This device may not cause harmful interference 2 This device must accept any interference received including interference that may cause undesired operations Changes or modifications not expressly approved by the party responsible for compliance could void the user s authority to operate the equipment This equipment has been tested and found to comply with the limit...

Page 70: ...act your local city office your household waste disposal service or the store where you purchased the product Use ONLY power wires of the appropriate wire gauge for your device Connect it to a power supply of the correct voltage Fuse Warning Replace a fuse only with a fuse of the same type and rating The POE Power over Ethernet devices that supply or receive power and their connected Ethernet cabl...

Page 71: ...il llévelo a un punto limpio Cuando llegue el momento de desechar el producto la recogida por separado éste y o su batería ayudará a salvar los recursos naturales y a proteger la salud humana y medioambiental Le symbole ci dessous signifie que selon les réglementations locales votre produit et ou sa batterie doivent être éliminés séparément des ordures ménagères Lorsque ce produit atteint sa fin d...

Page 72: ...Appendix B Legal Information NSW Series User s Guide 72 Environme nta l Produc t De c la ra tion ...

Page 73: ...ure correct usage to prevent danger to the user and others and to prevent property damage The meaning of these symbols are described below It is important that you read these descriptions thoroughly and fully understand the contents Explanation of the Symbols Vie wing Ce rtific ations Go to http www zyxel com to view this product s documentation and certifications Zyxe l L imite d Wa rra nty Zyxel...

Page 74: ... implied warranty of merchantability or fitness for a particular use or purpose Zyxel shall in no event be held liable for indirect or consequential damages of any kind to the purchaser To obtain the services of this warranty contact your vendor You may also refer to the warranty policy for the region in which you bought the device at http www zyxel com web support_warranty_info php Re gistration ...

Page 75: ...estore 53 saving 51 console port 20 contact information 63 copyright 69 customer support 63 D default Ethernet settings 18 default IP 9 35 diagnostics 58 ping 58 disclaimer 69 DNS 41 DNS Domain Name System 41 Domain Name System 41 dual firmware images 52 E Ethernet MAC 33 F FCC interference statement 69 file transfer using FTP command example 56 filename convention configuration configuration file...

Page 76: ...s 35 36 37 managing the device good habits 12 using FTP See FTP 11 using Telnet See command interface 11 using the command interface See command interface 11 MDIX Media Dependent Interface Crossover 18 Media Access Control 33 mounting brackets 14 N network applications 9 P ping test connection 58 port setup 39 port VLAN ID see PVID 47 ports speed duplex 40 power voltage 34 power connector 21 power...

Page 77: ...ture indicator 34 terminal emulation 20 21 trademarks 74 transceiver MultiSource Agreement MSA 19 transceivers 19 installation 19 removal 20 U user name 25 default 25 V ventilation holes 13 VID 35 38 43 VLAN number of VLANs 43 port number 43 port settings 46 PVID 47 static VLAN 44 status 42 43 trunking 48 VLAN number 35 36 37 38 VLAN trunking 48 VT100 21 W warranty 73 note 74 web configurator gett...

Reviews: