Chapter 28 Free Time
UAG Series User’s Guide
333
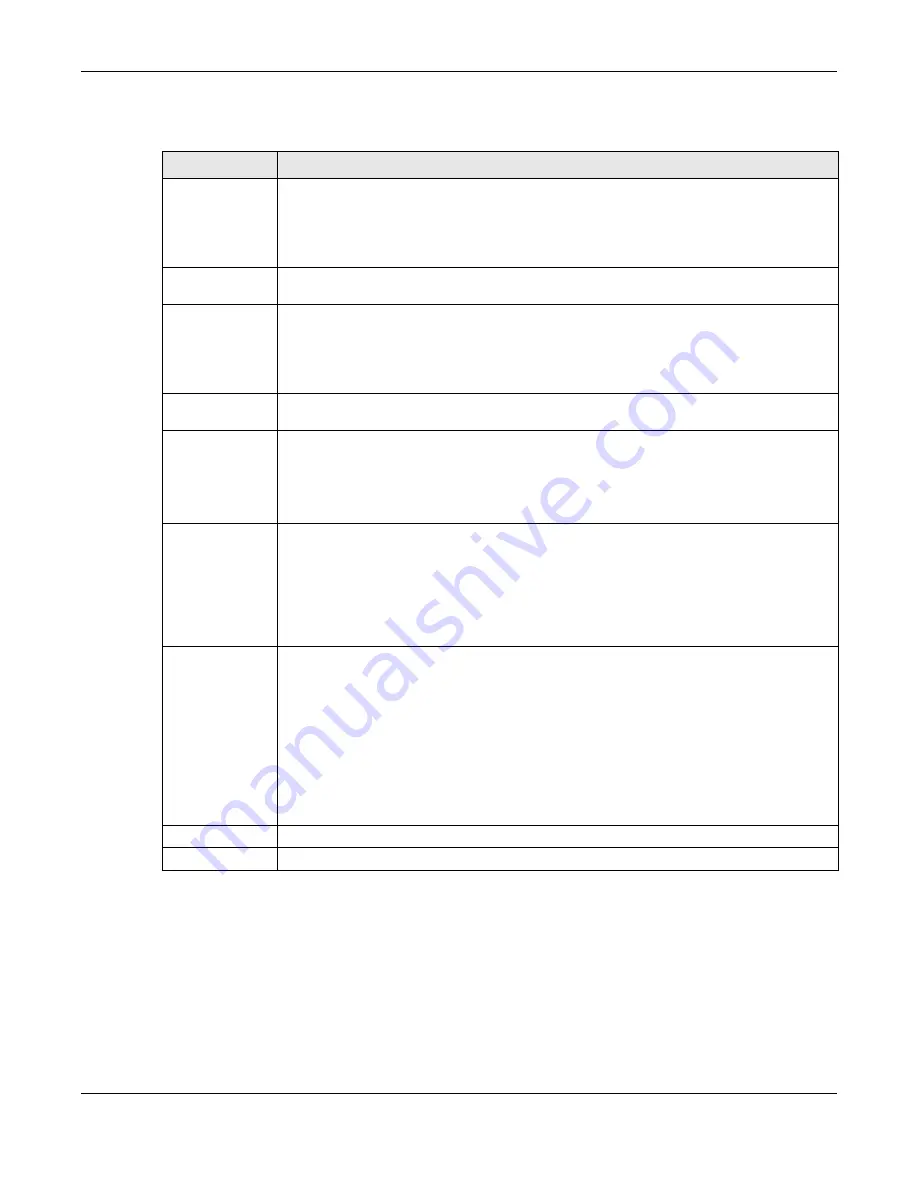
The following table describes the labels in this screen.
Table 153
Configuration > Free Time
LABEL
DESCRIPTION
Enable Free
Time
Select the check box to turn on the free time feature.
Note: After you set up web authentication policies and enable the free time feature on the
UAG, a link displays in the login screen when users try to access the Internet. The link
redirects users to a screen where they can get a free account.
Free Time Period Select the duration of time period for which the free time account is allowed to access the
Internet.
Reset Time
Select
Daily
to have the UAG allow free account access every day at the specified time.
Select
Weekly
to have the UAG allow free account access once a week on the day you
select.
Select
Monthly
to have the UAG allow free account access once a month on a set date.
Time
If you select
Daily
, select the time in 24-hour format at which the new free time account is
allowed to access the Internet.
Day
If you select
Weekly
, select the day on which the new free time account is allowed to
access the Internet.
If you select
Monthly
, enter the date on which the new free time account is allowed to
access the Internet. If the date you selected is not available in a month, such as 30th or
31th, the UAG allows the free account access on the last day of the month.
Maximum
Registration
Number Before
Reset Time
Enter the maximum number of the users that are allowed to log in for Internet access with
a free guest account before the time specified in the
Reset Time
field. This also sets how
many free guest accounts a user can get.
For example, if you set the
Maximum Registration Number Before Reset Time
to 1,
the
Reset Time
to
Daily
and the
Reset Time
to 13:00, even the first free guest account
has expired at 11:30, the user cannot get a second account and/or access the Internet
until 13:00.
Delivery Method
Specify how the UAG provides dynamic guest account information.
Select
On-Screen
to display the user account information in the web screen.
Select
SMS
to use Short Message Service (SMS) to send account information in a text
message to the user’s mobile device.
Select
On-Screen and SMS
to provide the account information both in the web screen
and via SMS text messages.
Note: You should have enabled SMS in the
Configuration > SMS
screen to send text
messages to the user’s mobile device.
Apply
Click this button to save your changes to the UAG.
Reset
Click this button to return the screen to its last-saved settings.

