EN
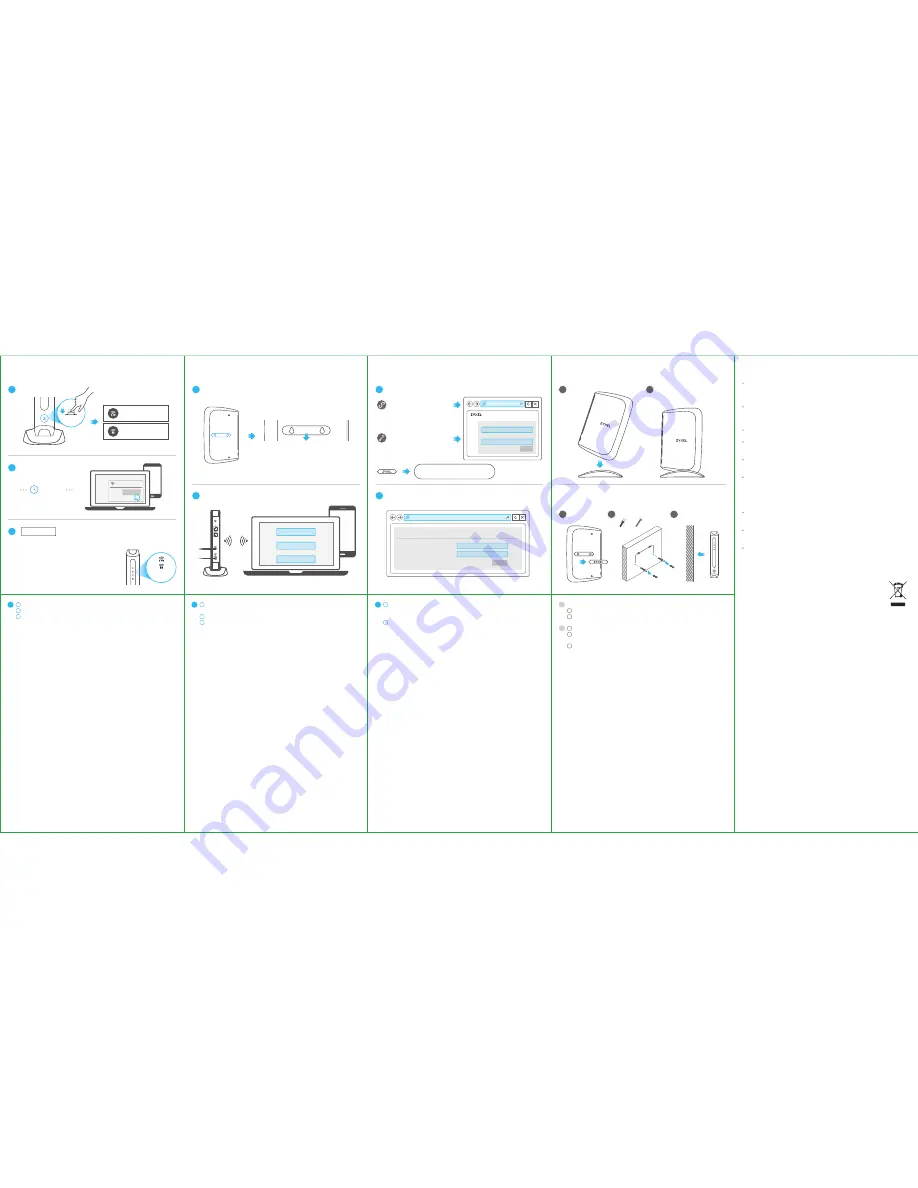
Desktop Installation
Connect the stand carefully as shown.
Place the WAP7205 with the stand on a flat surface.
Wall Mounting
Remove the cover of the wall mounting holes.
Drill two holes at a distance of 57 mm from each other and insert the masonry plugs
and screws.
Align the wall mounting holes on the WAP7205 with the screws on the wall. Hang the
WAP7205 on the screws.
Open Web Browser
Follow eaZy123 setup wizard
WAP7205
User
Password
admin
XXXXXXXXXXXXXX
Login
User Name:
admin
Password:
(Refer to the belly label)
http://zyxelsetup
(Windows)
http://zyxelsetup.local
(MAC)
or
eaZy 123 Setup
1
2
EN
1
2
3
Safety Warnings - English
Humid
、
dusty and extreme environment in which place the product and obstructing the
device ventilation slots are prohibited, any kind of conditions above may harm your
device.
There is a remote risk of electric shock from lightning.
(1) do not use the device outside, and make sure all the connections are indoors.
(2) do not install, use, or service this device during a thunderstorm.
Connect only suitable accessories to the device; make sure to connect the cables to the
correct ports.
Do not open the device, opening or removing covers can expose you to dangerous high
voltage points or other risks please, contact your vendor for further information.
Place connecting cables carefully so that no one will step on them or stumble over them
and disconnect all cables from this device before servicing or disassembling.
Please use the provided or designated connection cables/power cables/ adaptors.
connect it to the right supply voltage (for example, 110V AC in North America or 230V AC
in Europe), If the power adaptor or cord is damaged, it might cause electrocution.
remove it from the device and the power source , repairing the power adapter or cord is
prohibited , Contact your local vendor to order a new one.
Risk of explosion if battery is replaced by an incorrect type, dispose of used batteries
according to the instruction.
Please refer to the device back label, datasheet or box specifications catalog informa-
tion for rated power of device and operating temperature.
The socket-outlet shall be installed near the device, and shall be easily accessible
because it serves as the main disconnecting device.
European Union - Disposal and Recycling Information
The symbol below means that according to local regulations your
product and/or its battery shall be disposed of separately from domestic
waste. If this product is end of life, take it to a recycling station designat-
ed by local authorities. At the time of disposal, the separate collection of
your product and/or its battery will help save natural resources and
ensure that the environment is sustainable development.
Device Configuration
1
2
EN
Open a web browser and enter "http://zyxelsetup" (for Windows PC) or "http://zyxel-
setup.local" (for MAC PC), then log in with the default user name (admin) and
password (default pre-shared key).
Start the eaZy123 setup wizard.
1
2
Wireless Name (SSID)
Wireless Password (WPA2)
Apply
XXXXXXXXXXX
XXXXXXXXXXX
/ No WPS
WiFi Connection
EN
Remove the cover of the wall mounting holes to see the WAP7205's default SSID and
Wi-Fi key.
Use the SSID and WiFi Key to connect your wireless enabled devices to the WAP7205.
Open your web browser and make sure you can surf the Internet.
1
2
3
1
1
2
1
2
3
Desktop Installation
Wall Mounting
x2
x2
57m
m
/ Using WPS
The LED turns
static WHITE.
static
WHITE
LED Behavior
1
2
3
WiFi Connection
Amber Blinking
ON
Amber Blinking
ON
Press for 1 second.
EN
Press the WPS button on your WAP7205 for 1 second.
Within 2 minutes, press the connect button on your WiFi client.
The WAP7205 WiFi LED starts to blink amber and then turns static WHITE when the
WPS process completed.
Note: If WPS failed and the WiFi client couldn't connect to the WAP7205, go to the
next section (WiFi Connection - No WPS).
1
2
3
WPS
ON
SSID (2.4GHz)
Zyxelxxxxxx
SSID (5GHz)
Zyxelxxxxxx_5G
Pre-Shared key
XXXXXXXXXXXXX
SSID (2.4GHz)
SSID (5GHz)
Pre-Shared Key
2
within
minutes
2
Wi-Fi
Zyxelxxxxxx
Connect
2.4G/5G
Static white:
The WiFi network is enabled.
Blinking white:
Data is being sent or
received through the WiFi network.
White off:
The WiFi network is disabled.
Blinking amber:
WPS process is in progress.
Amber off:
WPS process completed, WPS
connection failed or WPS is disabled
Default login address: http://zyxelsetup
User name: admin
Password: Pre-Shared Key