Chapter 8 Basic Setting
XGS4600 Series User’s Guide
120
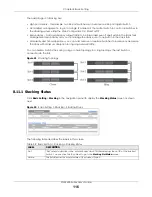
Figure 94
Basic Setting > Stacking > Configuration
The following table describes the labels in this screen.
Table 40 Basic Setting > Stacking > Configuration
LABEL
DESCRIPTION
Active
Select the
Active
check box to put the Switch in stacking mode. This will erase the running
configuration, config01 and config02. The master Switch’s login will remain unchanged. If you
want to reload a previous configuration, please back one up first.
Apply
Click
Apply
to activate the stacking mode.
Cancel
Click
Cancel
to clear the Active check box.
Force Master
Mode
Select the
Force Master Mode
check box to force this Switch to become a master Switch.
System Priority
Enter a number (from1 to 63) to assign a priority for the stacking Switch. The higher the number,
the higher the priority.
Apply
Click
Apply
to save the
Active Force Master Mode
and
System Priority
fields.
Cancel
Click
Cancel
to clear the
Active Force Master Mode
and
System Priority
fields.
Slot ID Freeze
Click the
Freeze
button to have the Switch retain its slot ID after reboot.
Slot
This field displays the slot or port channel of the stacked Switch.
MAC Address
This field displays the MAC address of the stacked Switch.
Type
This field displays the model name of the Switch.
Slot ID After
Reboot
Choose
Auto
to have a new slot ID assigned after reboot. If you want to keep the original slot ID
after reboot, you can click
Freeze
or select an ID in the
Slot ID After Reboot
list box.
Apply
Click
Apply
to save the
Slot ID After Reboot
field.
Cancel
Click
Cancel
to clear the
Slot ID After Reboot
field.

