Chapter 33 DHCP
XS1930 Series User’s Guide
273
33.5 DHCPv6 Relay
A DHCPv6 relay agent is on the same network as the DHCPv6 clients and helps forward messages
between the DHCPv6 server and clients. When a client cannot use its link-local address and a well-
known multicast address to locate a DHCPv6 server on its network, it then needs a DHCPv6 relay agent
to send a message to a DHCPv6 server that is not attached to the same network.
The DHCPv6 relay agent can add the remote identification (remote-ID) option and the interface-ID
option to the Relay-Forward DHCPv6 messages. The remote-ID option carries a user-defined string, such
as the system name. The interface-ID option provides slot number, port information and the VLAN ID to
the DHCPv6 server. The remote-ID option (if any) is stripped from the Relay-Reply messages before the
relay agent sends the packets to the clients. The DHCPv6 server copies the interface-ID option from the
Relay-Forward message into the Relay-Reply message and sends it to the relay agent. The interface-ID
should not change even after the relay agent restarts.
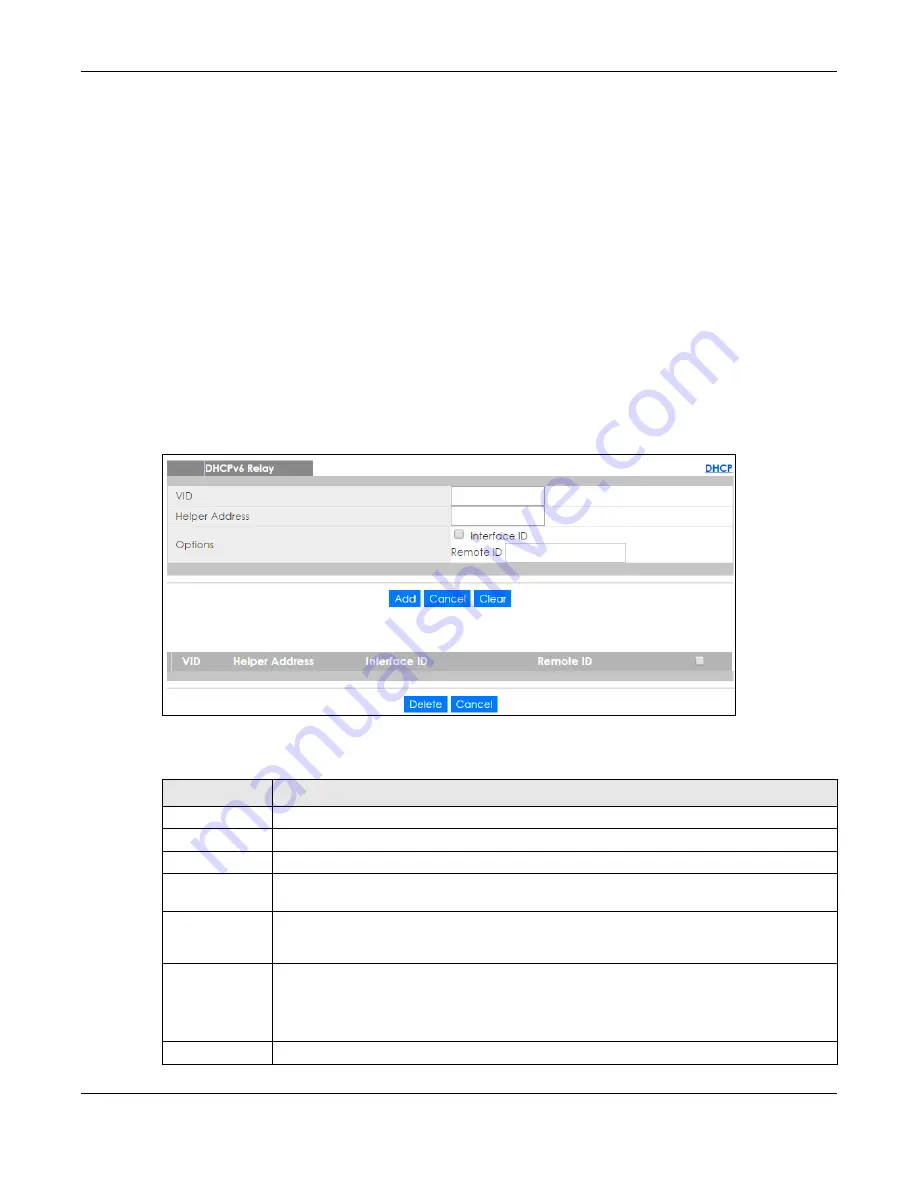
Use this screen to configure DHCPv6 relay settings for a specific VLAN on the Switch. Click
IP Application
>
DHCP > DHCPv6
in the navigation panel to display the screen as shown.
Figure 197
IP Application > DHCP > DHCPv6
The following table describes the labels in this screen.
Table 142 IP Application > DHCP > DHCPv6
LABEL
DESCRIPTION
VID
Enter the ID number of the VLAN you want to configure here.
Helper Address
Enter the remote DHCPv6 server address for the specified VLAN.
Options
Interface ID
Select this option to have the Switch add the interface-ID option in the DHCPv6 requests from
the clients in the specified VLAN before the Switch forwards them to a DHCPv6 server.
Remote ID
Enter a string of up to 64 printable characters to be carried in the remote-ID option. The Switch
adds the remote-ID option in the DHCPv6 requests from the clients in the specified VLAN before
the Switch forwards them to a DHCPv6 server.
Add
Click this to create a new entry or to update an existing one.
This saves your changes to the Switch’s run-time memory. The Switch loses these changes if it is
turned off or loses power, so use the
Save
link on the top navigation panel to save your changes
to the non-volatile memory when you are done configuring.
Cancel
Click
Cancel
to reset the fields to their last saved values.


