background image

10xgenomics.com

User Guide   |   CG000542   |   Rev A
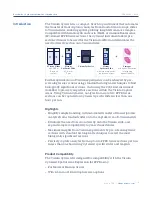
Visium CytAssist

with Readiness Test

For use with:

Visium CytAssist & Accessory Kit, 12-Month Warranty, PN-1000441


Visium CytAssist Instrument Accessory Kit, PN-1000433

Visium CytAssist & Accessory Kit, 24-Month Warranty, PN-1000442


Visium CytAssist Instrument Accessory Kit, PN-1000433

Summary of Contents for Visium CytAssist

Page 1: ...with Readiness Test For use with Visium CytAssist Accessory Kit 12 Month Warranty PN 1000441 Visium CytAssist Instrument Accessory Kit PN 1000433 Visium CytAssist Accessory Kit 24 Month Warranty PN 10...

Page 2: ...may refer to the products or services offered by other companies by their brand name or company name solely for clarity and does not claim any rights in those third party marks or names 10x Genomics...

Page 3: ...CytAssist Instrument Document Revision Summary Link to TOC 10xgenomics com Document Revision Summary Document Number CG000542 Rev A Title Visium CytAssist Instrument User Guide with Readiness Test Rev...

Page 4: ...cessory Kits 13 Tips Best Practices 14 Icons 15 Check Tissue Placement on Slide 15 Tissue Slide Placement on Tissue Slide Stage 17 Visium Slide Placement on Visium Slide Stage 22 10x Genomics Cloud 23...

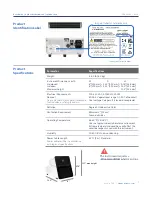
Page 5: ...Introduction 6 Introduction 7 Product Identification 7 Product Specifications...

Page 6: ...ions can be captured on CytAssist specific slides in less than one hour per run Highlights Simplify sample handling with automated transfer of transcriptomic analytes from standard slides onto the Cap...

Page 7: ...the sensitive reagents used with the instrument Humidity 30 80 R H non condensing Power Cable Length Power cables will be in accordance with regional specifications 6 7 ft 2 m Standard Product Specifi...

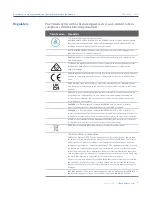
Page 8: ...Safety Compliance Information 9 Safety 10 Regulatory...

Page 9: ...he presence of moving mechanical parts that can be harmful to the operator if handled incorrectly The Hazardous Materials symbol indicates the presence of materials that are toxic or otherwise harmful...

Page 10: ...vironment EN 61000 3 2 Electromagnetic compatibility EMC Part 3 2 Limits Limits for harmonic current emissions equipment input current 16 A per phase EN 61000 3 3 Electromagnetic compatibility EMC Par...

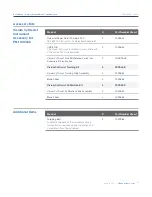
Page 11: ...System Components 12 System Components 13 Accessory Kits...

Page 12: ...Shipping Bolt Secures the camera during transportation removed during installation Interior Tissue Slide Stage Tissue Slide Clips Slide Alignment Guides Visium Slide Lock Visium Slide Stage Tissue Ali...

Page 13: ...ards for Accessory Kit Instruction 1 CG000548 Visium CytAssist Training Kit 1 1000458 Visium CytAssist Training Slide Assembly 2 2000681 Blank Slides 2 3000868 Visium CytAssist Calibration Kit 1 10004...

Page 14: ...Tips Best Practices 15 Icons 15 Check Tissue Placement on Slide 17 Tissue Slide Placement on Tissue Slide Stage 20 Visium Slide Placement on Visium Slide Stage 21 10x Genomics Cloud...

Page 15: ...548 located within the Instrument Accessory Kit laminated document with concise instructions a Ensure that the tissue region of interest will fit within the Capture Area of a Visium CytAssist Spatial...

Page 16: ...tissue lies within the green allowable area 15 mm from edge of frosted area marks 5 mm from the sides c Refer to the examples of good and bad tissue placement Refer to the Visium CytAssist Training K...

Page 17: ...center of the alignment guides for 6 5 mm rectangles or 11 mm lines Capture Areas on either the left or right side of the stage Align the center of the tissue region of interest to the center of the C...

Page 18: ...rmost position Examples of Good Slide Placement on the Tissue Slide Stage right side of the stage rotated still on the right side of the stage OR F F Slide F shown with a 6 5 mm section left side of t...

Page 19: ...adjust the position of the tissue within the alignment guides DO NOT touch the tissue section d If only one tissue on one slide will be loaded use a blank slide for the second position on the Tissue S...

Page 20: ...ing that the slide is not impacted The lock will partially obscure the slide label when correctly secured Visium Slide Stage is Empty Visium Slide Stage is Loaded Correctly with One Slide CORRECT Slid...

Page 21: ...com The image below demonstrates how movement of the tissue slides affects where target molecules will end up on the Visium CytAssist Spatial Gene Expression Slide Stage Tissue Slide Visium Slide POS...

Page 22: ...e Stage a Inspect the Visium Slide Stage for dust and debris and clean according to the Maintenance section as needed b Open the Visium Slide Lock by using one finger to pivot c Line up the slide with...

Page 23: ...strument information and download the latest firmware updates for their instruments Each Visium CytAssist instrument is required to be registered to the 10x Genomics Cloud during the First Time Use FT...

Page 24: ...Menu Options 23 Menu Options 26 Firmware Update Procedure...

Page 25: ...ment section Instrument Data Fromthismenuoption accessandexport Run Data includes CytAssist images run csv with metadata such as sample run name slide serial number etc Size 10s of mb run Support Pack...

Page 26: ...while older Support Data is deleted automatically oldest files are deleted first It is critical that users proceed to the next stage of the workflow in the assay kit user guide immediately rather tha...

Page 27: ...ecommended so that the instrument may receive security firmware updates and automatically upload system log files to the 10x Genomics Cloud 10x Genomics has no remote access to the instrument Users ma...

Page 28: ...ad enabled e A pop up on the home screen will alert the user of available updates f Open pop up and click to install Procedure with a network connection auto download disabled a A pop up on the home s...

Page 29: ...to start the test e Upon test completion follow onscreen instruction to unload slides Follow onscreen instruction in the event of a failed or incomplete test f Store the blank slides and the calibrat...

Page 30: ...System Operation 29 Step 1 Installation 31 Step 2 First Time Use 34 Step 3 Readiness Test 36 Step 4 Main Operation...

Page 31: ...e instrument Provides a minimum of 4 10 cm clearance around unit to allow free air circulation Warning Avoid using the Visium CytAssist in a manner not specified by 10x Genomics The Visium CytAssist h...

Page 32: ...ee Moving Shipping the Instrument section d Remove Shipping Bolt from the back of the instrument Retain for future use the Shipping Bolt holds the camera focus in a safe position during transportation...

Page 33: ...ires the following 10x Genomics Account Onscreen instruction will guide account setup Alternatively visit cloud 10xgenomics com to create an account beforehand Instrument serial number and instrument...

Page 34: ...accept the legal agreement e Update the firmware Internet connection After registration the instrument will automatically search for the latest firmware update Confirm data transmission settings for...

Page 35: ...increasing height The feet will come off the instrument if they are continued to be turned counterclockwise Once the instrument is leveled correctly check the back of the instrument to confirm that t...

Page 36: ...n Slide in the Instrument Accessory Kit Inspect for any chips or cracks Calibration slide may be cleaned with lens paper or laboratory wipes followed by compressed air Dirty slides may cause the readi...

Page 37: ...llowed by 70 ethanol or 70 isopropanol Use compressed air to dry remove debris as needed Clean glass windows with dry polyester swabs such as Texwipe TX714A Cleanroom Swab 0 5 L EW 33677 62 from Cole...

Page 38: ...area that results in successful analyte transfer and imaging Overlay the slides on the diagrams in the Visium CytAssist Quick Reference Cards for Accessory Kit Instruction CG000548 located in the Ins...

Page 39: ...and B c Open lid d Follow onscreen instruction and load the blank slides and calibration slide onto the instrument as described in the Tips and Best Practices section e Load reagents to the circular...

Page 40: ...one and a Run Info tab at the bottom of the screen Green indicates a successfully completed run Red indicates a failed run error see Troubleshooting Yellow indicates that the run has been canceled i C...

Page 41: ...y run See Maintenance section for further guidance l Export the run data via USB See Run Data section for further guidance m View and verify the tissue samples were accurately aligned within the Visiu...

Page 42: ...Maintenance 41 System Maintenance 43 Moving Shipping the Instrument...

Page 43: ...xwipe TX714A Cleanroom Swab 0 5 L EW 33677 62 from Cole Parmer or equivalent and compressed air Use a bright light e g flashlight to inspect the glass windows for any smudges and remove them as descri...

Page 44: ...st has been damaged in any way e g a power entry module or plug is damaged liquid was spilled into or objects fell into the instrument the instrument does not operate properly or has been dropped Use...

Page 45: ...strument transportation Menu Options System Alternate Modes Shipping Mode b Once Shipping Mode is active follow onscreen instruction to power down the instrument c Turn off the instrument completely u...

Page 46: ...e the four Tissue Clips to their innermost positions and tape down Ensure that the tape is placed over all four Tissue Slide Clips along with the overlap with all four corners of the protective film f...

Page 47: ...Place the foam packaging on top of the instrument i Unless directed otherwise do not include any parts of the Accessory Kit which includes the power cord j Coordinate with 10x Genomics Support for fu...

Page 48: ...Troubleshooting 47 Troubleshooting 49 Error Screens...

Page 49: ...r tissue on tissue slide if bubbles are outside of the tissue the risk of affecting assay performance is low If bubbles are on top of the tissue it may result in lack of usable reads in the tissue are...

Page 50: ...ser Guide CG000549 Readiness Test Fails Refer to the Maintenance section and clean the instrument as described Wipe down the Tissue Slide Stage and the Visium Slide Stage with 5 10 bleach solution fol...

Page 51: ...es for troubleshooting Upload pertinent logs to 10x Genomics by navigating to the Logs menu option on screen See Run Data section There are two types of errors Critical Errors When the instrument has...

Reviews: