background image

Manual 


page 1 of 11 

Handbuch VC Tilting Davits EN 1_2.docx 


FN:    

552603b (LG f. ZRS Graz) 

Bank: 

RB Graz-Mariatrost 

1st-Relief GmbH 

VAT No.:  

ATU76757859 

Swift/BIC: 

RZSTAT2G223 

Schulgasse 5 


IBAN: 

AT08 3837 7000 0420 9185 

8010 Graz, Austria 


Manual for Tilting Davits 


Summary of Contents for VERSACHOCK

Page 1: ...uch VC Tilting Davits EN 1_2 docx FN 552603b LG f ZRS Graz Bank RB Graz Mariatrost 1st Relief GmbH VAT No ATU76757859 Swift BIC RZSTAT2G223 Schulgasse 5 IBAN AT08 3837 7000 0420 9185 8010 Graz Austria Manual for Tilting Davits ...

Page 2: ...ting Davit 9 4 2 1 Attach davits to threaded deck plates 9 4 2 2 Tighten 9 4 2 3 Remove lynch 9 4 2 4 Re Insert lynch 10 4 2 5 Tilt and Pull 10 4 2 6 Reinsert hitch pin 10 4 2 7 Install tie downs 10 4 2 8 Enjoy 10 5 Additional information liability 11 5 1 Updates and other tips 11 5 2 Liability 11 5 3 Acknowledgments 11 List of figures Figure 1 Standard Deck Plate Spacing Top View 5 Figure 2 Stand...

Page 3: ...ollowing VersaChock tilting davits from 1st Relief Tilting Davits for Soft Inflatable Boats Article number 1st23VCTILTSIB Tilting Davits for Rigid Inflatable Boats Article number 1st23VCTILTRIB Davits for Soft Inflatable Boats ArtNbr 1st23VCTILTSIB Davits for Rigid Inflatable Boats ArtNbr 1st23VCTILTRIB Table 1 VersaChock Davit Versions Winch kit for Tilting Davits Art Nbr 1st23VCWINCHKIT Tie down...

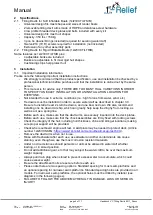
Page 4: ...ie downs must be installed in order to secure watercraft as described in chapter 3 3 Be sure to install at least 2 stern tie downs and one bow tie down We also recommend installing one tie down mid ship which can greatly help keep the dinghy from rocking as well as act as a spring line Before each use make sure that the davit arms are securely inserted into the deck plates Before each use make sur...

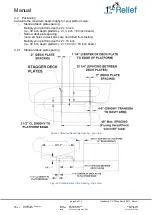
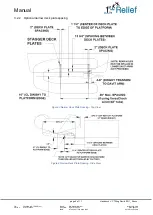
Page 5: ...mum beam dinghy for your platform size Standard deck plate spacing Multiply your platform depth x 2 3 inch i e 30 inch depth platform x 2 3 inch 63 inch beam Narrow deck plate spacing note aft holes in davit arms are not drilled from factory Multiply your platform depth x 2 10 inch i e 30 inch depth platform x 2 10 inch 70 inch beam 3 2 1 Standard deck plate spacing Figure 1 Standard Deck Plate Sp...

Page 6: ...S Graz Bank RB Graz Mariatrost 1st Relief GmbH VAT No ATU76757859 Swift BIC RZSTAT2G223 Schulgasse 5 IBAN AT08 3837 7000 0420 9185 8010 Graz Austria 3 2 2 Optional narrow deck plate spacing Figure 3 Narrow Deck Plate Spacing Top View Figure 4 Narrow Deck Plate Spacing Side View ...

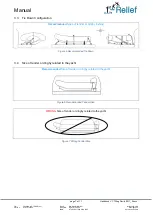
Page 7: ...se 5 IBAN AT08 3837 7000 0420 9185 8010 Graz Austria 3 3 Tie Down Configuration Recommended types of tender or dinghy lashing 3 4 Size of tender or dinghy related to the yacht Recommended Size of tender or dinghy related to the yacht WRONG Size of tender or dinghy related to the yacht Figure 5 Recommended Tie Down Figure 6 Recommended Tender Size Figure 7 Wrong Tender Size ...

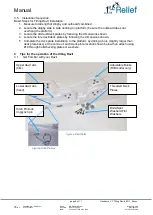
Page 8: ...form 3 Locate the aft davit deck plates by following the dimensions shown 4 Locate the fore davit deck plates by following the dimensions shown 5 Complete the deck plate installation to the platform by drilling a hole slightly larger than deck plate base at the centre of each deck plate location shown below then attach using 10 through bolts backing plates or washers 4 Tips for the operation of th...

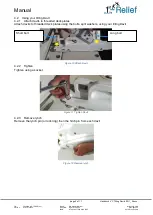
Page 9: ...9185 8010 Graz Austria 4 2 Using your tilting Davit 4 2 1 Attach davits to threaded deck plates Attach davits to threaded deck plates using the bolts split washers using your tilting Davit 4 2 2 Tighten Tighten using a socket 4 2 3 Remove lynch Remove the lynch pin or lock ring then the hitch pin from each davit Short bolt Long bolt Figure 10 Attach Davit Figure 11 Tighten Davit Figure 12 Remove l...

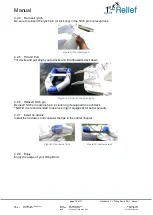
Page 10: ...nt loss 4 2 5 Tilt and Pull Tilt davits and pull dinghy onto davits and tilt afterwards davit down 4 2 6 Reinsert hitch pin Reinsert hitch pin and linch pin or lock ring if equipped in each davit NOTE It is recommended to use lock ring if equipped for better security 4 2 7 Install tie downs Install the tie downs and consider the tips in the earlier chapter 4 2 8 Enjoy Enjoy the usage of your tilti...

Page 11: ...mmend that the product specification use and installation be checked by a professional technician prior to purchase and that the installation be carried out by them Your safety and customer satisfaction are our top priority 5 3 Acknowledgments Thank you for choosing our products Together with our manufacturer VersaChock we strive to deliver the most innovative products of the highest quality Versa...

Reviews: