background image


Quick Start Guide 

(English) 


Summary of Contents for Drumit Three

Page 1: ...Quick Start Guide English ...
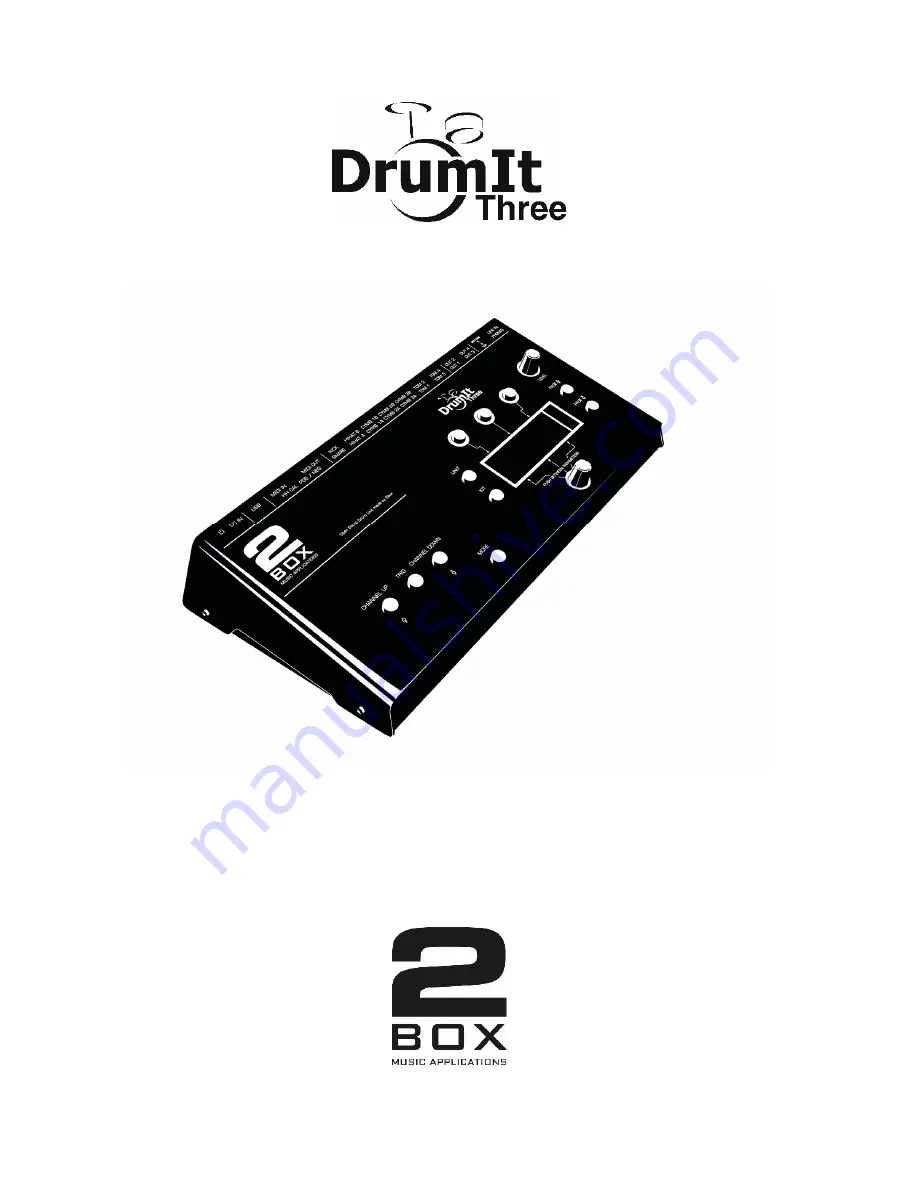
Page 2: ...r Settings 7 5 Setting Up and Calibrating The Hi Hat 9 6 Connections 11 7 USB 12 8 File System 13 9 KIT Bank 15 10 Editor Software 16 11 User Manual 16 12 Sound Downloads 16 13 Compatibility List 17 14 Connection Options and Trigger Types 18 15 Important Safety Precautions 20 Printed by 2BOX Distribution GmbH Version 1 0 2018 ...

Page 3: ...all functions you need to be aware of and everything you need to know to come to grips with this feature rich instrument Have fun 1 First Steps 1 1 Connecting Pads Connect your pads to the DrumIt Three module See Chapter 6 for connectivity options Next head over to the UNIT TRIG menu and specify which pad types you connected See Chapter 13 for a list of options 1 2 Connecting the Hi Hat To ensure ...

Page 4: ...e display are assigned to the values or functions that appear in the top row Press the button above the desired entry to set values or select functions The three entries in the bottom row are controlled using the rotary knob below the display This knob can be used to set the value of the parameter that is currently selected To select a different parameter in the bottom row simply press the knob Th...

Page 5: ... hat and calibrate the corresponding pad See below and the User Manual for a detailed discussion of these settings HSET This page is used to fine tune the settings you made on the HCAL page Use it to ensure the response matches your playing style SPEC This page allows you to set aspects that help you avoid double triggering and cross talk This is especially important for acoustic drum triggers you...

Page 6: ...d to the selected drum channel and to set the tuning and volume The channel can be selected using the CHANNEL buttons left or simply by hitting the assigned pad Note The Rim channels of toms 1 through 4 and the snare PERC 1 5 can be selected by simultaneously pressing the MORE and TRIG buttons ENV This is where you fine tune the selected sound and specify the loop setting for each channel CFNC If ...

Page 7: ...king the SAVE function in the UNIT PREF menu you only need to do so once Press the leftmost DATA button to switch the SAVE function On Saving one KIT Changes you wish to keep after editing the settings on a KIT page require that you save the KIT in question If the settings of selected KIT no longer correspond to the stored version a symbol appears next to SAVE on the KIT home page Press the leftmo...

Page 8: ...e character at the cursor position To confirm the name press the leftmost DATA button above the display SAVE Copying Moving and Swapping KITs Existing KITs can be moved MOVE to a different memory slot swapped with other KITs SWAP and copied COPY Start by pressing the leftmost button above the display Rotate the knob to select the number of the KIT that should act as target for the currently select...

Page 9: ...potential In most instances these setup and calibration steps only need to be performed once Just follow the steps below to set up your hi hat within minutes 1 Connect the hi hat pad and optional hi hat controller if available to the corresponding inputs on the module Input A is to be used for the trigger signals while Input B is to be used for the control commands 2 Navigate to the UNIT HCAL page...

Page 10: ...ssful you can now check whether the hi hat responds to your playing as expected If you are not happy with the response either repeat the calibration steps or fine tune the following parameters PFACT Increase this value to raise the calibration threshold This is useful for a consistent foot chick pedaled hi hat and foot splash quick release of the pedal after a chick sound We recommend taking your ...

Page 11: ... commercially available USB cable to connect the module to your computer 12V DC This is where you connect the external power supply MIDI IN Connect this to the MIDI OUT socket on the external MIDI controller to allow the module to receive MIDI messages MIDI OUT Connect this to the MIDI IN socket of the device that should receive MIDI messages from the module Channels Connect your pads to the input...

Page 12: ... USB When the DrumIt Three module is connected to a USB port on your computer PC or Mac and booted in USB mode the computer will consider it a regular storage device In this case the module behaves exactly like a USB hard disk or an SD card in a card slot You can drag and drop sound files from your computer to your 2BOX module and exchange files between the module and the computer Managing 2BOX so...

Page 13: ...T and UNIT settings DrumItInit dkit This file contains the KIT and UNIT settings programmed at the factory This file is required to perform a factory reset of the unit DrumItRub dkit A User KIT Bank optimized for 2box Pads with Rubber Heads DrumItTrig dkit A User KIT Bank optimized for 2box TrigIt Triggers DrumItOS1 3x xx bin Firmware operating system of the DrumIt Three DrumIt Three x x pdf Manua...

Page 14: ...start with the last chosen KIT Bank The folders contain the 2BOX sound files in the DSND format as well as play along songs in the WAV format Feel free to change the folder structure so as to organize the files in a way that works for you Given the DrumIt Three module s display size we recommend using short folder names and working with a limited number of folder levels ...

Page 15: ...t and enjoy these KITs in total The name of the KIT gives you an idea which song artist we had in mind when creating the preset Play these KITs to the songs in question and have fun Also worth to mention All sounds were recorded by or for 2box in various studios around the world There is no spec list for each and every sound in the 2box library but the names usually give you a hint which instrumen...

Page 16: ...mIt Three manual that you can download free of charge as a PDF www 2box drums com 12 Sound Downloads One special feature about the DrumIt Three is its open sound architecture You can transfer new sounds to your module and delete sound files you never use consider backing them up on your computer however You will find a host of additional sound files on our website which can be downloaded free of c...

Page 17: ...tive hall generator or switch Piezo head Piezo rim Piezo bow Piezo head Switch rim Piezo head Switch rim Switch cross stick Products 2box 2box 2box Alesis Crimson series Alesis Crimson series Alesis Crimson series Alesis DM 10 series Alesis DM 10 series Alesis DM 10 series Alesis Strike series Millenium MPS series Alesis Pro X Roland KD120 Roland PD 100 Millenium Roland KD140 Roland PD 125 Roland ...

Page 18: ...ch Velocity yes CyPSB Roland Piezo Switch Switch yes CyPS Alesis Roland Piezo Switch yes CyPSS Huaxin Alesis Piezo Switch Switch yes CyPSY Yamaha Piezo Switch Switch yes HiHat Various Piezo Switch Control to Input B x AcTr1 2box Ddrum Piezo Piezo small drum AcTr2 2box Ddrum Piezo Piezo Medium drum AcTr3 2box Ddrum Piezo Piezo Big drum RubH1 2box Piezo Piezo Rubber Heads S RubH2 2box Piezo Piezo Ru...

Page 19: ...19 20 Instrument Snare Tom Rim Cymbal Acoustic Various 1 zone 2 zones 3 zones 1 zone 2 zones 1 zone 2 zones 3 zones Trigger x x x x x x x x x x x x x x x x x x x x x x ...

Page 20: ...ate it in a responsible manner Do not allow any liquids to penetrate inside the unit Never drop the unit Never apply excessive force to the module or its controls Never expose the module to extremely hot 40 C or cold below 0 C temperatures Avoid covering the module s bottom or rear panel or its power supply adapter with blankets and the like These areas become hot while the unit is in use and this...

Reviews: