10/100 PCI Network Interface Cards
3C905CX For Complete PC Management3C905C For Complete PC Management3C905B3C900B
User Guide
http://www.3com.com/http://www.3com.com/productreg
Published September 2001User guide version 5.4.0
Page 1: ...twork Interface Cards 3C905CX For Complete PC Management 3C905C For Complete PC Management 3C905B 3C900B User Guide http www 3com com http www 3com com productreg Published September 2001 User guide v...
Page 2: ...3Com and a copy will be provided to you UNITED STATES GOVERNMENT LEGEND If you are a United States government agency then this documentation and the software described herein are provided to you subje...
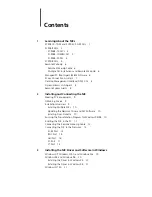
Page 3: ...e NIC Meeting PC Requirements 9 Obtaining Drivers 9 Installation Overview 9 Installing Multiple NICs 10 Updating the Network Driver and NIC Software 10 Installing From Diskette 10 Running the Preinsta...
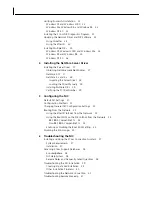
Page 4: ...the PCI Slot Number 29 5 Configuring the NIC Default NIC Settings 31 Configuration Methods 32 Changing General NIC Configuration Settings 32 Booting From the Network 33 Using the EtherCD to Boot from...
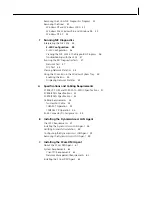
Page 5: ...aying Network Statistics 49 A Specifications and Cabling Requirements 3C905CX TX M and 3C905C TX M NIC Specifications 51 3C905B NICs Specifications 52 3C900B NICs Specifications 53 Cabling Requirement...
Page 6: ...te E Technical Support Online Technical Services 67 World Wide Web Site 67 3Com Knowledgebase Web Services 67 3Com FTP Site 67 Support from Your Network Supplier 68 Support from 3Com 68 Returning Prod...
Page 7: ...100 Mbps Fast Ethernet network The NICs support a suite of desktop and network management features including Remote Wake Up Managed PC Boot Agent MBA software 3Com Connection Assistant software Dynam...
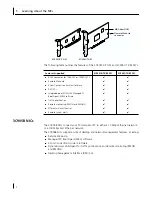
Page 8: ...3Com Connection Assistant software DynamicAccess LAN Agent for traffic prioritization and remote monitoring RMON and RMON2 Desktop Management Interface DMI 2 0s Features Supported 3C905CX TX M NIC 3C9...
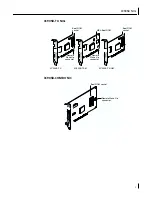
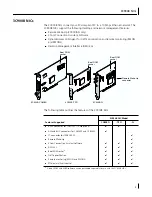
Page 9: ...DATA TX ACT 10 100 L N K 3C905B TX Boot ROM socket Remote Wake Up connector 3C905B TX NM TX DATA ACT 10 100 L N K MBA Boot ROM 3C905B TX M Remote Wake Up connector DATA TX ACT 10 100 L N K Boot ROM so...
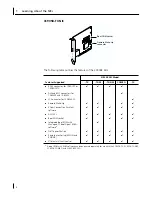
Page 10: ...10BASE2 SC connector for 100BASE FX Remote Wake Up 3Com Connection Assistant software DMI 2 0s Boot ROM socket Integrated boot ROM with Managed PC Boot Agent MBA softwarea a A boot ROM with MBA softwa...
Page 11: ...table outlines the features of the 3C900B NICs 3C900B COMBO Remote Wake Up connector 3C900B TPO 3C900B FL Boot ROM socket Boot ROM socket Boot ROM socket 10 10 LNK ACT RX 3C900B NIC Model Features Sup...
Page 12: ...se multiple NICs as Remote Wake Up NICs in the same PC the PC must have a power supply that can support multiple Remote Wake Up devices Refer to your PC documentation if you are unsure whether your PC...
Page 13: ...IC drivers Access a list of frequently asked questions as well as the 3Com Knowledgebase Depending on your network connection you can obtain self service support or assisted service support via the We...
Page 14: ...edia applications has priority over normal data Fast IP Eliminates router bottlenecks and improves performance in switched networks Efficient multicast control Prevents flooding of switched networks b...
Page 15: ...ollowing table that summarizes the NIC installation before installing the NIC in the PC Operating System Installation Steps Windows XP Windows 2000 Windows Millennium Edition Me 1 Install the NIC in t...
Page 16: ...tem environment The preinstallation program prevents conflicts between the NIC and your operating system It guides you through the NIC installation and must be run before you physically install the NI...
Page 17: ...the empty PCI slot Press firmly to ensure that the NIC is fully seated in the slot NOTE If you have a Windows 95 or Windows 98 PC do not install the NIC in your PC until you have run the preinstallati...
Page 18: ...te Wake Up RWU cable from the NIC to the PC motherboard Connecting the Remote Wake Up cable is optional Connect this cable only if your NIC supports Remote Wake Up and you want to use this feature The...
Page 19: ...4 Replace the PC cover and plug in the power cord Do not turn on the power to the PC The next step is to connect the NIC to the network Go to the next section Connecting the NIC to the Network NOTE I...
Page 20: ...requirements and maximum network cable lengths for the RJ 45 port To connect the RJ 45 port 1 Plug the RJ 45 connector on the twisted pair network cable into the RJ 45 port on the NIC backplate 2 Conn...
Page 21: ...Connect the other end of the network cable to another PC or to a 50 ohm terminator The next step is to install the NIC driver Go to Installing the NIC Driver and Software in Windows on page 19 or Inst...
Page 22: ...he AUI port on the NIC This connector attaches in only one way Orient the AUI connector to match the AUI port on the NIC 3 Move the slide latch up to the closed position to lock the AUI connector in p...
Page 23: ...the SC connector on the NIC 3 Connect the other end of the cable to an active 100BASE FX Fast Ethernet network port The next step is to install the NIC driver Go to Installing the NIC Driver and Soft...
Page 24: ...of the network cable to a 10BASE FL Ethernet network hub or switch Insert the cable that is connected to the transmit 10 connector on the NIC into the receive RX connector on the network hub or switch...
Page 25: ...e CD ROM drive 3 Click NIC Software NIC Drivers and Diagnostics and then Update Drivers and Diagnostics 4 To install the driver only click Update NIC Driver To install the driver and the NIC diagnosti...
Page 26: ...r the following information and then click OK Computer Name Identifies the PC on the network for other users This entry must be a unique name of 15 characters or fewer containing no spaces Workgroup I...
Page 27: ...the power to the PC 2 Double click the My Computer icon then the Control Panel icon and then the Network icon The Network window appears 3 Click the Adapters tab If networking has not been installed o...
Page 28: ...n to confirm that the NIC is installed properly Verifying Successful Installation Follow the steps for your operating system Windows XP and Windows 2000 To verify successful NIC installation 1 Right c...
Page 29: ...statistics and LEDs and access support databases To install the 3Com NIC Diagnostics program 1 Turn on the power to the PC and start Windows 2 Insert the EtherCD in the CD ROM drive The EtherCD Welco...
Page 30: ...ing the EtherCD To update the driver and NIC diagnostic software using the EtherCD 1 Turn on the power to the PC and start Windows 2 Insert the EtherCD in the appropriate drive in the PC The EtherCD W...
Page 31: ...your PC and connect it to the network 10 Plug in the PC power cord turn on the power to the PC and then start Windows Windows detects the second NIC The second NIC uses the same network driver as the...
Page 32: ...e installed Windows NT 4 0 To install multiple NICs in a PC running Windows NT 4 0 1 Install the NICs in your PC and connect each to the network 2 Turn on the power to the PC and start Windows NT 3 Do...
Page 33: ...d in the table below from the Novell World Wide Web site http www support novell com NetWare 3 12 To install the driver in a NetWare 3 12 server 1 Copy the MSM31X NLM ETHERTSM NLM and NBI31 NLM files...
Page 34: ...ubdirectory on the EtherCD to the server s hard drive 2 Boot the server and launch the Install program 3 Edit the AUTOEXEC NCF file to add the following line assuming the server start directory is C N...
Page 35: ...nd frametype2 can be one of the following Ethernet_802 2 Ethernet_802 3 Ethernet_II Ethernet_SNAP Make sure that the frametype for the server and the workstation is the same For example if the server...
Page 36: ......
Page 37: ...ull duplex or in one direction at a time half duplex Auto Select allows the NIC to automatically connect at the duplex mode of the connected hub or switch When you select this setting the Media Type i...
Page 38: ...ics Program on page 23 for instructions 2 Open the Windows Start menu 3 Select Programs and then 3Com NIC Utilities 4 Click 3Com NIC Doctor Windows 2000 Windows XP Windows Me Windows 98 Windows 95 or...
Page 39: ...do a network boot allowing the PC to be managed in the preboot stage Using the EtherCD to Boot from the Network These instructions apply to NICs that do not contain a boot ROM If the NIC installed in...
Page 40: ...as the first boot device in the PC BIOS Refer to your PC documentation for instructions on accessing and configuring the PC BIOS 3 Reboot the PC The MBA attempts to boot from the network using the def...
Page 41: ...led to disable the boot ROM 8 Click OK to save the setting and exit the program Disabling the 3Com Logo To disable the 3Com logo that appears on the screen when the NIC first connects to the network 1...
Page 42: ......
Page 43: ...To install and use the 3Com Connection Assistant requires Windows 95 Windows 98 Windows Me Windows 2000 or Windows NT 4 0 Internet Explorer version 4 0 or later or Netscape Navigator version 4 06 or...
Page 44: ...edgebase 3com com NIC Help System To access the 3Com NIC Help system 1 Make sure that the NIC its driver and the 3Com NIC Diagnostics program are installed See Installing the 3Com NIC Diagnostics Prog...
Page 45: ...Error Windows was unable to locate a driver for this device Error You have selected a plug and play adapter Please turn off your machine and install the adapter Then turn on your machine and reinstall...
Page 46: ...enable the PCI slot using the BIOS Setup program Enabling the PCI slot is especially common in PCI computers with a Phoenix BIOS a After installing the NIC turn on the PC and enter the Setup program...
Page 47: ...Connecting the NIC to the Network on page 14 Check your PC BIOS Make sure that you are running the latest BIOS for your PC If your BIOS has not been upgraded in the previous 12 months consult your PC...
Page 48: ...Up does not work with the new NIC installed there may be a problem with the PC motherboard Consult your PC manufacturer Removing the 3Com NIC Diagnostics Program The 3Com NIC Diagnostics Program can...
Page 49: ...If you want to physically remove the NIC from the PC shut down the system and turn the power off before removing the NIC If you want to reinstall the NIC driver and software restart the PC Windows Me...
Page 50: ...ht the name of the NIC in the Network Adapters box and then click Remove 4 Click Yes to confirm the removal 5 Click Close to close the Network screen You are prompted to restart the PC If you are phys...
Page 51: ...some NICs as indicated by N A in the table Depending on your NIC model the NIC may have two or three LEDs 2 LED Configuration Connector LED State Meaning RJ 45 AUI BNC SC ST LNK link Green If drivers...
Page 52: ...LED lights Connector LED State Meaning RJ 45 AUI BNC SC ST 10 LNK link On If drivers are installed the 10Mbps connection is active Yes N A N A N A Yes If drivers are not installed the NIC is receiving...
Page 53: ...the NIC connectivity to the network Do not remove the network cable while the Network Test is running 1 Click Run Network Test on the Diagnostics screen The Network Connectivity Test screen appears 2...
Page 54: ...5 Click the Statistics tab The Statistics screen appears The information is updated by the NIC driver every 5 seconds For a description of each statistic click the question mark in the upper right cor...
Page 55: ...isplaying Network Statistics When you drag the mouse pointer over the icon but do not double click the icon a network statistics box appears displaying the following information Frames Sent and Receiv...
Page 56: ......
Page 57: ...5 in 14 86 cm Power requirements 5 V 5 375 mA maximum 3 3 V 5 375 mA maximum 3 3 V 20mA maximum in sleep state with RWU disabled 3 3 V Aux for RWU supplied over PCI 2 2 compliant PCI bus Network Inter...
Page 58: ...MI 2 0s ACPI ASF specification Wired for Management WfM 1 1a 2 0 including PXE 2 0 and BIS SMBus 2 2 Pre OS boot protocol support PXE BootP DHCP NCP RPL Hardware Bus interface PCI Local Bus Specificat...
Page 59: ...ting humidity 10 to 90 noncondensing Storage humidity 10 to 90 noncondensing Altitude 984 ft to 9 840 ft 300 to 3 000 m Standards Conformance IEEE 803 3x flow control Microsoft PC98 PCI 2 1 DMI 2 0s H...
Page 60: ...ed in Ethernet Fast Ethernet and other network topologies The EIA TIA defines five categories of unshielded twisted pair cable Environment Operating temperature 32 to 158 F 0 to 70 C Storage temperatu...
Page 61: ...cable arranged in a star configuration and unshielded twisted pair cable Each node has a separate cable run that must not exceed 100 meters 328 ft from the node to the hub 100BASE TX Operation 100BAS...
Page 62: ......
Page 63: ...nology User Guide on the EtherCD CAUTION Do not install the DynamicAccess LAN agent on a PC running Windows 98 SE 1 The installation will result in system failure CAUTION If you plan to install the Dy...
Page 64: ...r name of the CD ROM drive 4 Click NIC Software 5 Click DynamicAccess Technologies 6 Click DynamicAccess LAN Agent 7 Click Install DynamicAccess LAN Agent Now 8 Exit the EtherCD and then exit Windows...
Page 65: ...itize applications which can ease bottlenecks in your network and allow critical applications to take network precedence Fast IP Allows you to enable and configure Fast IP Administration Allows you to...
Page 66: ......
Page 67: ...system alerts Each PC that contains a 3Com NIC and the 3Com DMI Agent generates a Management Information Format MIF file that contains information about the PC and the NIC DMI applications use the in...
Page 68: ...ation Intel LANDesk Client Manager Installing the 3Com DMI Agent This section describes how to install the 3Com DMI Agent For instructions on how to install the 3Com DMI Agent on a PC running Windows...
Page 69: ...t the PC when prompted To verify successful installation use a DMI compatible browser or a network management application that supports DMI 2 0s to verify that the 3Com NIC is present Refer to the 3Co...
Page 70: ......
Page 71: ...erDisk 2 contains NDIS 2 driver PACKET driver Help text files DOS utilities To create installation diskettes from the EtherCD 1 Turn on the power to the PC and start Windows 2 Insert the EtherCD in th...
Page 72: ...Files are copied 9 Remove the disk and insert the disk labeled EtherDisk 2 when prompted and then click OK Files are copied The diskette creation is complete NOTE For instructions on using the install...
Page 73: ...ch as technical documentation and a software library as well as support options that range from technical education to maintenance and professional services 3Com Knowledgebase Web Services This intera...
Page 74: ...t services To find out more about your support options call the 3Com technical telephone support phone number at the location nearest you When you contact 3Com for assistance have the following inform...
Page 75: ...bourg Netherlands Norway Poland Portugal South Africa Spain Sweden Switzerland U K 0800 297468 0800 71429 800 17309 0800 113153 0800 917959 0800 1821502 06800 12813 1800 553117 1800 9453794 800 8 7948...
Page 76: ...ia Ecuador Mexico Paraguay Peru Uruguay Venezuela 0810 222 3266 511 241 1691 0800 133266 or 55 11 5643 2700 525 201 0004 562 240 6200 525 201 0004 525 201 0004 525 201 0004 525 201 0004 511 241 1691 5...
Page 77: ...uirements 62 installing 62 network management requirements 62 overview 61 65 3Com icon in Windows system tray removing 48 showing 48 3Com Knowledgebase 67 3Com logo disabling 35 3Com NIC Diagnostics p...
Page 78: ...ink LED viewing 46 link speed viewing 49 logo 3Com disabling 35 M Managed PC Boot Agent MBA software overview 33 using on the EtherCD 33 using on the NIC boot ROM 34 media type configuring 32 default...
Page 79: ...n 39 error messages 39 LEDs 47 MBA boot ROM 33 network connection 41 NIC installation 39 Remote Wake Up 41 twisted pair cable description 54 U uninstalling the NIC 43 unshielded twisted pair UTP cable...
Page 80: ......