background image

CubePro

Cartridge Bay Replacement Guide

Original Instructions

Prosumer 3D Printer

Summary of Contents for CubePro

Page 1: ...CubePro Cartridge Bay Replacement Guide Original Instructions Prosumer 3D Printer...

Page 2: ...f the following measures Reorient or relocate the receiving antenna Increase the separation between the equipment and receiver Connect the equipment into an outlet on a circuit different from that to...

Page 3: ...conferred by our ninety 90 day warranty are in addition to and operate concurrently with all rights and remedies conveyed by such consumer protection laws and regulations including but not limited to...

Page 4: ...P FINGERS AND OTHER BODY PARTS AWAY HOT SURFACE HAZARD DO NOT TOUCH THE PRINT JETS DURING SETUP AND OPERATION THE PRINT JETS BECOME VERY HOT Caution Read and follow all instruction prior to setting up...

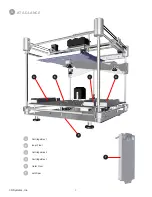
Page 5: ...4 3D Systems Inc 3 AT A GLANCE A E A Cartridge Bay 1 B Inner Floor C Cartridge Bay 2 D Cartridge Bay 3 E Outer Floor F Jet Wiper B C D F...

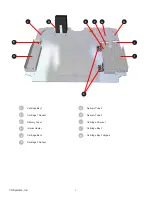
Page 6: ...G H I J K A Cartridge Bay 1 B Cartridge 1 Sensor C Delivery Tube 1 D Interior Heater E Cartridge Bay 2 F Cartridge 2 Sensor G Delivery Tube 2 H Delivery Tube 3 I Cartridge 3 Sensor J Cartridge Bay 3...

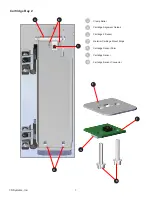
Page 7: ...ems Inc Cartridge Bay 2 A Clamp Roller B Cartridge Alignment Guides C Cartridge 2 Sensor D Material Cartridge Mount Rings E Cartridge Sensor Shim F Cartridge Sensor G Cartridge Sensor Connector A B D...

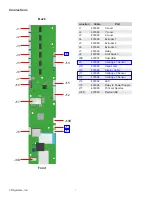
Page 8: ...9 Z Loom J4 401889 Extruder 1 J5 401889 Extruder 2 J6 401889 Extruder 3 J7 401893 Relay J8 401889 Limit Switch J8B 401897 Host USB J9 401895 Cartridge 1 Sensor J10 401889 Head Loom J12 401899 Display...

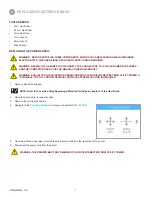
Page 9: ...Y WARNING EVEN AFTER THE PRINTER HAS BEEN TURNED OFF AND DISCONNECTED FROM UTILITY POWER IT IS POSSIBLE TO STILL CONTAIN RESIDUAL VOLTAGE EXTREME CAUTION IS REQUIRED 1 Remove all print cartridges NOTE...

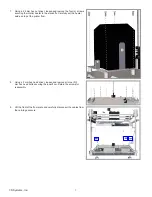
Page 10: ...to the standoffs Carefully set the heater aside on top of the printer floor 8 Using a 3 mm hex head driver loosen and remove all nine 9 3 mm hex head bolts securing the inner floor Retain the screws...

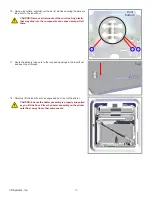
Page 11: ...o the components can cause damage if left there 11 Route the delivery tube nuts to the rounded openings in the inner floor and push them through 12 Carefully tilt the inner floor at an angle and pull...

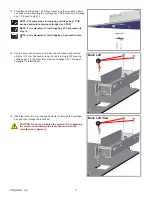
Page 12: ...NOTE For replacement of cartridge bay 2 proceed to step 18 14 Using a 3 mm hex driver and an 8 mm wrench loosen and remove all three 3 3 mm hex head screws A and 8 mm nuts B securing cartridge bay 1...

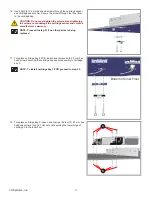
Page 13: ...void the manufacturer s warranty NOTE Proceed to step 21 if no other parts are being replaced 17 To replace cartridge bay 2 PCB loosen and remove both 2 5 mm hex head screws securing the cartridge bay...

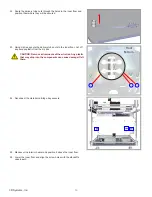
Page 14: ...ure the cartridge sensor assembly to the bottom of cartridge bay 2 by inserting and tightening both 2 2 5 mm hex head screws CAUTION Do not over tighten the screws Over tightening the screws could dam...

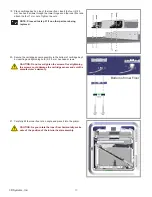
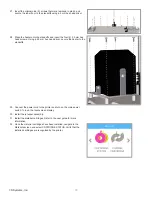
Page 15: ...ner floor Cut off any excess plastic from the zip ties CAUTION Remove all remnants of the wire ties Any plastic that may drop into the components can cause damage if left there 24 Reconnect the materi...

Page 16: ...m hex head driver secure the heater to the standoffs 29 Connect the power cord to the printer and turn on the main power switch Turn on the touchscreen display 30 Install the jet wiper assembly 31 Ins...

Page 17: ...3D Systems Inc 333 Three D Systems Circle Rock Hill SC 29730 www 3dsystems com 2014 3D Systems Inc All rights reserved PN 403167 00 Rev A...

Reviews: