3DP Workbench, User Manual
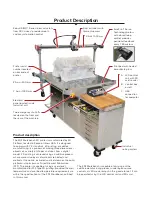
Introducing the Craftsman Workbench, a versatile and durable tool designed to enhance your workspace. With its sturdy build and practical features, this workbench is a must-have for any handyman or DIY enthusiast. Get the most out of your purchase by downloading the free Operator's Manual from 88.208.23.73:8080, offering comprehensive instructions and tips for optimal usage.
Share
Download


Reviews:
No comments
Related manuals for Workbench

7197
Brand: NCR Pages: 5

M150
Brand: Malyan Pages: 9

HandJet 250
Brand: EBS Pages: 34

VariQuest Perfecta 2400STP
Brand: Varitronics Pages: 227

VJ-2638
Brand: MUTOH Pages: 334

A1SD Series
Brand: Sindoh Pages: 142

ScreenWriter Colour ScreenWriter
Brand: Xante Pages: 446

Phaser 3140
Brand: Xerox Pages: 284

D-color MF 250 Plus
Brand: Olivetti Pages: 276

Robojet Disc Autoprinter
Brand: Aleratec Pages: 38

LBP228x
Brand: Canon Pages: 32

LBP5000 Series
Brand: Canon Pages: 162

LBP-8iv
Brand: Canon Pages: 170

LBP246dw
Brand: Canon Pages: 184

LBP 2900i
Brand: Canon Pages: 314

LBP215 Series
Brand: Canon Pages: 384

Laser Shot LPB3500
Brand: Canon Pages: 480

LBP112
Brand: Canon Pages: 152


