background image

T o u c h   P a n e l   P C  

A H P - 1 0 8 3


AHP-1083 

Intel

®

 Atom™ D2550  

1.86 GHz Processor  

Touch Panel PC 

With 8.4” TFT LCD 


AHP-1083 Manual 2

nd

 Ed. 

 July 2013 

Summary of Contents for AHP-1083

Page 1: ...Touch Panel PC A H P 1 0 8 3 AHP 1083 Intel Atom D2550 1 86 GHz Processor Touch Panel PC With 8 4 TFT LCD AHP 1083 Manual 2nd Ed July 2013...

Page 2: ...is manual is intended to be accurate and reliable However the original manufacturer assumes no responsibility for its use or for any infringements upon the rights of third parties that may result from...

Page 3: ...rd is a trademark of Award Software International Inc Intel and Atom are trademarks of Intel Corporation Microsoft Windows is a registered trademark of Microsoft Corp IBM PC AT PS 2 and VGA are tradem...

Page 4: ...make sure that the following materials are enclosed 1 AHP 1083 Touch Panel PC 1 Phoenix Terminal Block 1 Mounting bracket and screws 1 CD ROM for manual in PDF format If any of these items should be...

Page 5: ...NOT COVER THE OPENINGS 8 Make sure the voltage of the power source is correct before connecting the equipment to the power outlet 9 Position the power cord so that people cannot step on it Do not pla...

Page 6: ...MENT FCC This device complies with Part 15 FCC Rules Operation is subject to the following two conditions 1 this device may not cause harmful interference and 2 this device must accept any interferenc...

Page 7: ...Touch Panel PC A H P 1 0 8 3 vi Below Table for China RoHS Requirements AAEON Panel PC Workstation Pb Hg Cd Cr VI PBB PBDE O SJ T 11363 2006 X SJ T 11363 2006...

Page 8: ...apter 2 Hardware Installation 2 1 Panelmount Installation 2 2 2 2 Clear CMOS JP2 2 3 2 3 COM2 RI 5V 12V Selection JP3 2 3 2 4 COM Port 2 CN19 2 3 2 5 COM Port 1 CN33 2 4 2 6 CompactFlash Installation...

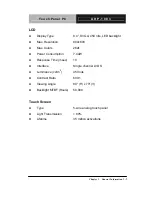
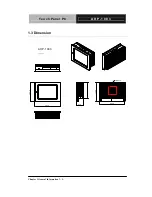
Page 9: ...Touch Panel PC A H P 1 0 8 3 Chapter 1 General Information 1 1 General Chapter 1 Information...

Page 10: ...n computer In addition its fit anywhere design makes it very flexible and able to be used in many different kinds of installations It can be VESA 75 mounted or Panel mounted For system integrators thi...

Page 11: ...B default 2GB LCD CRT Controller Intel NM10 Integrated I O Port USB2 0 x 2 RS 232 x 1 RS 232 422 485 x 1 LAN x 2 VGA x 1 Power input x 1 Power button x 1 Storage Disk Drive CFast slot x 1 Easy to swap...

Page 12: ...7 W x 18 31 H x 9 1 D 4525mm x 465mm x 230mm Net Weight 4 4 lb 2kg Gross Weight 6 16 lb 2 8kg Environmental Operating Temperature 32 F 122 F 0 C 50 C Storage Temperature 4 F 158 F 20 C 70 C Operating...

Page 13: ...Max Resolution 800x600 Max Colors 262k Power Consumption 7 44W Response Time msec 10 Interface Single channel LVDS Luminance cd m2 450 nits Contrast Ratio 600 1 Viewing Angle 80 H x 70 V Backlight MTB...

Page 14: ...Touch Panel PC A H P 1 0 8 3 Chapter 1 General Information 1 6 1 3 Dimension AHP 1083 UNITS mm 245 0 1 8 3 0 67 9 1 4 6 0 237 9 1 7 5 9 VESA 75...

Page 15: ...Touch Panel PC A H P 1 0 8 3 Chapter 2 Quick Installation Guide 2 1 Hardware Installation Chapter 2...

Page 16: ...ets which be packed in the accessory box Follow the steps below Step 1 Place the operator panel into the wall Step 2 Place the mounting brackets and bore the screw on it Step 3 Screw mounting kits to...

Page 17: ...fault 2 3 Clear CMOS 2 3 COM2 RI 5V 12V Selection JP3 JP3 Function 1 2 12V 3 4 RI Default 5 6 5V Note Max Current rating is 0 5A 2 4 COM Port 2 CN19 RS 232 Mode Pin Signal Pin Signal 1 DCDB 2 DSRB 3 R...

Page 18: ...TXD 6 N C 7 RXD 8 N C 5 Volt 12 Volt 9 Ground 10 N C RS 485 Mode Pin Signal Pin Signal 1 TXD 2 N C 3 N C 4 N C 5 TXD 6 N C 7 N C 8 N C 5 Volt 12 Volt 9 Ground 10 N C 43 CRT_PLUG 2 5 COM Port 1 CN33 Pi...

Page 19: ...nel PC A H P 1 0 8 3 Chapter 2 Quick Installation Guide 2 5 2 6 CompactFlash Installation Step 1 Loose the screw of cover to open the CompactFlash Slot Step 2 Insert the CompactFlash to the CompactFla...

Page 20: ...H P 1 0 8 3 Chapter 2 Quick Installation Guide 2 6 2 7 Hard Disk Drive Installation Step 1 Loose the eight M3 screws of the rear cover Step 2 Loose the three specified M3 screws to get the Hard Disk D...

Page 21: ...Touch Panel PC A H P 1 0 8 3 Chapter 2 Quick Installation Guide 2 7 Step 3 Insert the HDD to the HDD bracket Step 4 Fasten the four screws to fasten the HDD and the HDD bracket...

Page 22: ...Touch Panel PC A H P 1 0 8 3 Chapter 2 Quick Installation Guide 2 8 Step 5 Connect the SATA cable to the HDD...

Page 23: ...Touch Panel PC A H P 1 0 8 3 Chapter 3 AMI BIOS Setup 3 1 AMI Chapter 3 BIOS Setup...

Page 24: ...tup Menu Setup submenu Main Options summary default setting System Date Day MM DD YYYY Change the month year and century The Day is changed automatically System Time HH MM SS Change the clock of the s...

Page 25: ...ons summary default setting ACPI Settings System ACPI Parameters S5 RTC Wake Settings Support S5 RTC Wake Function CPU Configuration CPU Configuration Parameters SATA Configuration SATA Device Options...

Page 26: ...O Configuration IT8783 Super IO Configuration Parameters H W Monitor Monitor hardware status ACPI Settings Options summary default setting Suspend Disabled ACPI Sleep State S3 Suspend to RAM Select th...

Page 27: ...system with Fixed Time Enabled Enable or disable System wake on alarm event Wake up time is setting by following settings Wake up day 0 31 Select 0 for daily system wake up 1 31 for which day of the...

Page 28: ...te 0 59 Wake up second 0 59 Disabled Wake system with Dynamic Time Enabled Enable or disable System wake on alarm event Wake up time is current time Increase minutes Wake up minute increase 1 5 CPU Co...

Page 29: ...lt setting Disabled Hyper Threading Enabled CPU Hyper Threading Technology support or not SATA Configuration Options summary default setting Enabled SATA Controller s Disabled SATA Controller Enable D...

Page 30: ...Configure SATA controller operating as IDE AHCI mode Enabled SATA PORTx Disabled Enable Disable SATA Portx Enabled SATA Portx Hot Plug Disabled Enable Disable SATA Portx Hot Plug function USB Configur...

Page 31: ...sables legacy support if no USB devices are connected DISABLE option will keep USB devices available only for EFI application Auto Floppy Forced FDD Hard Disk Device Name Emulation Type CD ROM If Auto...

Page 32: ...er IO Configuration Options summary default setting Serial Port x Configuration Set Parameters of Serial Port x Power off Power on Restore AC Power Loss Last State Set Power on after power fail functi...

Page 33: ...ummary default setting Disabled Serial Port Enabled En Disable specified serial port Auto IO 2F8h IRQ 3 IO 3F8h IRQ 3 4 5 7 10 11 12 IO 2F8h IRQ 3 4 5 7 10 11 12 IO 3E8h IRQ 3 4 5 7 10 11 12 Change Se...

Page 34: ...Touch Panel PC A H P 1 0 8 3 Select a resource setting for Super IO device RS232 RS422 COM2 Type Option RS485 Configure COM2 operated as RS232 RS422 or RS485 H W Monitor Chapter 3 AMI BIOS Setup 3 12...

Page 35: ...Touch Panel PC A H P 1 0 8 3 Setup submenu Chipset Options summary default setting Host Bridge Host Bridge Parameters South Bridge South Bridge Parameters Chapter 3 AMI BIOS Setup 3 13...

Page 36: ...Panel PC A H P 1 0 8 3 Host Bridge Options summary default setting Intel IGD Configuration Enter to set Graphic Configuration Memory Information Show current memory information Chapter 3 AMI BIOS Setu...

Page 37: ...ting Disabled Auto Disable IGD Enabled Auto disable IGD upon external GFX detected VBIOS Default CRT IGFX Boot Type 1 st LVDS Select the Video Device which will be activated during POST LCD Panel Type...

Page 38: ...ol PWM Normal Backlight control setting 100 75 50 25 LVDSx Backlight Controller 0 Adjust backlight brightness Disabled Control LVDSx Enabled Dis Enable LVDSx 128MB Fixed Graphics Memory Size 256MB Con...

Page 39: ...Bridge Options summary default setting ATX Type Power Mode AT Type Select AT ATX Power Mode TPT Devices Configure onboard TPT Devices Disabled PCI Express Port x Enabled Enable Disable PCI Express Por...

Page 40: ...Touch Panel PC A H P 1 0 8 3 TPT Devices Options summary default setting Disabled R8111E x Controller Enabld R8111E Enable Disable Chapter 3 AMI BIOS Setup 3 18...

Page 41: ...default setting Disabled Quiet Boot Enabled Enables or disables Quiet Boot option Disabled Launch 8111E PXE OpROM Enabled En Disable PXE boot for onboard 8111E LAN Boot Option X XXXX Drive BBS Priori...

Page 42: ...Touch Panel PC A H P 1 0 8 3 BBS Priorities Options summary default setting Disabled Boot Option x Device name Sets the system boot order Chapter 3 AMI BIOS Setup 3 20...

Page 43: ...A user password does not provide access to many of the features in the Setup utility Install the Password Press Enter on this item a dialog box appears which lets you enter a password You can enter no...

Page 44: ...uired at boot time or when the user enters the Setup utility Removing the Password Highlight this item and type in the current password At the next dialog box press Enter to disable password protectio...

Page 45: ...will be unlocked using the HDD Password we entered while system booting Install the Password Press Enter on this item a dialog box appears which lets you enter a password You can enter no more than si...

Page 46: ...uired at boot time or when the user enters the Setup utility Removing the Password Highlight this item and type in the current password At the next dialog box press Enter to disable password protectio...

Page 47: ...eset the system after saving the changes Discard Changes and Reset Reset system setup without saving any changes Restore Defaults Restore Load Default values for all the setup options Save as User Def...

Page 48: ...Touch Panel PC A H P 1 0 8 3 Chapter 3 AMI BIOS Setup 3 26 Restore the User Defaults to all the setup options...

Page 49: ...Touch Panel PC A H P 1 0 8 3 Chapter 4 Driver Installation 4 1 Driver Chapter 4 Installation...

Page 50: ...utilities that meet your needs Follow the sequence below to install the drivers Step 1 Install Chipset Driver Step 2 Install VGA Driver Step 3 Install LAN Driver Step 4 Install AHCI Driver Step 5 Inst...

Page 51: ...S folder 3 Follow the instructions that the window shows 4 The system will help you install the driver automatically Step 2 Install VGA Driver For Windows 7 1 Click on the STEP2 VGA folder and select...

Page 52: ...4 2 Install IEMGD Double click on the IEMGDInstallCC exe Select the configuration Follow the instructions that the window shows The system will help you install the driver automatically Due to AHP 108...

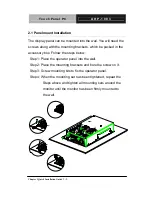
Page 53: ...Touch Panel PC A H P 1 0 8 3 Chapter 4 Driver Installation 4 5...

Page 54: ...nstall the driver automatically Step 3 Install LAN Driver 1 Click on the Step 3 LAN folder and select the OS folder your system is 2 Double click on the Setup exe file located in each OS folder 3 Foll...

Page 55: ...3 Follow the instructions that the window shows 4 The system will help you install the driver automatically Step 6 Install Serial Port Driver Optional 1 Click on the STEP6 Serial Port Driver Optional...

Reviews: