background image

Turbo Systems Switzerland Ltd

Operation Manual / Power2 850-M16

High-pressure stage PT004165

Document identification

Document number

HZTL4063

Revision

F

Language

English

Original Operation Manual

Product identification

Serial number

PT004165

Customer part number

HZTL53396B

Delivery date (yyyy-mm-dd)

2022-09-05

Weight

700

kg

Operating limits according to rating plate

Speed limit in test rig operation only

n

Mmax

612

1/s

Speed limit during operation

n

Bmax

612

1/s

Gas inlet temperature limit in test rig operation only

t

Mmax

650

°C

Gas inlet temperature limit during operation

t

Bmax

620

°C

Compressor inlet temperature after intercooler

t

Cmax

60

°C

Summary of Contents for PT004165

Page 1: ...al number PT004165 Customer part number HZTL53396B Delivery date yyyy mm dd 2022 09 05 Weight 700 kg Operating limits according to rating plate Speed limit in test rig operation only nMmax 612 1 s Spe...

Page 2: ......

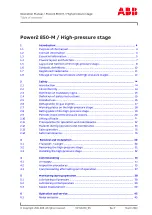
Page 3: ...5 2 5 Intended use 16 2 6 Deflagration on gas engines 17 2 7 Warning plates on the high pressure stage 18 2 8 Rating plate of the high pressure stage 19 2 9 Periodic check of the pressure vessels 20 2...

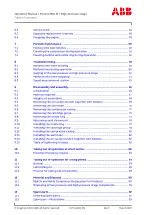
Page 4: ...e air suction branch together with bellows 69 9 5 Removing the wall insert 70 9 6 Removing the compressor casing 72 9 7 Removing the cartridge group 73 9 8 Removing the nozzle ring 75 9 9 Measuring ax...

Page 5: ...Operation Manual Power2 850 M High pressure stage Table of contents Copyright 2022 ABB All rights reserved HZTL4063_EN Rev F March 2022 14 Tools 101 Figures 102 Tables 103...

Page 6: ...prevention and environmental protection Target group The Operation Manual is aimed at engineers and trained mechanics responsible for the proper operation of the engine and for the Power2 connected t...

Page 7: ...ressure stages This may result in sections and descriptions of components that are not relevant for a specific Power2 high pressure stage Please contact a Turbo Systems service station if you have any...

Page 8: ...Operation Manual Power2 850 M High pressure stage 1 Introduction 1 3 Essential information Copyright 2022 ABB All rights reserved HZTL4063_EN Rev F March 2022 Page 6 104...

Page 9: ...re Power2 LP and high pressure stage Power2 HP within two stage turbocharging Power2 The low pressure stage is always op erated in combination with a high pressure stage connected in series The two st...

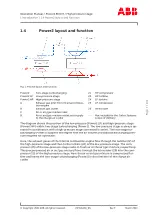
Page 10: ...v F March 2022 1 5 Layout and function of the high pressure stage Fig 2 Layout and function of the high pressure stage 01 Air suction branch 08 Radial plain bearing 02 Bellows 09 Turbine 03 Compressor...

Page 11: ...ayout and function of the high pressure stage 8 the exhaust gas flows through the gas inlet casing 11 and the nozzle ring 12 and reaches the turbine 09 The HP turbine uses the energy contained in the...

Page 12: ...ust be complied with Definition of Caution Warning Caution and warning signs are described in chapter Safety Terms used The following terms are used in this document Two stage turbocharging Power2 Low...

Page 13: ...n over specified tightening angle Hand tight tighten without tools Oil Apply screw locking paste e g Loctite Apply high temperature grease Apply other paste in accordance with specifications Oil free...

Page 14: ...a VCI label on the package the following instructions must be observed Fig 4 Volatile Corrosion Inhibitor VCI WARNING Health protection when handling VCI VCI products are not hazardous in terms of the...

Page 15: ...his case the low pressure or high pressure stage or the cartridge group must be checked and repack aged by a Turbo Systems service station u Inspect the package for damage If the package is damaged th...

Page 16: ...or supplies and materials Are a consequence of insufficient compliance with safety instructions Are a consequence of insufficient or inappropriate performance of maintenance and in spection work The...

Page 17: ...Respiratory mask to protect against Dusts Gases Safety helmet Ear protection Table 3 Personal protective equipment to be worn specific to the respective task 2 4 Definition of safety instructions WAR...

Page 18: ...ects all warranty claims for any non intended ap plications 1 Euromot The European Association of Internal Combustion Engine Manufacturers 2 Directive 94 9 EC concerning equipment and protective syste...

Page 19: ...of 15 bar guideline value After a deflagration event Turbo Systems recommends verifying the following points on the low pressure and high pressure stages Position of the turbine and compressor casing...

Page 20: ...he designated locations or not readable proceed as fol lows u Order new warning plates from Turbo Systems service stations u Remove any warning plates that have become unreadable u Clean and degrease...

Page 21: ...Further data 6 Power2 designation 7 Power2 serial number 8 Power2 stage 9 Serial number of the low or high pressure stage 10 Year of construction of the low or high pressure stage 11 Weight of the low...

Page 22: ...late each is attached on the left and the right side of the foot bearing casing and to the air suction branch of the high pressure stage 2 9 Periodic check of the pressure vessels The pressure vessels...

Page 23: ...y helmet Fig 9 Attachment of loads on the crane hook Fig 10 Attachment angle If there are two or more suspension points the attachment angle of 45 must not be ex ceeded This prevents excessive loading...

Page 24: ...ust be checked periodically Suitable working materials and personal protective equipment must be kept in a perfect condition Only authorised personnel may remain in the vicinity of the Power2 when the...

Page 25: ...ar ear protection if the sound pressure level exceeds 85 dB A Wear ear protection Hazards due to hot surfaces Surfaces of the low pressure and high pressure stage attached parts and operating fluids l...

Page 26: ...sulation and for providing protection against contact with hot surfaces u Compliance with the instructions and specifications given by the en ginebuilder to protect against contact with hot surfaces...

Page 27: ...commissioning and operation u Visually inspect your working environment before starting work u Remove any obstacles and objects littering the workplace u Check all pipes to and from the Power2 for da...

Page 28: ...otwear to protect against mechanical hazard and risk of fall ing Wear protective clothing WARNING Risk of falling When work is performed on the low pressure or high pressure stage there is a risk of f...

Page 29: ...work Safety during disassembly assembly maintenance and repair u Observe the procedures for set up service and inspection work and the inspection inter vals u Inform the operating staff before starti...

Page 30: ...aling vapours of operating materials and supplies or con tact with them may be harmful to health u Do not breathe in these substances and avoid contact with the skin u Ensure proper ventilation u Obse...

Page 31: ...ibres from insulation materials can have adverse effects on the health or cause irritations Unsuitable and combustible insulation materials are a fire hazard u Only use suitable and non combustible in...

Page 32: ...g 11 Swivel lifting eye example Thread M Length L Minimum load limit Quantity M12 min 15mm max 20mm 700kg 2 Table 7 Swivel lifting eyes Lifting gear with a sufficient load limit must be used for remov...

Page 33: ...st be transported and fitted separately Fig 12 Suspension of complete high pressure stage u Remove insulation u Disconnect all gas air water and oil pipes in accordance with the enginebuilder s instru...

Page 34: ...ts of the bearing casing and one lifting gear to the support u Check that the orifices specified for the high pressure stage are installed in the two oil supply pipes u Check that the gaskets have bee...

Page 35: ...ure and high pressure stage must be pre lubricated in order to avoid bearing damage caused by dry running u Adhere to the admissible oil pressure range see Table 12 Oil pressure range 38 An electrical...

Page 36: ...k of oil leakage during standstill The following measures are recommended for reducing the risk of oil leakage during stand still Reduction of the pressure in the bearing space by a means of an approp...

Page 37: ...e or property can be caused by dirt and solid ma terial particles in the oil u For the initial commissioning phase and after all service work flush the complete lubricating system with warm oil u Use...

Page 38: ...speed oil pressure and charging pressure at various engine performances u Measure the exhaust gas temperature before and after the turbine u Measure the air temperature before and after the compresso...

Page 39: ...fter the turbine for combustion residues or wa ter residues and clean it Remove any foreign objects that may be present u Check and clean filter silencer or air supply line and remove any foreign obje...

Page 40: ...easuring point The measuring point M is at the oil supply channel of the high and low pressure stage that is not used for the oil supply Power2 Status Engine Status Low pressure and high pressure stag...

Page 41: ...il temperature at the outlet Toil inlet C 850 Admissible 90 150 Temporarily admissible 1 h Alarm 90 95 150 155 Not admissible stop engine 95 155 Not admissible preheat oil prior before start 30 Table...

Page 42: ...tem consists of a sensor 01 with integrated cables 02 05 an electronic unit 04 and a plug 06 The sensor operates according to the eddy current prin ciple and is installed in a radial direction in rela...

Page 43: ...ormance immediately until the maximum speed of all low and high pressure stages no longer exceeds 70 of nBmax u If the engine cannot be stopped it can continue to be driven with this reduced engine pe...

Page 44: ...3 Speed measurement Copyright 2022 ABB All rights reserved HZTL4063_EN Rev F March 2022 5 3 5 Replacing the speed measurement system Removing the speed measurement system Fig 16 Dimension X u Measure...

Page 45: ...pyright 2022 ABB All rights reserved HZTL4063_EN Rev F March 2022 Installing the speed measurement system Fig 18 Setting dimension X 1 Set speed sensor 86505 in the plate 86507 to dimension X 2 Secure...

Page 46: ...TL4063_EN Rev F March 2022 Fig 19 Control dimension S 3 Secure plate with wedge lock washer 86508 and socket screw 86510 Observe tighten ing torque 4 Adjust dimension X until S 0 mm is reached 5 Posit...

Page 47: ...nce of 1 metre from the low pressure and high pressure stage The highest value of the emission sound pressure level1 reaches a maximum of 105 dB A near the compressor end compressor casing filter sile...

Page 48: ...harsh envir onmental conditions poor fuel quality or high system vibrations can lead to untimely machine damage even if the prescribed service intervals are ob served u Agree on a specific service in...

Page 49: ...ecifications on the rating plate The following work must be carried out by a Turbo Systems service station Replacement of the bearing parts Replacement of the turbine and the compressor 6 2 6 Entries...

Page 50: ...rts and replacing the non rotating components exposed to hot gas A decisive role is played by various influencing parameters which in extreme cases can drastically reduce the replacement interval of t...

Page 51: ...m specific operating conditions combustion quality exhaust gas composition Atmospheric humidity after the intercooler For bearing parts Lubricating oil quality oil filtering oil condition oil monitori...

Page 52: ...tate LP compressor 25 100 h Engine load 50 100 HP compressor HP turbine stage 80 200 h Engine load 25 LP turbine stage LP filter silencer2 500 h Engine stopped Table 15 Maintenance intervals 1 If the...

Page 53: ...he contamination of the compressor stage compressor wheel and diffuser depends on the degree of purity of the sucked in air Deposits can form in the flow channels if salt oil mist or dust are sucked i...

Page 54: ...alt water but only pure water for cleaning CAUTION Volume of water Uncontrolled volumes of water can damage the pressure stages and the en gine u Never connect the water line without the orifice speci...

Page 55: ...u Trigger water injection according to the instructions of the enginebuilder u Observe water pressure before connection to pressure stage u Operate engine for at least five additional minutes after cl...

Page 56: ...els with low ash sulphur sodium and vanadium contents The fuel must also be correctly stored prepared and handled Turbo Systems recommends using fuels with a mass ratio of vanadium to sodium of less t...

Page 57: ...ter Thermal shock Spalling of contamination due to the temperature differential CAUTION Corrosion and deposits when cleaning Salt water and cooling water treatment substances damage and adversely affe...

Page 58: ...inlet in the LP stage N m2 Engine load Max gas inlet temperature when starting cleaning C Holding time at reduced load min 850 9500 2500 3200 800 25 430 10 Table 18 Operating point for turbine cleanin...

Page 59: ...in the low pressure stage during cleaning u Switch the 3 way valve during cleaning from scavenging air to water supply u Carry out the cleaning process with cleaning parameters according to the specif...

Page 60: ...he cleaning process If the load is too low water can collect in the gas outlet casing Indications for this are a sudden severe drop in the low pressure stage speed or a very large increase in the gas...

Page 61: ...essure stage Rotor unbalance Contact a Turbo Systems service sta tion Turbine or compressor damaged Bearing damaged Table 24 Malfunctions when starting Vibrations Rubbing of rotating parts Normal beha...

Page 62: ...a Turbo Systems service sta tion Change of operating state of high pressure stage Check the operating point of the high pressure stage Pipes Defects such as leaks in the ex haust gas pipes or charge a...

Page 63: ...ture too high Engine performance and engine speed unchanged Possible causes Remedy Engine Malfunction in the injection system Repair or contact manufacturer Low pressure or high pressure stage Insuffi...

Page 64: ...er silencer contaminated there fore pressure drop too high Clean Compressor turbine contaminated Compressor turbine damaged Contact a Turbo Systems service sta tion Exhaust gas back pressure too high...

Page 65: ...on gases Correct the influx of ventilation gases in accordance with the enginebuilder s in structions Table 34 Malfunctions during operation Compressor 1 contamination Reduced fatigue strength of the...

Page 66: ...ntinuously or periodic ally their components may be damaged u Gradually reduce the engine load u Have the cause clarified and remedied immediately by a Turbo Systems service station u Have parts asses...

Page 67: ...ing Foreign object in the pressure stage Table 37 Malfunctions when stopping Runout noises Runout time too short Possible causes Remedy Low pressure or high pressure stage Pressure stage contaminated...

Page 68: ...ark the casing position for assembly Tightening torques for components The specified tightening torques of the bolted connections must be observed Tightening torques for assembly devices Unless otherw...

Page 69: ...on of the assembly devices Not all assembly devices are marked with a part number Identification is guaranteed by the tool list This list is enclosed with the toolbox WARNING Servicing the assembly de...

Page 70: ...ch 2022 9 3 Weights of assemblies The specified weights of the individual parts or assemblies are rounded up standard values Fig 21 Overview of assemblies Designation Weight kg 01 Air suction branch 9...

Page 71: ...bellows u Disconnect the air line in accordance with the enginebuilder s instructions u Dismantle insulation as far as necessary u If present Disconnect supply line for compressor cleaning from air s...

Page 72: ...pper area 2 Unplug cable connector 86515 and fix speed measurement cable in wall insert 3 Use three press off screws 90900 to press off the wall insert 77000 until the lifting device can be fitted Fig...

Page 73: ...ly 9 5 Removing the wall insert Copyright 2022 ABB All rights reserved HZTL4063_EN Rev F March 2022 Fig 25 Removing wall insert 3 8 Fit support angle 90450 with screws 90658 washers 72003 and nuts 720...

Page 74: ...30 to compressor casing 72000 with screws 90658 2 Fit two plates 90031 and secure with plate 90032 screw 90656 and nut 90432 3 Secure lifting gear to swivel lifting eye 90657 and attach compressor cas...

Page 75: ...ing 42010 2 Loosen and remove the screws 42099 3 Fit bracket 90030 and fit swivel lifting eye 90657 to cartridge group with screws 90900 4 Move in three plates 90031 5 To secure fit plate 90032 with s...

Page 76: ...of the cartridge group u The cover must be on a level surface u The cover may not be used to transport the cartridge group Fig 29 Moving out cartridge group 3 9 Lower the cartridge group into the hold...

Page 77: ...assembly 9 8 Removing the nozzle ring Copyright 2022 ABB All rights reserved HZTL4063_EN Rev F March 2022 9 8 Removing the nozzle ring Fig 31 Removing the nozzle ring 1 Loosen and remove screws 56017...

Page 78: ...Serious damage to engines or property can be caused by clearances outside the tolerance and excessively worn parts u Have the components assessed and if necessary replaced by a Turbo Systems service s...

Page 79: ...ed HZTL4063_EN Rev F March 2022 9 10 Installing the nozzle ring Fig 33 Installing the nozzle ring Part number Thread and tightening torque 56017 M8 Tx40 25 Nm Table 42 Tightening torque 56017 1 Fit no...

Page 80: ...11 Installing the cartridge group Fig 34 Installing O rings u Fit new O rings 42017 42018 Fig 35 Installing the cartridge group 1 1 Clean slots for lamellar rings 64001 and fit new lamellar rings Arra...

Page 81: ...3_EN Rev F March 2022 Fig 36 Installing the cartridge group 2 Part number Thread and tightening torque 42099 M12x80 80 Nm Table 43 Tightening torque 42099 5 Fit a screw 42099 as a safeguard 6 Remove s...

Page 82: ...on is out of tolerance the cartridge group has not been correctly installed and can be the cause of serious damage to the ma chine or property u Remove and reinstall the cartridge group u Always repla...

Page 83: ...torque 61090 1 Application with adapter 90249 and special key 90250 see below 1 Fit a new O ring 42012 2 Secure lifting gear to swivel lifting eye 90657 and insert compressor casing Installation of br...

Page 84: ...s that are difficult to access and observe the reduced torque 9 13 Installing the wall insert Fig 39 Installing the wall insert 1 1 Fit bracket 90030 Installation of bracket see Fig 24 Removing wall i...

Page 85: ...nstalling the wall insert 2 Part number Thread and tightening torque 72002 M12x95 50 Nm Table 46 Tightening torque 72002 6 Fit a nut 72004 as a safeguard 7 Remove bracket 90030 8 Slide in wall insert...

Page 86: ...rt number Thread and tightening torque 72004 M12 120 Nm Table 47 Tightening torque 72004 1 Remove lock nut 72004 2 Loop around air suction branch and secure to air line in such a way that the bellows...

Page 87: ...The following tightening torques Nm must be observed for the designated bolted connec tions Part number Thread and tightening torque 42099 M12x80 80 Nm 56017 M8 Tx40 25 Nm 61090 M12 120 Nm 61090 nuts...

Page 88: ...the alarm and depending on the situation stop the engine u Seal the oil leak u Soak up oil and dispose of in an environmentally compatible manner Wear safety gloves to protect against thermal hazards...

Page 89: ...are required are not part of the scope of delivery of Turbo Systems and must be manufactured by the operator on the basis of the drawing see Fig 43 Cover plate gasket and sleeves 87 Parts required 1...

Page 90: ...099 1 Remove air suction branch with bellows wall insert compressor casing and cartridge group 2 Close opening in bearing casing with gasket 02 and cover plate 01 3 Secure cover plate 01 with spacer s...

Page 91: ...udes cleaning and applying preservative oil to the relevant components 11 3 Process for taking out of operation Different measures are required depending on the process used to take the low pressure a...

Page 92: ...rm the customer of the presence of such substance s with sufficient information available to the supplier RoHS2 Directive 2011 65 EC in English only The EU Directive 2011 65 EC recast restricts the us...

Page 93: ...aluminium and bearing brass Further components are Non metallic materials filter components of felt and polyethylene lubricants engine oil electronic parts speed sensor and associated components u Dis...

Page 94: ...model variants are not taken into account in this document contact an Turbo Systems Service Station u Dispose of placed and unusable parts in an environmentally friendly and professional manner in acc...

Page 95: ...1 21002 32189 32102 32190 32001 32105 42086 32106 32101 32003 32118 42302 25000 Available within the spare part set HZTL443386 Mod A Part no Designation 21000 Turbine 21002 Piston ring 21007 Damping w...

Page 96: ...ustrations Copyright 2022 ABB All rights reserved HZTL4063_EN Rev F March 2022 Cartridge 64001 10900 42099 42010 Available within the spare part set HZTL443552 Mod A Part no Designation 10900 Cartridg...

Page 97: ...iffuser 64002 64000 42164 42163 42015 42011 42306 42700 42305 42008 42300 Available within the spare part set HZTL443553 Mod A Part no Designation 42008 Socket screw 42011 O ring 42015 Sealing cover 4...

Page 98: ...reserved HZTL4063_EN Rev F March 2022 Bearing casing 42009 42013 42049 42043 42001 42018 42017 42012 Available within the spare part set HZTL443387 Mod A Part no Designation 42001 Bearing casing 4200...

Page 99: ...9 61004 51001 61050 56017 56001 Available within the spare part set HZTL443388 Mod A Part no Designation 51001 Gas inlet casing 51169 Screw plug 51229 Water supply pipe 51230 Angular screw coupling 51...

Page 100: ...t 2022 ABB All rights reserved HZTL4063_EN Rev F March 2022 Gas outlet casing 61073 61001 61036 61090 61052 Available within the spare part set HZTL443389 Mod A Part no Designation 61001 Gas outlet ca...

Page 101: ...040 86507 86508 86509 86510 86505 86516 77012 72003 72004 77000 Available within the spare part set HZTL443390 Mod A Part no Designation 72000 Compressor casing 72002 Stud 72003 Washer 72004 Hexagon n...

Page 102: ...pyright 2022 ABB All rights reserved HZTL4063_EN Rev F March 2022 Air inlet casing 82022 82300 82140 82142 82000 82007 HZTL443391 Mod A Part no Designation 82000 Air suction branch 82007 Screw plug 82...

Page 103: ...90450 Support 2 90426 Ring spanner 1 90657 Swivel lifting eyes 2 90900 Press off screw 3 90901 Press off screw 3 90913 Press off screw 4 90658 Hexagon head screw 4 90656 Hexagon head screw 1 90662 Hex...

Page 104: ...g dimension X 43 Fig 19 Control dimension S 44 Fig 20 Load time chart 56 Fig 21 Overview of assemblies 68 Fig 22 Removing the air suction branch 69 Fig 23 Removing wall insert 1 70 Fig 24 Removing wal...

Page 105: ...during operation Lubricat ing oil pressure too low 60 Table 27 Malfunctions during operation Power2 LP speed reductions 60 Table 28 Malfunctions during operation Power2 HP speed reductions 60 Table 29...

Page 106: ...l Power2 850 M High pressure stage Tables Copyright 2022 ABB All rights reserved HZTL4063_EN Revision F March 2022 Table 57 98 Table 58 99 Table 59 100 Table 60 Customer tool set 90000 101 Page 104 10...

Reviews: