background image

T E C H N O L O G Y

F O R

T H E

W E L D E R ´ S

W O R L D .

Z

E

R

T I

F I

Z I E R T E S

Q M - S Y S

T

E

M

DIN EN

ISO 9001

www.binzel-abicor.com

DE

Betriebsanleitung 

/


EN

Operating instructions 

/


FR

Mode d’emploi 

/


FI

Käyttöohjeet

/ HU

Kezelési útmutató 

/ IT

Istruzioni per l’uso 

PL

Instrukcja użytkowania

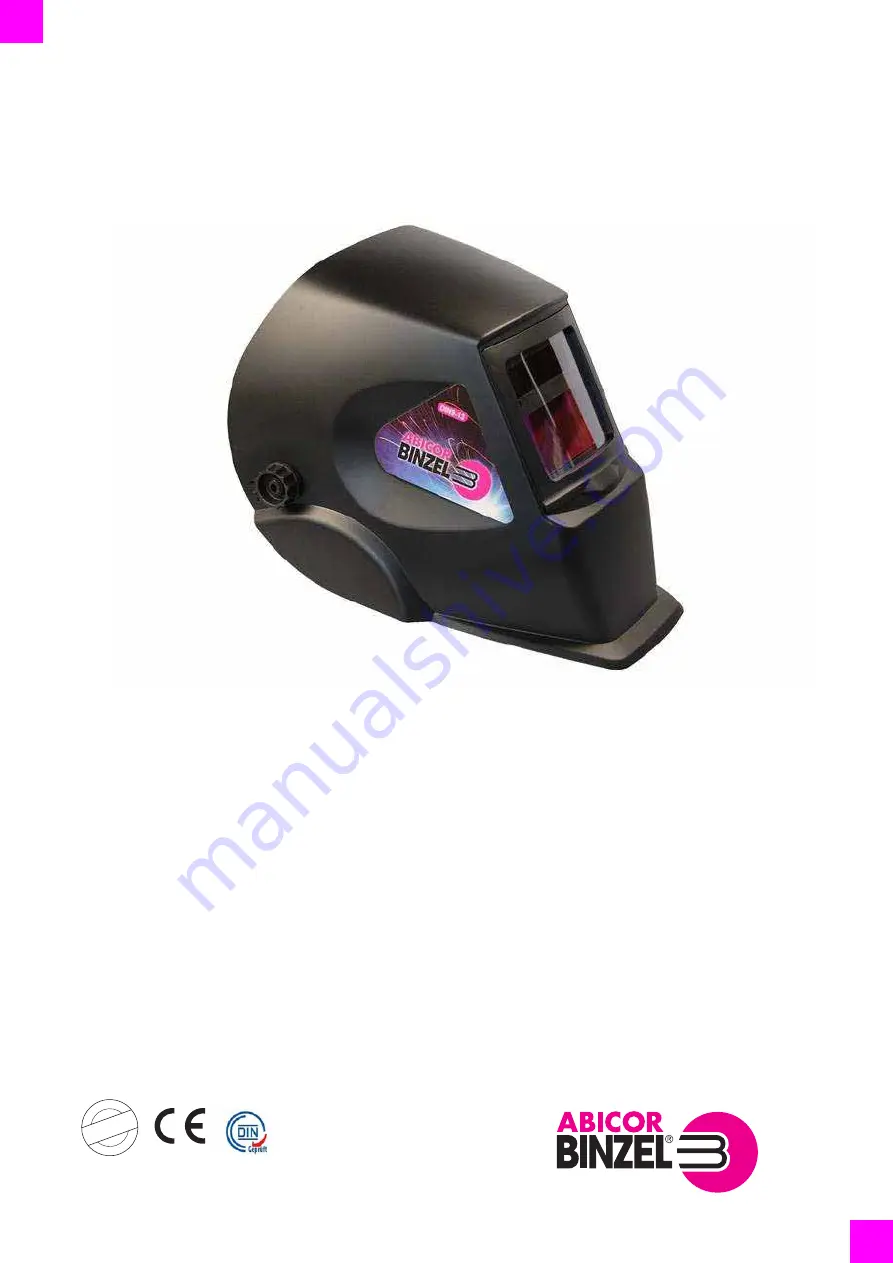
ADF 600S

DE

Automatik- Schweißhelm

EN

Automatic Welding Helme

FR

Casque de soudage automatique

FI

Automaattimaski

HU

Automata hegesztő fejpajzs

IT

Maschera di saldatura automatica

PL

Automatyczna przyłbica spawalnicza

Summary of Contents for ADF 600S

Page 1: ...eitung EN Operating instructions FR Mode d emploi FI Käyttöohjeet HU Kezelési útmutató IT Istruzioni per l uso PL Instrukcja użytkowania ADF 600S DE Automatik Schweißhelm EN Automatic Welding Helme FR Casque de soudage automatique FI Automaattimaski HU Automata hegesztő fejpajzs IT Maschera di saldatura automatica PL Automatyczna przyłbica spawalnicza ...

Page 2: ...rnschild DE 5 3 Produktbeschreibung DE 6 3 1 Technische Daten DE 6 3 2 Typenschild DE 7 3 2 1 Automatik Schweißhelm DE 7 3 2 2 Frontscheibe DE 7 3 2 3 Innere Abdeckscheibe DE 7 3 3 Verwendete Zeichen und Symbole DE 8 4 Lieferumfang DE 8 4 1 Transport DE 8 4 2 Lagerung DE 8 5 Funktionsbeschreibung DE 8 6 Inbetriebnahme DE 9 6 1 Schutzfolie entfernen Vorsatzscheiben austauschen DE 9 6 2 Kopfband ein...

Page 3: ...ung gewarnt Die verwendeten Sicherheitshinweise weisen auf konstruktiv nicht vermeidbare Restrisiken hin die beachtet und befolgt werden müssen Ein Nichtbeachten dieser Sicherheitshinweise kann zur Gefahr für das Leben Gesundheit von Personen Umweltschäden oder zu Sachschäden führen Das Produkt ist nur in einwandfreiem Zustand unter Beachtung der Betriebsanleitung zu betreiben Für Schäden die durc...

Page 4: ...en nur von Fachkräften durchgeführt werden Eine Fachkraft ist eine Person die aufgrund ihrer fachlichen Ausbildung Kenntnisse und Erfahrungen die ihr übertragenen Arbeiten beurteilen und mögliche Gefahren erkennen kann In Deutschland siehe TRBS 1203 Halten Sie andere Personen vom Arbeitsbereich fern Beachten Sie die Arbeitssicherheitsvorschriften des jeweiligen Landes Sorgen Sie für eine gute Bele...

Page 5: ...s das Verdunkelungsvisier Ihre Augen entsprechend der Schweiß oder Schneidaufgabe schützt 2 Tragen Sie immer Sicherheitsbrillen die nach CE ANSI CSA oder AS NZS zertifizieren sind wenn Sie diesen Helm verwenden Die vordere Abdeckung d h das vordere stoßfeste Visier KANN ZERBRECHEN und bietet KEINEN speziellen Schutz gegen herumfliegende Teile Spritzer und Sprays 3 Durch Beschädigung und Kratzer wi...

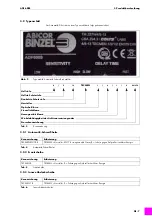
Page 6: ... Transport Temperatur der Umgebungsluft 5 C bis 55 C 23 F bis 131 F Tab 1 Umgebungsbedingungen Transport und Lagerung Optische Klasse 1 2 1 2 Sichtfeld 98x44 mm 3 86 x1 73 Filtergröße 110x90 mm 4 33 x3 54 x0 35 Lichtbogensensor 2 Hellstufe DIN 4 Schutzstufe DIN 9 bis DIN 13 Schutzsteuerung Extern variabler Schutz Ein Aus Vollautomatisch Empfindlichkeitssteuerung Einstellbar niedrig hoch UV IR Schu...

Page 7: ...Optische Klasse Steuerlichtklasse Homogenitätsklasse Winkelabhängigkeit des Lichttransmissiongrades Normkennzeichnung Tab 3 Kennzeichnung Kennzeichnung Erläuterung TECMEN EN175 B TECMEN Hersteller EN 175 angewandte Norm B Schutz gegen Aufprall mit mittlerer Energie Tab 4 Automatik Schweißhelm Kennzeichnung Erläuterung TECMEN B TECMEN Hersteller B Schutz gegen Aufprall mit mittlerer Energie Tab 5 F...

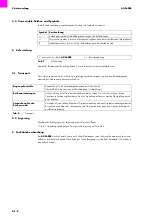
Page 8: ...er wieder in den hellen Zustand Symbol Beschreibung Aufzählungssymbol für Handlungsanweisungen und Aufzählungen Querverweissymbol verweist auf detaillierte ergänzende oder weiterführende Informationen 1 Handlungsschritt e im Text die der Reihenfolge nach durchzuführen sind Automatik Schweißhelm ADF 600S Betriebsanleitung Tab 7 Lieferumfang Eingangskontrolle Kontrollieren Sie die Vollständigkeit an...

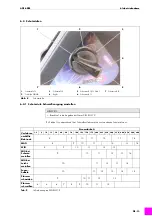
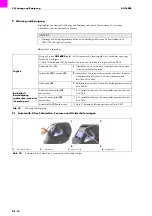
Page 9: ...ue ersetzen 2 Automatik Filter 6 entnehmen dabei Befestigungsclips nach oben und unten drücken Folie entfernen oder Vorsatzscheibe 4 durch eine neue ersetzen 3 Automatik Filter 6 wieder in ADF 600S 5 einsetzen 4 Vorsatzscheibe 2 in Halterahmen 1 einsetzen 5 Halterahmen 1 inkl Vorsatzscheibe mit vier Punkten in ADF 600S 5 einrasten lassen 1 Halterahmen 2 Äußere Vorsatzscheibe 3 Reglerkabel 4 Innere...

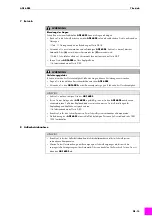
Page 10: ...n Brechen Sie die Schweißarbeiten mit dem ADF 600S sofort ab und beheben Sie die auftretenden Störungen Tab 11 Störungen und deren Behebung auf Seite DE 18 Verwenden Sie nur einen intakten ADF 600S Passen Sie den ADF 600S auf Ihre Kopfgröße an HINWEIS Achten Sie auf den richtigen Sitz des ADF 600S Testen Sie das Anliegen des ADF 600S regelmäßig in dem Sie den ADF 600S anheben und wieder absetzen S...

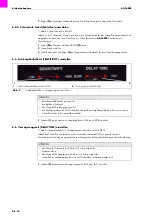
Page 11: ...1 Kunststoffmuttern 2 lösen und Kopffixierung 1 in Pfeilrichtung hin und her bewegen Ermitteln Sie dabei Ihren individuellen Abstand 2 Kunststoffmuttern 2 fest ziehen 1 Kopfband 2 Haltestift Abb 5 Kopfhöhe einstellen 2 1 1 Kopffixierung 2 Kunststoffmutter 2 Stk Abb 6 Abstand der Augen zur Schweißmaske einstellen 2 1 HINWEIS Um eine gleichmäßige Abdunkelung zu gewährleisten achten Sie auf einen gle...

Page 12: ...raus drücken 2 Haltestift 1 in einer der drei Winkeleinstellungen einrasten lassen 3 Kunststoffmuttern 2 fest ziehen 1 Haltestift 2 Kunststoffmutter 2 Stk Abb 7 Schwenkanschlag einstellen 2 1 HINWEIS Um eine gleichmäßige Abdunkelung zu gewährleisten achten Sie auf eine einheitliche Winkeleinstellung beider Seiten ...

Page 13: ...stufe 12 Abb 8 Schutzstufen 2 3 5 1 6 7 4 HINWEIS Beachten Sie die Angaben der Norm DIN EN 379 Stromstärke A Verfahren 1 5 6 10 15 30 40 60 70 100 125 150 175 200 225 250 300 350 400 450 500 600 umhüllte Elektrode 8 9 10 11 12 13 14 MAG 8 9 10 11 12 13 14 WIG 8 9 10 11 12 13 MIG bei Schwer metallen 9 10 11 12 13 14 MIG bei Leicht metallen 10 11 12 13 14 Fugen hobeln 10 11 12 13 14 15 Plasma schnei...

Page 14: ...AY TIME einstellen Abb 9 Lichtempfindlichkeit Verzögerungszeit einstellen auf Seite DE 14 Sobald das Schweißen unterbrochen wird wechselt der Automatik Filter von dunkel auf hell Die voreingestellte Verzögerungszeit gleicht das Nachglühen auf dem Werkstück nach dem Schweißen aus 1 Schalter 2 auf gewünschte Verzögerungszeit SLOW oder FAST einstellen 1 Schalter Lichtempfindlichkeit SENSITIVITY 2 Ver...

Page 15: ...lichen Korrektionsbrillen unter dem ADF 600S Verwenden Sie den ADF 600S nur bei Raumtemperatur gegen Teilchen hoher Geschwindigkeit HINWEIS Achten Sie auf den richtigen Sitz des ADF 600S Testen Sie das Anliegen des ADF 600S regelmäßig in dem Sie den ADF 600S anheben und wieder absetzen Sollte das Kopfband dabei verrutschen passen Sie die Einstellungen für Kopfumfang und Kopfhöhe entsprechend an 6 ...

Page 16: ...erfläche mit einem weichen Tuch abwischen Verwenden Sie keine starken Lösungsmittel Solarzellen 2 Sensoren 3 2 Solarzellen Sensoren mit Brennspiritus und einem sauberen Tuch abwischen Wischen Sie mit einem trockenen und fusselfreien Tuch nach Helmschale 4 3 Helmschale mit weichen Tuch und Seifenlauge abwischen und desinfizieren Bei Bedarf Beschädigung gebrochen zerkratzt schmutzig etc Äußere Vorsa...

Page 17: ...hritte in der Reihenfolge der folgenden Bilder aus 1 ADF 600S 2 Automatik Filter 3 Reglerkabel Abb 11 Automatik Filter austauschen 2 1 3 HINWEIS Achten Sie auf die korrekte Position des Reglerkabels 3 Das Reglerkabel 3 darf nicht eingeklemmt sein Montieren Sie die Bauteile in umgekehrter Reihenfolge ...

Page 18: ...ie Betriebsanleitungen der schweißtechnischen Komponenten wie z B Stromquelle Schweißbrenner System Umlaufkühlaggregat usw Störung Ursache Behebung Unregelmäßige Abdunkelung Das Kopfband wurde nicht gleichmäßig eingestellt Stellen Sie das Kopfband genau ein und achten Sie auf einen gleichmäßigen Abstand der Augen zur Filterlinse 6 2 Kopfband einstellen auf Seite DE 10 6 3 Kopfumfang einstellen auf...

Page 19: ...en oder den Automatik Filter aus 6 1 Schutzfolie entfernen Vorsatzscheiben austauschen auf Seite DE 9 9 2 Automatik Filter austauschen auf Seite DE 17 Das Umgebungslicht ist unzureichend Sorgen Sie für bessere Umgebungsbeleuchtung Die Schutzstufe ist falsch eingestellt Stellen Sie die Schutzstufe erneut ein 6 4 Schutzstufen auf Seite DE 13 Schweißhelm rutscht Das Kopfband wurde nicht gleichmäßig e...

Page 20: ...EN 4 2 4 Classification of the warnings EN 4 2 5 Warning label EN 5 3 Product description EN 6 3 1 Technical data EN 6 3 2 Nameplate EN 7 3 2 1 Automatic welding helmet EN 7 3 2 2 Front screen EN 7 3 2 3 Inner cover screen EN 7 3 3 Signs and symbols used EN 8 4 Scope of delivery EN 8 4 1 Transport EN 8 4 2 Storage EN 8 5 Functional description EN 8 6 Putting into operation EN 9 6 1 Removing protec...

Page 21: ...ns The operating instructions warn you against unavoidable residual hazards for users third parties devices or other material property The safety instructions used which must be adhered to point out unavoidable design related residual hazards Non observance of these safety instructions may result in risks to the life or health of personnel environmental damage or material damage The product may on...

Page 22: ...e and due to their knowledge of the relevant standards are able to assess the tasks assigned to them and identify possible dangers in Germany see TRBS 1203 Keep other persons out of the work area Please observe the accident prevention regulations of the country in question Ensure good lighting of the work area and keep the work area clean Occupational health and safety regulations of the country i...

Page 23: ...ant welding or cutting operation 2 Always wear safety goggles that are certified in accordance with CE ANSI CSA or AS NZS when using this helmet The front cover i e the shock resistant visor at the front of the helmet MAY CRACK and does NOT offer special protection against projected parts spatter and spray 3 Damage and scratches will impair vision and significantly reduce impact protection To avoi...

Page 24: ...pping ambient temperature 5 C to 55 C 23 F to 131 F Tab 1 Ambient conditions for transport and storage Optical class 1 2 1 2 Visual field 98x44 mm 3 86 x1 73 Filter size 110x90 mm 4 33 x3 54 x0 35 Arc sensor 2 Light stage DIN 4 Protection level DIN 9 to DIN 13 Protection control External variable protection On Off Fully automatic Sensitivity control Adjustable low high UV IR protection Up to prote...

Page 25: ...l Manufacturer Visual class Control class Homogeneity class Angle dependency of the light transmission grade Standard name Tab 3 Marking Marking Explanation TECMEN EN175 B TECMEN Manufacturer EN 175 Standard used B Protection against impact with average power Tab 4 Automatic welding helmet Marking Explanation TECMEN B TECMEN Manufacturer B protection against impact with average power Tab 5 Front s...

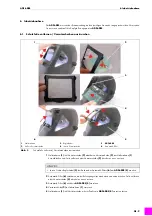
Page 26: ...s the automatic filter switches back to light condition Symbol Description Bullet symbol for instructions and lists Cross reference symbol refers to detailed supplementary or further information 1 Step s described in the text to be carried out in succession Automatic welding helmet ADF 600S Operating instructions Tab 7 Scope of delivery Goods in inspection Use the delivery note to check that every...

Page 27: ...a new one 2 Remove the automatic filter 6 by pushing the fastener clips upward and downward Remove the film or replace the viewing pane 4 with a new one 3 Insert the automatic filter 6 back into the ADF 600S 5 4 Insert the viewing pane 2 in the retaining frame 1 5 Click the retaining frame 1 incl viewing pane with four points in the ADF 600S 5 1 Retaining frame 2 Outside viewing pane 3 Control cab...

Page 28: ... ADF 600S can damage the eyes Immediately stop welding work with the ADF 600S and resolve the malfunctions that occurred Tab 11 Troubleshooting on page EN 18 Only use an intact ADF 600S Adjust the ADF 600S to your head size NOTICE Ensure the proper seating of the ADF 600S Test the seating of the ADF 600S regularly by lifting and reseating the ADF 600S If the head band slips in the process adjust t...

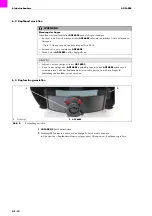
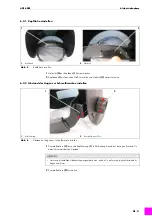
Page 29: ...to the welding mask 1 Loosen the plastic nuts 2 and move the head fixing 1 back and forth in the direction of the arrows Determine your individual distance by doing this 2 Tighten the plastic nuts 2 1 Head band 2 Positioning pin Fig 5 Adjusting head height 2 1 1 Head fixing 2 2 plastic nuts Fig 6 Adjusting the distance of the eyes to the welding mask 2 1 NOTICE In order to ensure uniform darkening...

Page 30: ...ts 2 and press the positioning pin 1 out 2 Click the positioning pin 1 into one of the three angle settings 3 Tighten the plastic nuts 2 1 Positioning pin 2 2 plastic nuts Fig 7 Adjusting the swivelling stop 2 1 NOTICE In order to ensure uniform darkening ensure uniform angle adjustment on both sides ...

Page 31: ...otection level 11 7 Protection level 12 Fig 8 Protection levels 2 3 5 1 6 7 4 NOTICE Observe the information in the standard DIN EN 379 Current intensity A Procedure 1 5 6 10 15 30 40 60 70 100 125 150 175 200 225 250 300 350 400 450 500 600 Coated electrode 8 9 10 11 12 13 14 MAG 8 9 10 11 12 13 14 TIG 8 9 10 11 12 13 MIG for heavy metals 9 10 11 12 13 14 MIG for light metals 10 11 12 13 14 Gougi...

Page 32: ...ity SENSITIVITY 1 Set the switch 1 to the desired LOW or HIGH light sensitivity 6 6 Adjusting the DELAY TIME Fig 9 Adjusting the light sensitivity delay on page EN 14 As soon as the welding is stopped the automatic filter switches from dark to light The pre set delay time compensates for the after glow on the workpiece after welding 1 Set the switch 2 to the desired SLOW or FAST delay time 1 Light...

Page 33: ...oom temperature NOTICE Ensure the proper seating of the ADF 600S Test the seating of the ADF 600S regularly by lifting and reseating the ADF 600S If the head band slips in the process adjust the settings for head circumference and head height 6 Putting into operation on page EN 9 For the welding process please consider all components that are included in the welding system The ADF 600S may only be...

Page 34: ... 1 1 Wipe off the surface with a soft cloth Do not use any strong solvents Solar cells 2 sensors 3 2 Wipe off the solar cells sensors with methylated spirits and a clean cloth Then wipe off with a dry lint free cloth Helmet shell 4 3 Use a soft cloth and soapy water to wipe down and disinfect the helmet shell As needed in case of damage broken scratched dirty etc Replace outside viewing pane 2 6 1...

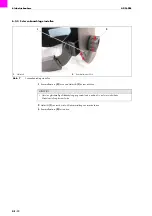
Page 35: ...he steps in the order of the following pictures 1 ADF 600S 2 Automatic filter 3 Control cable Fig 11 Replacing the automatic filter 2 1 3 NOTICE Ensure that the control cable 3 is in the correct position The control cable 3 must not be pinched in Mount all parts in the reverse sequence ...

Page 36: ...ot adjusted evenly Adjust the head band precisely and ensure equal distance of the eyes to the filter lens 6 2 Adjusting head band on page EN 10 6 3 Adjusting head circumference on page EN 10 The distance of the eyes to the filter lens is not even Automatic filter doesnotdarken or flickers The viewing pane is dirty or damaged Replace the viewing panes 6 1 Removing protective film replacing viewing...

Page 37: ...packaging to the necessary minimum The ability to recycle packaging materials is always considered during their selection The welding helmet slips The head band was not adjusted evenly Adjust the head band precisely and ensure equal distance of the eyes to the filter lens 6 2 Adjusting head band on page EN 10 6 3 Adjusting head circumference on page EN 10 Fault Cause Troubleshooting Tab 11 Trouble...

Page 38: ...3 Tuotekuvaus FI 6 3 1 Tekniset tiedot FI 6 3 2 Tyyppikilpi FI 7 3 2 1 Automaattimaski FI 7 3 2 2 Uloin suojalasi FI 7 3 2 3 Sisempi suojalasi FI 7 3 3 Käytetyt merkit ja symbolit FI 8 4 Toimitussisältö FI 8 4 1 Kuljetus FI 8 4 2 Varastointi FI 8 5 Toiminnan kuvaus FI 8 6 Käyttöönotto FI 9 6 1 Suojakalvon poistaminen suojalasin vaihtaminen FI 9 6 2 Pääpannan säätäminen FI 10 6 3 Pään ympärysmitan ...

Page 39: ...tä riskeistä Käytetyt turvallisuusohjeet viittaavat rakenteellisesti väistämättömiin riskeihin Nämä ohjeet on huomioitava ja niitä on noudatettava Näiden turvallisuusohjeiden noudattamatta jättäminen voi vaarantaa henkilöiden hengen tai terveyden sekä aiheuttaa ympäristö tai aineellisia vahinkoja Tuotetta saa käyttää ainoastaan teknisesti virheettömässä kunnossa ja käyttöohjetta noudattaen Valmist...

Page 40: ...Pidä muut henkilöt työskentelyalueen ulkopuolella Noudata kyseisen maan työturvallisuusmääräyksiä Varmista että työskentelyalueella on riittävä valaistus ja pidä työskentelyalue siistinä Kunkin maan työturvallisuussääntöjä Esim Saksassa Arbeitsschutzgesetz und Betriebssicherheitsverordnung työsuojalaki ja käyttöturvallisuusasetus Työturvallisuutta ja onnettomuuksien ehkäisyä koskevia sääntöjä 2 3 ...

Page 41: ...eja joilla on CE ANSI CSA tai AS NZS sertifiointi Hitsausmaskiin kuuluva iskunkestävä suojus SAATTAA RIKKOUTUA EIKÄ suojaa silmiä ilmaan sinkoutuvilta osilta roiskeilta eikä suihkeilta 3 Maskin vauriot ja naarmut rajoittavat näkyvyyttä ja heikentävät iskunkestävyyttä merkittävästi Vaurioitunut ja naarmuuntunut silmäsuojus on välittömästi vaihdettava uuteen loukkaantumisten välttämiseksi 4 Älä käyt...

Page 42: ...tila 20 70 C 4 158 F Työlämpötila kuljetus ympäröivän ilman lämpötila 5 55 C 23 131 F Taulukko 1 Kuljetuksen ja varastoinnin ympäristöolosuhteet Optinen luokitus 1 2 1 2 Näkökenttä 98 x 44 mm 3 86 x 1 73 Suodatinkoko 110 x 90 mm 4 33 x 3 54 x 0 35 Valokaarianturi 2 Kirkas taso DIN 4 Tummennus DIN 9 13 Tummennuksenohjaus Ulkoinen muuttuva suojaus Päälle pois Täysautomaattinen Herkkyydenohjaus Sääde...

Page 43: ...n suojataso Valmistaja Optinen luokitus Hajavalo Homogeenisuus Valonläpäisevyyden riippuvuus kulmasta Standardimerkintä Taulukko 3 Merkinnät Merkinnät Selitys TECMEN EN175 B TECMEN valmistaja EN 175 sovellettu standardi B suojaa keskivahvoilta iskuilta Taulukko 4 Automaattimaski Merkinnät Selitys TECMEN B TECMEN valmistaja B suojaa keskivahvoilta iskuilta Taulukko 5 Uloin suojalasi Merkinnät Selit...

Page 44: ...ksi hitsauksen päätyttyä Symboli Kuvaus Luetelmamerkki toimintaohjeissa ja luetteloissa Ristiviittausmerkki joka viittaa yksityiskohtaisiin täydentäviin tai muihin lisätietoihin 1 Merkitsee tekstissä toimintavaiheita jotka on suoritettava annetussa järjestyksessä Automaattimaski ADF 600S Käyttöohje Taulukko 7 Toimitussisältö Tarkastus saapumisen yhteydessä Tarkasta lähetyksen täydellisyys lähetysl...

Page 45: ...alvo tai vaihda suojalasi 2 uuteen 2 Irrota automaattisuodatin 6 ja paina samalla kiinnitysklipsejä ylös ja alaspäin Irrota kalvo tai vaihda suojalasi 4 uuteen 3 Aseta automaattisuodatin 6 takaisin paikoilleen ADF 600S 5 maskiin 4 Aseta suojalasi 2 kehykseen 1 1 Kehys 2 Ulompi suojalasi 3 Säätimen johto 4 Sisempi suojalasi 5 ADF 600S 6 Automaattisuodatin Kuva 3 Suojakalvon poistaminen suojalasin v...

Page 46: ... viallisella ADF 600S maskilla voi vahingoittaa silmiä Keskeytä välittömästi ADF 600S maskin käyttäminen hitsaustöissä ja korjaa ilmenneet viat Taulukko 11 Häiriöt ja niiden poisto sivulla FI 18 Käytä vain vahingoittumatonta ADF 600S maskia Säädä ADF 600S pääsi koon mukaan HUOMAUTUS Pidä huolta ADF 600S maskin istuvuudesta Testaa ADF 600S maskin istuvuus säännöllisesti nostamalla ADF 600S maski yl...

Page 47: ... 1 Löysää muovimuttereita 2 ja liikuta kiinnitintä 1 nuolen suuntaisesti edestakaisin Määritä sopiva etäisyys 2 Kiristä muovimutterit 2 1 Pääpanta 2 Tappi Kuva 5 Pään korkeuden säätäminen 2 1 1 Kiinnitin 2 Muovimutterit 2 kpl Kuva 6 Silmien ja maskin välin säätäminen 2 1 HUOMAUTUS Tarkista että molemmat silmät ovat samalla etäisyydellä suojalasista Näin varmistetaan suojalasin tasainen tummentumin...

Page 48: ...a 2 ja paina tappi 1 ulos 2 Anna tapin lukittua yhteen kolmesta kulmasäädöstä 1 3 Kiristä muovimutterit 2 1 Tappi 2 Muovimutterit 2 kpl Kuva 7 Kääntövasteen säätäminen 2 1 HUOMAUTUS Tarkista että molemmilla puolilla on sama kulmasäätö Näin varmistetaan suojalasin tasainen tummentuminen ...

Page 49: ...6 Tummuusaste 11 7 Tummuusaste 12 Kuva 8 Tummuusasteet 2 3 5 1 6 7 4 HUOMAUTUS Noudata standardin DIN EN 379 määräyksiä Virta A Menetelmä 1 5 6 10 15 30 40 60 70 100 125 150 175 200 225 250 300 350 400 450 500 600 Päällystetyt elektrodit 8 9 10 11 12 13 14 MAG 8 9 10 11 12 13 14 TIG 8 9 10 11 12 13 MIG raskasmetallit 9 10 11 12 13 14 MIG kevytmetallit 10 11 12 13 14 Hitsaussaumojen tasoittaminen 1...

Page 50: ...veen DELAY TIME asettaminen Kuva 9 Valoherkkyyden viiveen säätäminen sivulla FI 14 Kun hitsaaminen keskeytetään automaattisuodatin kirkastuu Ennalta määritetty viive vastaa työkappaleen jälkihehkua hitsaamisen päättymisen jälkeen 1 Valitse haluttu viive SLOW tai FAST kytkimen 2 avulla 1 Kytkin valoherkkyys SENSITIVITY 2 Viive DELAYTIME Kuva 9 Valoherkkyyden viiveen säätäminen 1 2 HUOMAUTUS HIGH ko...

Page 51: ... maskia ainoastaan huoneenlämmössä suojautuen nopeasti lentäviltä hiukkasilta HUOMAUTUS Pidä huolta ADF 600S maskin istuvuudesta Testaa ADF 600S maskin istuvuus säännöllisesti nostamalla ADF 600S maski ylös ja laskemalla se takaisin alas Jos pääpanta luiskahtaa pois paikoiltaan säädä sitä pään ympärysmitan ja korkeuden mukaan 6 Käyttöönotto sivulla FI 9 Huomioi hitsausprosessissa kaikki hitsausjär...

Page 52: ...lä liinalla Älä käytä vahvoja puhdistusaineita Aurinkokennot 2 anturit 3 2 Puhdista anturit ja aurinkokennot spriillä ja puhtaalla liinalla Pyyhi ne sen jälkeen kuivalla nukkaamattomalla pyyhkeellä Maskin kuori 4 3 Pyyhi ja desinfioi maskin kuori saippualiuokseen kostutetulla pehmeällä liinalla Tarvittaessa kun vahingoittunut säröinen naarmuinen likainen jne Vaihda ulompi suojalasi 2 6 1 Suojakalv...

Page 53: ...a vaiheet alla olevien kuvien mukaisessa järjestyksessä 1 ADF 600S 2 Automaattisuodatin 3 Säätimen johto Kuva 11 Automaattisuodattimen vaihtaminen 2 1 3 HUOMAUTUS Huomioi säätimen johdon 3 oikea asento Säätimen johto 3 ei saa jäädä puristuksiin Asenna osat päinvastaisessa järjestyksessä ...

Page 54: ...ei ole säädetty tasaisesti Säädä pääpanta tarkasti ja varmista että molemmat silmät ovat samalla etäisyydellä suodattimen lasista 6 2 Pääpannan säätäminen sivulla FI 10 6 3 Pään ympärysmitan säätäminen sivulla FI 10 Silmät eri etäisyydellä suodattimen lasista Automaatti suodatin ei tummene tai välkkyy Suojalasi on likainen tai vahingoittunut Vaihda suojalasi 6 1 Suojakalvon poistaminen suojalasin ...

Page 55: ...en yhteydessä käytettävän pakkausmateriaalin minimiin Pakkausmateriaalien valinnassa otetaan huomioon mahdollinen uusiokäyttö Hitsausmaski ei pysy paikallaan Pääpantaa ei ole säädetty tasaisesti Säädä pääpanta tarkasti ja varmista että molemmat silmät ovat samalla etäisyydellä suodattimen lasista 6 2 Pääpannan säätäminen sivulla FI 10 6 3 Pään ympärysmitan säätäminen sivulla FI 10 Häiriö Syy Ratka...

Page 56: ...t FR 4 2 5 Étiquette d avertissement FR 5 3 Description du produit FR 6 3 1 Caractéristiques techniques FR 6 3 2 Plaque signalétique FR 7 3 2 1 Casque de soudage automatique FR 7 3 2 2 Écran de protection frontale FR 7 3 2 3 Écran de protection intérieure FR 8 3 3 Signes et symboles utilisés FR 8 4 Matériel fourni FR 8 4 1 Transport FR 8 4 2 Stockage FR 8 5 Description des fonctions FR 8 6 Mise en...

Page 57: ...ques résiduels inévitables pour l utilisateur les tiers les dispositifs ou d autres biens matériels Les consignes de sécurité utilisées indiquent les risques résiduels inévitables qui doivent être observés et respectés Le non respect de ces consignes de sécurité peut entraîner un risque pour la vie et la santé de personnes et peut causer des dégâts sur l environnement ou des dommages aux biens Le ...

Page 58: ...mation ses connaissances et son expérience peut réaliser des interventions dans le respect des normes de sécurité en Allemagne voir TRBS 1203 Tenez les autres personnes à l écart de la zone de travail Respectez les prescriptions de prévention des accidents en vigueur dans le pays concerné Veillez à ce que la zone de travail soit bien éclairée et propre Règles du pays respectif relatives à la prote...

Page 59: ...ent vos yeux 2 Portez toujours des lunettes de protection certifiées conformes aux normes CE ANSI CSA ou AS NZS lorsque vous utilisez le casque La visière résistante aux chocs située sur la face avant du casque PEUT SE BRISER et n assure AUCUNE protection spéciale contre les pulvérisations ou les pièces et grattons projetés 3 Si la visière est endommagée ou rayée la visibilité s en trouve limitée ...

Page 60: ...R 6 Stockage en lieu clos température de l air ambiant Entre 20 C et 70 C entre 4 F et 158 F Température de fonctionnement transport température de l air ambiant Entre 5 C et 55 C entre 23 F et 131 F Tab 1 Conditions environnementales de transport et de stockage Classe optique 1 2 1 2 Champ de vision 98 x 44 mm 3 86 x1 73 Taille du filtre 110 x 90 mm 4 33 x3 54 x0 35 Capteur d arc 2 Niveau de lumi...

Page 61: ...létique du filtre de protection de soudage automatique 4 9 13 TECMEN 1 2 1 2 EN379 Niveau de luminosité Niveau de protection le plus clair Niveau de protection le plus foncé Fabricant Classe optique Classe de la lumière de commande Classe d homogénéité Dépendance angulaire du degré de transmission de la lumière Marquage conforme à la norme Tab 3 Marquage Marquage Explication TECMEN EN175 B TECMEN ...

Page 62: ...istance aux impacts de moyenne énergie Tab 6 Écran de protection intérieure Symbole Description Symbole d énumération pour les instructions de service et les énumérations Symbole de renvoi faisant référence à des informations détaillées complémentaires ou supplémentaires 1 Étapes énumérées dans le texte et devant être exécutées dans l ordre Casque de soudage automatique ADF 600S Mode d emploi Tab ...

Page 63: ...mplacez l écran de protection 2 2 Retirez le filtre automatique 6 en poussant les clips de fixations vers le haut et vers le bas Retirez le film ou remplacez l écran de protection 4 3 Replacez le filtre automatique 6 dans l ADF 600S 5 4 Placez l écran de protection 2 dans la cassette 1 1 Cassette 2 Écran de protection extérieure 3 Câble du régulateur 4 Écran de protection intérieure 5 ADF 600S 6 F...

Page 64: ... agrandir le serre tête AVERTISSEMENT Éblouissement Le soudage avec un ADF 600S défectueux peut endommager les yeux Cessez immédiatement les opérations de soudage à l aide de l ADF 600S et procédez à la résolution des problèmes Tab 11 Dépannage à la page FR 18 N utilisez l ADF 600S que s il est intact Ajustez l ADF 600S à la taille de votre tête AVIS Veillez à ce que l ADF 600S soit bien positionn...

Page 65: ...ez les écrous en plastique 2 puis tournez la fixation de la tête 1 dans le sens des flèches d avant en arrière Déterminez ainsi la distance qui vous convient 2 Serrez les écrous en plastique 2 fermement 1 Serre tête 2 Picot Fig 5 Régler la hauteur de tête 2 1 1 Fixation de la tête 2 Écrou en plastique x2 Fig 6 Régler la distance entre les yeux et le masque de soudage 2 1 AVIS Pour garantir un obsc...

Page 66: ... exerçant une pression 2 Bloquez la goupille butée 1 dans l une des trois positions de réglage de l angle 3 Serrez les écrous en plastique 2 fermement 1 Goupille butée 2 Écrou en plastique x2 Fig 7 Régler la butée de positionnement 2 1 AVIS Afin de garantir un obscurcissement uniforme veillez à ce que le réglage de l angle soit identique de chaque côté ...

Page 67: ...ion 9 4 Régulateur 5 Niveau de protection 10 sans fig 6 Niveau de protection 11 7 Niveau de protection 12 Fig 8 Niveaux de protection 2 3 5 1 6 7 4 AVIS Respectez les spécifications de la norme EN 379 Ampérage A Procédé 1 5 6 10 15 30 40 60 70 100 125 150 175 200 225 250 300 350 400 450 500 600 Électrode enrobée 8 9 10 11 12 13 14 MAG 8 9 10 11 12 13 14 TIG 8 9 10 11 12 13 MIG avec des métaux lour...

Page 68: ... sensibilité à la lumière temporisation à la page FR 14 Dès que le soudage est interrompu le filtre automatique passe de la teinte foncée à la teinte claire La temporisation définie permet d équilibrer l incandescence sur la pièce d œuvre après le soudage 1 Réglez l interrupteur 2 sur la temporisation souhaitée SLOW ou FAST 1 Interrupteur pour régler la sensibilité à la lumière SENSITIVITY 2 Tempo...

Page 69: ...rature ambiante pour vous protéger des particules à grande vitesse AVIS Veillez à ce que l ADF 600S soit bien positionné Testez l ajustement de l ADF 600S régulièrement en soulevant l ADF 600S et en le reposant Si le serre tête glisse ajustez les réglages du tour de tête et de la hauteur de tête selon les besoins 6 Mise en service à la page FR 9 Pour le processus de soudage observez tous les éléme...

Page 70: ...face à l aide d un chiffon doux N utilisez aucun solvant puissant Cellules solaires 2 capteurs 3 2 Essuyez les cellules solaires capteurs à l aide d un chiffon propre Passez ensuite un chiffon sec et non pelucheux Coque du casque 4 3 Essuyez et désinfectez la coque du casque avec un chiffon doux et une solution savonneuse En cas de besoin d endommagement cassé rayé sale etc Remplacez l écran de pr...

Page 71: ... suivant l ordre des illustrations suivantes 1 ADF 600S 2 Filtre automatique 3 Câble du régulateur Fig 11 Remplacer le filtre automatique 2 1 3 AVIS Veillez à ce que le câble du régulateur soit bien positionné 3 Le câble du régulateur 3 ne doit pas être coincé Assemblez les composants dans l ordre inverse ...

Page 72: ...sant de votre installation par exemple la source de courant le système de torche de soudage le groupe refroidisseur etc Problème Cause Solution Obscurcisseme nt irrégulier Le serre tête n a pas été réglé uniformément Ajustez le serre tête correctement et veillez à garder une distance uniforme entre les yeux et la lentille du filtre 6 2 Régler le serre tête à la page FR 10 6 3 Régler le tour de têt...

Page 73: ...filtre automatique 6 1 Retirer le film protecteur Remplacer les écrans de protection à la page FR 9 9 2 Remplacer le filtre automatique à la page FR 17 La lumière ambiante est insuffisante L éclairage ambiant doit être amélioré Le niveau de protection est mal réglé Procédez à nouveau au réglage du niveau de protection 6 4 Niveaux de protection à la page FR 13 Le casque de soudage glisse Le serre t...

Page 74: ...eztető táblák HU 5 3 Termékleírás HU 6 3 1 Műszaki adatok HU 6 3 2 Típustábla HU 7 3 2 1 Automata hegesztő fejpajzs HU 7 3 2 2 Külső előtétlemez HU 7 3 2 3 Belső előtétlemez HU 7 3 3 Alkalmazott jelölések és jelek HU 8 4 Szállítási terjedelem HU 8 4 1 Szállítás HU 8 4 2 Tárolás HU 8 5 Működés leírása HU 8 6 Üzembe helyezés HU 9 6 1 Védőfólia eltávolítása Előtétlemezek cseréje HU 9 6 2 Fejpánt beál...

Page 75: ...mélyre készülékre vagy más tárgyakra való maradék kockázattal kapcsolatban a kezelési útmutatóban történik figyelmeztetés Az alkalmazott biztonsági előírások a nem elkerülhető maradék kockázatokra utalnak figyelembe kell venni és be kell tartani őket Ezen biztonsági utasítások figyelmen kívül hagyása életveszélyes vagy egészségre káros lehet környezeti károkhoz vagy anyagi károkhoz vezethet A term...

Page 76: ...ámít az a személy aki a képzettsége ismeretei és tapasztalatai alapján a neki kiadott munkát meg tudja ítélni és fel tudja ismerni a lehetséges veszélyeket Németországban lásd TRBS 1203 Egyéb személyeket tartson távol a munkaterülettől Vegye figyelembe az egyes országokban érvényben lévő munkabiztonsági előírásokat Gondoskodjon a munkaterület jó megvilágításáról és tartsa tisztán a munkaterületet ...

Page 77: ...ladatnak megfelelő mértékben védi a szemét 2 A fejpajzs használatakor mindig viseljen CE ANSI CSA vagy AS NZS szerint minősített védőszemüveget Az elülső betét azaz az elülső ütésálló előtétlemez ELTÖRHET és nem nyújt SEMMILYEN speciális védelmet a szétrepülő darabok fröccsenések és permetek ellen 3 A sérülések és karcolások korlátozhatják a szabad kilátást és jelentősen csökkenthetik az ütésállós...

Page 78: ...vegő hőmérséklete 5 C és 55 C között 23 131 F 1 táblázat Környezeti feltételek szállítás és tárolás közben Optikai osztály 1 2 1 2 Látómező 98x44 mm 3 86 x1 73 Szűrőméret 110x90 mm 4 33 x3 54 x0 35 Elektromos ív érzékelő 2 Fényáteresztő képesség DIN 4 Védelmi szint DIN 9 DIN 13 Védelmi szint vezérlése Külső állítható védelmi szint Ki bekapcsolás Automatikus Érzékenységvezérlés Állítható alacsony m...

Page 79: ...Gyártó Optikai osztály Vezérlőfény osztály Homogenitási osztály A fényáteresztő képesség szögfüggősége Szabvány jelölése 3 táblázat Jelölés Jelölés Magyarázat TECMEN EN175 B TECMEN gyártó EN 175 alkalmazott szabvány B közepes energiájú becsapódás elleni védelem 4 táblázat Automata hegesztő fejpajzs Jelölés Magyarázat TECMEN B TECMEN gyártó B közepes energiájú becsapódás elleni védelem 5 táblázat K...

Page 80: ...szűrő ismét a magas fényáteresztő képességű állapotra vált Jel Leírás Felsorolásjel kezelési utasításokhoz és felsorolásokhoz Részletező kiegészítő vagy további információkra mutató hivatkozási jel 1 A megadott sorrendben végrehajtandó műveleti lépés ek ADF 600S automata hegesztő fejpajzs Használati útmutató 7 táblázat Szállítási terjedelem Ellenőrzés beérkezéskor A szállítólevél alapján ellenőriz...

Page 81: ... előtétlemezre 2 Vegye ki az automata szűrőt 6 ehhez a rögzítő kapcsokat nyomja felfele és lefele Távolítsa el a fóliát vagy cserélje ki az előtétlemezt 4 egy újra 3 Az automata szűrőt 6 helyezze be ismét az ADF 600S be 5 4 Helyezze be az előtétlemezt 2 a tartókeretbe 1 5 A tartókeretet 1 az előtétlemezzel együtt pattintsa be az ADF 600S be 5 négy ponton 1 Tartókeret 2 Külső előtétlemez 3 Szabályo...

Page 82: ...sel való hegesztés esetén szemkárosodás léphet fel Azonnal szakítsa meg az ADF 600S sel való hegesztést és küszöbölje ki az üzemzavarokat 11 táblázat Zavarok és azok megszüntetése a HU 18 oldalon Csakis ép ADF 600S t használjon Állítsa be saját fejméretére az ADF 600S t ÉRTESÍTÉS Ügyeljen az ADF 600S helyes illeszkedésére Rendszeresen próbálja ki az ADF 600S illeszkedését azzal hogy az ADF 600S t ...

Page 83: ...nyag csavaranyákat 2 és mozgassa a fejrögzítést 1 a nyíl által jelzett irányban ide oda Határozza meg az Önnek megfelelő távolságot 2 Szorítsa meg a műanyag csavaranyákat 2 1 Fejpánt 2 Tartócsap 5 ábra Fejmagasság beállítása 2 1 1 Fejrögzítés 2 Műanyag csavaranya 2 db 6 ábra A szemek és a hegesztőmaszk közötti távolság beállítása 2 1 ÉRTESÍTÉS Ahhoz hogy egyenlő elsötétítést biztosítson ügyeljen a...

Page 84: ...ki a tartócsapot 1 2 Pattintsa be a tartócsapot 1 a három szögbeállítás egyikébe 3 Szorítsa meg a műanyag csavaranyákat 2 1 Tartócsap 2 Műanyag csavaranya 2 db 7 ábra Billentő ütköző beállítása 2 1 ÉRTESÍTÉS Ahhoz hogy egyenlő elsötétítést biztosítson ügyeljen arra hogy mindkét oldalon ugyanakkora szöget állítson be ...

Page 85: ...11 es védelmi szint 7 12 es védelmi szint 8 ábra Védelmi szintek 2 3 5 1 6 7 4 ÉRTESÍTÉS Tartsa be a DIN EN 379 szabvány előírásait Áramerősség A Eljárás 1 5 6 10 15 30 40 60 70 100 125 150 175 200 225 250 300 350 400 450 500 600 Bevonatos elektróda 8 9 10 11 12 13 14 MAG 8 9 10 11 12 13 14 AWI 8 9 10 11 12 13 MIG nehézfém eknél 9 10 11 12 13 14 MIG könnyűfé meknél 10 11 12 13 14 Gyökfara gás 10 1...

Page 86: ...6 Késleltetési idő DELAY TIME beállítása 9 ábra Fényérzékenység késleltetési idő beállítása a HU 14 oldalon A hegesztés megszakításakor az automata szűrő azonnal átvált sötétről világosra Az előre beállított késleltetési idő a munkadarab hegesztés utáni utóizzásának felel meg 1 Állítsa a kapcsolót 2 igény szerint a SLOW vagy FAST késleltetési időre 1 Fényérzékenység SENSITIVITY kapcsoló 2 Késlelte...

Page 87: ...ségű darabkák elleni védekezésre ÉRTESÍTÉS Ügyeljen az ADF 600S helyes illeszkedésére Rendszeresen próbálja ki az ADF 600S illeszkedését azzal hogy az ADF 600S t felemeli és ismét leereszti Amennyiben eközben a fejpánt elcsúszik igazítsa meg a fejkörfogat és a fejmagasság szerinti beállításokat 6 Üzembe helyezés a HU 9 oldalon Vegye figyelembe a hegesztési folyamat során a hegesztőrendszerben lévő...

Page 88: ...a szűrő 1 1 Törölje le a felületét egy puha törlőkendővel Ne használjon erős oldószereket Napelemek 2 érzékelők 3 2 A napelemeket érzékelőket denaturált szesszel és egy tiszta törlőkendővel törölje le Ezt követően törölje át egy száraz szöszmentes törlőkendővel Pajzstest 4 3 A pajzstestet puha kendővel és szappanos vízzel törölje át és fertőtlenítse Szükség károsodás esetén törött karcolt szennyez...

Page 89: ...eleteket a következő ábrák sorrendje szerint 1 ADF 600S 2 Automata szűrő 3 Szabályozó kábel 11 ábra Automata szűrő cseréje 2 1 3 ÉRTESÍTÉS Ügyeljen a szabályozó kábel 3 helyes pozíciójára A szabályozó kábelnek 3 nem szabad becsípődnie Az alkatrészeket fordított sorrendben szerelje össze ...

Page 90: ...sználjon ÉRTESÍTÉS Vegye figyelembe a hegesztéstechnikai komponensek mint pl áramforrás hegesztőpisztoly rendszer hűtőaggregátor stb üzemeltetési utasításait is Zavar Ok Elhárítás Nem egyenletes elsötétítés A fejpánt beállítása nem egyenlő a két oldalon Állítsa be helyesen a fejpántot és ügyeljen arra hogy a szemek ugyanakkora távolságra legyenek a szűrő előtétlemezétől 6 2 Fejpánt beállítása a HU...

Page 91: ... az előtétlemezeket vagy az automata szűrőt 6 1 Védőfólia eltávolítása Előtétlemezek cseréje a HU 9 oldalon 9 2 Automata szűrő cseréje a HU 17 oldalon A háttérvilágítás elégtelen Gondoskodjon jobb világításról A védelmi szint hibásan lett beállítva Állítsa be újra a védelmi szintet 6 4 Védelmi szintek a HU 13 oldalon A hegesztő fejpajzs elmozdul A fejpánt beállítása nem egyenlő a két oldalon Állít...

Page 92: ...ci IT 6 3 2 Targhetta di identificazione IT 7 3 2 1 Maschera di saldatura automatica IT 7 3 2 2 Pannello anteriore IT 8 3 2 3 Piastra di copertura interna IT 8 3 3 Segni e simboli utilizzati IT 9 4 Contenuto della fornitura IT 9 4 1 Trasporto IT 9 4 2 Immagazzinamento IT 9 5 Descrizione del funzionamento IT 9 6 Messa in servizio IT 10 6 1 Rimozione della pellicola protettiva Sostituzione dei panne...

Page 93: ...zioni d uso contengono avvertimenti circa l esistenza di rischi residui inevitabili per operatori terzi apparecchi o altri beni Le avvertenze per la sicurezza rimandano a rischi residui strutturalmente inevitabili e devono essere osservate e rispettate La mancata osservanza di queste avvertenze per la sicurezza può rappresentare un pericolo per la vita e la salute delle persone o provocare danni a...

Page 94: ...le specializzato Per personale specializzato s intende una persona che grazie alla propria formazione alle proprie conoscenze ed esperienze nel settore è in grado di valutare i lavori conferitigli e riconoscere i potenziali pericoli In Germania vedi TRBS 1203 Tenere altre persone lontane dall area di lavoro Osservare le norme antinfortunistiche specifiche del rispettivo paese Provvedere a una buon...

Page 95: ...te protegga gli occhi in base al tipo di attività di saldatura o taglio 2 Indossare sempre gli occhiali di sicurezza certificati secondo CE ANSI CSA o AS NZS quando si utilizza questa maschera La copertura anteriore ovvero la visiera anteriore resistente agli urti PUÒ ROMPERSI e NON fornisce alcuna protezione speciale contro componenti volanti spruzzi e spray 3 Danni e graffi limitano la visibilit...

Page 96: ...previsto Attenersi alle condizioni ambientali per il trasporto e l immagazzinamento Tab 1 a pagina IT 6 Immagazzinamento in luogo chiuso a temperatura ambiente da 20 C a 70 C 4 F a 158 F Temperatura di funzionamento trasporto temperatura ambiente da 5 C a 55 C 23 F a 131 F Tab 1 Condizioni ambientali per il trasporto e l immagazzinamento Classe ottica 1 2 1 2 Campo visivo 98x44 mm 3 86 x1 73 Dimen...

Page 97: ... a elettrodo TIG c c e c a saldatura a impulsi TIG c c e c a MIG MAG saldatura a impulsi MIG MAG taglio al plasma saldatura al plasma scriccatura Tab 2 Dati tecnici Fig 2 Targhetta di identificazione del filtro di protezione di saldatura automatico 4 9 13 TECMEN 1 2 1 2 EN379 Grado di protezione in stato chiaro Grado di protezione più chiaro Grado di protezione più scuro Produttore Classe ottica C...

Page 98: ...iastra di copertura interna Marcatura Legenda TECMEN B TECMEN produttore B protezione contro gli urti con energia media Tab 5 Pannello anteriore Marcatura Legenda TECMEN 1 B TECMEN produttore B protezione contro gli urti con energia media Tab 6 Piastra di copertura interna ...

Page 99: ...hiaro a uno stato oscurato Al termine del processo di saldatura il filtro automatico torna nuovamente allo stato chiaro Simbolo Descrizione Simbolo per le istruzioni procedurali e gli elenchi Il simbolo di rimando rinvia a informazioni dettagliate integrative o supplementari 1 Passaggi operativi nel testo che devono essere eseguiti nell ordine indicato Maschera di saldatura automatica ADF600S Istr...

Page 100: ...llicola oppure sostituire il pannello frontale 2 con un pannello di ricambio 2 Rimuovere il filtro automatico 6 premendo i fermagli di fissaggio verso l alto e verso il basso Rimuovere la pellicola oppure sostituire il pannello frontale 4 con un pannello di ricambio 3 Inserire nuovamente il filtro automatico 6 nella ADF600S 5 1 Cornice di supporto 2 Pannello frontale esterno 3 Cavo di controllo 4 ...

Page 101: ...ngitesta AVVERTENZA Abbagliamento Saldare con una ADF600S difettosa può causare lesioni agli occhi Interrompere immediatamente le operazioni di saldatura con la ADF600S e correggere gli eventuali malfunzionamenti Tab 11 Anomalie e rimedi a pagina IT 19 Utilizzare solamente una ADF600S perfettamente integra Adattare la ADF600S alle dimensioni della propria testa AVVISO Prestare attenzione al corret...

Page 102: ...re i dadi in plastica 2 e spostare avanti e indietro il dispositivo di fissaggio per testa 1 nella direzione delle frecce Determinare la distanza individuale 2 Fissare i dadi in plastica 2 ruotandoli 1 Stringitesta 2 Perno di tenuta Fig 5 Regolazione dell altezza della testa 2 1 1 Dispositivo di fissaggio per testa 2 Dado in plastica 2 pz Fig 6 Impostazione della distanza degli occhi dalla mascher...

Page 103: ...ta 1 premendolo 2 Impostare il perno di tenuta 1 su una delle tre regolazioni dell angolo 3 Fissare i dadi in plastica 2 ruotandoli 1 Perno di tenuta 2 Dado in plastica 2 pz Fig 7 Impostazione dell arresto oscillazione 2 1 AVVISO Per garantire un oscuramento uniforme accertarsi che la regolazione dell angolo sia uniforme su entrambi i lati ...

Page 104: ...anopola di regolazione 5 Grado di protezione 10 in figura 6 Grado di protezione 11 7 Grado di protezione 12 Fig 8 Gradi di protezione 2 3 5 1 6 7 4 AVVISO Attenersi alle specifiche della norma DIN EN 379 Amperaggio A Processo 1 5 6 10 15 30 40 60 70 100 125 150 175 200 225 250 300 350 400 450 500 600 Elettrodo rivestito 8 9 10 11 12 13 14 MAG 8 9 10 11 12 13 14 TIG 8 9 10 11 12 13 MIG per metalli ...

Page 105: ... 6 6 Impostazione del tempo di ritardo DELAY TIME Fig 9 Regolazione della sensibilità alla luce tempo di ritardo a pagina IT 15 Quando la saldatura viene interrotta il filtro automatico passa da scuro a chiaro Il tempo di ritardo specificato compensa il bagliore presente sul pezzo dopo la saldatura 1 Impostare l interruttore 2 sul tempo di ritardo desiderato SLOW o FAST 1 Interruttore di sensibili...

Page 106: ...elevata velocità AVVISO Prestare attenzione al corretto posizionamento della ADF600S Verificare regolarmente la calzata della ADF600S sollevando e togliendo di nuovo la ADF600S Se lo stringitesta scivola durante questa operazione modificare di conseguenza le regolazioni per la circonferenza e l altezza della testa 6 Messa in servizio a pagina IT 10 Tenere conto di tutti i componenti integrati nel ...

Page 107: ...erficie con un panno morbido Non utilizzare solventi aggressivi Celle solari 2 sensori 3 2 Pulire le celle solari sensori con alcol denaturato e un panno pulito Asciugare con un panno asciutto e privo di lanugine Calotta della maschera 4 3 Pulire e disinfettare la calotta della maschera con un panno morbido e acqua saponata Se necessario o in caso di danni rotture graffi sporcizia ecc Sostituzione...

Page 108: ...ine indicato nelle figure seguenti 1 ADF600S 2 Filtro automatico 3 Cavo di controllo Fig 11 Sostituzione del filtro automatico 2 1 3 AVVISO Prestare attenzione alla posizione corretta del cavo di controllo 3 Il cavo di controllo 3 non deve essere schiacciato Rimontare tutti i componenti nell ordine inverso ...

Page 109: ...esempio generatore sistema della torcia per saldatura unità di raffreddamento in ricircolo ecc Anomalia Causa Rimedio L oscuramentoè irregolare Lo stringitesta non è stato regolato in modo uniforme Regolare lo stringitesta correttamente accertandosi che la distanza degli occhi dalla lente del filtro sia uniforme 6 2 Regolazione dello stringitesta a pagina IT 11 6 3 Regolazione della circonferenza ...

Page 110: ...tettiva Sostituzione dei pannelli frontali a pagina IT 10 9 2 Sostituzione del filtro automatico a pagina IT 18 La luce ambientale è insufficiente Provvedere a una migliore illuminazione ambientale Il grado di protezione è impostato in modo errato Impostare nuovamente il grado di protezione 6 4 Gradi di protezione a pagina IT 14 La maschera di saldatura scivola Lo stringitesta non è stato regolato...

Page 111: ...ADF600S 12 Smaltimento IT 21 ...

Page 112: ... 2 5 Tabliczki ostrzegawcze PL 5 3 Opis produktu PL 6 3 1 Dane techniczne PL 6 3 2 Tabliczka znamionowa PL 8 3 2 1 Automatyczna przyłbica spawalnicza PL 8 3 2 2 Szybka przednia PL 8 3 2 3 Wewnętrzna szybka ochronna PL 8 3 3 Stosowane znaki i symbole PL 9 4 Zakres dostawy PL 9 4 1 Transport PL 9 4 2 Składowanie PL 9 5 Opis działania PL 9 6 Uruchomienie PL 10 6 1 Usuwanie folii ochronnej wymiana szy...

Page 113: ...arte ostrzeżenia przed niemożliwym do wyeliminowania pozostałym ryzykiem wystąpienia zagrożenia dla użytkowników osób trzecich sprzętu lub innych wartości rzeczowych Przedstawione wskazówki bezpieczeństwa wskazują na pozostałe ryzyko niemożliwe do wyeliminowania na drodze konstrukcyjnej należy się z nimi zapoznać oraz ich przestrzegać Nieprzestrzeganie tych wskazówek bezpieczeństwa może spowodować...

Page 114: ... trzymać zawsze w pobliżu urządzenia aby mieć możliwość sprawdzenia w niej informacji i dołączyć ją do urządzenia w przypadku przekazania go innemu użytkownikowi Czynności polegające na uruchomieniu obsłudze i konserwacji mogą być wykonywane wyłącznie przez wykwalifikowanych pracowników Wykwalifikowanym pracownikiem jest osoba która ze względu na swoje zawodowe wykształcenie wiedzę i doświadczenie...

Page 115: ...enia OSTRZEŻENIE Oznacza możliwość wystąpienia niebezpiecznej sytuacji Należy tego unikać niezastosowanie się może spowodować ciężkie obrażenia PRZESTROGA Oznacza możliwość wystąpienia szkodliwej sytuacji Należy tego unikać niezastosowanie się może spowodować lekkie lub nieznaczne obrażenia UWAGA Oznacza niebezpieczeństwo powstania uszczerbku w rezultacie pracy lub szkód materialnych w wyposażeniu...

Page 116: ...rzystaniem z kasku 6 Przestroga Procesy spawania mogą skutkować wydzieleniem chemikaliów powodujących raka lub deformacje i inne wady wrodzone Podczas spawania należy zapewnić odpowiednią wentylację OSTRZEŻENIE Niebezpieczeństwo w razie użycia niezgodnego z przeznaczeniem W przypadku użycia niezgodnego z przeznaczeniem produkt może stwarzać zagrożenie dla ludzi zwierząt i mienia Używać produktu wy...

Page 117: ...wymiany baterii Czas rozjaśniania 1 16 000 s od rozjaśnienia do zaciemnienia Opóźnienie od rozjaśnienia do zaciemnienia od 0 25 do 0 30 s w pozycji fast szybki od 0 65 do 0 80 s w pozycji slow wolny Niskie natężenie prądu TIG 10 A DC AC Tryb szlifowania tak Materiał hełmu nylon odporny na uderzenia Ciężar całkowity 435 g Obszary zastosowania spawanie elektrodowe spawanie TIG DC AC spawanie impulso...

Page 118: ...Producent Klasa optyczna Klasa rozproszenia światła Klasa odchylenia współczynnika przepuszczania światła Klasa kątowego współczynnika przepuszczania światła Oznaczenie normy Tab 3 Oznaczenie Oznaczenie Objaśnienie TECMEN EN175 B TECMEN producent EN 175 zastosowana norma B ochrona przed uderzeniami o średniej energii Tab 4 Automatyczna przyłbica spawalnicza Oznaczenie Objaśnienie TECMEN B TECMEN p...

Page 119: ...ępuje ponowne rozjaśnienie filtra automatycznego Symbol Opis Symbol wyliczania w przypadku instrukcji postępowania oraz wyliczeń Symbol odsyłacza wskazuje na szczegółowe uzupełniające lub dalsze informacje 1 Etapy postępowania w tekście które należy wykonać w danej kolejności Automatyczny hełm spawacza ADF 600S Instrukcja użytkowania Tab 7 Zakres dostawy Sprawdzanie po dostawie Na podstawie dowodu...

Page 120: ...ymień szybkę ochronną 2 na nową 2 Wyjmij filtr automatyczny 6 naciskając klips mocujący do góry i do dołu Usuń folię lub wymień szybkę ochronną 4 na nową 3 Ponownie włóż filtr automatyczny 6 do przyłbicy ADF 600S 5 4 Włóż szybkę ochronną 2 w ramkę uchwytu 1 1 Ramka uchwytu 2 Zewnętrzna szybka ochronna 3 Przewód regulatora 4 Wewnętrzna szybka ochronna 5 ADF 600S 6 Filtr automatyczny Rys 3 Usuwanie ...

Page 121: ...wej przyłbicy ADF 600S może doprowadzić do obrażeń oczu Należy natychmiast przerwać prace spawalnicze wykonywane przy użyciu przyłbicy ADF 600S i usunąć występujące usterki Tab 11 Usterki i ich usuwanie na stronie PL 19 Należy używać wyłącznie sprawnej przyłbicy ADF 600S Przyłbicę ADF 600S należy dopasować do wielkości swojej głowy UWAGA Należy zwracać uwagę na prawidłowe posadowienie przyłbicy AD...

Page 122: ...tki z tworzywa sztucznego 2 i przesuń blokadę główną 1 tam i z powrotem w kierunku strzałek Ustalisz w ten sposób indywidualny odstęp 2 Dokręć nakrętki z tworzywa sztucznego 2 1 Taśma nagłowna 2 Trzpień podtrzymujący Rys 5 Ustawianie wysokości nagłowia 2 1 1 Blokada główna 2 Nakrętka z tworzywa sztucznego 2 szt Rys 6 Ustawianie odstępu oczu od maski spawalniczej 2 1 UWAGA W celu zapewnienia równom...

Page 123: ...ń podtrzymujący 1 2 Zatrzaśnij trzpień podtrzymujący 1 w jednym z trzech ustawień kąta 3 Dokręć nakrętki z tworzywa sztucznego 2 1 Trzpień podtrzymujący 2 Nakrętka z tworzywa sztucznego 2 szt Rys 7 Ustawianie ogranicznika odchylania 2 1 UWAGA W celu zapewnienia równomiernego zaciemnienia należy ustawić taki sam kąt po obu stronach ...

Page 124: ...ień zaciemnienia 12 Rys 8 Stopień zaciemnienia 2 3 5 1 6 7 4 UWAGA W tym zakresie należy stosować się do informacji zawartych w normie PN EN 379 Natężenie prądu A Metoda 1 5 6 10 15 30 40 60 70 100 125 150 175 200 225 250 300 350 400 450 500 600 Elektroda otulona 8 9 10 11 12 13 14 MAG 8 9 10 11 12 13 14 TIG 8 9 10 11 12 13 MIG metale ciężkie 9 10 11 12 13 14 MIG metale lekkie 10 11 12 13 14 Elekt...

Page 125: ...nie czasu opóźnienia DELAY TIME Rys 9 Ustawianie światłoczułości czasu opóźnienia na stronie PL 15 Po przerwaniu spawania następuje ponowna zmiana stopnia zaciemnienia filtra automatycznego z zaciemnionego na rozjaśniony Ustawiony czas opóźnienia równoważy dopalanie przedmiotu obrabianego po spawaniu 1 Ustaw przełącznik 2 na żądany czas opóźnienia SLOW lub FAST 1 Przełącznik światłoczułość SENSITI...

Page 126: ... dużej prędkości UWAGA Należy zwracać uwagę na prawidłowe posadowienie przyłbicy ADF 600S Należy regularnie sprawdzać przyleganie przyłbicy ADF 600S podnosząc i ponownie zdejmując przyłbicę ADF 600S Jeżeli następuje przy tym przesuwanie taśmy nagłownej należy odpowiednio dopasować ustawienia obwodu głowy i wysokości głowy 6 Uruchomienie na stronie PL 10 Należy uwzględnić komponenty systemu spawaln...

Page 127: ...yj powierzchnię miękką ścierką Nie używaj agresywnych rozpuszczalników Ogniwa słoneczne 2 czujniki 3 2 Wytrzyj ogniwa słoneczne czujniki spirytusem denaturowanym i czystą ścierką Wytrzyj suchą i niestrzępiącą się ścierką Skorupa kasku 4 3 Wytrzeć i zdezynfekować skorupę kasku miękką ścierką i ługiem mydlanym W razie potrzeby uszkodzenia pęknięcia zadrapania zabrudzenia itp Wymiana zewnętrznej szyb...

Page 128: ...jności pokazanej na poniższych rysunkach 1 ADF 600S 2 Filtr automatyczny 3 Przewód regulatora Rys 11 Wymiana filtra automatycznego 2 1 3 UWAGA Należy pamiętać o prawidłowej pozycji przewodu regulatora 3 Nie wolno dopuścić do zakleszczenia przewodu regulatora 3 Elementy należy zamontować w odwrotnej kolejności ...

Page 129: ... Należy używać wyłącznie sprawnej przyłbicy ADF 600S UWAGA Należy przestrzegać także instrukcji użytkowania urządzeń spawalniczych np źródła prądu systemu palnika spawalniczego i obiegowego agregatu chłodzącego Usterka Przyczyna Sposób usunięcia Nierównomiern e zaciemnienie Nierówno ustawiona taśma nagłowna Ustaw dokładnie taśmę nagłowną zachowując równomierny odstęp oczu od soczewki filtra 6 2 Us...

Page 130: ...ybki ochronne lub filtr automatyczny 6 1 Usuwanie folii ochronnej wymiana szybek ochronnych na stronie PL 10 9 2 Wymiana filtra automatycznego na stronie PL 18 Niewystarczające oświetlenie otoczenia Zadbaj o lepsze oświetlenie otoczenia Nieprawidłowo ustawiony stopień zaciemnienia Ponownie ustaw stopień zaciemnienia 6 4 Stopień zaciemnienia na stronie PL 14 Zsuwanie się przyłbicy spawalniczej Nier...

Page 131: ...ADF 600S 12 Utylizacja PL 21 ...

Page 132: ... R T H E W E L D E R S W O R L D www binzel abicor com Alexander Binzel Schweisstechnik GmbH Co KG Postfach 10 01 53 D 35331 Giessen Tel 49 0 64 08 59 0 Fax 49 0 64 08 59 191 Email info binzel abicor com BAL 0427 0 2017 05 22 ...

Reviews: