background image


Service Guide


                                                                                                                                                            2014/4/25 

Summary of Contents for Iconia One 8

Page 1: ...Service Guide 2014 4 25...

Page 2: ...r expressed of implied with respect to the contents hereof and specially disclaims any warranties of merchantability or fitness for any particular purpose Any Acer Incorporated software described in t...

Page 3: ...Conventions The following conventions are used in this manual...

Page 4: ...generic service guide In such cases please contact your regional office or the responsible personnel channel to provide you with further technical details 2 Please note WHEN ORDERING FRU PARTS that y...

Page 5: ...tem block diagram Chapter 2 a Software Upgrade SOP SOP of SD Download and EUU b Service tool SOP Chapter 3 a Disassembly and Assembly SOP b Required tools and screws Chapter 4 Diagnostic Tool SOP Chap...

Page 6: ...0 View angle Wide view angle 85 85 85 85 degree Typical backlight 300 min 350 nits typ cd m2 Pixel Pitch 0 13455 V x 0 13455 H mm Contrast ratio 800 1 Touch Panel Capacitive type G G solution Driver I...

Page 7: ...SK 4 DQPSK and 8DPSK Channel 79 channels Data Rates Basic data rates GFSK 1Mbps EDR data rates 4 DQPSK 2Mbps and 8DPSK 3Mbps Operating Range 10m Output Power Class 1 0dBm 10dBm Receive Sensitivity Und...

Page 8: ...system 720p 100nits WLAN 3G Gmail Youtube playback 720p video min 5 75 hours via WIFI Detailed criterion defined in the test summary document released by Acer DQM Battery low Battery low when battery...

Page 9: ...is on even in lock state Once CPU is on system Acer logo should show up within 2 seconds Press to suspend the device when device is on Press to resume the device when device is in suspend mode Once i...

Page 10: ...fe cycle Min rating of 10K connect disconnect cycles HDMI N A Audio Jack 3 5mm Audio Jack 4ring with Mic Micro SD connector MicroSD memory card up to 128GB SDHC exFAT compatible SD 3 0 compatible Supp...

Page 11: ...document released by Acer DQM Certification CE FCC IC NCC CB BSMI BQB WiFi WHQL Country List Defined in the document Citizen Country List Accessory Accessories in box USB Cable Charger Plug QSG Access...

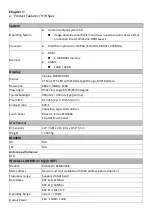
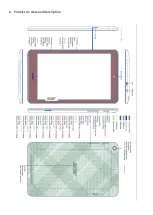
Page 12: ...b Product six view and description...

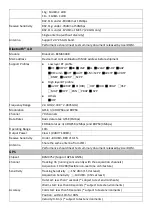
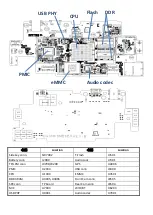
Page 13: ...c Block Diagram...

Page 14: ...dio Jack J7001 TP LCM conn J9701 J8200 GPS U4006 PMIC U2003 USB conn J9400 CPU U1000 EMMC U3501 DDR3 RAM U3005 U3006 Front Cam conn J8505 SPK conn TP board Rear Cam conn J8504 MIC U7003 WIFI BT U6203...

Page 15: ...2 USB cable Install Driver Tool 1 Enter to fastboot mode Fast key enter to recovery mode Press Power and Volume up key together over 3 sec release Power key but keep pressing the volume up key until...

Page 16: ...below drawing in Devices Administrator in PC Install Download Tool 1 Install PhoneFlashTool_5 2 1 0_external_win32 exe in your PC When set up in final you may see the Phone Flash Tool icon in your pro...

Page 17: ...Tool icon Phone Flash program will auto Popup on PC display 3 Search the unzip image location by clicking icon Browser After that click icon Start to flash to start download image as you need When st...

Page 18: ...wnload finish as below 100 progress drawing please push power key to make the tablet reboot 5 Connect the AC ADP and Reset to default Reminding It s better no plug out the AC Adaptor until reboot proc...

Page 19: ...cable 2 Connect B1 820 with PC by USB cable and click the Phone Flash Tool icon Phone Flash program will auto Popup on PC display 3 Search the unzip image location by clicking icon Browser After that...

Page 20: ...ey to reboot show the display Then need press Power key to reboot again 5 Long press Power key to power off and enter to recovery mode Then wipe all user data 6 Reboot system and download to factory m...

Page 21: ...her over 3 sec release Power key but keep pressing the volume up key until recovery mode display popup 3 Select apply update from external storage then press power key 4 Select the OTA image file the...

Page 22: ...lAndroidDriver and Factory image in your PC it s unnecessary if your PC has installed Following example will put adb tool under C folder Read Acer SNID 1 Switch on Citizen adb port 2 Connect Citizen a...

Page 23: ...well Re write Acer 22 code SN Switch on Citizen adb port 1 Connect Citizen and PC by USB cable 2 To open C adb folder then open sn txt file on PC and change the dedicated SN number save it 3 Double cl...

Page 24: ...to C adb folder to open mac txt file in PC and check the content as well Re write Acer Wifi Mac address 1 Switch on Citizen adb port 2 Connect Citizen and PC by USB cable 3 To open C adb folder then o...

Page 25: ...en BT read bat in c adb You may also return to C adb folder to open bd_addr conf file and check the content as well Re write Acer BT address 1 Switch on Citizen adb port 2 Connect Citizen and PC by US...

Page 26: ...ping to WW others non For shipping to WW others 1 Switch on Citizen adb port 2 Connect Citizen and PC by USB cable 3 Double click Citizen country cod read read bat in c adb Re write country code 1 Swi...

Page 27: ...adb port 2 Connect Citizen and PC by USB cable 3 Double click User log bat in c adb 4 Press Ctrl C to clos log catching 5 Copy the log Use your mouse to select all log in DOC window Using Ctrl C to co...

Page 28: ...assembling tool 1 Insert the plectrum into gap which next to the side key 2 Hold the plastic stick and gash the gap slide and separate the back cover base on the direction of clasp 2 on left side 4 on...

Page 29: ...break open LCD cover by pressing down the plastic stick 3 Hold the cover and take off the cover base on the axis of LCD cover up side 4 Take off the battery Tear off the tap on connector and separate...

Page 30: ...Take off the main PCBA board Remove the screw and take off the speaker box USB metal holder and separate all connector take off FPC and antenna board After that you can separate the PCBA and other par...

Page 31: ...6 Take off TP LCM and LCD Bezel Put TP LCM LCD bezel on oven under the degree of 70 80 centigrade then separate the TP LCM and LCD Bezel after around 20 min 7 Finish All parts disassembled drawing...

Page 32: ...Assembly Step1 Tear off the liner paper stick and fix LCM and LCD bezel Step2 To assemble side key FPC on LCD Bezel...

Page 33: ...NT PCB on bezel and stick the Cu foil on metal frame Step 4 Put MIC Rubber on PCB MIC and stick on PCBA Step 5 Assembly Metal USB with screw Fix the PCB on LCD Bezel Connect Side Key FPC with ZIF cont...

Page 34: ...Camera on LCD Bezel and connect with ZIF contr Step7 Put TP board and stick on Metal Frame Connector TP FPC with ZIF contr Step8 Put SPK BOX on LCD Bezel and fix it by screw Connect SPK BOX connector...

Page 35: ...Step9 Assemble LCM FPC with LCM module which on PCBA Stick Battery on bezel and lock BTB connector Step10 Put the tape on each ZIF cntr WTB cntr...

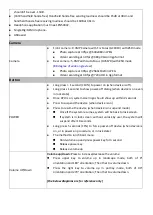
Page 36: ...Step 11 Base on direction to assembly back cover and make sure the well locking with device...

Page 37: ...ter in Hardware Testing Mode Press the MENU button and click on ICON Factory Test Tool in APPS press the button to perform the functional test Figure 1 1 Figure 1 2 Select Manual UI Testing as Hardwar...

Page 38: ...a Blemish Front Camera Key Speaker SD Card Headset Mic Head set Mic G Sensor Verify Water Ripple 1 Water Ripple 2 Bluetooth G Sensor Backlight LCD TP Around Test Power Current Touch Calibration Unifor...

Page 39: ...esult that you saw to choose High Back Light or Low Back Light as shown below This example may get PASS when you choose Low Back Light KEY Follow the picture s instruction to press related key success...

Page 40: ...front camera check the picture and according to the actual result that you saw to choose PASS or FAIL Rear_Camera Rear Camera test click on any position of display it should take a picture by rear cam...

Page 41: ...SD card test insert MicroSDcard and then according to the test result which be displayed on the screen to choose PASS or FAIL TP TP test To use your two fingers to slide the red indicated direction 4...

Page 42: ...se which color do you see on screen finally RED or GREEN or BLUE This example may get PASS when choose GREEN G sensor calibration G sensor verification Enter the Manual UI Test in factory image mode P...

Page 43: ...G sensor PASS criteria if 0 1g x 0 1g and 0 1g y 0 1g and 0 9g z 1 1g it shall pass verification test Here g 9 8m s s G sensor calibration G sensor verification Enter the Manual UI Test in factory im...

Page 44: ...pter 5 Serial Number Definition Acer 22 Barcode Follows Code 128 standard refer to http www adams1 com pub russadam 128code html Acer 22 Code SN PPPPPPPPPPYWWSSSSSMMVV Acer SNID YWWddddddMM TP LCD Bez...

Page 45: ...Rear CCD Front CCD Battery Main board...

Page 46: ...Chapter 6 a Exploded Diagram and Description...

Page 47: ......

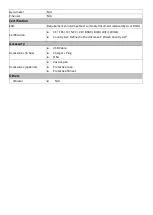
Page 48: ...b SPL List...

Reviews: