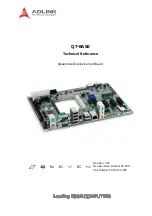
background image


Q7-BASE

Technical Reference

Qseven Reference Carrier Board

Revision: 3.00  
Revision Date: October 03, 2017
Part Number: 50-1Z180-1020

Summary of Contents for Q7-BASE

Page 1: ...Q7 BASE Technical Reference Qseven Reference Carrier Board Revision 3 00 Revision Date October 03 2017 Part Number 50 1Z180 1020 ...

Page 2: ...make changes to specifications and product descriptions at any time with out notice Trademarks Product names mentioned herein are used for identification purposes only and may be trade marks and or registered trademarks of their respective companies Revision History Copyright 2015 2016 2017 ADLINK Technology Incorporated www adlinktech com This document contains proprietary information protected b...

Page 3: ...ual and on the associated equipment before handling operating the equipment Read these safety instructions carefully Keep this manual for future reference Read the specifications section of this manual for detailed information on the operating environment of this equipment Turn off power and unplug any power cords cables when installing mounting or un install ing removing equipment To avoid electr...

Page 4: ...nformation This information adds clarity or specifics to text and illustrations This information indicates the possibility of minor physical injury component damage data loss and or program corruption This information warns of possible serious physi cal injury component damage data loss and or program corruption ...

Page 5: ...nufacturing CN2 20 3 3 ATX BattMan 5V Standby Mode Select CN3 20 3 4 ATX BattMan 5V Power Good Mode Select CN4 20 3 5 Smart Battery BattMan Interface CN5 21 3 6 Post Code Enable CN8 21 3 7 eDP Display 22 3 7 1 eDP0 CN10 22 3 7 2 eDP1 CN11 23 3 8 PS 2 Power Source Select CN20 24 3 9 COM1 COM2 CN39 25 3 10 PCI Express x1 CN42 CN44 CN45 26 3 11 Digital Audio CN46 26 3 12 USB Signals 27 3 12 1 Standar...

Page 6: ...89 38 3 40 HDA_SDO I2S_SDO Select CN90 38 3 41 HDA_SDI I2S_SDI Select CN91 38 3 42 EN_V3P3S Select CN92 39 3 43 USB3_CN_p USB3_mPCIe_p Select CN93 39 3 44 USB3_CN_n USB3_mPCIe_n Select CN94 39 3 45 USB OTG Power Control CN95 39 3 46 USB_VBUS Source Select CN96 40 3 47 PWM Backlight Voltage Select CN97 40 3 48 eDP1 Backlight Control CN98 40 3 49 eDP1 Backlight Enable CN99 40 3 50 I2C EEPROM Address...

Page 7: ...even modules and serves as design reference for systems based on the Qseven form factor The Qseven module plugs directly into the Q7 BASE where the carrier board becomes a design platform for testing and developing your applications Figure 1 1 provides an overview photo of the Q7 BASE interface hardware The proceeding sections and chapters in this manual present these features in fur ther detail F...

Page 8: ...ace One SDMMC slot 4 x for SD card Audio interfaces Supports HD Audio and AC 97 One 3 in 1 stack audio jack for HD audio with Line In Out MIC One 4 pin digital audio header for SPDIF Input Output One I2S audio header Video interfaces One dual channel LVDS header 18 24 bit One LVDS backlight header One standard DisplayPort connector One standard HDMI connector Two optional eDP connectors Power inte...

Page 9: ...even compliant modules featuring an MXM2 230 pin module interface with eDP display support Qseven Module MXM2 Connector 4x USB2 0 Super I O USB ports a b c d HDA 2x USB3 0 USB ports x y Ethernet RJ45 GbE HDA Codec ALC888 Mini USB device USB port1 Pin Header 2x10 SO8 socket SD MMC Socket CAN D Sub9 Pin Header 2x4 Pin Header 2x17 2x COM LPT 2x PS2 LPC TPM connector POST Code CPLD 7 Segment Display L...

Page 10: ...sed with the Q7 BASE Table 1 4 defines the environmental conditions under which the carrier is qualified to operate and to be stored Table 1 2 Weight and Footprint Dimensions Item Dimension Overall height is measured from the upper board surface to the top of the highest permanent component on the upper board surface This measurement does not include the cooling solution which can vary The cooling...

Page 11: ...ted to the carrier using female female standoffs with M2 5 threads and M2 5 B head screws Figure 1 3 Mechanical Dimensions Top Side 34 2 x M 2 5 2 x M 2 5 2 37 5 2 35 177 97 17 90 73 25 9 42 64 8 170 24 18 33 91 69 72 237 54 165 10 33 02 10 16 6 x T o p a n d B o t t o m 13 71 230 73 5 5 2 7 5 2 x 2 x 7 5 7 5 3 2 T o p a n d B o t t o m 7 x 123 55 5 2 4 64 6 2 x 58 42 87 81 185 88 Q7 BASE R1_B2_Ca...

Page 12: ...6 Product Overview This page intentionally left blank ...

Page 13: ...mm jumper header for selecting ATX or BattMan 5V Standby mode JIH21N12050 03S10B 01G 4 2 8 G CN4 ATX BattMan 5V Power Good Select 2 pin 2 0mm jumper header for selecting ATX or BattMan 5V Power Good mode JIH21N12050 02S10B 01G 4 CN5 Smart Battery 10 pin 2 54 box header for BattMan signals JIHVEI 23N6960 10S10B 01G G BLACK CN8 Post Code Enable 3 pin 2 0mm jumper header for enabling or disabling Pos...

Page 14: ...isplay power management to select 3V3 5V or 12V NELTRON 2208SM 06G CR CN63 ATX PS_ON 6 pin 0 079 2mm jumper header for setting Power Signal_ON for the ATX connector NELTRON 2208SM 06G CR CN64 USB0 Voltage Select 3 pin 0 079 2mm jumper header for selecting USB0 voltage source Standby or Voltage In JIH 21N12050 03S10B 01G 4 2 8 G CN65 LVDS Backlight Interface 8 pin 0 100 2 54mm shrouded header for L...

Page 15: ...HDA_SYNC I2S_WS Select 3 pin 2 0mm jumper header for selecting between HDA_SYNC and I2S_WS JIH21N12050 03S10B 01G 4 2 8 G CN88 HDA_RST I2S_RST Select 3 pin 2 0mm jumper header for selecting between HDA_RST and I2S_RST JIH21N12050 03S10B 01G 4 2 8 G CN89 HDA_BITCLK I2S_CLK Select 3 pin 2 0mm jumper header for selecting between HDA_BITCLK and I2S_CLK JIH21N12050 03S10B 01G 4 2 8 G CN90 HDA_SDO I2S_S...

Page 16: ...4 2 8 G CN105 ACT LINK LED Source Select 3 pin 2 0mm jumper header for selecting between GBE_LINK and GBE_ACT R C JIH21N12050 03S10B 01G 4 2 8 G CN106 ACT LINK LED Anode Select 3 pin 2 0mm jumper header for selecting between V3P3A and GBE_ACT JIH21N12050 03S10B 01G 4 2 8 G CN107 1000Mbit Anode Select 3 pin 2 0mm jumper header for selecting between GBE_LINK1000 and V3P3A JIH21N12050 03S10B 01G 4 2 ...

Page 17: ...h Kingbright KCSA02 101 LED8 POST 81 High Seven segment display LED for 81H POST codes high nibble of address 81h Kingbright KCSA02 101 LED9 POST 81 Low Seven segment display LED for 81H POST codes low nibble of address 81h Kingbright KCSA02 101 LED11 S3 Suspend Yellow Activity LED for S3 sleep state ON high level LIGITEK LG 170HY CT LED12 S5 Suspend Yellow Activity LED for S5 sleep state ON high ...

Page 18: ...layPort control DIPTRONICS DHNF 04 T Q T SW12 DP Enable 4 pole 0 050 1 27mm dip switch for configuring DisplayPort enable DIPTRONICS DHNF 04 T Q T SW13 DP Operation 4 pole 0 050 1 27mm dip switch for configuring DisplayPort operation DIPTRONICS DHNF 04 T Q T SW14 eDP0 Enable 4 pole 0 050 1 27mm dip switch for configuring eDP0 enable DIPTRONICS DHNF 04 T Q T SW15 eDP0 Operation 4 pole 0 050 1 27mm ...

Page 19: ...ble 2 1 Header Connector Switch and LED Descriptions Continued Header Connector Signal Device Description CN1 CN84 CN8 CN86 CN70 CN10 CN11 CN66 CN100 CN52 CN27 CN85 SW4 SW3 SW5 SW2 SW1 SW11 SW12 SW13 SATA0 SATA1 LED8 LED9 LED6 LED7 LED3 LED2 LED1 LED13 LED14 SW19 SW17 HDMI1 RJ451 AJ1 USB3 CN39 CN50 PS1 USB2 USB1 CN71 LED11 LED12 LED4 CN50 CN2 CN46 CN108 CN107 CN106 CN105 CN103 CN51 CN61 CN78 CN69 ...

Page 20: ...92 EN_V3P3S Mode Select CN93 USB3_CN_p or USB3_mPCIe_p Select CN94 USB3_CN_n or USB3_mPCIe_n Select CN95 USB OTG Control Select CN96 USB_VBUS Source Select CN97 Backlight Voltage Select CN98 eDP Backlight Control CN99 eDP Backlight Enable CN100 SD Card Slot CN101 USB5_CN_p or USB5_20_p Select CN102 USB5_CN_n or USB5_20_n Select CN103 USB 3 0 Voltage Select CN104 LRESET Source Select CN105 ACT LINK...

Page 21: ...lustrates the faces of the standard interface connectors mounted along the opposite edge of the carrier shown in Figure 2 3 These connectors are for HDMI DisplayPort and embedded DisplayPort industry standard cable connectors Figure 2 4 IO Panel Connector Locations opposite side Q7 BASE R1_B2_Carrier_IO_panel_b PS1 COM1 COM2 USB1 USB2 USB AJ1 CN39 USB3 RJ451 3 0 2 0 Mini USB 2 0 2 0 USB Mouse Keyb...

Page 22: ...c supports this interface Figure 2 5 depicts the three lines of the audio jacks Line In 1 Blue Line Out 2 Green and MIC In 3 Pink Figure 2 6 presents the functional block diagram of HDA I2S sig nals and hardware on the carrier Figure 2 5 Stereo Jack Configuration Figure 2 6 Audio Block Diagram 1 2 3 I2S Header CN86 Audio Codec ALC888 M XM 2 Connector Audio Jack AJ1 Line in line out mic SPDIF Heade...

Page 23: ...Slot The SD Card slot CN100 provides the standard 4 bit push push interface for SD memory cards LED5 provides indication of SD power Figure 2 8 SD Card Slot UHS cards with 1 8V data signaling are sup ported The card supply is always 3 3V regardless if either 1 8V signaling or 3 3V signaling is com mitted by both card controllers The SoC and the SD card will agree on which standard they are compati...

Page 24: ... 2 SD Card Slot CN100 Pin Signal Description Scheme 1 SDIO_D3 SDIO data bit3 2 SDIO_CMD SDIO Command 3 GND Ground 4 VCC_SDIO 3 3V power supply 5 SDIO_CK SDIO clock 6 GND Ground 7 SDIO_D0 SDIO data bit0 8 SDIO_D1 SDIO data bit1 9 SDIO_D2 SDIO data bit2 10 SDIO_CD SDIO card detect 11 GND Ground 12 SDIO_WP SDIO write protect Table 2 3 Battery Socket BT1 Pin Signal Description 1 3V_BAT 3 volts power f...

Page 25: ...from pin 1 is noted as 10 pins 2 rows odd even pin sequence 1 2 Consecutive numbering is noted for example as 24 pins 2 rows consecu tive pin sequence 1 13 where pin 13 is directly across from pin 1 Refer to Figure 2 1 for pin 1 locations Table 3 1 ATX Power Signals CN1 Pin Signal Description Pin Signal Description 1 V3P3_ATX Power Supply DC voltage 13 V3P3_ATX Power Supply DC voltage 2 V3P3_ATX P...

Page 26: ... pitch NOTE Shaded table cell denotes ground Table 3 2 Manufacturing CN2 Pin Signal Pin Signal 1 MFG_NC0 Reserved for manufacturing and debugging 2 MFG_NC1 Reserved for manufacturing and debugging 3 MFG_NC2 Reserved for manufacturing and debugging 4 MFG_NC3 Reserved for manufacturing and debugging 5 MFG_NC4 Reserved for manufacturing and debugging 6 GND Table 3 3 ATX Battman 5V Standby Mode Select...

Page 27: ... to Power On the carrier Table 3 5 Smart Battery BattMan Interface CN5 Pin Signal Jumper Settings 1 SMB_CLK_5V SMBus clock Make sure to set the following jumper configurations before implementing a BattMan power supply to Power On the carrier Remove the jumper from the 2 pin jumper header CN3 Select 5V Standby Remove the jumper from the 2 pin jumper header CN4 Select 5V Power Good Install a jumper...

Page 28: ... CN59 5 eDP0_BKLT_PWR Backlight power 5V 12V selected at CN59 6 NC Not Connected 7 NC Not Connected 8 eDP0_BKLT_PWM Backlight brightness via pulse width modulation PWM 9 eDP0_BKLT_ENABLE Backlight power enable 10 eDP0_BKLT_GND Backlight ground 11 eDP0_BKLT_GND Backlight ground 12 eDP0_BKLT_GND Backlight ground 13 eDP0_BKLT_GND Backlight ground 14 eDP0_HPD Hot Plug Detect 15 eDP0_LCD_GND LCD ground...

Page 29: ...P0_TX2_n Lane 2 Display Port primary channel differential pair 2 negative 36 eDP0_HS_GND High Speed Ground 37 eDP0_TX3_p Lane 3 Display Port primary channel differential pair 3 positive 38 eDP0_TX3_n Lane 3 Display Port primary channel differential pair 3 negative 39 eDP0_HS_GND High Speed Ground 40 NC Not Connected Table 3 8 eDP1 Video Signals CN11 Pin Signal Description 1 NC Not Connected 2 eDP1...

Page 30: ...Port primary channel differential pair 0 negative 30 eDP1_HS_GND High Speed Ground 31 eDP1_TX1_p Lane 1 Display Port primary channel differential pair 1 positive 32 eDP1_TX1_n Lane 1 Display Port primary channel differential pair 1 negative 33 eDP1_HS_GND High Speed Ground 34 eDP1_TX2_p Lane 2 Display Port primary channel differential pair 2 positive 35 eDP1_TX2_n Lane 2 Display Port primary chann...

Page 31: ... Low signal informs the modem or data set that the controller is ready to send data 8 COM1_CTS Clear to Send This is the modem control input The function of this pin can be tested by reading bit 4 of the handshake status register 9 COM1_RI Ring Indicator An active low signal indicates that a ring signal is being received from the modem or the data set Table 3 11 COM2 Signals CN39 Pin Signal Descri...

Page 32: ...ells denote ground Table 3 12 PCIe x1 CN42 CN44 CN45 Pin Signal Pin Signal B1 V12P0_ATX A1 PCIE_A_PRSNT1 B2 V12P0_ATX A2 V12P0_ATX B3 V12P0_ATX A3 V12P0_ATX B4 GND A4 GND B5 SMB_CK A5 Not Connected B6 SMB_DAT A6 Not Connected B7 GND A7 Not Connected B8 3VP3 A8 Not Connected B9 Not Connected A9 3VP3S B10 3VP3A auxiliary A10 3VP3S B11 PCIE_WAKE A11 PCIE_RST B12 Not Connected A12 GND B13 GND A13 PCIE...

Page 33: ...option signals shared with port 5 from the Qseven module can be routed to this con nector if they are not used by the USB3 connector 3 12 3 USB2 This connector is used as a Mini USB 2 0 device connector The signals are routed to USB port 1 on the Qseven connector 3 12 4 USB3 This 2 port stack provides USB 3 0 signals top connector for ports 0 and 1 SSRX0 SSTX0 and SSRX1 SSTX1 from the Qseven modul...

Page 34: ...note power or ground 3 14 CAN Termination CN51 Table 3 15 lists the pin signals of the CAN termination jumper header which provides 2 pins with 2 00mm pitch NOTE Default setting is empty pins Installing a jumper on this header activates 120R termina tion between CAN_L and CAN_H Table 3 14 CAN Signals CN50 Pin Signal 1 Not Connected 2 CAN_GND 3 CAN_Low 4 CAN_High 5 CAN_GND 6 Not Connected 7 Not Con...

Page 35: ...ists the pin signals of the coin cell battery enable jumper header which provides 2 pins with 2 00mm pitch Table 3 16 CPLD Programming Signals CN52 Pin Signal 1 POST_TCK Test Clock 2 GND 3 POST_TDO Test Data Output 4 V3P3_ATX 5 POST_TMS Test Mode Select 6 Not Connected 7 Not Connected 8 Not Connected 9 POST_TDI Test Data Input 10 GND Table 3 17 FAN CN53 Pin Signal 1 GND 2 FAN_VCC V12P0_ATX or V5P0...

Page 36: ...als of the LCD Supply Voltage Select jumper header which provides 6 pins 2 rows with odd even pin sequence 1 2 and 0 079 2mm pitch NOTE The shaded table cells denote Ground or Power Default jumper installed on 1 2 Table 3 19 Backlight Voltage Select Signals CN59 Pin Signal Jumper Position 1 LCD_12V Jumper Installed 1 2 12 volts Default Jumper Installed 2 3 5 volts 2 BKLT_PWR_SRC 3 LCD_5V Table 3 2...

Page 37: ...or Power Default jumper installed on 1 2 3 23 LVDS Backlight CN65 Table 3 24 lists the pin signals of the LVDS Backlight interface which provides 8 pins 2 rows with odd even pin sequence 1 2 and 0 100 2 54mm pitch NOTE The shaded table cells denote Ground or Power Table 3 22 ATX PS_ON Selection CN63 Pin Signal 1 V5P0_SBY 2 GND 3 SUS_S3 4 GND 5 SUS_S5 6 GND Table 3 23 USB0 Voltage Select Signals CN...

Page 38: ...olled by chipset and selected at CN62 4 VCC_LVDS 5 GND 6 LVDS_CON_A0_N 7 LVDS_CON_A0_P 8 LVDS_PWR_EN_NI 9 LVDS_CON_A1_N 10 LVDS_CON_A1_P 11 LVDS_BKLT_EN_NI 12 LVDS_CON_A2_P 13 LVDS_CON_A2_N 14 Not Connected 15 LVDS_CON_ACLK_N 16 LVDS_CON_ACLK_P 17 VCC_LVDS 18 LVDS_CON_A3_P 19 LVDS_CON_A3_N 20 GND 21 LVDS_CON_B0_N 22 LVDS_CON_B0_P 23 GND 24 LVDS_CON_B1_N 25 LVDS_CON_B1_P 26 GND 27 LVDS_CON_B2_N 28 ...

Page 39: ...CN70 Table 3 27 lists the pin signals of the UART Interface header which provides 10 pins 2 rows with odd even sequence and 0 100 2 54mm pitch NOTE The shaded table cells denote Power or Ground This port supports only RS232 Table 3 26 SIO Enable Signals CN69 Pin Signal 1 LPC_CLK 2 SIO_CLK 3 GND SIO_OFF Table 3 27 UART Interface Signals CN70 Pin Signal 1 Not Connected 2 Not Connected 3 CON_UART_RX ...

Page 40: ...ote Ground The symbol indicates the signal is Active Low Table 3 28 LPT Interface Signals CN71 Pin Signal Pin Signal 1 LPT_STB _R 2 LPT_AFD _R 3 LPT_PD0_R 4 LPT_ERR 5 LPT_PD1_R 6 LPT_INIT _R 7 LPT_PD2_R 8 LPT_SLIN _R 9 LPT_PD3_R 10 GND 11 LPT_PD4_R 12 GND 13 LPT_PD5_R 14 GND 15 LPT_PD6_R 16 GND 17 LPT_PD7_R 18 GND 19 LPT_ACK 20 GND 21 LPT_BUSY 22 GND 23 LPT_PE 24 GND 25 LPT_SLCT 26 VCC_LPT 5 volts...

Page 41: ...wer The symbol indicates the signal is Active Low 3 31 Fan Voltage Select CN79 Table 3 32 lists the pin signals of the Fan Voltage Select jumper header which provides 3 pins single row with 0 079 2mm pitch NOTE The shaded table cells denote power or ground Default jumper installed on 2 3 Table 3 30 CAN 5 Volt Enable Signals CN77 Pin Signal 1 V5P0_ATX 2 Pin 9 at CN50 Table 3 31 LPC TPM Interface Si...

Page 42: ...led 2 3 ATX mode Default 2 ATX_PWRGD 3 ATX_PWRGD_5V Table 3 35 DisplayPort Signals CN84 Pin Signal Description 1 DP_D0_CON_P Lane 0 DisplayPort primary channel differential pair 0 positive 2 GND Ground 3 DP_D0_CON_N Lane 0 DisplayPort primary channel differential pair 0 negative 4 DP_D1_CON_P Lane 1 DisplayPort primary channel differential pair 1 positive 5 GND Ground 6 DP_D1_CON_N Lane 1 DisplayP...

Page 43: ...tch 20 3V3S_DP DisplayPort Power Table 3 36 Display Mode Select CN85 Pin Signal Jumper Position 1 V3PS Jumper Installed 1 2 HDMI mode Jumper Installed 2 3 DisplayPort mode Default 2 DP HDMI_SEL2 3 GND Table 3 37 I2S Signals CN86 Pin Signal Pin Signal 1 I2S_WS Word Select from module Codec 2 I2S_ V3P3S 3 3V for module Codec 250mA max 3 I2S_SDO Data Output from module Codec 4 I2S_ V1P8S 1 8V for mod...

Page 44: ...ect CN91 Table 3 42 lists the pin signals of the HDA_SDI I2S_SDI Select jumper header which provides 3 pins in a single row with 2 00mm pitch Table 3 39 HDA_RST I2S_RST Select CN88 Pin Signal Jumper Position 1 I2S_RST Jumper Installed 1 2 I2S Jumper Installed 2 3 HDA Default 2 HDA_RST I2S_RST 3 HDA_RST Table 3 40 HDA_BITCLK I2S_CLK Select CN89 Pin Signal Jumper Position 1 I2S_CLK Jumper Installed ...

Page 45: ...he USB OTG Power Control jumper header which provides 3 pins in a single row with 2 00mm pitch Table 3 43 EN_V3P3S Select CN92 Pin Signal Jumper Position 1 V5_IN Jumper Installed 1 2 ATX mode Jumper Installed 2 3 SUS_S3 Default 2 EN_V3P3S 3 SUS_S3 Table 3 44 USB3_CN_p USB3_mPCIe_p Select CN93 Pin Signal Jumper Position 1 USB3_CN_p Jumper Installed 1 2 USB connector Default Jumper Installed 2 3 Min...

Page 46: ...t Enable jumper header which provides 2 pins in a single row with 2 00mm pitch Table 3 47 USB_VBUS Source Select CN96 Pin Signal Jumper Position 1 USB_VBUS_SRC Jumper Installed 1 2 USB_VBUS Default Jumper Installed 2 3 USB_CC 2 USB_VBUS 3 USB_CC Client Connect Table 3 48 PWM Backlight Voltage Select CN97 Pin Signal Jumper Position 1 V3P3S Jumper Installed 1 2 3 3V Default Jumper Installed 2 3 5V 2...

Page 47: ... the DP Control dip switch which provides 4 poles 8 positions with 1 27mm pitch NOTE Setup for normal mode 1 OFF 2 ON 3 OFF 4 ON Refer to the PI3EQXDP1201 DisplayPort Redriver datasheet for more details Table 3 51 I2C EEPROM Address Select Switch SW6 Pin Signal Pin Signal 1 off I2C_A0 Default 8 on VCC_I2C 2 off I2C_A1 Default 7 on VCC_I2C 3 off I2C_A2 Default 6 on VCC_I2C 4 off I2C_WP 5 on VCC_I2C...

Page 48: ...nals of the eDP0 Operation dip switch which provides 4 poles 8 posi tions with 1 27mm pitch NOTE Setup for normal mode 1 ON 2 ON 3 OFF 4 OFF Refer to the PI3EQXDP1201 DisplayPort Redriver datasheet for more details Table 3 54 DP Enable Switch SW12 Pin Signal Pin Signal 1 off DP_ENABLE Default 8 on GND 2 off DP_AUTOEQ Default 7 on GND 3 off DP_OC_0 Default 6 on GND 4 off DP_OC_1 Default 5 on GND Ta...

Page 49: ...ignals of the eDP1 Operation dip switch which provides 4 poles 8 posi tions with 1 27mm pitch NOTE Setup for normal mode 1 ON 2 ON 3 OFF 4 OFF Refer to the PI3EQXDP1201 DisplayPort Redriver datasheet for more details Table 3 57 eDP0 Control Switch SW16 Pin Signal Pin Signal 1 off eDP0_CNTRL Default 8 on V3P3S 2 off eDP0_CNTRL Default 7 on GND 3 off eDP0_EQ Default 6 on V3P3S 4 off eDP0_EQ Default ...

Page 50: ...erface select dip switch which provides 4 poles 8 positions with 1 27mm pitch NOTE GPIO_I2C 1 8 ON 2 7 ON 3 6 OFF 4 5 OFF Default LVDS_I2C 1 8 OFF 2 7 OFF 3 6 ON 4 5 ON Table 3 60 eDP1 Control Switch SW19 Pin Signal Pin Signal 1 off eDP1_CNTRL Default 8 on V3P3S 2 off eDP1_CNTRL Default 7 on GND 3 off eDP1_EQ Default 6 on V3P3S 4 off eDP1_EQ Default 5 on GND Table 3 61 I2C EEPROM Address Interface...

Page 51: ...count and then going to the Ask a Question feature Requests can be submitted 24 hours a day 7 days a week You will receive immediate confirmation that your request has been entered Once you have submitted your request you must log in to go to the My Question area where you can check status update your request and access other fea tures Download Service This service is also free and available 24 ho...

Page 52: ...ntact the ADLINK regional office nearest you Table A 1 Technical Support Contact Information Continued Method Contact Information LiPPERT ADLINK Technology GmbH Address Hans Thoma Strasse 11 D 68163 Mannheim Germany Tel 49 621 43214 0 Fax 49 621 43214 30 Email emea adlinktech com ...

Reviews: