
Z-Wave ZDW103 Series 200, Release 2.2 Instructions
P/D 020708
HomePro
by ADVANCED CONTROL TECHNOLOGIES, INC.
0760-01
1
Z-Wave Radio Frequency (RF) Controlled, 500W, 120 VAC,
Wall Mounted 3-Way Dimmer,
Series 200, Release 2.2
ZDW103
ZDW103 WALL MOUNTED DIMMER
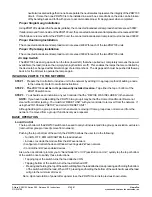
The ZDW103 Wall Mounted Dimmer is a component of the HomePro lighting control system. Wire the Wall Mounted
Dimmer in place of the standard wall switch according to the diagram above and program from the Wireless Controller
to operate loads. Inclusion of the ZDW103 Wall Mounted Dimmer on the ZTH100 Wireless Controller menu allows
remote ON/OFF control and dimming of lights connected.
This Wall Mounted Dimmer is designed to work with other Z-Wave enabled devices. Z-Wave nodes of other types
can be Included in the network and will also act as repeaters to increase the range of the network.
This product supports 40Kbps data transmission.
This product can also be used for networking support in
systems that stream metadata. An example might include transmission of information from audio devices such as
song title, artist, and album information to various displays around the home.
DANGER! SHOCK HAZARD.
Read and understand these instructions before installing. This device is intended for
installation in accordance with the National Electric code and local regulations in the United States, or the Canadian
Electrical Code and local regulations in Canada. It is recommended that a qualified electrician perform this installation.
There are no field repairable assemblies on this unit. If service is needed, the unit must be returned where purchased.
CAUTION: To reduce the risk of overheating and possible damage
to other equipment, do not install
to control a receptacle, a motor operated appliance, a fluorescent lighting fixture, or a transformer-supplied
appliance, but
only permanently installed incandescent lamp fixtures
. Make sure the lamp(s) to be controlled
directly from the dimmer receiver total no more than 500 watts. Retain instructions for future use.
INSTALLATION
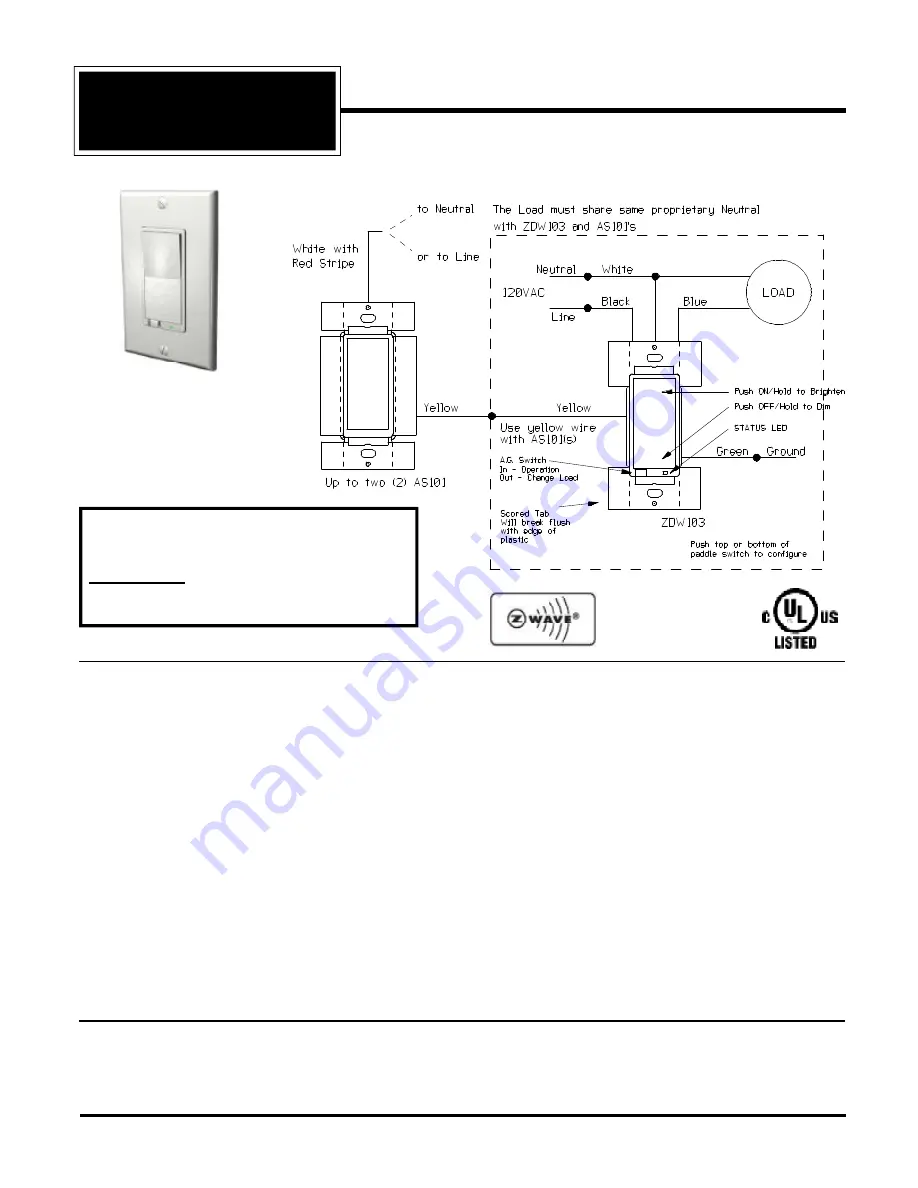
STEP 1.
With power off, wire this ZDW103 and AS101’s according to the diagram show.
Caution!
Do not wire unit
“live” (with power on the circuit) and do not
allow the yellow wire to contact line voltage, neutral or ground
or you will damage the device. AS101’s are required to be wired to the same line (or neutral) which is also
wired to the master unit as well as the load being controlled, and not wired to any other neutral. If multiple
HomePro
RF Home Automation
Supplied with matching
decorative switch plate
Note:
This module must be “Included in the
Network”
only where it will be permanently
installed
. The proper operation of this node in the
mesh network is dependent on it knowing its
location with respect to other nodes. You cannot
“test bench” configure this module.


