background image

MICRO CONTROLS INC.

ADVANCED

U

s

e

M

an

ual

SMD23E2 and SMD24E2

  Integrated Stepper 

  Indexer/Driver/Motor


with Integral 2-Port Ethernet Switch 

     Device Level Ring functionality for EtherNet/IP

     Media Redundancy Protocol for PROFINET

Manual #: 940-0S152

Summary of Contents for SMD23E2

Page 1: ...VANCED U s e r M anual SMD23E2 and SMD24E2 Integrated Stepper Indexer Driver Motor with Integral 2 Port Ethernet Switch Device Level Ring functionality for EtherNet IP Media Redundancy Protocol for PROFINET Manual 940 0S152 ...

Page 2: ...als and workmanship for a period of 18 months Within this warranty period AMCI shall at its option repair or replace free of charge any equipment covered by this warranty which is returned shipping charges prepaid within eighteen months from date of invoice and which upon examination proves to be defective in material or workmanship and not caused by accident misuse neglect alteration improper ins...

Page 3: ...18 Capture Encoder Position Input 18 General Purpose Input 18 Optional Encoder 18 Incremental Encoder 18 Absolute Multi turn Encoder 18 Reference SMD23E2 SMD24E2 Specifications cont d Status LED s 19 Module Status MS LED 19 Network Status NS LED 19 SMD23E2 and SMD24E2 Connectors 20 Power and Inputs Connector 20 Ethernet Connectors 20 Torque and Power Curves 21 Power Supply Sizing 22 Regeneration B...

Page 4: ...sition 53 Position Preset 53 CW CCW Find Home Commands 53 Homing Inputs 54 Physical Inputs 54 Network Data Input 54 Homing Configurations 54 Reference Homing an SMD23E2 or SMD24E2 continued Homing Profiles 55 Home Input Only Profile 55 Profile with Backplane_Proximity_Bit 56 Profile with Overtravel Limit 57 Controlling Find Home Commands In Progress 58 Controlled Stop Conditions 58 Immediate Stop ...

Page 5: ...ble Shields 91 Sinking Sensors Require a Pull Up Resistor 91 Network Connectors 91 Compatible Connectors and Cordsets 92 TIA EIA 568 Color Codes 92 Task Installing the SMD23E2 or SMD24E2 continued EtherNet IP Connections 92 Non DLR Applications 92 DLR Applications 92 PROFINET Connections 93 Non MRP Applications 93 MRP Applications 93 Modbus TCP Connections 93 Task Set the IP Address and Protocol D...

Page 6: ...tions 121 Task PROFINET Network Configuration Basic Steps 123 Download the GSDML files 123 GSDML File Installation 123 Configure the PROFINET Network 124 Add the SMD23E2 or SMD24E2 to the PROFINET Network 124 Set the I O Configuration 126 Verify and Download the New Configuration 126 MRP Installations 127 Configure the SMD23E2 or SMD24E2 as an MRC 127 Optional Task Configure Your Network Interface...

Page 7: ...that resets every month SMD23A2 and SMD24A2 products are identical to their E2 counterparts but are factory con figured for the PROFINET protocol instead of the EtherNet IP protocol The E2 part number is used throughout this manual and applied equally to the A2 part numbers When informa tion is applicable only to the A2 units the part number used will be A2 Each unit contains a two port Ethernet s...

Page 8: ...is a registered trademark of PROFIBUS PROFI NET International PI Adobe and Acrobat are registered trademarks of Adobe Systems Incorporated All other trademarks contained herein are the property of their respective holders Revision Record This manual 940 0S152 is the third release of this manual It was released August 30th 2018 It documents the PROFINET protocol support and the built in webserver f...

Page 9: ...n how to set the home position of the SMD23E2 or SMD24E2 Configuration Mode Data Format Reference information on the format of the network data to and from the SMD23E2 or SMD24E2 that is used to configure it Command Mode Data Format Reference information on the format of the network data to and from the SMD23E2 or SMD24E2 that is used to command it Installing the SMD23E2 or SMD24E2 Task instructio...

Page 10: ...ABOUT THIS MANUAL SMD23E2 and SMD24E2 User s Manual ADVANCED MICRO CONTROLS INC 10 Notes ...

Page 11: ...er This encoder gives you the additional functionality of position verification and stall detection The absolute multi turn encoder allows you to track machine position with power removed eliminating the need to home the machine after cycling power Three different IP ratings are available in the SMD23E2 and SMD24E2 product lines IP50 Units have sealed M12 D coded connectors for their ethernet port...

Page 12: ...E2 or SMD24E2 is powered by a nominal 24 to 48 Vdc power source and can accept surge voltages of up to 60 Vdc without damage The output motor current is fully programmable from 1 0 Arms to 3 4 Arms which makes the SMD23E2 and SMD24E2 units suitable to a wide range of applications In addi tion to the Motor Current setting the Motor Steps per Turn Idle Current Reduction and Anti Resonance Cir cuit f...

Page 13: ...he SMD23E2 or SMD24E2 is the sixteen bit word however some parameters and data values can exceed this size For these thirty two bit values the default data format is referred to as the multi word format The data value is split between the hundreds digit and the thousands digit For example a value of 12 345 would have 12 placed in the first lower addressed word and 345 placed in the second higher a...

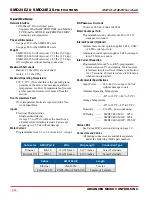
Page 14: ...Programmable from 0 1 to 3 4 Arms in 0 1 A steps DCPowerAUX Current 70 mA 24Vdc 40mA 48Vdc Motor Counts per Turn Programmable to any value from 200 to 32 767 steps per revolution Internal Encoder Optional Incremental encoder option supplies 1 024 2 048 or 4 096 counts per turn Absolute encoder option supplies 2 048 counts per turn 32 bit max counts Idle Current Reduction Programmable from 0 to 100...

Page 15: ...ows you to drive the motor in either direction as long as the command is active Synchrostep Move Allows you to treat the SMD23 4E2 as a motion axis by constantly updating position and velocity data to the unit Relative Move Allows you to drive the motor a specific number of steps in either direction from the current location Absolute Move Allows you to drive the motor from one known location to an...

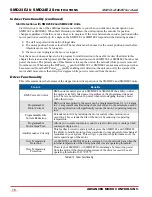
Page 16: ...ctionality This table summarizes the features of the stepper motor driver portion of the SMD23E2 and SMD24E2 units Table R1 2 Driver Functionality Feature Benefits RMS Current Control RMS current control gives an SMD23E2 or SMD24E2 the ability to drive the motor at its fully rated power regardless of the programmed steps per turn There is no reduction in power when microstepping that may occur wit...

Page 17: ...e to its home position The SMD23E2 and SMD24E2 units allows you to define this starting position in two ways The first is with a Position Preset command The second is with a sensor mounted on the machine When you define one of the inputs as the Home Input you can issue commands to the SMD23E2 or SMD24E2 that will cause the unit to seek this sensor How the unit actually finds the home sensor is des...

Page 18: ... Inputs The inputs are not used by the SMD23E2 or SMD24E2 units but their on off state is reported in the network data and is available to your host controller Optional Encoder The SMD23E2 and SMD24E2 can be ordered with an integral encoder The encoder is typically used for position verification and stall detection Additionally an input can be configured to capture the encoder value when the input...

Page 19: ...us LED red three times if there is an error with the internal absolute encoder Network Status NS LED The Network Status LED is a bi color red green LED The state of the LED depends on the protocol the SMD23E2 or SMD24E2 is configured to Table R1 3 Network Status LED States LED State EtherNet IP Definition Modbus TCP Definition PROFINET Definition Off No Power No power or no TCP con nections No pow...

Page 20: ...f the unit was ordered with an encoder the DCPowerAUX pin will also maintain power to the encoder If the motor shaft is rotated while motor power is removed the encoder position will update Once power is restored to the motor a Preset Position command can be issued to restore the correct motor position without having to go through a homing sequence If Stall Detection is enabled on the SMD23E2 SMD2...

Page 21: ... 06786 Tel 860 585 1254 Fax 860 584 1973 http www amci com SMD23E2 and SMD24E2 User s Manual SMD23E2 SMD24E2 SPECIFICATIONS 21 Torque and Power Curves Figure R1 7 SMD23E2 130 Torque and Power Curves Figure R1 8 SMD23E2 240 Torque and Power Curves ...

Page 22: ... generated by the motor decreases towards the end of its usable speed Therefore the power generated at your machine s operating point may be less than the maximum the motor can generate at a lower speed Example 1 An SMD23E2 130 will be running at a maximum of 7 RPS and a 48 Vdc supply will be used Based on the power curve in figure R1 7 on the previous page the combinations will generate a maximum...

Page 23: ...d In these instances the motor acts as a generator With the speed of the motor multiplied by the ratio of the gearhead this can lead to large enough voltage spikes to damage the attached power supply The first line of defense against regenerative events is an appropriately sized power supply The additional capacitance typically found in a larger supplies can be used to absorb the regenerative ener...

Page 24: ...Power Cordsets AMCI Binder Description MS 28 99 3729 810 04 Mating connector for Ethernet Connector Male 4 pin D coded Screw terminal connections 6 to 8 mm dia cable Straight IP67 rated when properly installed AMCI Part Description CNER 5M 4 position 24 AWG shielded EIA TIA 568B color coded Connectors Straight M12 D coded Male to RJ45 Shield attached to both connec tors Cable length 5 m AMCI Binde...

Page 25: ...thirty two bit double integer format the range is 2 147 483 648 to 2 147 483 647 In contin uous rotation applications you should choose the double integer format Home Position The Home Position is any position on your machine that you can sense and stop at There are two ways to defining the Home Position The first is using the Preset Position command to set the Motor Position register to a known v...

Page 26: ...negative if the Target Position is less than the Current Position The Motor Position value reported back to the host exceeds 8 388 607 counts However you cannot move beyond 8 388 607 counts with an Absolute Move The only way to move beyond 8 388 607 counts is with multiple relative moves or jog commands Definition of Acceleration Types With the exception of Registration Moves all move commands inc...

Page 27: ...r acceleration and the smoothness of Triangular S Curve acceleration Like the Triangular S Curve this acceleration type begins and ends the acceleration phase smoothly but the middle of the acceleration phase is linear Figure R2 3 shows a trapezoidal curve when the linear acceleration phase is half of the total acceleration time With this setting the Trapezoidal S Curve acceleration only requires ...

Page 28: ...also programmed by the move command until the speed reaches the Starting Speed which occurs at the Target Position B The motor stops at this point Note that the acceleration and deceleration values can be different in the move Figure R2 4 above shows a Trapezoidal Profile A Trapezoidal Profile occurs when the Programmed Speed is reached during the move This occurs when the number of steps needed t...

Page 29: ...ch move type in detail including if the move is affected by this command Immediate Stop Command When this command is issued from the host the axis will come to an Immedi ate Stop The move cannot be restarted and the machine must be homed again before Absolute Moves can be run Note that power is not removed from the motor Hardware Control Stop Jog or Registration Move Input Triggering this input ty...

Page 30: ...stop When stopped successfully the SMD23E2 or SMD24E2 will set an In_Hold_State bit in the input data table The Relative Move can be restarted with the Resume Move command from the host controller or the move can be aborted by starting another move The Resume Move command allows you to change the move s Pro grammed Speed Acceleration Value and Type and the Deceleration Value and Type The Target Po...

Page 31: ...hine without having to calculate relative posi tions If you are controlling a rotary table you can drive the table to any angle without hav ing to calculate the distance to travel For example an Absolute Move to 180 will move the table to the correct position regardless of where the move starts from Controlled Stop Conditions The move completes without error You toggle the Hold_Move control bit in...

Page 32: ...ondition the motion stops immediately and the position becomes invalid It is possible to change the speed of a Jog Move without stopping the motion The Programmed Speed Accel eration and Deceleration parameters can be changed during a Jog Move When the Programmed Speed is changed the motor will accelerate or decelerate to the new Programmed Speed using the new accelerate decelerate parameter value...

Page 33: ...s set with the command the SMD23E2 and SMD24E2 will decelerate at the programmed Deceleration value until it has output the Programmed Number of Steps and then stop the move without further deceleration An additional feature of the Registration Moves is the ability to program the driver to ignore the Controlled Stop conditions until a minimum number of steps have occurred This value is programmed ...

Page 34: ...on of travel a Reset Errors command does not have to be issued Note that it is possible to start a move while a CW or CCW Limit Switch is active as long as the direction of travel is opposite that of the activated Limit Switch For example it is possible to start a CW Registration Move while the CCW Limit Switch is active Assembled Moves All of the moves explained so far must be run individually to...

Page 35: ...rogrammed Speed of each segment must be greater than or equal to the Starting Speed 5 The Programmed Speed can be the same between segments This allows you to chain two segments together 6 For all segments except for the last one the programmed position defines the end of the segment For the last segment the programmed position defines the end of the move 7 Once you enter a segment that segment s ...

Page 36: ...hat is brought to a controlled stop with the Hold_Move bit cannot be restarted The use of the Hold_Move bit is explained in the Controlling Moves In Progress section starting on page 41 Immediate Stop Conditions The Immediate_Stop bit makes a 0 1 transition in the Network Input Data A positive transition on an input configured as an E Stop Input A CW or CWW Limit Switch is reached If the limit tha...

Page 37: ... new Blend or Dwell Move is written to the unit As described in Saving an Assembled Move in Flash on page 38 it is also possible to save a Dwell Move to flash memory This move is restored on power up and can be run as soon as you configure your SMD23E2 or SMD24E2 and enter Command Mode Controlled Stop Conditions The move completes without error You toggle the Hold_Move control bit in the Network O...

Page 38: ... 2 The SMD23E2 or SMD24E2 responds by setting both the In_Assembled_Mode and Waiting_For_Assembled_Segment bits in the Network Input Data 3 When the host detects that the Waiting_For_Assembled_Segment bit is set it writes the data for the first segment in the Network Output Data and sets the Read_Assembled_Data bit 4 The SMD23E2 or SMD24E2 checks the data and when finished resets the Waiting_For_A...

Page 39: ...the move command data remains unchanged If you wish to program a second move and run it as an Indexed Move type then you must have a 0 1 transition on the move command bit before the new parameters are accepted The easiest way to accomplish this is by writing a value of 16 0000 to the command word between issuing move commands A Jog Move that is started as an Indexed Move will come to a controlled...

Page 40: ...nge of 21 to 65 535 When using the SMD23E2 or SMD24E2 as an axis follower it is best to run the virtual axis as a high priority event driven periodic task When using the SMD23E2 or SMD24E2 as an axis follower it is best to configure the unit to have a starting speed of 1 This will reduce jitter in the motor position at slow speeds or when the position is near its target When using the SMD23E2 or S...

Page 41: ...mming errors have not occurred New Acceleration Deceleration and Programmed Speed parameters can be written to the SMD23E2 or SMD24E2 while a Jog Move is in its hold state If these parameters are accepted without error the move can be resumed and it will use the new parameter values Registration Moves Registration Moves can be brought to a controlled stop with the Hold bit but they cannot be resta...

Page 42: ...MOTION CONTROL SMD23E2 and SMD24E2 User s Manual ADVANCED MICRO CONTROLS INC 42 Notes ...

Page 43: ...rogrammed speed For the smoothest transition from the starting speed the starting speed should be equal to the square root of the acceleration in steps sec2 For example if the choose acceleration is 20 000 steps sec2 the smoothest transition occurs when the starting speed is 141 1412 20 000 Figure R3 1 Constant Acceleration Curves Variable Definitions The following variables are used in these equa...

Page 44: ...ed to accelerate and decelerate 250 002 199 982 449 984 steps If a move with the above acceleration deceleration starting speed and programmed speed has a length greater than 449 984 steps the SMD23E2 or SMD24E2 will generate a Trapezoidal profile If the move is equal to 449 984 steps the unit will generate a Triangular profile and the it will output one pulse at the pro grammed speed If the move ...

Page 45: ...or Trapezoidal Profiles you must first determine the number of counts that you are running at the Pro grammed Speed This value DP below is equal to your DA and DD values subtracted from your total travel You can then calculate your total profile time TP below from the second equation DP Total Number of Steps DA DD TP TA TD DP VP For Triangular Profiles the total time of travel is simply TP TA TD D...

Page 46: ...er When using variable accelerations the starting speed does not have to be equal to the square root of the pro grammed acceleration value Variable acceleration provides smooth transitions at the beginning and end of the acceleration phase Triangular S Curve Acceleration Figure R3 2 shows the speed profile of a move during its acceleration phase The figure shows the desired tri angular S curve acc...

Page 47: ...se the programmed acceleration value to keep the accelera tion time the same If your constant acceleration value is the maximum your system will allow then using S curve accelerations will lengthen the time needed to accelerate to your desired speed In the case of Triangular S curve accelerations where the Acceleration Jerk parameter is optimized at 200 t the value of t must be twice that of the a...

Page 48: ...acceleration multiplied by the time it is applied This is shown graphically in figure R3 5 as the area of the blue rectangle In order for the Trapezoidal S curve acceleration to reach the same speed in the same amount of time the area of the polygon must equal the area of the rectangle This means that a trapezoidal S curve acceleration profile that is has a period of constant acceleration equal to...

Page 49: ...e accelerations calculating the percentage increase in time is shown in figure R3 6 The time added to the acceleration phase is equal to the time spent increasing the acceleration during the phase As shown in the figure when the Trapezoidal S curve is programmed to spend 50 of its time at the programmed acceleration value the time spent in the acceleration phase will be 133 33 of the time spent if...

Page 50: ...ter value of 20 and the second a value of 400 Triangular or Trapezoidal S curve accelerations are always symmetrical We ll use this fact to calculate the profile up to one half of the change in speed At that point doubling the time and distance will yield the total time and distance traveled Example 1 Jerk 20 Because af is less than or equal to the programmed acceleration of 58 000 steps sec2 the ...

Page 51: ...constant acceleration period is 2 0 1336 0 7672 or 34 8 of the entire phase Sm 30 000 steps sec 2 15 000 steps sec Sm midpoint of change in speed J 100j a j Ja 100 J Acceleration Jerk parameter j physical jerk property af calculated final acceleration j 400 58 000 steps sec 100 j 232 000 steps sec Just as displacement 1 2 at 2 speed 1 2 jt 2 15 000 steps sec 232 000 steps sec t 2 2 t 2 15 000 step...

Page 52: ...CALCULATING MOVE PROFILES SMD23E2 and SMD24E2 User s Manual ADVANCED MICRO CONTROLS INC 52 Notes ...

Page 53: ...eparately and the motor position can also be preset to the encoder position The motor and encoder position values can be preset anywhere in the range of 8 388 607 to 8 388 607 When presetting the motor position to the encoder position the programmed Steps per Turn and Counts per Turn parameter values are used to scale the encoder position before the motor position is set to it For example assume t...

Page 54: ...hange on the physical input once this transition occurs You must pro gram your host to control the state of this bit This bit is disabled by default and must be activated when you configure the SMD24E2 or SMD24E2 before is can be used If you decide to activate this bit when you configure the unit and then never set it to a 1 the SMD23E2 or SMD24E2 will never act on the physical Home Input Homing C...

Page 55: ...ofile 1 Acceleration from the configured Starting Speed to the Programmed Speed 2 Run at the Programmed Speed until the Home Input activates 3 Deceleration to the Starting Speed and stop followed by a two second delay 4 Acceleration to the Programmed Speed opposite to the requested direction 5 Run opposite the requested direction until the Home Input transitions from Active to Inactive 6 Decelerat...

Page 56: ...0 1 transition 4 Deceleration towards the Starting Speed when the Backplane_Proximity_Bit transitions from 0 to 1 The axis will stop as soon as the Home Input becomes active 5 The Starting Speed is the minimum speed the profile will run at If the axis decelerates to the Starting Speed before reaching the Home Input it will continue at this speed Figure R4 2 shows the Backplane_Proximity_Bit stayin...

Page 57: ...ng the CCW limit during a CW Find Home command This can occur if the overtravel limits are not wired to the unit correctly or not configured correctly when the unit was configured Figure R4 3 Profile with Overtravel Limit 1 Acceleration from the configured Starting Speed to the Programmed Speed 2 Run at the Programmed Speed 3 Hit CW Limit and immediately stop followed by a two second delay 4 Accel...

Page 58: ...rting Speed At this point the motor will stop Note that Find Home commands cannot be restarted once held Immediate Stop Conditions The Immediate Stop bit makes a 0 1 transition in the Network Input Data An inactive to active transition on an input configured as an E Stop Input The overtravel limit associated with travel in the opposite direction is activated i e Activating the CCW limit during a C...

Page 59: ...rmats are described in the following chapter Power Up Behavior An SMD23E2 or SMD24E2 will always power up in Command Mode If available the unit will use its stored configuration data to configure itself The SMD23E2 or SMD24E2 will then check for valid network com mand data and will only enable the motor driver section if the Enable_Driver bit is set Configuration Mode Data Format An SMD23E2 or SMD...

Page 60: ...SMD24E22 When using the signed thirty two bit format there is an additional parameter named Binary_Endian Siemens processors typically use big endian format but you should refer to your PLC s documentation to verify the format used by your processor Examples of the formats are given below Table R5 2 Position Data Format Examples The range of values when using the multi word format is 32 768 000 to...

Page 61: ...o be set to 1 You must also program the Encoder_Resolution parameter in configuration word 6 Bit 11 Use_Backplane_Proximity 0 when the Backplane_Proximity_Bit is not used when homing the SMD23E2 or SMD24E2 1 when the Backplane_Proximity_Bit is used when homing the unit Note that this bit is not the Backplane_Proximity_Bit but enables or disables its operation Do not use the Backplane_Proximity_Bit...

Page 62: ...t defines the mechanical end point for CW motion 0 1 0 CCW Limit Input defines the mechanical end point for CCW motion 0 1 1 Start Indexed Move Starts the move that is currently located in the output reg isters 0 1 1 Start Indexed Move Capture Encoder Value When the encoder is enabled on an SMD23E2 or SMD24E2 the encoder position value is captured when ever this input transitions An inactive to ac...

Page 63: ... the consequences of using this feature Adding the code necessary to write down the configuration to an SMD23E2 or SMD24E2 on power up or network connection is fairly straight forward on most PLC based hosts Adding this code allows you to easily change the configuration in the host and easily configure a new drive if you ever need to swap one out on the machine 2 The endurance of the flash memory ...

Page 64: ...o the Idle Current only take effect at the end of the first move after re configuration Input Data Format The format for the Network Input Data when an SMD23E2 or SMD24E2 is in Configuration Mode is shown below Table R5 5 Network Input Data Format Configuration Mode Configuration Word 0 Format Word 0 When the Configuration data is valid and accepted this word mirrors the value of the Configuration...

Page 65: ... only acting on the bit based on the mode of the SMD23E2 or SMD24E2 Invalid Configurations The following configurations are invalid 1 Setting any of the reserved bits in the configuration words 2 Setting any parameter to a value outside of its valid range This includes setting the Lower Word of the Starting Speed to a value greater than 999 3 Configuring the two inputs to have the same function su...

Page 66: ...CONFIGURATION MODE DATA FORMAT SMD23E2 and SMD24E2 User s Manual ADVANCED MICRO CONTROLS INC 66 Notes ...

Page 67: ...ameters written to the SMD23E2 or SMD24E2 when issuing commands The Binary_Input_Format bit controls the format of the data values written to the host controller by the SMD23E2 or SMD24E2 When either of these parameters are set to their 32 bit signed integer format settings the Binary_Endian bit determines if the 32 bit values are stored and transmitted least significant bits first or most signifi...

Page 68: ...between two 16 bit words Command Word 0 and Command Word 1 Only one bit in Command Word 0 can make a 0 1 transition at a time Output Data Format The following table shows the format of the output network data words when writing command data to the SMD23E2 or SMD24E2 Figure R6 1 Command Data Format Commands are only accepted when the command bit makes a 0 1 transition The easiest way to do this is ...

Page 69: ...ve can be run Their use is explained in the Assembled Move Programming section of this manual starting on page 38 Bit 10 Reset_Errors When this bit makes a 0 1 transition the unit will clear all existing command errors and reset the Move_Complete bit in the Network Input Data This bit does not clear a configu ration error or the Position_Invalid status bit Bit 9 Preset_Position When this bit makes...

Page 70: ...Motor Position value will become invalid if this bit is set during a move Setting this bit when a move is not in progress will not cause the Motor Position to become invalid Bit 3 Resume_Move When this bit makes a 0 1 transition the unit will resume a move that you previ ously placed in a hold state Use of the Resume_Move and Hold_Move bits can be found in the Con trolling Moves In Progress sectio...

Page 71: ...ng the Backplace_Proximity_Bit can be found in the Profile with Backplane_Proximity_Bit section found on page 56 Bit 10 Reserved Must equal 0 Bit 9 Assembled_Move_Type When this bit equals 0 a Blend Move is started when the Run Assem bled Move bit Command Word 1 Bit 13 makes a 0 1 transition When this bit equals 1 a Dwell Move is started on the transition The direction of a Blend Move is controlle...

Page 72: ...he offset is stored without error the unit will respond by setting the Acknowledge bit Bit 13 of Status Word 1 Format see page page 83 Bit 4 Reverse_Blend_Direction When you command a Blend Move to run this bit determines the direc tion of rotation Set to 0 for a clockwise Blend Move 1 for a counter clockwise Blend Move Bits 3 2 Reserved Must equal 0 Bit 1 Motor Current If reset to 0 when a move c...

Page 73: ...get Position Upper Word Steps Combined value between 8 388 608 and 8 388 607 3 Rel Target Position Lower Word 4 Programmed Speed Upper Word Steps Second Combined value between the Configured Starting Speed and 2 999 999 5 Programmed Speed Lower Word 6 Acceleration Steps sec ms 1 to 5000 7 Deceleration Steps sec ms 1 to 5000 8 Motor Current 0 1 amps 0 to 34 Ignored if bit 1 of Command Word 1 is not...

Page 74: ...e including parameter values from the previous command PROFINET Word Function Units Range 0 Command Word 0 16 0008 1 Command Word 1 See pg 71 2 Unused See Note Below 3 Unused See Note Below 4 Programmed Speed Upper Word Steps Second Combined value between the Configured Starting Speed and 2 999 999 5 Programmed Speed Lower Word 6 Acceleration Steps sec ms 1 to 5000 7 Deceleration Steps sec ms 1 to...

Page 75: ...1 2 Unused See Note Below 3 Unused See Note Below 4 Programmed Speed Upper Word Steps Second Combined value between the Configured Starting Speed and 2 999 999 5 Programmed Speed Lower Word 6 Acceleration Steps sec ms 1 to 5000 7 Deceleration Steps sec ms 1 to 5000 8 Motor Current 0 1 amps 0 to 34 Ignored if bit 1 of Command Word 1 is not set 9 Acceleration Jerk 0 to 5000 PROFINET Word Function Un...

Page 76: ...tarting Speed and 2 999 999 5 Programmed Speed Lower Word 6 Acceleration Steps sec ms 1 to 5000 7 Deceleration Steps sec ms 1 to 5000 8 Motor Current 0 1 amps 0 to 34 Ignored if bit 1 of Command Word 1 is not set 9 Acceleration Jerk 0 to 5000 PROFINET Word Function Units Range 0 Command Word 0 16 0080 1 Command Word 1 See pg 71 Bits 7 6 must equal 10 2 Stopping Distance Upper Word Steps Combined v...

Page 77: ...ombined value between the Configured Starting Speed and 2 999 999 5 Programmed Speed Lower Word 6 Acceleration Steps sec ms 1 to 5000 7 Deceleration Steps sec ms 1 to 5000 8 Motor Current 0 1 amps 0 to 34 Ignored if bit 1 of Command Word 1 is not set 9 Acceleration Jerk 0 to 5000 PROFINET Word Function Units Range 0 Command Word 0 16 0100 1 Command Word 1 See pg 71 Bits 7 6 must equal 10 2 Stoppin...

Page 78: ...so reset the Move_Complete status bit in the Network Input Data Resetting errors will not reset the Position_Invalid or Configuration_Error bits PROFINET Word Function Units Range 0 Command Word 0 16 0200 1 Command Word 1 See pg 71 2 Position Preset Value Upper Word Steps Combined value between 8 388 608 and 8 388 607 3 Position Preset Value Lower Word 4 Unused See Note Below 5 Unused See Note Bel...

Page 79: ...us command PROFINET Word Function Units Range 0 Command Word 0 16 2000 1 Command Word 1 See pg 71 Blend Move Bit 9 0 Dwell Move Bit 9 1 Reverse_Blend_Direction is set by Bit 4 2 Unused See Note Below 3 Unused See Note Below 4 Unused See Note Below 5 Unused See Note Below 6 Unused See Note Below 7 Unused See Note Below 8 Unused See Note Below 9 Unused with Blend Move Dwell Time with Dwell Move mill...

Page 80: ...0 set it will accept the block and reset bit 9 in Status Word 0 When your pro gram sees this bit reset it must respond by resetting bit 12 of Command Word 0 The SMD23E2 or SMD24E2 will respond to this by setting bit 9 in Status Word 0 and the next Segment Block can be written to the unit You can write a maximum of sixteen Segment Blocks for each Assembled Move PROFINET Word Function Units Range 0 ...

Page 81: ...he range of values when using the multi word format is 32 768 000 to 32 767 999 When used in continuous rotation applications such as control of a conveyor belt it is possible to overflow these values When any of the three position values overflow the value of the associ ated data words will become indeterminate AMCI strongly suggests using the signed 32 bit integer format for continuous rotation ...

Page 82: ...s not been preset or the machine has not been homed The network connection has been lost and re established An Immediate or Emergency Stop has occurred An End Limit Switch has been reached A motor stall has been detected Absolute moves cannot be performed while the position is invalid Bit 9 Waiting_For_Assembled_Segment The SMD23E2 or SMD24E2 sets this bit to tell the host that it is ready to acce...

Page 83: ...E Stop input is active Motor current is removed if there is a Driver_Fault Bit 7 below regardless of the state of this bit Motor current is also removed if the motor is idle and Idle Current Reduction is programmed to its To 0 setting Bit 14 Stall_Detected Set to 1 when a motor stall has been detected Bit 13 Command_Acknowledge Normally 0 This bit is set to 1 when one of the following com mands co...

Page 84: ... is not set if the communication loss is on the protocol level not the physical level Bit 5 Reserved Will always equal zero Bit 4 Temperature_Above_90 C This bit is set to 1 when the processor internal temperature exceeds 90 C At this point the heatsink temperature is typically near 83 C If this bit trips often and you want to lower the operating temperature of the unit consider changing how the d...

Page 85: ...and do not exceed the impulse voltage capability of the product s insu lation These criteria are equivalent to the Pollution Degree 3 and Over Voltage Category II designations of the Inter national Electrotechnical Commission IEC 1 1 3 IP65 67 Rated Units SMD23E2 M12P and SMD24E2 M12P SMD23E2 and SMD24E2 units that are IP67 rated are suitable for use in an industrial environment that meet the foll...

Page 86: ...o acts as a heatsink so motors should be mounted on a large unpainted metal surface Mounting a motor in this fashion will allow a significant amount of heat to be dissipated away from the motor which will increase the unit s life by reduc ing its operating temperature If you cannot mount the motor on a large metal surface you may need to install a fan to force cooling air over the unit Motors shou...

Page 87: ... Outline Drawing Figure T1 1 SMD23E2 Outline Drawing 0 003 0 08 A A Section S S 3X Scale 0 000 0 013 2 25 max 57 max 1 60 Max 40 6 1 520 0 005 38 61 0 13 0 81 0 04 20 6 1 0 19 0 01 4 8 0 3 0 06 0 01 1 5 0 3 S AMCI Motor SMD23E2 130 E A M12 S P SMD23E2 240 E A M12 S P Length 3 93 99 8 4 73 120 1 2 25 max 57 max 1 856 0 008 47 14 0 2 4 4 6 4 0 18 0 5 0 0 0 001 0 03 0 000 0 013 S 1 856 0 008 47 14 0 ...

Page 88: ...bs 15N Internal encoders are mounted on the end of the motor shaft that is internal to the unit Exces sive axial load may cause encoder mis alignment and damage to the unit This type of damage is not covered under warranty 0 003 0 08 A A Section S S 3X Scale 0 000 0 013 2 36 0 02 60 0 5 1 60 Max 40 6 1 520 0 005 38 61 0 13 0 81 0 04 20 6 1 0 27 0 01 6 8 0 3 0 06 0 01 1 5 0 3 S 2 36 0 02 60 0 5 1 8...

Page 89: ...t is rated to IP67 when the mate is properly attached 1 5 1 Compatible Connectors and Cordsets Many different connectors and cordsets are available on the market all of which will work with the SMD23E2 and SMD24E2 units provided that the manufacturer follows the A coded M12 standards The fol lowing connector and cordset is available from AMCI Connector Table T1 1 Compatible Connectors Power Cordse...

Page 90: ...ower to the SMD23E2 and SMD24E2 units Note that Pin 5 DCPow erAUX is only used when you introduce a circuit for removing power from the motor Colors in parentheses are the appropriate wire color of the CNPL 5M cable Figure T1 4 M12 Power Wiring 1 7 Input Wiring Inputs 1 and 2 are single ended inputs that share the DC Common return pin They accept 3 5 to 27 Vdc with out the need for an external cur...

Page 91: ...Inputs The logical states of the sensor and SMD23E2 or SMD24E2 input will be reversed The SMD23E2 or SMD24E2 input is off when the sensor is active You can set the logic state of the input when you configure the unit 1 8 Network Connectors Figure T1 6 shows the Ethernet connector pinout when viewed from the back of the SMD23E2 or SMD24E2 The Ethernet ports on the units are an auto sense ports that...

Page 92: ...e T1 5 TIA EIA Color Codes 1 9 EtherNet IP Connections 1 9 1 Non DLR Applications The SMD23E2 and SMD24E2E2 units have two Ethernet ports with a built in Ethernet switch connecting the two In non DLR applications either port can be used to attach the unit to the network The remaining port can be used to extend the network to another device if this would reduce wiring costs 1 9 2 DLR Applications I...

Page 93: ...n you need only run one cable from your controller to the first unit The second unit can then be attached to the first with a short cable There is no need to run two cables from your controller 1 10 2 MRP Applications In Media Redundancy Protocol applications the SMD23E2 and SMD24E2 units function as a Media Redun dancy Client MRC In these applications both ports are used when wiring the ring dais...

Page 94: ...INSTALLING THE SMD23E2 OR SMD24E2 SMD23E2 and SMD24E2 User s Manual ADVANCED MICRO CONTROLS INC 94 Notes ...

Page 95: ...ess for theSMD23E2 and SMD24E2 units is 192 168 0 50 with a subnet mask of 255 255 255 0 The easiest way to verify this address is with the ping command as described in steps A 3 and A 4 of the Optional Task Configure Your Network Interfaces which starts on page 129 If the driver does not respond to this address then it may take some effort to determine the correct address There is a label on the ...

Page 96: ...nfigure Your Network Interfaces page 129 The network inter faces on your computer must be on the same subnet before you can communicate with an SMD23E2 or SMD24E2 2 2b 1 Disconnect the SMD23E2 or SMD24E2 from the host controller and cycle power to the unit This ensures that the unit does not have any open connections to the host controller 2 2b 2 Start your web browser and connect to the SMD23E2 o...

Page 97: ...e 2 Enter your desired values into the IP Address Subnet Mask and Default Gateway fields The Default Gateway setting is not optional It must be set to a valid address on the chosen subnet Because the Default Gateway is often not used in device level networks if you do not have a required value for it AMCI suggests setting the Default Gateway to the IP address of your host controller 3 If need be c...

Page 98: ...for the EtherNet IP protocol EtherNet IP is the communica tions protocol used by the AMCI NET Configurator utility Once connected to the unit you can select any IP address and protocol supported by the device PREREQUISITE You must know the present IP address The factory default address is 192 168 0 50 PREREQUISITE Task 1 6 Power Wiring found on page 90 You must be able to power the unit PREREQUISI...

Page 99: ... the designated location and creates links to the Start Menu No changes are made to your registry settings 2 2c 3 Verify that Your Host Controller is Disconnected from the SMD23E2 or SMD24E2 EtherNet IP is not a multi master protocol There can be only one bus master on the network at a time In order to program the SMD23E2 or SMD24E2 the AMCI Net Configurator utility must act as a bus master Theref...

Page 100: ...ress of the unit Figure T2 4 Scan for SMD23E2 or SMD24E2 If scanning for the SMD23E2 or SMD24E2 click on the IP Address of the unit and click on the Connect button The Net Configurator utility will connect to the unit 2 2c 7 Click on the Allow IP Checkbox to Access the IP Settings Figure T2 5 below shows the screen that results when you are connected to the SMD23E2 or SMD24E2 In order to change th...

Page 101: ...f you do not have a required value for it AMCI suggests setting the Default Gateway to the IP address of your host controller 2 2c 9 Set the Communications Protocol The factory default protocol for the SMD23E2 and SMD24E2 is EtherNet IP In order to use the Modbus TCP or PROFINET protocols simply click on the appropriate button 2 2c 10 Write the New IP Address to the SMD23E2 or SMD24E2 Click on the...

Page 102: ...SET THE IP ADDRESS AND PROTOCOL SMD23E2 and SMD24E2 User s Manual ADVANCED MICRO CONTROLS INC 102 Notes ...

Page 103: ...his will open the EDS Wizard Figure T3 1 Opening the EDS Wizard 2 Click on Next to advance to the Options screen Many EtherNet IP platforms support the use of EDS files to simplify the addition and configuration of devices This chapter covers the installation and use of the EDS file for systems that are programmed with Rockwell Automation Studio 5000 version 20 and above Other systems will follow ...

Page 104: ... press Next Figure T3 2 EDS Options Screen 2 The registration screen will open Select the Register a single file radio button Figure T3 3 EDS Registration Screen 3 Click on the Browse button and browse to the folder that contains the extracted EDS file you downloaded from the AMCI website Select the EDS file and click on the Open button to return to the registration screen Click on the Next button...

Page 105: ...Screen 5 Press on the Next button to advance to the Change Graphic Image screen This screen gives you the ability to change the icon associated with the device Figure T3 5 Change ECS Icon Screen 6 Click on the Change icon button In the window that opens click on Browse and browse to the folder that contains the extracted EDS and icon files you downloaded from the AMCI website 7 Select the icon fil...

Page 106: ...onfiguration tree before adding the unit to your project Refer to your Rockwell Automation documentation if you need instructions for configuring the ethernet port 3 4 Add the SMD23E2 or SMD24E2 to Your Project You can add an AMCI SMD23E2 or SMD24E2 to the project once the Ethernet port built in or bridge module is configured As shown in figure T3 6 below the Ethernet port will be listed under the...

Page 107: ...ecified here The Change button allows you to change the Module Definition if needed 3 5 2 Connection Tab The default RPI time is eight milliseconds This value can be changed in this tab 3 5 3 Configuration Tab The Configuration tab is used to define the configuration data that is written down to the SMD23E2 or SMD24E2 when the device connects to the network You can also click on the Apply button t...

Page 108: ...figuration Mode Data Format reference chapter 3 6 Buffering the I O Data Input and output data is transferred asynchronously to the program scan The input data tags should be buff ered with Synchronous Copy File instructions to guarantee stable data during the program scan Figure T3 9 Buffer I O Data When copying input data the data can be converted from byte to integer format by specifying an int...

Page 109: ... bridge module you will have to add it to the I O Configuration tree before adding the driver to your project Refer to your Rockwell Automation documentation if you need instructions for configuring the ethernet port 4 2 Add the SMD23E2 or SMD24E2 You can add the SMD23E2 or SMD24E2 to the project once the Ethernet port built in or bridge module is con figured 1 Right click on the Ethernet port and...

Page 110: ...sulting Select Module Type screen type generic into the filter as shown in figure T4 2 This will limit the results in the Catalog Number list 3 Select the Catalog Number ETHERNET MODULE in the list 4 Click on the Create button to create the module 5 Click on Close if necessary to close the Select Module Type screen Figure T4 2 Selecting a Generic Device ...

Page 111: ...t be deleted and again added to the project if the Comm Format is incorrect IP Address Must be the address you set for the SMD23E2 or SMD24E2 Refer to the Set the IP Address and Protocol task chapter starting on page 95 for information on setting the IP Address of the unit Input Assembly Instance 100 Size 10 words Output Assembly Instance 150 Size 10 words Configuration Assembly Instance 110 Size ...

Page 112: ...is possible to store configuration data in the flash memory of the SMD23E2 or SMD24E2 and this configu ration will be used on power up to configure the device However writing the configuration data to the driver on power up may simplify system maintenance if the device ever has to be swapped out 4 4 Buffer I O Data Data to and from the SMD23E2 or SMD24E2 should be buffered once per scan using Sync...

Page 113: ...ead from the SMD23E2 or SMD24E2 This file must be at least 10 words in length An Integer file to contain the data written to the SMD23E2 or SMD24E2 This file must be at least 10 words in length A Message MG data file This file must have at least two elements one to control the Read Operation and one to control the Write Operation An Extended Routing Information RIX data file This file is used to s...

Page 114: ...l and press Enter 3 Double click in the Communication Command field click on the select CIP Generic and press Enter 4 If the Message Instruction is being used to read data from the SMD23E2 or SMD24E2 enter the integer file where the data will be placed in the Data Table Address Received field and press enter 5 If the Message Instruction is being used to write data to the SMD23E2 or SMD24E2 enter t...

Page 115: ...nd press Enter 9 For Read operations the Service Code field will change to E hex For Write operations the Ser vice Code field will change to 10 hex For both read and write operations the Class field will change to 4 hex and the Attribute field will change to 3 hex 10 For Read operations enter a value of 100 decimal 64 hex in the Instance field For Write operations enter a value of 150 decimal 96 h...

Page 116: ... or SMD24E2 Please note that the Data Table Address Send field may be different in your appli cation Figure T5 4 Write Message Instruction Setup Screen Click on the MultiHop tab on the top of the window As shown in figure T5 5 enter the IP address of the SMD23E2 or SMD24E2 and press Enter Figure T5 5 Message Instruction MultiHop Settings After you are finished adding both the read and write messag...

Page 117: ...heck this 1 Double click on Channel Configuration in the Project Tree and then select the Channel 1 tab The fol lowing window will open Figure R6 7 MicroLogix Ethernet Configuration Screen 2 Enter the IP address and Subnet Mask of your MicroLogix 1100 not the address of the SMD23E2 or SMD24E2 and click on Apply The Ethernet Port should now be working AMCI is aware of an issue with the RIX data typ...

Page 118: ...ETHERNET IP EXPLICIT MESSAGING SMD23E2 and SMD24E2 User s Manual ADVANCED MICRO CONTROLS INC 118 Notes ...

Page 119: ...s 3 the fourth register contains Discrete Inputs 48 through 63 The Coil and Holding Register tables in the Modbus data model map to the same physical memory locations in the SMD23E2 or SMD24E2 units These registers hold data that is from the host controller to the unit This data is typically commands Addresses for these registers start at 1024 in zero based addressing Coil addresses start at 16 38...

Page 120: ...odbusprotocolcanbedownloadedathttp www modbus org specs php Figure T6 1 Modbus Data Reference Map 6 4 Supported Number of Connections All SMD23E2 and SMD24E2 units support six concurrent connections When connections exist the Network Status NS LED on the back of the unit will flash green The number of blinks indicate the number of active connections There is a two second break between groups of fl...

Page 121: ...a read 6 6 Supported Modbus Exceptions Table T6 2 Supported Modbus Exceptions Function Code Function Name SMD23E2 or SMD24E2 Register Addressing method 1 Read Coils OUTPUT Bit Addresses starting at 16 384 2 Read Discrete Inputs INPUT Bit Addresses starting at 0 3 Read Holding Registers OUTPUT INPUT Word Out Regs Starting at 1024 In Regs Starting at 0 4 Read Input Registers INPUT Word Addresses sta...

Page 122: ...MODBUS TCP CONFIGURATION SMD23E2 and SMD24E2 User s Manual ADVANCED MICRO CONTROLS INC 122 Notes ...

Page 123: ...ile Installation 1 Open or create a new project that will include the SMD23E2 or SMD24E2 and open the Project View of the project 2 In the menu select Options Manage general station description files GSD 3 In the window that opens click on the button and navigate to the folder that contains the extracted GSDML file you downloaded from the AMCI website Once at the folder click on the OK button 4 Cl...

Page 124: ...to open the Hardware Catalog 3 You can search for SMD23 or browse to the SMD23x2 icon by clicking through Other field devices PROFINET IO IO Advanced Micro Controls Inc AMCI_Products AMCI_Drives Drag and drop the appropriate icon onto the PROFINET network Both the SMD23E2 and SMD24E2 units use the SMD23x2 profile from the GSDML file 4 Drag the green square on the SMD23x2 icon onto the PROFINET net...

Page 125: ...ick on the SMD23x2 icon and select Properties from the pop up menu The Inspector window will open at the bottom of the screen Under the General tab select the General heading You can rename the SMD23E2 or SMD24E2 by changing the Name field 6 Under the PROFINET interface x1 heading select Ethernet addresses Under the IP protocol section set the desired IP address and subnet mask for the SMD23E2 or ...

Page 126: ...ce view tab The view in the Hardware Catalog will change Expand the Module tree to show both the Input and Output modules 2 To map the I O bytes to the CPU double click on the 20 bytes IN and 20 bytes OUT icons in the Hardware Catalog The system will automatically assign the next I and Q addresses to the data table Figure T7 4 I O Byte Mapping 7 6 Verify and Download the New Configuration 1 Contin...

Page 127: ...ced options Media redundancy Use the MRP domain drop down menu to select the appropriate domain Use the Media redundancy role drop down menu to select Client 3 Continuing in the Inspector window select Advanced options Port 1 Port interconnection Under Partner port the partner port you assigned to the port when you drew the topology is shown If you do not know which port will be the partner port i...

Page 128: ...E2 and SMD24E2 User s Manual ADVANCED MICRO CONTROLS INC 128 7 7 Configure the SMD23E2 or SMD24E2 as an MRC continued 5 Continue configuring the rest of the devices on the network before compiling the project and downloading it to the CPU ...

Page 129: ...rk interfaces that are not attached to the SMD23E2 or SMD24E2 This includes all wireless interfaces as well as all Bluetooth interfaces A 3 Configure Your Network Interface Before you can communicate with an SMD23E2 or SMD24E2 your network interface must be on the same subnet as the driver The rest of this procedure assumes you are using the 192 168 0 xxx subnet If you are not you will have to adj...

Page 130: ...rties button Set the address and subnet mask to appropriate values 192 168 0 1 and 255 255 255 0 will work for an SMD23E2 or SMD24E2 that has factory default settings The default gateway and DNS server settings can be ignored A 4 Test Your Network Interface Going back to the terminal you opened in the last step type in ping aaa bbb ccc ddd where aaa bbb ccc ddd in the IP address of the SMD23E2 or ...

Page 131: ...20 Gear Drive Plymouth Ind Park Terryville CT 06786 Tel 860 585 1254 Fax 860 584 1973 http www amci com SMD23E2 and SMD24E2 User s Manual CONFIGURE YOUR NETWORK INTERFACES 131 Notes ...

Page 132: ...LEADERS IN ADVANCED CONTROL PRODUCTS ADVANCED MICRO CONTROLS INC ...

Page 133: ...20 Gear Drive Plymouth Ind Park Terryville CT 06786 Tel 860 585 1254 Fax 860 584 1973 http www amci com SMD23E2 and SMD24E2 User s Manual CONFIGURE YOUR NETWORK INTERFACES 133 ...

Reviews: