background image

www.advateklights.com

PixLite E4-S Mk3 User Manual V20220819

PixLite E4-S Mk3 User Manual

Summary of Contents for PixLite E4-S Mk3

Page 1: ...www advateklights com PixLite E4 S Mk3 User Manual V20220819 PixLite E4 S Mk3 User Manual ...

Page 2: ...ower 10 5 2 Control Data 11 5 3 Connecting Pixel LEDs 11 5 4 Expanded Mode 12 5 5 Aux Port 13 6 Network Configuration 15 6 1 Network Layout Options 15 6 2 IGMP Snooping 16 6 3 IP Addressing 16 6 3 1 DHCP 16 6 3 2 AutoIP 16 6 3 3 Static IP 17 6 3 4 Factory IP Address 17 7 Operation 19 7 1 Start up 19 7 2 Sending Ethernet Data 19 7 3 Pixel Outputs 19 7 4 Button Actions 20 7 5 Hardware Test Pattern 2...

Page 3: ...3 9 Specifications 24 9 1 Operating Specifications 24 9 1 1 Power 24 9 1 2 Thermal 24 9 2 Physical Specifications 24 9 3 Electrical Fault Protection 25 10 Troubleshooting 26 10 1 LED Codes 26 10 2 Statistical Monitoring 27 10 3 Solutions for Common Issues 28 10 4 Other Issues 28 10 5 Reset to Factory Defaults 28 11 Disclaimer 30 ...

Page 4: ...d advanced management platforms 2 1 Management Configuration This manual covers physical aspects of the PixLite E4 S Mk3 controller and its essential setup steps only Detailed information about its configuration options can be found in the PixLite Mk3 Management Guide Configuration management and monitoring of this device can be performed via the web based Management Interface To access the interf...

Page 5: ...nowledge only Installation of the device should not be attempted without such knowledge The pixel output connectors shall be used for pixel output connection only Completely disconnect the supply source during abnormal operation and before making any other connections to the device Specification and certification markings are located on the side of the device ...

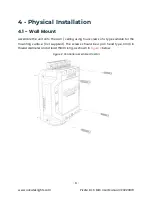
Page 6: ...ation 4 1 Wall Mount Assemble the unit onto the wall ceiling using four screws of a type suitable for the mounting surface not supplied The screws should be a pan head type 3mm in thread diameter and at least 15mm long as shown in Figure 2 below Figure 2 Controller Assembled to Wall ...

Page 7: ...o a DIN rail using the optional mounting kit part number MNT0101 1 Align the controller s mounting holes with the outermost mounting holes on each bracket Using the four supplied M3 12mm long screws assemble the controller to the mounting brackets as shown in Figure 3 below Figure 3 Controller Assembled to Bracket ...

Page 8: ...4 S Mk3 User Manual V20220819 2 Align the lower edge of the bracket with the lower edge of the DIN rail 1 and push the controller down so it clicks onto the DIN rail 2 as shown in Figure 4 below Figure 4 Controller Assembled to DIN Rail ...

Page 9: ...er Manual V20220819 3 To remove the controller from the DIN rail pull the controller horizontally toward its power connector 1 and rotate the controller up and off the rail 2 as shown in Figure 5 below Figure 5 Removal of Controller from DIN Rail ...

Page 10: ...uired for supply connection is 1 0mm2 16AWG VW 1 Refer to Section 9 1 for operating specifications for powering this device Figure 6 Location of Power Input Pixels that are connected to the PixLite E4 S Mk3 cannot be powered through the device itself any pixels connected must have their power sourced separately from a power supply instead If multiple power supplies are in use then the DC ground al...

Page 11: ...pixel LEDs to a PixLite E4 S Mk3 is shown in Figure 8 below Refer to Section 7 3 for the specific capacity of a pixel output Figure 8 Pixel Set up The pixel lights are connected directly via the 4 pluggable screw terminal connectors on the rear of the unit Each connector is labelled with its output channel number 1 4 which is clearly marked on the top surface Simply wire your lights into each scre...

Page 12: ...th a clock line pixels that only use a data line have the potential to lower the maximum achievable refresh rate in a pixel system If a pixel system is using data only pixels then the refresh rates will typically be improved by using expanded mode Enabling expanded mode allows for twice as many data outputs so the same number of pixels can be spread out over these outputs resulting in a large impr...

Page 13: ...g DMX512 from another source Configure the Aux port to DMX512 Output to allow conversion of a single universe of incoming sACN or Art Net data to the DMX512 protocol This then allows any DMX512 device s to be connected to this port and effectively be controllable over Ethernet Configure the Aux port to DMX512 Input to allow the PixLite to be driven by an external source of DMX512 control Whilst th...

Page 14: ... 14 www advateklights com PixLite E4 S Mk3 User Manual V20220819 Figure 11 Location and Pinout of the Aux Port ...

Page 15: ...g Control Device could be any source of Ethernet data e g desktop PC laptop lighting console or media server Having a router on the network is not mandatory but is useful for IP address management with DHCP see Section 6 3 1 Figure 13 Network Layout Without a Switch Router The controller can alternatively be connected directly to the host machine as shown in Figure 13 A crossover cable is not requ...

Page 16: ...ware firewall in place 6 3 IP Addressing 6 3 1 DHCP Routers typically have an internal DHCP server which means they can assign an IP address to a connected device if requested DHCP is always enabled by default on this device so it can immediately connect to any existing network with a router DHCP Server If the controller is in DHCP mode and is not assigned an IP address by a DHCP server it will as...

Page 17: ... need to ensure that other devices that need to communicate with this device are on the same subnet Therefore they should have the same subnet mask and a similar but unique IP address When setting static network settings the Gateway address can be set to 0 0 0 0 if it is not required If communication between the device and other VLANs is required the Gateway address should be configured and will t...

Page 18: ...ccess the device s Management Interface by manually browsing to 192 168 0 50 in your web browser or by using Advatek Assistant 3 After establishing a connection to the device make sure to configure the IP address settings for future communication and save the configuration Note The Factory IP is only a temporary setting used to regain connectivity to the device When the device is reset powered off...

Page 19: ...t port Sync modes are supported for both Art Net and sACN To learn more refer to the technical note on synchronous mode here www advateklights com knowledge base Details of incoming and outgoing packets can be viewed in the Management Interface 7 3 Pixel Outputs Each of the 4 pixel outputs on the PixLite E4 S Mk3 can drive up to 6 universes of data This allows for a total of up to 24 universes of ...

Page 20: ...oller is already running or turn it on remotely using its Management Interface The controller will then enter the test pattern mode where different test patterns are available as described in the table below The controller will display the test pattern on all pixels on each of the pixel outputs and the Aux DMX512 output if enabled simultaneously Pressing the TEST button while in test mode will mov...

Page 21: ...fresh rate a system can achieve and where any limiting factors may exist Refresh rates are available in the Management Interface for each of the following elements l Incoming sACN l Incoming Art Net l Incoming DMX512 Aux Port l Outgoing Pixels l Outgoing DMX512 Aux Port 7 7 sACN Priorities It is possible to have multiple sources of the same sACN universe received by the one PixLite The source with...

Page 22: ...from the PixLite E4 S Mk3 using the inbuilt microSD slot Design your own breathtaking pixel shows record them directly onto the microSD card and play them back as many times as you wish SHOWTime also unlocks the ability to create up to 25 powerful triggers and use advanced intensity controls to enable true standalone behavior and enhance live environments For more information download the PixLite ...

Page 23: ...vailable from the Advatek website at the following link www advateklights com downloads The downloaded file will be archived in a zip format which should be extracted The fw file is the file that the controller needs 8 1 Updating via the Management Interface 1 Open the Management Interface and navigate to the Update Firmware page 2 Load the firmware fw file with the file browser 3 Click Update Fir...

Page 24: ...ng conditions for a PixLite E4 S Mk3 controller 9 1 1 Power Parameter Value Range Units Input Power 5 24 V DC Maximum Power Consumption 2 5 W 9 1 2 Thermal Parameter Value Range Units Ambient Operating Temperature 20 to 70 C 9 2 Physical Specifications Dimension Metric Imperial Length 86mm 3 39 Width 115mm 4 53 Height 33mm 1 30 Weight 0 1kg 0 2lbs ...

Page 25: ...suitable installation environment specified in Section 11 ESD protection is present on all ports All pixel output lines are protected against direct shorts of up to 36V DC This means that even if your pixels or wiring have a fault that causes a direct short between DC power lines and data or clock lines on any output it will not damage the device The Aux Port is also protected against direct short...

Page 26: ...10 1 LED Codes There are multiple LEDs on the PixLite E4 S Mk3 that are useful for troubleshooting The location of each is shown in Figure 15 below Figure 15 Location of LEDs Please refer to the tables below for condition codes for the multi color status LED and the Ethernet port LEDs ...

Page 27: ...e Off Off No Power Hardware Fault White Flashing 3 flashes every 5 seconds Power Supply Stability Error Detected power device off and on again Red White Various Critical Error contact Advatek Support Link LED Green Activity LED Yellow Condition Solid Flashing Connected okay receiving trans mitting data Solid Off Connected okay no data Off Off No link established 10 2 Statistical Monitoring Many is...

Page 28: ...age to the pixels should be measured with a voltage measurement tool The voltage at the pixels should be within operating specifications of the pixels 10 4 Other Issues Check the LED codes as per Section 10 1 If the device still fails to perform as expected perform a factory default reset on the device as per Section 10 5 below For the latest information more specific troubleshooting guides and ot...

Page 29: ...se the Reset button The controller will now have factory default configuration 5 Alternatively reset to factory defaults via the Management Interface in the Configuration page Note This process will reset all configuration parameters to Factory Defaults including IP Address settings listed in Section 6 3 4 as well as Security settings ...

Page 30: ...e see the terms and conditions on our website for more information The PixLite E4 S Mk3 has been tested against and independently certified as compliant with the Standards listed in the table below Audio Video and ICTE Safety Requirements UL 62368 1 Radiated Emissions EN 55032 FCC Part 15 Multimedia Immunity EN 55035 Electrostatic Discharge EN 61000 4 2 Radiated Immunity EN 61000 4 3 Electrical Fa...

Page 31: ...st harmful interference when the equipment is operated in a commercial environment This equipment generates uses and can radiate radio frequency energy and if not installed and used in accordance with the instruction manual may cause harmful interference to radio communications Operation of this equipment in a residential area is likely to cause harmful interference in which case the user will be ...

Reviews: