background image

HG795440XB

EN

GAS HOB

USER MANUAL

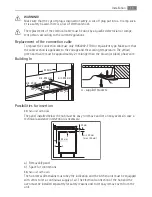
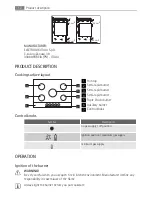
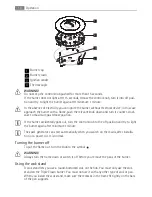
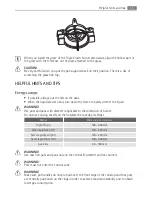
Summary of Contents for HG795440XB

Page 1: ...HG795440XB EN GAS HOB USER MANUAL ...

Page 2: ...se spend a few minutes reading to get the very best from it ACCESSORIES AND CONSUMABLES In the AEG webshop you ll find everything you need to keep all your AEG appliances looking spotless and working perfectly Along with a wide range of accessories designed and built to the high quality standards you would expect from specialist cookware to cutlery baskets from bottle holders to delicate laundry b...

Page 3: ...aning 17 What to do if 18 Technical data 19 Environment concerns The following symbols are used in this user manual Important information concerning your personal safety and information on how to avoid damaging the appliance General information and tips Environmental information Subject to change without notice Contents 3 ...

Page 4: ...l packaging stickers and the protective layer of the stainless steel hob panel if present from the appliance before first use Do not remove the rating plate It can inva lidate the guarantee Set the cooking zones to the off position after each use Burners and accessible part become hot during and after use Do not put cutlery or sau cepan lids on the cooking surface Cookware and its contents can tip...

Page 5: ...se built in appliances after you assemble the appliance into correct built in units and work surfaces that obey the standards Do not install the hob over a domestic appliances if the installation instructions do not allow it Install the appliance only on a worktop with flat surface Do not change the specifications or modify this product There is the risk of injury and damage to the appliance Fully...

Page 6: ...t connections can make the terminal become too hot A qualified electrician must install the clamping connections correctly Use a strain relief clamp on cable Use the correct mains connection cable and replace the damaged mains cable with ap plicable cable Speak to your local Service Force Centre The appliance must have the electrical installation which lets you disconnect the appli ance from the m...

Page 7: ...uld be consulted to determine the requisite air vent requirements For appliances installed in the Republic of Ireland please refer to the NSAI Domestic Gas Installation I S 813 Current Editions Table Four Location The hob may be located in a kitchen a kitchen diner or bed sitting room with a volume greater than 20 m but not in a bathroom or shower room The minimum distance combustible material can...

Page 8: ... of the thread fitted to the hob connecting pipe Failure to ensure the correct assembly will cause leakage of gas Make sure that the gas supply pressure of the appliance obeys the recommended values Rigid connection Carry out connection by using metal rigid pipes copper with mechanical end Injectors replacement 1 Remove the pan supports 2 Remove the caps and crowns of the burner 3 With a socket sp...

Page 9: ... current regulations The appliance must be earthed Always use a correctly installed shockproof socket Make sure that there is access to the mains plug after the installation Do not pull the mains cable to disconnect the appliance Always pull the mains plug The appliance must not be connected with an extension cable an adapter or a multiple socket There is a risk of fire Make sure that the ground c...

Page 10: ...he appliance is supplied with a 3 core flexible supply cord with a 3 amp plug If it is neces sary to change the fuse use a 3 amp ASTA approved BS 1362 fuse 1 2 3 4 5 1 Green and Yellow 2 3 amp fuse 3 Brown 4 Cord clamp 5 Blue Should the plug need to be replaced for any reason the wires in the mains lead are col oured in accordance with the following code Green and yellow Earth Blue Neutral Brown L...

Page 11: ...oximately 2 cm longer than the brown or black phase wire Building In min 45 mm min 650 mm 680 mm min 450 mm 40 mm 490 mm 2 0 2 0 600 mm A A supplied brackets Possibilities for insertion Kitchen unit with door The panel installed below the hob must be easy to remove and let an easy access in case a technical assistance intervention is necessary min 20 mm max 150 mm 40 mm 60 mm a b a Removable panel...

Page 12: ...rapid burner 5 Triple Crown burner 6 Auxiliary burner 7 Control knobs Control knobs Symbol Description no gas supply off position ignition position maximum gas supply minimum gas supply OPERATION Ignition of the burner WARNING Be very careful when you use open fire in kitchen environment Manufacturer decline any responsibility in case misuse of the flame Always light the burner before you put cook...

Page 13: ...ill let thermocouple to warm up If not the gas supply will be interrupted 3 Adjust the flame after it is regular If after some tries the burner does not light check if the crown and its cap are in correct positions Each control knob has a pilot light It lights up when you turn the control knob 1 2 3 1 Burner cap and crown 2 Thermocouple 3 Ignition candle Operation 13 ...

Page 14: ...ner accidentally goes out turn the control knob to the off position and try to light the burner again after minimum 1 minute The spark generator can start automatically when you switch on the mains after installa tion or a power cut It is normal Turning the burner off To put the flame out turn the knob to the symbol WARNING Always turn the flame down or switch it off before you remove the pans of ...

Page 15: ...and pans with diameter applicable to the dimension of burner Do not use cooking vessels on the hotplate that overlap its edges Burner Diameters of cookware Triple Crown 180 260 mm Semi rapid rear left 120 240 mm Semi rapid rear right 120 240 mm Semi rapid front left 120 220 mm Auxiliary 80 180 mm WARNING Use cast iron pots and pans only on the central if present and rear burners WARNING Pots must ...

Page 16: ...move the pan supports to easily clean the hob To clean the enamelled parts cap and crown wash it with warm soapy water and dry it carefully before you put them back Stainless steel parts wash with water and then dry with a soft cloth The pan supports are not dishwasher proof they must be washed by hand When you wash the pan supports by hand take care when you dry them as the enamel ling process oc...

Page 17: ...ectrical supply is switched on Control the fuse If the fuse is released more than one time refer to a qualified electrician Burner cap and crown are placed uneven Make sure that the burner cap and crown are in correct positions The flame is blow out immedi ately after ignition Thermocouple is not heated sufficient After lightning the flame keep the knob pushed for approximately 5 seconds The gas r...

Page 18: ...y These data are available on the supplied rating plate Model description Product number PNC Serial Number S N Use the original spare parts only They are available at Service Force Centre and approved spare parts shops TECHNICAL DATA Hob dimensions Width 696 mm Length 516 mm Hob recess dimensions Width 680 0 2 mm Length 490 0 2 mm Heat input Triple Crown burner 3 8 kW Semi rapid burner 1 9 kW Auxi...

Page 19: ... 96 0 181 71 138 136 Triple Crown 3 8 1 4 146 0 362 98 276 271 ENVIRONMENT CONCERNS The symbol on the product or on its packaging indicates that this product may not be treated as household waste Instead it should be taken to the appropriate collection point for the recycling of electrical and electronic equipment By ensuring this product is disposed of correctly you will help prevent potential ne...

Page 20: ...ng materials are friendly to the environment and can be recycled The plastic components are identified by marking PE PS etc Discard the packaging materials as household waste at the waste disposal facilities in your municipality 20 ...

Page 21: ...21 ...

Page 22: ...22 ...

Page 23: ...23 ...

Page 24: ...www aeg com shop 397196801 C 272011 ...

Reviews: